


一、LNMP的核心优势
在于其高并发处理能力、低资源消耗和作为反向代理的卓越性能。
二、流程图
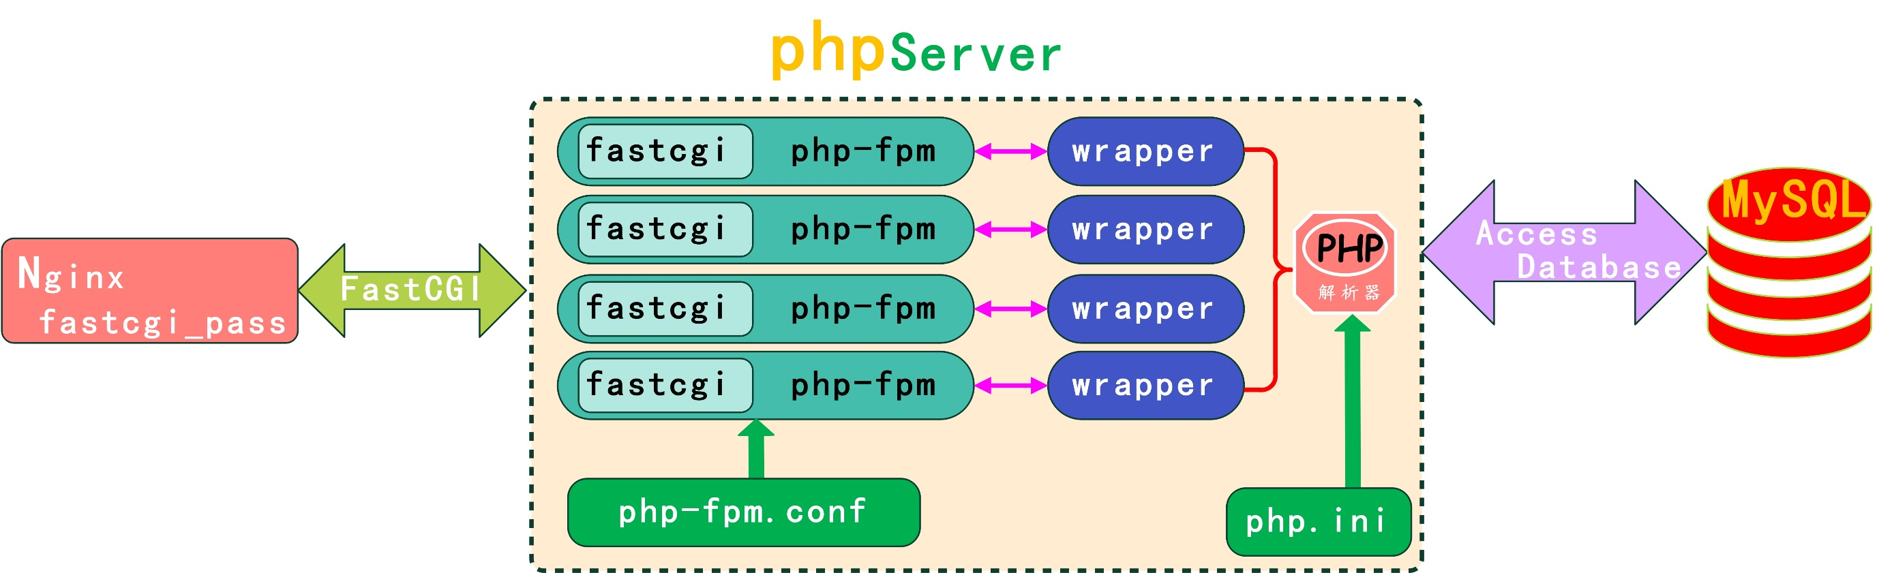
工作流程描述:
用户在浏览器中输入网址,浏览器向服务器发送一个 HTTP 请求。
↓
Nginx 监听 80(HTTP)或 443(HTTPS)端口,接收到这个请求。
Nginx 首先检查请求的 URL判断请求的是静态文件还是动态文件。如果请求的是静态文件,Nginx 会直接读取文件并返回给用户,流程结束。如果是动态请求,需要 PHP 来处理。
↓
Nginx 将请求转发给 PHP-FPM:
根据配置文件,Nginx 通过 FastCGI 协议 将请求和相关的文件路径传递给 PHP-FPM 进程池。PHP-FPM 通常在一个 Unix Socket 或 TCP 端口上监听。
↓
PHP-FPM 处理 PHP 脚本:
PHP-FPM 的 Worker 进程接收到请求,找到对应的 index.php 文件。PHP 解释器开始解析和执行 index.php 文件中的代码。
↓
PHP 与 MySQL 交互:
在执行过程中,如果 PHP 代码包含数据库查询,PHP 会使用 MySQL 扩展,连接到 MySQL 数据库。MySQL 执行查询,并将结果返回给 PHP 程序。
↓
PHP 生成 HTML:
PHP 将数据库返回的数据与 HTML 模板结合,生成一个完整的 HTML 页面。PHP-FPM 返回结果给 Nginx:PHP-FPM 将这个生成的 HTML 内容作为响应,通过 FastCGI 协议返回给 Nginx。
↓
Nginx 返回响应给用户:
Nginx 接收到来自 PHP-FPM 的响应后,将其作为 HTTP 响应返回给用户的浏览器。
↓
浏览器渲染页面:
用户的浏览器接收到 HTML、CSS、JS 等文件,并将其渲染成用户看到的最终网页。
三、架构部署
【位置:10.0.0.7单台服务器,主机名为LNMP】
1.部署Nginx及wordpress业务
1)查看本地是否存在Nginx软件包
yum search nginx
2)存在则使用yum -y insatll nginx安装,不存在则使用Nginx的官方仓库安装
[root@LNMP ~]# vim /etc/yum.repos.d/nginx.repo #Nginx官方仓库配置文件
点击查看代码
[nginx-stable]		#仓库名称
name=nginx stable repo			#名称
baseurl=http://nginx.org/packages/centos/7/$basearch/   #安装仓库的地址
gpgcheck=0			#检查软件,0为不检查
enabled=1			#是否启用仓库,1为开启0为关闭
gpgkey=https://nginx.org/keys/nginx_signing.key		#检查MD5校验信息地址
[root@LNMP ~]# yum -y install nginx    #安装nginx
[root@LNMP ~]# nginx -V        #查看nginx的版本
nginx version: nginx/1.26.1
[root@LNMP ~]#id www #查看用户是否存在
[root@LNMP ~]# groupadd -g666 www #创建用户组
[root@LNMP ~]# useradd -u666 -g666 -M -s /sbin/nologin www #创建www虚拟用户
[root@LNMP ~]# vim /etc/nginx/nginx.conf
点击查看代码
# 核心区块
user  www;					# 启动用户
worker_processes  auto;			# 启动的进程数量 以内核核心数相同

error_log  /var/log/nginx/error.log notice;	  #错误日志位置 日志级别(notice)
pid        /var/run/nginx.pid;				  # PID所在的文件

# 事件模块
events {
    worker_connections  65535;   # 每个进程最大的连接数量 默认为1024(每个链接至少占用一个文件描述符)
}


#http区块 响应请求
http {
    include       /etc/nginx/mime.types;			#支持的媒体类型
    default_type  application/octet-stream;         #不支持的类型默认下载方式下载到windows

    log_format  main  '$remote_addr - $remote_user [$time_local] "$request" '
                      '$status $body_bytes_sent "$http_referer" '
                      '"$http_user_agent" "$http_x_forwarded_for"';   # 定义日志格式
    access_log  /var/log/nginx/access.log main;  # 调用日志格式

    sendfile        on;   # 开启文件的高效传参
    #tcp_nopush     on;   # 文件高效传输

    keepalive_timeout  65; # 超时时间65秒

    #gzip  on;			   # 开启压缩

    include /etc/nginx/conf.d/*.conf;	# 将conf.d下的*.conf引用到当前位置(相当于写入到当前模块)

}
[root@LNMP ~]# vim /etc/nginx/conf.d/wp.conf
点击查看代码
server{
	listen 80;	#监听80端口
	server_name www.wp.com;		#网站域名
	root /code/wordpress;		#实际访问的代码目录

	location / {		#默认返回的页面location的优先级最低
		index index.php index.html;
	}

	location ~ \.php$ {	      #根据优先级执行匹配.php结尾的文件,连接PHP
		fastcgi_pass 127.0.0.1:9000;          #PHP进程
                fastcgi_param SCRIPT_FILENAME $document_root$fastcgi_script_name;	  #$document_root为root指定的代码目/code录/$fastcgi_script_name为用户访问服务器的URI
		include fastcgi_params;		#存放PHP变量
	}
}
[root@LNMP ~]# cd /code #创建代码目录
[root@LNMP code]# wget https://cn.wordpress.org/wordpress-6.0-zh_CN.tar.gz #下载wordpress业务包
[root@LNMP code]# tar xf wordpress-6.0-zh_CN.tar.gz #解压代码到code目录下
5)修改wordpress代码目录的属主属组为启动用户
[root@LNMP code]# chown -R www.www /code/wordpress/
6)测试并启动nginx
[root@LNMP conf.d]# nginx -t #测试nginx
[root@LNMP conf.d]# systemctl start nginx #启动nginx
[root@LNMP ~]# systemctl enable nginx #开机自启
7)查看80端口是否存在
[root@LNMP ~]# netstat -tnulp
2.部署PHP服务
1)安装PHP
[root@LNMP ~]# yum -y install php php-bcmath php-cli php-common php-devel php-embedded php-fpm php-gd php-intl php-mbstring php-mysqlnd php-opcache php-pdo php-process php-xml php-json
2)配置PHP服务,并修改启动用户、监听方式
[root@LNMP ~]# vim /etc/php-fpm.d/www.conf
点击查看代码
...     #省略符号
user = www       #启动用户
; RPM: Keep a group allowed to write in log dir.
group = www      #启动组
...
listen = 127.0.0.1:9000    #监听方式,本机访问
···
[root@LNMP ~]# php-fpm -t #测试php
[root@LNMP ~]# systemctl start php-fpm #启动php服务
[root@LNMP ~]# systemctl enable php-fpm #加入开机自启
[root@LNMP ~]# netstat -tnulp #查看9000端口知否存在
4)配置php连接mariadb数据库
[root@LNMP ~]# vim /code/mysql.php
点击查看代码
<?php
    $servername = "localhost";
    $username = "root";
    $password = "wq123456.com";

    // 创建连接
    $conn = mysqli_connect($servername, $username, $password);

    // 检测连接
    if (!$conn) {
        die("Connection failed: " . mysqli_connect_error());
    }
    echo "php可以连接MySQL...";
?>
3.部署mariadb数据库
1)安装mariadb
[root@LNMP ~]# yum -y install mariadb-server
2) 启动mariadb服务
[root@LNMP ~]# systemctl start mariadb #启动mariadb
[root@LNMP ~]# systemctl start mariadb #开机自启mariadb
3)配置密码
[root@LNMP ~]# mysqladmin password 'wq123456.com'
[root@LNMP ~]# mysql -uroot -pwq123456.com #登录测试
4.创建wordpress库
[root@LNMP code]# mysql -uroot -pwq123456.com -e "create database wordpress;" #创建库
[root@LNMP code]# mysql -uroot -pwq123456.com -e "show databases;"
#查看库
5.windows解析
10.0.0.7 www.wp.com
6.根据页面提示注册登录
注:
1)location模块的优先级
2)主配置文件中的include /etc/nginx/conf.d/.conf; # 将conf.d下的.conf引用到当前位置(相当于写入到当前模块)
3)统一虚拟用户,使服务之间可以相互访问,以及方式浏览器客户端修改文件内容
4)当访问IP地址、server_name相同时,优先匹配/etc/nginx/conf.d/下的第一个.conf业务文件

 浙公网安备 33010602011771号