
【springcloud】springcloud Greenwich SR4版本笔记
springcloud Greenwich SR4版本笔记
本文只记录实际版本,配置,pom,代码以及注意事项。别的在其他springcloud 的F版本中已有详述。
示例代码地址:https://github.com/wjqhuaxia/springcloud-greenwich-sr4.git
目录:
2、feign调用
3、网关zuul
3.1、过滤器实现权限校验
3.2、智能路由
3.3、跨域处理
4、hystrix服务降级、熔断、限流
4.2、zuul-hystrix服务降级
4.3、hystrix服务熔断
5、ribbon客户端负载匀衡
6、config
6.1、config server
6.2、config client
1. eureka server
详细描述请查看另一文章。路径【springcloud】Eureka服务注册中心搭建
1.1 版本选择
jdk:    1.8
springcloud:    Greenwich.SR4
springboot:    2.1.9.RELEASE
1.2 pom
1.2.1 项目父pom
<parent>
    <groupId>org.springframework.boot</groupId>
    <artifactId>spring-boot-starter-parent</artifactId>
    <version>2.1.9.RELEASE</version>
  </parent>

  <properties>
    <project.build.sourceEncoding>UTF-8</project.build.sourceEncoding>
    <project.reporting.outputEncoding>UTF-8</project.reporting.outputEncoding>
    <java.version>1.8</java.version>
  </properties>

  <dependencyManagement>
    <dependencies>
        <dependency>
            <groupId>org.springframework.cloud</groupId>
            <artifactId>spring-cloud-dependencies</artifactId>
            <version>Greenwich.SR4</version>
            <type>pom</type>
            <scope>import</scope>
        </dependency>
    </dependencies>
  </dependencyManagement>

  <dependencies>
  	<dependency>
		<groupId>org.springframework.cloud</groupId>
		<artifactId>spring-cloud-netflix-eureka-client</artifactId>
	</dependency>
	<dependency>
		<groupId>org.springframework.cloud</groupId>
		<artifactId>spring-cloud-starter-netflix-eureka-server</artifactId>
	</dependency>
  </dependencies>

    <repositories>
        <repository>
            <id>spring-milestones</id>
            <name>Spring Milestones</name>
            <url>https://repo.spring.io/libs-milestone</url>
            <snapshots>
                <enabled>false</enabled>
            </snapshots>
        </repository>
    </repositories>
1.2.2 eureka server pom
<dependencies>
  	<dependency>
		<groupId>org.springframework.cloud</groupId>
		<artifactId>spring-cloud-starter-netflix-eureka-server</artifactId>
	</dependency>
     <dependency>
  		<groupId>org.springframework.boot</groupId>
    	     <artifactId>spring-boot-starter-security</artifactId>
  	</dependency>
</dependencies>
1.3 配置
1.3.1 单节点配置
application.yml中配置如下:
server:
  port: 8761
eureka:
  instance:
    hostname: localhost
  client:
    registerWithEureka: false
    fetchRegistry: false
    serviceUrl:
      defaultZone: http://${eureka.instance.hostname}:${server.port}/eureka/
1.4 代码
eureka server 中起动类代类如下:
@SpringBootApplication
@EnableEurekaServer
public class EurekaServerApplication {

    public static void main(String[] args) {
    	SpringApplication.run(EurekaServerApplication.class, args);
    }
}
1.5 安全校验
1.5.1 pom增加项
        <dependency>
  		<groupId>org.springframework.boot</groupId>
  		<artifactId>spring-boot-starter-security</artifactId>
  	</dependency>
1.5.2 eureka server
配置修改如下
server:
  port: 8761

user: huaxia
password: huaxia

spring:
  security:
    user:
      name: ${user}
      password: ${password}

eureka:
  instance:
    hostname: localhost
  client:
    registerWithEureka: false
    fetchRegistry: false
    serviceUrl:
      defaultZone: http://${user}:${password}@{eureka.instance.hostname}:${server.port}/eureka/
1.5.3 eureka client
配置时修改如下
eureka:
  client:
    service-url:
      defaultZone:http://${user}:${password}@{eureka.instance.hostname}:${server.port}/eureka/
1.5.4 注意项
A、由于默认是开启CSRF,所以需要将其关闭,不然会出现如下错误:
javax.ws.rs.WebApplicationException: com.fasterxml.jackson.databind.exc.MismatchedInputException:
Root name 'timestamp' does not match expected ('instance') for type [simple type, class com.netflix.appinfo.InstanceInfo]
在eureka服务端,创建一个WebSecurityConfig类,代码如下:
// WebSecurityConfig.java

@EnableWebSecurity
@Configuration
public class WebSecurityConfig extends WebSecurityConfigurerAdapter {
    @Override
    protected void configure(HttpSecurity http) throws Exception {
        http.csrf().disable(); //关闭csrf
        super.configure(http); //开启认证
    }
}
B、spring-boot-starter-security包只能放在eureka server项目的pom中,如果放在其他服务的pom中,在调用接口时会报401,Unauthorized

1.5.5 总结
1、如果在eureka服务端增加上安全认证,客户端无法注册成功,先看看有没有WebSecurityConfig。
2、客户端也需要用户名和密码认证注册的,服务端改成安全认证,客户端不要忘了改。
3、如果服务端是安全认证的集群服务,客户端注册时每个地址都需要用户名和密码安全认证
安全配置参考:https://blog.csdn.net/wgh100817/article/details/101719042
2、feign调用
详细请查看另一文章:【springcloud】模拟RPC调用(Feign)
2.1 pom文件修改
添加feign依赖
<!-- Feign 依赖 -->
     <dependency>
         <groupId>org.springframework.cloud</groupId>
         <artifactId>spring-cloud-starter-openfeign</artifactId>
     </dependency>
2.2 feign代码实现
2.2.1 feign接口
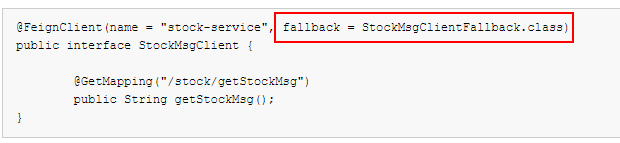
@FeignClient(name = "stock-service", fallback = StockMsgClientFallback.class)
public interface StockMsgClient {

	@GetMapping("/stock/getStockMsg")
	public String getStockMsg();
}
2.2.2 feign接口调用
@RestController
public class HelloOrderController {

	@Autowired
	private StockMsgClient stockMsgClient;
	@Autowired
	private IntegralMsgClient integralMsgClient;

	@GetMapping("/testStockRequest")
	@ResponseBody
	public String testStockRequest(){
		return "order service: " + stockMsgClient.getStockMsg();
	}

	@GetMapping("/testIntegralRequest")
	@ResponseBody
	public String testIntegralRequest(){
		return "order service: " + integralMsgClient.getIntegralMsg();
	}

	@RequestMapping(value = "/hello")
	@ResponseBody
	public String hello(){
		return "Hello Order Controller!";
	}
}
2.3 feign-hystrix服务降级
2.3.1 feignclient调用
2.3.2 fallback实现
@Component
public class StockMsgClientFallback implements StockMsgClient{

	@Override
	public String getStockMsg() {
		return "getStockMsg 服务异常,请稍后再试!";
	}

}
3、网关zuul
zuul相关详细描述请移步:
【springcloud】API Gateway 的路由和过滤(Zuul--1)
【springcloud】Zuul高级配置(zuul--2)
【springcloud】Zuul高级配置(zuul--3)
3.1 pom配置
        <dependency>
  		<groupId>org.springframework.cloud</groupId>
  		<artifactId>spring-cloud-starter-netflix-zuul</artifactId>
  	</dependency>
3.2 智能路由实现
配置即可
zuul:
  prefix: /api  #zuul.prefix 配置项可以为所有的路由地址都添加一个前缀
  routes:
    order-service: /order-service/**
    stock-service: /stock-service/**
订单服务-服务降级处理
@Component
public class OrderServiceFallbackProvider implements FallbackProvider {

    @Override
    public String getRoute() {
        return "order-service";
    }

    @Override
    public ClientHttpResponse fallbackResponse(String route, final Throwable cause) {
        if (cause instanceof HystrixTimeoutException) {
            return response(HttpStatus.GATEWAY_TIMEOUT);
        } else {
            return response(HttpStatus.INTERNAL_SERVER_ERROR);
        }
    }

    private ClientHttpResponse response(final HttpStatus status) {
        return new ClientHttpResponse() {
            @Override
            public HttpStatus getStatusCode() throws IOException {
                return status;
            }

            @Override
            public int getRawStatusCode() throws IOException {
                return status.value();
            }

            @Override
            public String getStatusText() throws IOException {
                return status.getReasonPhrase();
            }

            @Override
            public void close() {
            }

            @Override
            public InputStream getBody() throws IOException {
                return new ByteArrayInputStream("订单服务暂时不可用,请稍后重试!".getBytes());
            }

            @Override
            public HttpHeaders getHeaders() {
                HttpHeaders headers = new HttpHeaders();
                headers.setContentType(MediaType.APPLICATION_JSON);
                return headers;
            }
        };
    }
}
本示例中使用的是spring security安全框架实现安全管理。spring security的springboot集成可参考:springboot集成security
具体代码已上传github。以下记录简略步骤:
3.4.1 pom修改
       <!-- security依赖 -->
       <dependency>
		<groupId>org.springframework.boot</groupId>
		<artifactId>spring-boot-starter-security</artifactId>
	</dependency>
3.4.2 配置项
package cn.com.wjqhuaxia.config;

import java.io.IOException;
import java.io.PrintWriter;

import javax.servlet.ServletException;
import javax.servlet.http.HttpServletRequest;
import javax.servlet.http.HttpServletResponse;

import org.slf4j.Logger;
import org.slf4j.LoggerFactory;
import org.springframework.beans.factory.annotation.Autowired;
import org.springframework.context.annotation.Bean;
import org.springframework.context.annotation.Configuration;
import org.springframework.security.authentication.BadCredentialsException;
import org.springframework.security.config.annotation.ObjectPostProcessor;
import org.springframework.security.config.annotation.authentication.builders.AuthenticationManagerBuilder;
import org.springframework.security.config.annotation.method.configuration.EnableGlobalMethodSecurity;
import org.springframework.security.config.annotation.web.builders.HttpSecurity;
import org.springframework.security.config.annotation.web.builders.WebSecurity;
import org.springframework.security.config.annotation.web.configuration.WebSecurityConfigurerAdapter;
import org.springframework.security.core.Authentication;
import org.springframework.security.core.AuthenticationException;
import org.springframework.security.core.userdetails.UsernameNotFoundException;
import org.springframework.security.crypto.password.PasswordEncoder;
import org.springframework.security.web.access.intercept.FilterSecurityInterceptor;
import org.springframework.security.web.authentication.AuthenticationFailureHandler;
import org.springframework.security.web.authentication.AuthenticationSuccessHandler;

import cn.com.wjqhuaxia.service.impl.UserServiceImpl;
/**
 * spring-security权限管理的核心配置
 * @author wjqhuaxia
 *
 */
@Configuration
@EnableGlobalMethodSecurity(prePostEnabled = true) //全局
public class WebSecurityConfig extends WebSecurityConfigurerAdapter {

	private final Logger logger = LoggerFactory.getLogger(getClass());

    @Autowired
    private UserServiceImpl userService;//实现了UserDetailsService接口
    @Autowired
    private MyFilterInvocationSecurityMetadataSource myFilterInvocationSecurityMetadataSource;//权限过滤器(当前url所需要的访问权限)
    @Autowired
    private MyAccessDecisionManager myAccessDecisionManager;//权限决策器
    @Autowired
    private AuthenticationAccessDeniedHandler authenticationAccessDeniedHandler;//自定义错误(403)返回数据

    /**
     * 自定义的加密算法
     * @return
     */
    @Bean
    public PasswordEncoder myPasswordEncoder() {
    	return new MyPasswordEncoder();
    }
    /**
     *  配置userDetails的数据源,密码加密格式
     */
    @Override
    protected void configure(AuthenticationManagerBuilder auth) throws Exception {
        auth.userDetailsService(userService).passwordEncoder(myPasswordEncoder());
    }
    /**
     * 配置放行的资源
     */
    @Override
    public void configure(WebSecurity web) throws Exception {
        web.ignoring()
           .antMatchers("/index.html", "/static/**","/loginPage","/register")
           // 给 swagger 放行;不需要权限能访问的资源
           .antMatchers("/swagger-ui.html", "/swagger-resources/**", "/images/**", "/webjars/**", "/v2/api-docs",
        		   "/configuration/ui", "/configuration/security", "/swagger-ui.html#!");
    }

    /**
     * 这段配置,我认为就是配置Security的认证策略, 每个模块配置使用and结尾。
		authorizeRequests()配置路径拦截,表明路径访问所对应的权限,角色,认证信息。
		formLogin()对应表单认证相关的配置
		logout()对应了注销相关的配置
		httpBasic()可以配置basic登录
     */
    /**
     * HttpSecurity包含了原数据(主要是url)
     * 1.通过withObjectPostProcessor将MyFilterInvocationSecurityMetadataSource和MyAccessDecisionManager注入进来
     * 2.此url先被MyFilterInvocationSecurityMetadataSource处理,然后 丢给 MyAccessDecisionManager处理
     * 3.如果不匹配,返回 MyAccessDeniedHandler
     */
    @Override
    protected void configure(HttpSecurity http) throws Exception {
    		// authorizeRequests()配置路径拦截,表明路径访问所对应的权限,角色,认证信息
        	http.authorizeRequests()
                .withObjectPostProcessor(new ObjectPostProcessor<FilterSecurityInterceptor>() {
                    @Override
                    public <O extends FilterSecurityInterceptor> O postProcess(O o) {
                        o.setSecurityMetadataSource(myFilterInvocationSecurityMetadataSource);
                        o.setAccessDecisionManager(myAccessDecisionManager);
                        return o;
                    }
                })
                .and()
            // formLogin()对应表单认证相关的配置
            .formLogin()
            	//.loginPage("/loginPage.html")
            	.loginProcessingUrl("/login")
            	.usernameParameter("username")
            	.passwordParameter("password")
            	.permitAll()
            .failureHandler(new AuthenticationFailureHandler() {
	            @Override
	            public void onAuthenticationFailure(HttpServletRequest httpServletRequest, HttpServletResponse httpServletResponse, AuthenticationException e) throws IOException, ServletException {
	            	logger.error("onAuthenticationFailure error. e: {}", e);
	            	httpServletResponse.setContentType("application/json;charset=utf-8");
	                PrintWriter out = httpServletResponse.getWriter();
	                StringBuffer sb = new StringBuffer();
	                sb.append("{\"status\":\"error\",\"msg\":\"");
	                if (e instanceof UsernameNotFoundException || e instanceof BadCredentialsException) {
	                    sb.append("用户名或密码输入错误,登录失败!");
	                } else {
	                    sb.append("登录失败!");
	                }
	                sb.append("\"}");
	                out.write(sb.toString());
	                out.flush();
	                out.close();
	            }
            }).successHandler(new AuthenticationSuccessHandler() {
            @Override
	            public void onAuthenticationSuccess(HttpServletRequest httpServletRequest, HttpServletResponse httpServletResponse, Authentication authentication) throws IOException, ServletException {
	                httpServletResponse.setContentType("application/json;charset=utf-8");
	                PrintWriter out = httpServletResponse.getWriter();
	                String s = "{\"status\":\"success\",\"msg\":\"登陆成功\"}";
	                out.write(s);
	                out.flush();
	                out.close();
	            }
            }).and()
            // logout()对应了注销相关的配置
            .logout()
            	.permitAll()
            	.and()
            	.csrf()
            	.disable()
        	.exceptionHandling()
        		.accessDeniedHandler(authenticationAccessDeniedHandler);
    }
}
3.4.3 权限数据源信息
详细信息见github代码以及springboot集成security,此处仅做简略记录。
4、springcloud config
4.1 config server
4.1.1 pom
添加 spring-cloud-config-server 依赖。
  <parent>
    <groupId>cn.com.wjqhuaxia</groupId>
    <artifactId>greenwich-sr4-master</artifactId>
    <version>0.0.1-SNAPSHOT</version>
  </parent>
  <artifactId>greenwich-sr4-config</artifactId>

  <dependencies>
  	<dependency>
		<groupId>org.springframework.cloud</groupId>
		<artifactId>spring-cloud-config-server</artifactId>
	</dependency>
  </dependencies>
4.1.2 启动类
添加 @EnableConfigServer 注解。
package cn.com.wjqhuaxia;

import org.springframework.boot.SpringApplication;
import org.springframework.boot.autoconfigure.SpringBootApplication;
import org.springframework.cloud.config.server.EnableConfigServer;
import org.springframework.cloud.netflix.eureka.EnableEurekaClient;

@SpringBootApplication
@EnableConfigServer
@EnableEurekaClient
public class ConfigServerApplication {

    public static void main(String[] args) {
    	SpringApplication.run(ConfigServerApplication.class, args);
    }
}
4.1.3 配置项
application.yml,其中uri为git远程库地址。
spring:
  application:
    name: config-center
  cloud:
    config:
      server:
        git:
          uri: https://github.com/wjqhuaxia/config.git
          username: xx
          password: xx

server:
  port: 8000  # 端口号默认8080
# 服务注册
eureka:
  client:
    serviceUrl:
      defaultZone: http://huaxia:huaxia@localhost:8761/eureka/
4.2 config client
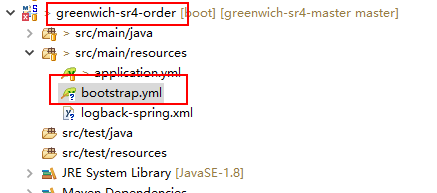
示例代码中order项目,修改application.yml文件,并添加bootstrap.yml文件
4.2.1 pom
添加config-client依赖
        <dependency>
		<groupId>org.springframework.cloud</groupId>
		<artifactId>spring-cloud-config-client</artifactId>
	</dependency>
4.2.2 配置文件内容
spring:
  application:
    name: order-service
  cloud:
    config:
      discovery:
        enabled: true
        service-id: config-center  # 指定用于获取配置的配置中心服务(应用)名称
      profile: test
      label: master
eureka:
  client:
    serviceUrl:
      defaultZone: http://huaxia:huaxia@localhost:8761/eureka/

 浙公网安备 33010602011771号