
OpenCV实战(1)——图像相似度算法(比对像素方差,感知哈希算法,模板匹配(OCR数字匹配),OpenCV的安装)
如果需要处理的原图及代码,请移步小编的GitHub地址
传送门:请点击我
如果点击有误:https://github.com/LeBron-Jian/ComputerVisionPractice
最近一段时间学习并做的都是对图像进行处理,其实自己也是新手,各种尝试,所以我这个门外汉想总结一下自己学习的东西,图像处理的流程。但是动起笔来想总结,一下却不知道自己要写什么,那就把自己做过的相似图片搜索的流程整理一下,想到什么说什么吧。
一:图片相似度算法(对像素求方差并比对)的学习
1.1 算法逻辑
1.1.1 缩放图片
将需要处理的图片所放到指定尺寸,缩放后图片大小由图片的信息量和复杂度决定。譬如,一些简单的图标之类图像包含的信息量少,复杂度低,可以缩放小一点。风景等复杂场景信息量大,复杂度高就不能缩放太小,容易丢失重要信息。根据自己需求,弹性的缩放。在效率和准确度之间维持平衡。
1.1.2 灰度处理
通常对比图像相似度和颜色关系不是很大,所以处理为灰度图,减少后期计算的复杂度。如果有特殊需求则保留图像色彩。
1.1.3 计算平均值
此处开始,与传统的哈希算法不同:分别依次计算图像每行像素点的平均值,记录每行像素点的平均值。每一个平均值对应着一行的特征。
1.1.4 计算方差
对得到的所有平均值进行计算方差,得到的方差就是图像的特征值。方差可以很好的反应每行像素特征的波动,既记录了图片的主要信息。
1.1.5 比较方差
经过上面的计算之后,每张图都会生成一个特征值(方差)。到此,比较图像相似度就是比较图像生成方差的接近成程度。
一组数据方差的大小可以判断稳定性,多组数据方差的接近程度可以反应数据波动的接近程度。我们不关注方差的大小,只关注两个方差的差值的大小。方差差值越小图像越相似!
1.2 代码:
import cv2
import matplotlib.pyplot as plt

#计算方差
def getss(list):
    #计算平均值
    avg=sum(list)/len(list)
    #定义方差变量ss,初值为0
    ss=0
    #计算方差
    for l in list:
        ss+=(l-avg)*(l-avg)/len(list)
    #返回方差
    return ss

#获取每行像素平均值
def getdiff(img):
    #定义边长
    Sidelength=30
    #缩放图像
    img=cv2.resize(img,(Sidelength,Sidelength),interpolation=cv2.INTER_CUBIC)
    #灰度处理
    gray=cv2.cvtColor(img,cv2.COLOR_BGR2GRAY)
    #avglist列表保存每行像素平均值
    avglist=[]
    #计算每行均值,保存到avglist列表
    for i in range(Sidelength):
        avg=sum(gray[i])/len(gray[i])
        avglist.append(avg)
    #返回avglist平均值
    return avglist

#读取测试图片
img1=cv2.imread("james.jpg")
diff1=getdiff(img1)
print('img1:',getss(diff1))

#读取测试图片
img11=cv2.imread("durant.jpg")
diff11=getdiff(img11)
print('img11:',getss(diff11))

ss1=getss(diff1)
ss2=getss(diff11)
print("两张照片的方差为:%s"%(abs(ss1-ss2)))

x=range(30)

plt.figure("avg")
plt.plot(x,diff1,marker="*",label="$jiames$")
plt.plot(x,diff11,marker="*",label="$durant$")
plt.title("avg")
plt.legend()
plt.show()


cv2.waitKey(0)
cv2.destroyAllWindows()
两张原图:

图像结果如下:
img1: 357.03162469135805
img11: 202.56193703703704
两张照片的方差为:154.469687654321
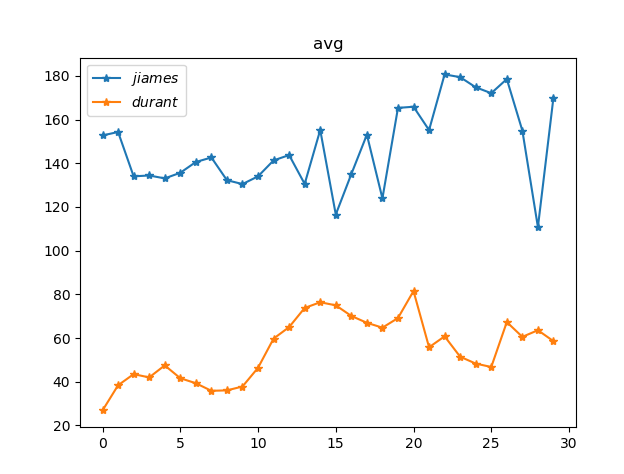
实验环境开始设置了图片像素值,而且进行灰度化处理,此方法比对图像相似对不同的图片方差很大,结果很明显,但是对比比较相似,特别相似的图片不适应。
二:图片相似度算法(感知哈希算法)的学习
"感知哈希算法"(Perceptual hash algorithm),它的作用是对每张图片生成一个"指纹"(fingerprint)字符串,然后比较不同图片的指纹。结果越接近,就说明图片越相似。
2.1 算法步骤
2.1.1 缩小尺寸
将图片缩小到8x8的尺寸,总共64个像素。这一步的作用是去除图片的细节,只保留结构、明暗等基本信息,摒弃不同尺寸、比例带来的图片差异。
2.1.2 简化色彩
将缩小后的图片,转为64级灰度。也就是说,所有像素点总共只有64种颜色。
2.1.3 计算平均值
计算所有64个像素的灰度平均值
2.1.4 比较像素的灰度平均值
将每个像素的灰度,与平均值进行比较。大于或等于平均值,记为1;小于平均值,记为0。
2.1.5 计算哈希值
将上一步的比较结果,组合在一起,就构成了一个64位的整数,这就是这张图片的指纹。组合的次序并不重要,只要保证所有图片都采用同样次序就行了。
得到指纹以后,就可以对比不同的图片,看看64位中有多少位是不一样的。在理论上,这等同于计算"汉明距离"(Hamming distance)。如果不相同的数据位不超过5,就说明两张图片很相似;如果大于10,就说明这是两张不同的图片。
    此算法参考博客:http://www.ruanyifeng.com/blog/2011/07
    /principle_of_similar_image_search.html

但是未实现代码,代码如下:
#!/usr/bin/python

import glob
import os
import sys

from PIL import Image

EXTS = 'jpg', 'jpeg', 'JPG', 'JPEG', 'gif', 'GIF', 'png', 'PNG'

def avhash(im):
    if not isinstance(im, Image.Image):
        im = Image.open(im)
    im = im.resize((8, 8), Image.ANTIALIAS).convert('L')
    avg = reduce(lambda x, y: x + y, im.getdata()) / 64.
    return reduce(lambda x, (y, z): x | (z << y),
                  enumerate(map(lambda i: 0 if i < avg else 1, im.getdata())),
                  0)

def hamming(h1, h2):
    h, d = 0, h1 ^ h2
    while d:
        h += 1
        d &= d - 1
    return h

if __name__ == '__main__':
    if len(sys.argv) <= 1 or len(sys.argv) > 3:
        print "Usage: %s image.jpg [dir]" % sys.argv[0]
    else:
        im, wd = sys.argv[1], '.' if len(sys.argv) < 3 else sys.argv[2]
        h = avhash(im)

        os.chdir(wd)
        images = []
        for ext in EXTS:
            images.extend(glob.glob('*.%s' % ext))

        seq = []
        prog = int(len(images) > 50 and sys.stdout.isatty())
        for f in images:
            seq.append((f, hamming(avhash(f), h)))
            if prog:
                perc = 100. * prog / len(images)
                x = int(2 * perc / 5)
                print '\rCalculating... [' + '#' * x + ' ' * (40 - x) + ']',
                print '%.2f%%' % perc, '(%d/%d)' % (prog, len(images)),
                sys.stdout.flush()
                prog += 1

        if prog: print
        for f, ham in sorted(seq, key=lambda i: i[1]):
            print "%d\t%s" % (ham, f)
三:模板匹配
3.1 模板匹配的定义
模板就是一幅已知的小图像,而模板匹配就是在一幅大图像中搜寻目标,已知该图中有要找的目标,且该目标与模板有相同的尺度,方向和图像元素,通过一定的算法可以在图像中找到目标。
模板匹配和卷积原理很像,模板在原图像上开始滑动,计算模板与图像被模板覆盖的地方的差别程度,这个差别程度的计算方法在opencv里有6种,然后将每次计算的结果放入一个矩阵里,作为结果输出。假如原图像是A*B大小,而模板是 a*b大小,则输出结果的矩阵是 (A-a+1)*(B-b+1)。
3.2 模板匹配方法
模板匹配在opencv中的函数为 cv2.matchTemplate(),下面看一下其源码:
def matchTemplate(image, templ, method, result=None, mask=None): # real signature unknown; restored from __doc__
    """
    matchTemplate(image, templ, method[, result[, mask]]) -> result
    .   @brief Compares a template against overlapped image regions.
    .
    .   The function slides through image , compares the overlapped patches of size \f$w \times h\f$ against
    .   templ using the specified method and stores the comparison results in result . Here are the formulae
    .   for the available comparison methods ( \f$I\f$ denotes image, \f$T\f$ template, \f$R\f$ result ). The summation
    .   is done over template and/or the image patch: \f$x' = 0...w-1, y' = 0...h-1\f$
    .
    .   After the function finishes the comparison, the best matches can be found as global minimums (when
    .   #TM_SQDIFF was used) or maximums (when #TM_CCORR or #TM_CCOEFF was used) using the
    .   #minMaxLoc function. In case of a color image, template summation in the numerator and each sum in
    .   the denominator is done over all of the channels and separate mean values are used for each channel.
    .   That is, the function can take a color template and a color image. The result will still be a
    .   single-channel image, which is easier to analyze.
    .
    .   @param image Image where the search is running. It must be 8-bit or 32-bit floating-point.
    .   @param templ Searched template. It must be not greater than the source image and have the same
    .   data type.
    .   @param result Map of comparison results. It must be single-channel 32-bit floating-point. If image
    .   is \f$W \times H\f$ and templ is \f$w \times h\f$ , then result is \f$(W-w+1) \times (H-h+1)\f$ .
    .   @param method Parameter specifying the comparison method, see #TemplateMatchModes
    .   @param mask Mask of searched template. It must have the same datatype and size with templ. It is
    .   not set by default. Currently, only the #TM_SQDIFF and #TM_CCORR_NORMED methods are supported.
    """
    pass
下面对模板匹配方法进行解释:
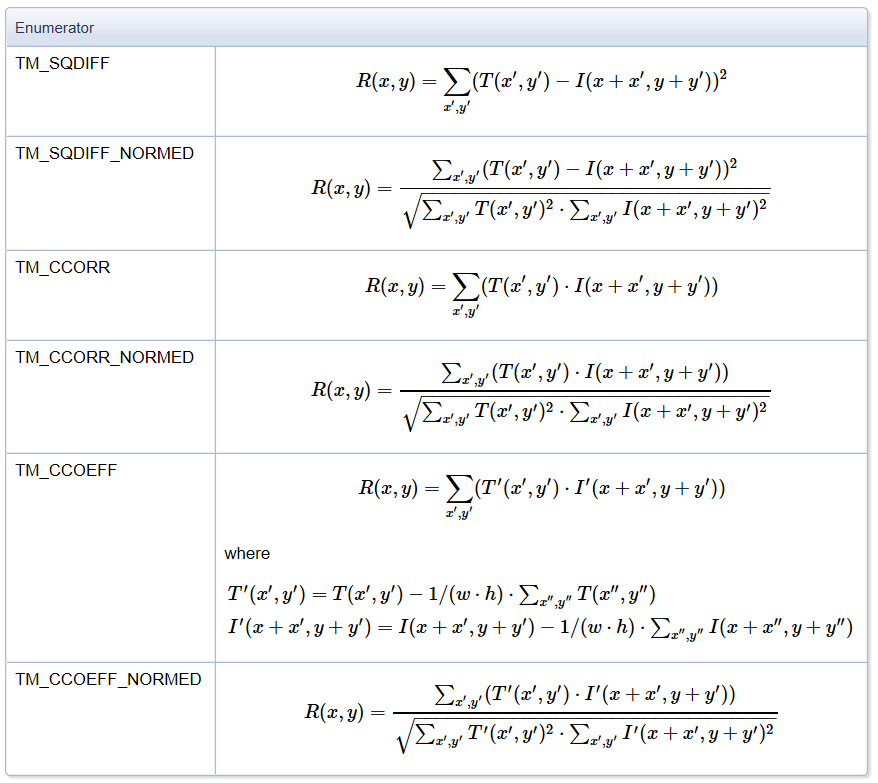
- cv2.TM_CCOEFF:系数匹配法,计算相关系数,计算出来的值越大,越相关
- cv2.TM_CCOEFF_NORMED:相关系数匹配法,计算归一化相关系数,计算出来的值越接近1,越相关
- cv2.TM_CCORR:相关匹配法,计算相关性,计算出来的值越大,越相关
- cv2.TM_CCORR_NORMED:归一化相关匹配法,计算归一化相关性,计算出来的值越接近1,越相关
- cv2.TM_SQDIFF:平方差匹配法,计算平方不同,计算出来的值越小,越相关
- cv2.TM_SQDIFF_NORMED:归一化平方差匹配法,计算归一化平方不同,计算出来的值越接近0,越相关
公式复制opencv官网,如下:
下面实操一下。
3.2 模板匹配一个对象实例
原图是lena.jpg,模板是lena的脸,均可以去我GitHub上拿。
代码:
#_*_coding:utf-8_*_
import cv2
import numpy as np
import matplotlib.pyplot as plt
img_path = 'lena.jpg'
img = cv2.imread(img_path, 0)
template = cv2.imread('face.jpg', 0)
template_h, template_w = template.shape[:2]
print(img.shape) # (263, 263)
print(template.shape) # (110, 85)
methods = ['cv2.TM_CCOEFF', 'cv2.TM_CCOEFF_NORMED', 'cv2.TM_CCORR',
'cv2.TM_CCORR_NORMED', 'cv2.TM_SQDIFF', 'cv2.TM_SQDIFF_NORMED']
res = cv2.matchTemplate(img, template, cv2.TM_SQDIFF)
# 函数返回值就是矩阵的最小值,最大值,最小值的索引,最大值的索引。
min_val, max_val, min_index, max_index = cv2.minMaxLoc(res)
# print(min_val, max_val, min_index, max_index)
# 39168.0 74403584.0 (107, 89) (159, 62)
for meth in methods:
img2 = img.copy()
# 匹配方法的真值
method = eval(meth)
# print(meth, method)
'''
cv2.TM_CCOEFF 4
cv2.TM_CCOEFF_NORMED 5
cv2.TM_CCORR 2
cv2.TM_CCORR_NORMED 3
cv2.TM_SQDIFF 0
cv2.TM_SQDIFF_NORMED 1
'''
res = cv2.matchTemplate(img, template, method)
# 函数返回值就是矩阵的最小值,最大值,最小值的索引,最大值的索引。
min_val, max_val, min_loc, max_loc = cv2.minMaxLoc(res)
# 如果是平方差匹配 TM_SQDIFF 或归一化平方差匹配 TM_SQDIFF_NORMED,取最小值
if method in [cv2.TM_SQDIFF, cv2.TM_SQDIFF_NORMED]:
top_left = min_loc
else:
top_left = max_loc
bottom_right = (top_left[0] + template_w, top_left[1] + template_h)
# 画矩形
cv2.rectangle(img2, top_left, bottom_right, 255, 2)
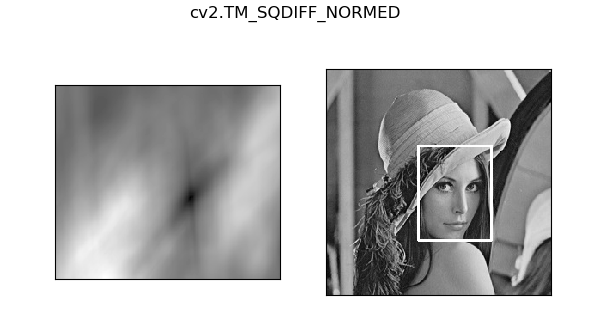
plt.subplot(121), plt.imshow(res, cmap='gray')
plt.xticks([]), plt.yticks([]) # 隐藏坐标轴
plt.subplot(122), plt.imshow(img2, cmap='gray')
plt.xticks([]), plt.yticks([])
plt.suptitle(meth)
plt.show()
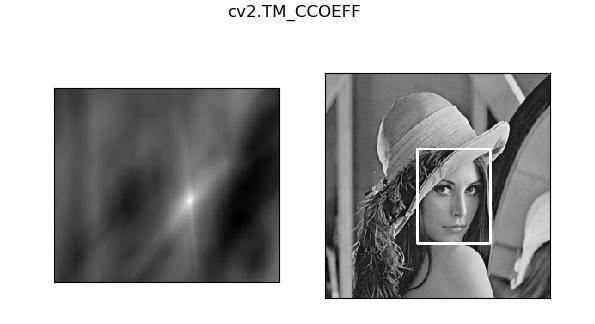
效果如下:
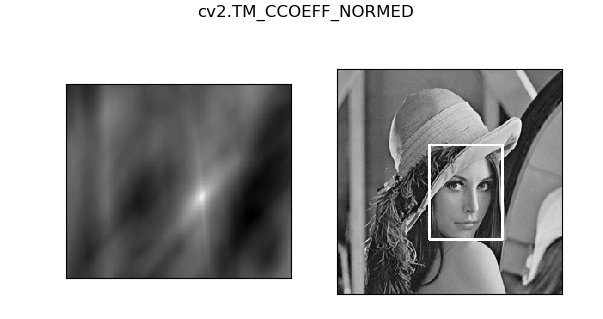
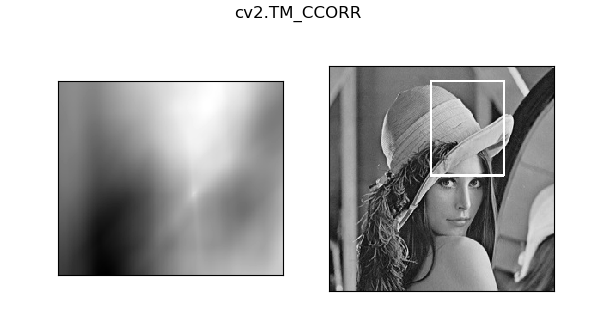
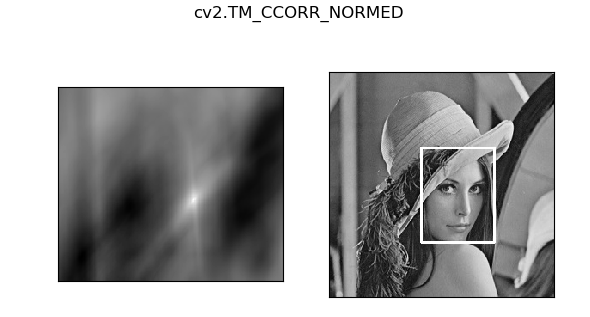
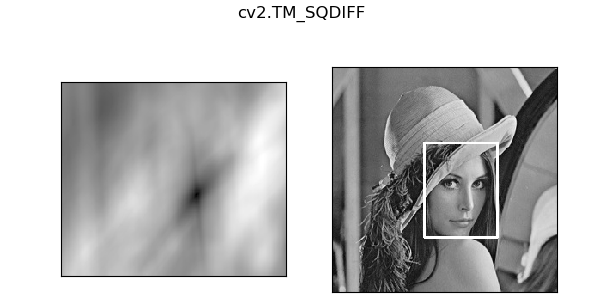
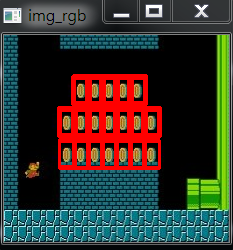
3.3 模板匹配多个对象
有时候,你需要匹配的模板在图像中多次出现,那么就需要多对象匹配。多对象匹配的原理很简单,因为opencv里的模板匹配里的每一处和模板进行对比,所以同一个模板下,多对象匹配情况下,结果矩阵里会有好几个值,和最大(小)值接近,如果我们设置一个阈值,在这个阈值以上(以下)的值都提取出来,再分别得到他们的坐标,理论上只要这个阈值设置的恰当,就可以将多对象都匹配出来。
原图是超级玛丽的一张截图,模板是金币,也可以去我GitHub上拿。
这种方法的方框要 粗一点,因为我们定义的 threshold 为 0.8,(只针对代码中的 cv2.TM_CCOEFF_NORMED 匹配方法),loc检测出来有 9个点,相当于画了三次框,所以要粗一点。
代码:
#_*_coding:utf-8_*_
import cv2
import numpy as np
import matplotlib.pyplot as plt


img_path = 'mario.jpg'
img_rgb = cv2.imread(img_path)
img_gray = cv2.cvtColor(img_rgb, cv2.COLOR_BGR2GRAY)
template = cv2.imread('mario_coin.jpg', 0)

template_h, template_w = template.shape[:2]
print(img_gray.shape)   # (207, 225)
print(template.shape)  # (27, 16)


res = cv2.matchTemplate(img_gray, template, cv2.TM_CCOEFF_NORMED)
threshold = 0.8
# 取匹配程度大于 80% 的坐标
loc = np.where(res >= threshold)
for pt in zip(*loc[::-1]):  # *表示可选参数
    bottom_right = (pt[0] + template_w, pt[1] + template_h)
    cv2.rectangle(img_rgb, pt, bottom_right, (0, 0, 255), 2)

cv2.imshow('img_rgb', img_rgb)
cv2.waitKey(0)
cv2.destroyAllWindows()
效果如下:
3.4 cv2.minMaxLoc()函数用法
cv2.minMaxLoc() 函数功能:假设有一个矩阵 a,现在需要求这个矩阵的最小值,最大值,并得到最大值,最小值的索引。就可以使用此函数。
cv2.minMaxLoc()函数源码如下:
def minMaxLoc(src, mask=None): # real signature unknown; restored from __doc__
    """
    minMaxLoc(src[, mask]) -> minVal, maxVal, minLoc, maxLoc
    .   @brief Finds the global minimum and maximum in an array.
    .
    .   The function cv::minMaxLoc finds the minimum and maximum element values and their positions. The
    .   extremums are searched across the whole array or, if mask is not an empty array, in the specified
    .   array region.
    .
    .   The function do not work with multi-channel arrays. If you need to find minimum or maximum
    .   elements across all the channels, use Mat::reshape first to reinterpret the array as
    .   single-channel. Or you may extract the particular channel using either extractImageCOI , or
    .   mixChannels , or split .
    .   @param src input single-channel array.
    .   @param minVal pointer to the returned minimum value; NULL is used if not required.
    .   @param maxVal pointer to the returned maximum value; NULL is used if not required.
    .   @param minLoc pointer to the returned minimum location (in 2D case); NULL is used if not required.
    .   @param maxLoc pointer to the returned maximum location (in 2D case); NULL is used if not required.
    .   @param mask optional mask used to select a sub-array.
    .   @sa max, min, compare, inRange, extractImageCOI, mixChannels, split, Mat::reshape
    """
    pass
函数返回值就是矩阵的最小值,最大值,最小值的索引,最大值的索引。
下面举个例子:
#_*_coding:utf-8_*_
import cv2
import numpy as np


a = np.array([[1,2,3,4], [5,6,7,8]])
min_val, max_val, min_index, max_index = cv2.minMaxLoc(a)
print(min_val, max_val, min_index, max_index)
# 1.0 8.0 (0, 0) (3, 1)
3.5 实战——信用卡数字识别
关于图片和代码,可以去我的GitHub中拿,GitHub地址在文章上面。
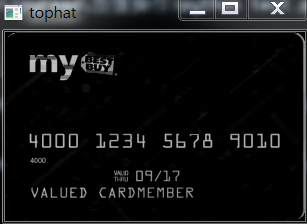
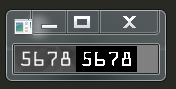
这一实战的目的是识别出信用卡中的数字,也就是我们的卡号,信用卡如下:

而我们的模板图片如下:
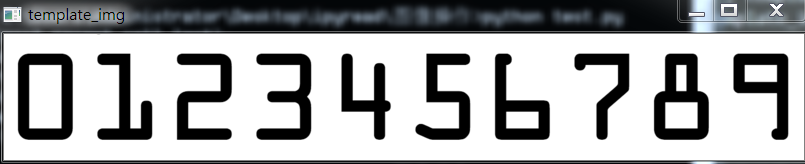
对模板图像处理过程:
首先对图像二值化,并对二值化的图片进行逆运算:

然后拿到原二值图像的轮廓:
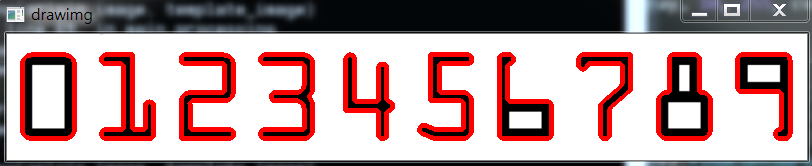
最后将数字对应的轮廓存入字典中,方便后面对比。
对信用卡进行图像处理,这里不再一一赘述,均在代码中,只展示图像的处理过程及其结果:
灰度化信用卡图像:

对信用卡图像进行顶帽处理:
对图像进行sobel算子的X方向: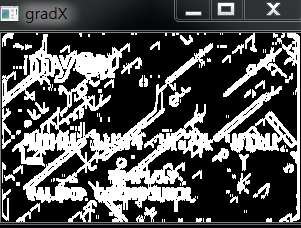
再进一步处理: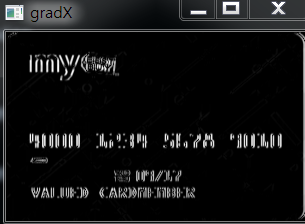
对图像进行膨胀腐蚀:
再对图像进行二值化: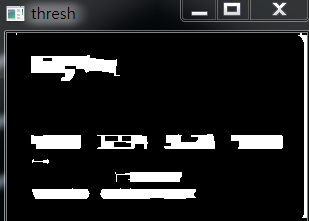 进一步二值化:
找到原图的地址:

设置筛选范围,找到我们需要的区域: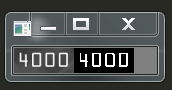


最后展示在原图:
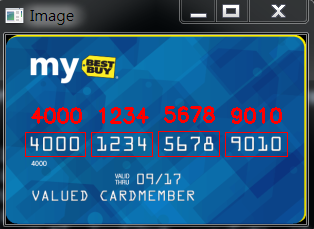
也可以将结果展示在编译器:
Credit Card Type: Visa
Credit Card #: 4000123456789010
完整代码如下:
#_*_coding:utf-8_*_
import cv2
import numpy as np

# 指定信用卡类型
FIRST_NUMBER = {
    '3': "Amerian Express",
    '4': "Visa",
    '5': 'MasterCard',
    '6': 'Discover Card'
}


def cv_show(name, img):
    cv2.imshow(name, img)
    cv2.waitKey(0)
    cv2.destroyAllWindows()


def sort_contours(cnts, method='left-to-right'):
    reverse = False
    i = 0

    if method == 'right-to-left' or method == 'bottom-to-top':
        reverse = True
    if method == 'top-to-bottom' or method == ' bottom-to-top':
        i = 1

    # 用一个最小的矩形,把找到的形状包起来 x, y, h, w
    boundingBoxes = [cv2.boundingRect(c) for c in cnts]
    # #zip(*)相当于解压,是zip的逆过程
    (cnts, boundingBoxes) = zip(*sorted(zip(cnts, boundingBoxes),
        key=lambda b: b[1][i], reverse=reverse))

    return cnts, boundingBoxes


def myresize(image, width=None, height=None, inter=cv2.INTER_AREA):
    dim = None
    (h, w) = image.shape[:2]
    if width is None and height is None:
        return image
    if width is None:
        r = height / float(h)
        dim = (int(w*r), height)
    else:
        r = width / float(w)
        dim = (width, int(h*r))
    resized = cv2.resize(image, dim, interpolation=inter)
    return resized


def trmplate_processing(template_image):
    # 读取模板图像
    template_img = cv2.imread(template_image)
    # cv_show('template_img', template_img)
    gray = cv2.cvtColor(template_img, cv2.COLOR_BGR2GRAY)
    # cv_show('gray', gray)
    # 二值图像
    ref = cv2.threshold(gray, 10, 255, cv2.THRESH_BINARY_INV)[1]
    # cv_show('ref', ref)

    # 计算轮廓
    # cv2.findContours() 函数接受的参数为二值图,即黑白的(不是灰度图)
    # cv2.RETR_EXTERNAL 只检测外轮廓  cv2.CHAIN_APPROX_SIMPLE 只保留终点坐标
    # 返回的list中每个元素都是图像中的一个轮廓
    refCnts, hierarchy = cv2.findContours(ref.copy(), cv2.RETR_EXTERNAL, cv2.CHAIN_APPROX_SIMPLE)

    drawimg = template_img.copy()
    cv2.drawContours(drawimg, refCnts, -1, (0, 0, 255), 3)
    # cv_show('drawimg', drawimg)
    # print(np.array(refCnts).shape)   # (10,)
    # 排序,从左到右,从上到下
    refCnts1 = sort_contours(refCnts, method='left-to-right')[0]
    digits = {}
    # 遍历每一个轮廓
    for (i, c) in enumerate(refCnts1):
        # 计算外接矩阵并且resize成合适大小
        (x, y, w, h) = cv2.boundingRect(c)
        roi = ref[y:y+h, x:x+w]
        roi = cv2.resize(roi, (57, 88))

        # 每一个数字对应每个模板
        digits[i] = roi

    # print(digits)
    return digits

def origin_img_processing(origin_image, digits):
    # 读入输入图像,并进行预处理
    img = cv2.imread(origin_image)
    # cv_show('img', img)
    # print(img.shape)  # (368, 583, 3)
    img = myresize(img, width=300)
    # print(img.shape)  # (189, 300, 3)
    gray = cv2.cvtColor(img, cv2.COLOR_BGR2GRAY)
    # cv_show('gray', gray)

    # 初始化卷积核
    rectKernel = cv2.getStructuringElement(cv2.MORPH_RECT, (9, 3))
    sqKernel = cv2.getStructuringElement(cv2.MORPH_RECT, (5, 5))
    # 礼帽操作,突出更明显的区域
    tophat = cv2.morphologyEx(gray, cv2.MORPH_TOPHAT, rectKernel)
    # cv_show('tophat', tophat)

    # ksize = -1 相当于用 3*3 的 ksize=-1
    gradX = cv2.Sobel(tophat, ddepth=cv2.CV_32F, dx=1, dy=0, ksize=-1)
    # 下面np函数等价于  cv2.convertScaleAbs(gradX)
    gradX = np.absolute(gradX)
    # cv_show('gradX', gradX)
    (minVal, maxVal) = (np.min(gradX), np.max(gradX))
    gradX = (255*((gradX - minVal) / (maxVal - minVal)))
    gradX = gradX.astype('uint8')
    # print(np.array(gradX).shape)  # (189, 300)
    # cv_show('gradX', gradX)

    # 通过闭操作(先膨胀,再腐蚀)将数字连在一起
    gradX = cv2.morphologyEx(gradX, cv2.MORPH_CLOSE, rectKernel)
    # cv_show('gradX', gradX)
    # THRESH_OTSU 会自动寻找合适的阈值,适合双峰,需把阈值参数设置为0
    thresh = cv2.threshold(gradX, 0, 255, cv2.THRESH_BINARY | cv2.THRESH_OTSU)[1]
    # cv_show('thresh', thresh)

    # 再来一个闭操作  先膨胀后腐蚀
    thresh = cv2.morphologyEx(thresh, cv2.MORPH_CLOSE, sqKernel)
    # cv_show('thresh_again', thresh)

    #计算轮廓
    threshCnts, hierarchy = cv2.findContours(thresh.copy(), cv2.RETR_EXTERNAL, cv2.CHAIN_APPROX_SIMPLE)
    cur_img = img.copy()
    cv2.drawContours(cur_img, threshCnts, -1, (0, 0, 255), 3)
    # cv_show('cur_image', cur_img)

    locs = []
    # 遍历轮廓
    for (i, c) in enumerate(threshCnts):
        # 计算矩形
        (x, y, w, h) = cv2.boundingRect(c)
        ar = w / float(h)

        # 选择合适的区域,根据实际任务来,这里的基本都是四个数字一组
        if ar > 2.5 and ar<4.0:
            if (w > 40 and w < 55) and (h > 10 and h < 20):
                # 符合的留下来
                locs.append((x, y, w, h))

    # 将符合的轮廓从左到右排序
    locs = sorted(locs, key=lambda x:x[0])

    output = []
    # 遍历轮廓中每一个数字
    for (i, (gX, gY, gW, gH)) in enumerate(locs):
        # initialize the list of group digits
        groupOutput = []
        # 根据坐标提取每一个组
        group = gray[gY - 5: gY + gH + 6, gX - 5:gX + gW + 5]
        # cv_show('group', group)

        # 预处理
        group1 = cv2.threshold(group, 0, 255, cv2.THRESH_BINARY|cv2.THRESH_OTSU)[1]
        # cv_show('group', group)
        # res = np.hstack((group, group1))
        # cv_show('group & threshold', res)

        # 计算每一组的轮廓
        digitCnts, hierarchy = cv2.findContours(group1.copy(), cv2.RETR_EXTERNAL, cv2.CHAIN_APPROX_SIMPLE)
        digitCnts = sort_contours(digitCnts, method='left-to-right')[0]

        # 计算每一组中的每一个数值
        for c in digitCnts:
            # 找到当前数值的轮廓,resize成合适的大小
            (x, y, w, h) = cv2.boundingRect(c)
            roi = group1[y:y+h, x:x+w]
            roi = cv2.resize(roi, (57, 88))
            # cv_show('roi', roi)

            # 计算匹配得分
            scores = []

            # 在模板中计算每一个得分
            for (digit, digitROI) in digits.items():
                # 模板匹配
                result = cv2.matchTemplate(roi, digitROI, cv2.TM_CCOEFF)
                (_, score, _, _) = cv2.minMaxLoc(result)
                scores.append(score)

            # 得到最合适的数字
            groupOutput.append(str(np.argmax(scores)))

        # 画出来
        cv2.rectangle(img, (gX-5, gY-5), (gX+gW+5, gY+gH+5), (0, 0, 255), 1)
        cv2.putText(img, "".join(groupOutput), (gX, gY-15),
            cv2.FONT_HERSHEY_SIMPLEX, 0.65, (0, 0, 255), 2)

        # 得到结果
        output.extend(groupOutput)

    # 打印结果
    print('Credit Card Type: {}'.format(FIRST_NUMBER[output[0]]))
    print("Credit Card #: {}".format("".join(output)))
    cv_show('Image', img)


if __name__ == '__main__':
    origin_image = r'images/credit_card_01.png'
    template_image = r'images/ocr_a_reference.png'
    digits = trmplate_processing(template_image)
    origin_img_processing(origin_image, digits)
部分代码解释:
img = cv2.imread("card.png", 1)
img_gray = cv2.cvtColor(img, cv2.COLOR_BGR2GRAY)
template = cv2.imread("temp.png", 0)
w, h = template.shape[::-1]
res = cv2.matchTemplate(img_gray, template, cv2.TM_CCOEFF_NORMED)

locs = np.where(res >=0.985)
for loc in zip(*locs[::-1]):
     img =cv2.rectangle(img, loc, (loc[0] + w, loc[1] + h), (0, 0, 255), 3)
这里我跳出一些许多代码,直接找到关键代码:
首先对于 locs = np.where(res > threshold) 进行分析,threshold 就是我们设定的阈值,res>thrshold 就是将结果array 里符合条件的数值换成True,反之换成 False。
其次对于 np.where 的作用就是将 true的索引输出到 Loc变量里面。
loc[::-1] 将输出的索引换成 x, y 坐标,因为索引和 x , y 坐标是正好相反的,所以要对换下位置。
四:关于OpenCV的安装
OpenCV的全称open Sourse Computer Vision Library ,是一个跨平台的计算机视觉库,OpenCV可用于开发实时的图像处理,计算机视觉以及模式识别的程序。
OpenCV是用C++语言编写,它的主要接口也是C++语言,但是依然保留了大量的C语言接口,该库也有大量的Python,Java和MATLAB的接口,另外,一个使用CUDA的GPU接口也用于2010.9 开始实现。
3.1 为什么使用Python+OpenCV
虽然python很强大,而且也有自己的图像处理库PIL,但是相对于OpenCV来讲,它还是弱小很多。跟很多开源软件一样OpenCV也提供了完善的python接口,非常便于调用。OpenCV 的稳定版是2.4.8,最新版是3.0,包含了超过2500个算法和函数,几乎任何一个能想到的成熟算法都可以通过调用OpenCV的函数来实现,超级方便。
3.2 import cv2发生错误的解决方案
错误如下:

1,进入cmd控制台,查看python版本

2 根据自己用的python版本,下载对应的OpenCV
https://www.lfd.uci.edu/~gohlke/pythonlibs/

3,下载numpy,对应的版本
https://pypi.python.org/pypi/numpy
 cp36代表着匹配python3.6版本。

win32、amd64代表着32位、64位系统。
4,安装OpenCV,下载下来是一个whl格式文件,把此文件放在安装的文件名下,直接安装。

就这样安装成功。
于2020.10.12 整理
参考文献:https://blog.csdn.net/wsp_1138886114/article/details/81368890
公式地址如下:https://docs.opencv.org/3.3.1/df/dfb/group__imgproc__object.html#ga3a7850640f1fe1f58fe91a2d7583695d

 浙公网安备 33010602011771号