模板方法模式
在《Head First设计模式》一书中,在对模板方法模式介绍之前,提及了这样一句话,可总结为:我们之前讨论的设计模式,都是围绕封装对象创建、方法调用、复杂接口等等。
但是今天要讨论的模板方法设计模式,是对算法块的封装。模板方法模式在一个方法中定义一个算法的框架,而将一些步骤延迟到子类中去实现。模板方法模式赋予子类在不改变算法结构的情况下,子类可以重新定义算法中的某些步骤。
也就是说,模板方法模式是用来创建一个算法的模板。在这个设计模式中,模板就是一个方法。
模板方法模式适用的场景:
-
实现一个算法的模板,并且该模板不能改变,可变部分交由子类去实现;
-
各个子类中公共的行为被抽离出来集中到父类中,避免了代码重复。
模板方法模式的优点:
-
提高代码扩展性;
-
提高代码复用性,避免程序臃肿;
-
符合开闭原则。
模板方法模式的缺点:
-
提升了系统复杂度
-
由于该模式提供的是一个算法的模板,所以具体实现还是由子类实现,导致类数量增加;
-
父类新增新的抽象方法,所有子类都需实现(这个继承自身缺陷)。
下面通过一个简单的例子,来说明模板方法模式在实际编码中的运用。
这里举一个商品上架到淘宝商城的例子,对上架需要做的步骤封装到一个算法里面,后续子类只需要实现该算法即可。
第一步:使用抽象类定义上架商品类,代码如下:
package com.concurrency.designpattern.behavioral.templatemethod;

/**
 * <p>Title: Product</p>
 * <p>Description: 商品上架准备算法封装</p>
 * <p>Company: http://www.yinjiedu.com</p>
 * <p>Project: annotation</p>
 *
 * @author: WEIQI
 * @Date: 2019-12-15 19:08
 * @Version: 1.0
 */
public abstract class Product {

    protected final void makeProduct() {
        this.putaway();
        this.denominateProduct();
        this.obtainType();
        this.productUrl();
        this.productrepertory();
    }

    /**
     * @description: 将商品上架到淘宝
     * @auther: WEIQI
     * @date: 2019-12-15 19:20
     */
    final void putaway() {
        System.out.println("上架商品到淘宝");
    }

    /**
     * @description: 获取商品类型
     * @auther: WEIQI
     * @date: 2019-12-15 19:29
     */
    final int obtainType() {
        Integer productType = 1;
        System.out.println("获取商品类型逻辑");
        return productType;
    }

    /**
     * @description: 为商品命名
     * @auther: WEIQI
     * @date: 2019-12-15 19:20
     */
    abstract void denominateProduct();

    /**
     * @description: 商品地址链接
     * @auther: WEIQI
     * @date: 2019-12-15 19:22
     */
    abstract void productUrl();

    /**
     * @description: 商品库存
     * @auther: WEIQI
     * @date: 2019-12-15 19:22
     */
    abstract void productrepertory();
}
第二步:定义两个具体商品,实现父类,代码分别为:
apple上架产品类:
package com.concurrency.designpattern.behavioral.templatemethod;

/**
 * <p>Title: AppleProduct</p>
 * <p>Description: 上架apple手机 </p>
 * <p>Company: http://www.yinjiedu.com</p>
 * <p>Project: annotation</p>
 *
 * @author: WEIQI
 * @Date: 2019-12-15 19:33
 * @Version: 1.0
 */
public class AppleProduct extends Product {
    /**
     * @description: 为商品命名
     * @auther: WEIQI
     * @date: 2019-12-15 19:20
     */
    @Override
    void denominateProduct() {
        System.out.println("Apple xs");
    }

    /**
     * @description: 商品地址链接
     * @auther: WEIQI
     * @date: 2019-12-15 19:22
     */
    @Override
    void productUrl() {
        System.out.println("https://www.apple.com");
    }

    /**
     * @description: 商品库存
     * @auther: WEIQI
     * @date: 2019-12-15 19:22
     */
    @Override
    void productrepertory() {
        System.out.println("20000");
    }
}
小米手机上架类:
package com.concurrency.designpattern.behavioral.templatemethod;

/**
 * <p>Title: XiaomiProduct</p>
 * <p>Description: 上架小米手机</p>
 * <p>Company: http://www.yinjiedu.com</p>
 * <p>Project: annotation</p>
 *
 * @author: WEIQI
 * @Date: 2019-12-15 19:34
 * @Version: 1.0
 */
public class XiaomiProduct extends Product {
    /**
     * @description: 为商品命名
     * @auther: WEIQI
     * @date: 2019-12-15 19:20
     */
    @Override
    void denominateProduct() {
        System.out.println("小米 MIX");
    }

    /**
     * @description: 商品地址链接
     * @auther: WEIQI
     * @date: 2019-12-15 19:22
     */
    @Override
    void productUrl、() {
        System.out.println("https://www.mi.com");
    }

    /**
     * @description: 商品库存
     * @auther: WEIQI
     * @date: 2019-12-15 19:22
     */
    @Override
    void productrepertory() {
        System.out.println("20001");
    }
}
查看当前类图关系如下:

我们可以看到子类当前继承实现了下面三个方法:
denominateProduct、productUrl、productrepertory
接下来我们写一个测试类,在实际开发中就是应用层代码:
package com.concurrency.designpattern.behavioral.templatemethod;

/**
 * <p>Title: Test</p>
 * <p>Description: 测试类</p>
 * <p>Company: http://www.yinjiedu.com</p>
 * <p>Project: annotation</p>
 *
 * @author: WEIQI
 * @Date: 2019-12-15 19:42
 * @Version: 1.0
 */
public class Test {
    public static void main(String[] args) {

        Product appleProduct = new AppleProduct();
        appleProduct.makeProduct();

        Product xiaomiProduct = new XiaomiProduct();
        xiaomiProduct.makeProduct();
    }
}
运行结果如下:
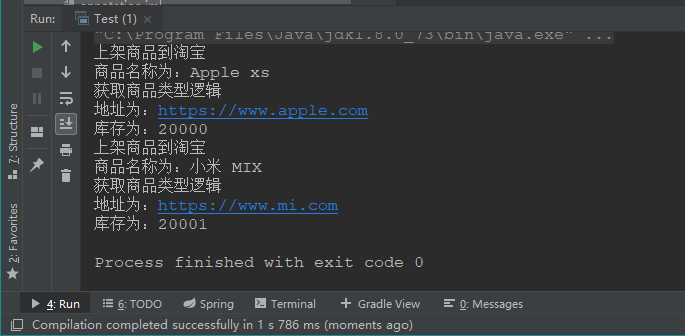
如上:我们对整个商品上架流程算法在父类做了统一的模板。
当前类图如下:
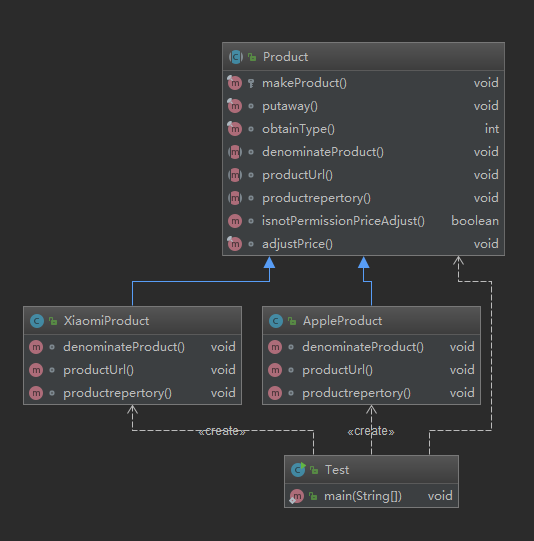
从上面类图中可以清楚的看到类之间的调用关系。
模板方法模式中的钩子
钩子是一种被什么在抽象类中的方法,但是在钩子方法中只有空的或者默认的实现。
钩子出现在抽象类中的意义:钩子的存在,可以让子类有能力对算法的不同点进行控制,至于要不要控制,完全由子类自己决定。
在上面实例中,我们可以做一个这样的挂钩:允许apple手机可以做价格调整权限,方便平台做优惠活动,而小米手机不允许有价格调整权限。
只需要对父类做如下调整:
-
修改算法模板,如下:
/**
     * @description: 制作商品
     * @auther: WEIQI
     * @date: 2019-12-15 21:03
     */
    protected final void makeProduct() {
        this.putaway();
        this.denominateProduct();
        this.obtainType();
        this.productUrl();
        this.productrepertory();
        if (isnotPermissionPriceAdjust()) {
            this.adjustPrice();
        }
    }
可以看到,在模板方法中添加了对价格调整的条件控制。
2. 新加两个方法,一个作为钩子方法,另一个为业务处理方法,如下:
/**
     * @description: 是否允许价格调整,默认返回false (定义钩子 hook)
     * @auther: WEIQI
     * @date: 2019-12-15 20:11
     * @return: boolean
     */
    boolean isnotPermissionPriceAdjust() {
        return false;
    }

    /**
     * @description: 调整价格
     * @auther: WEIQI
     * @date: 2019-12-15 20:12
     */
    final void adjustPrice() {
        System.out.println("调整价格");
    }
3. 在AppleProduct中使用钩子,如下:
/**
     * @description: 允许价格调整
     * @auther: WEIQI
     * @date: 2019-12-15 20:11
     * @return: boolean
     */
    @Override
    boolean isnotPermissionPriceAdjust() {
        return true;
    }
使用钩子之后的类图如下:
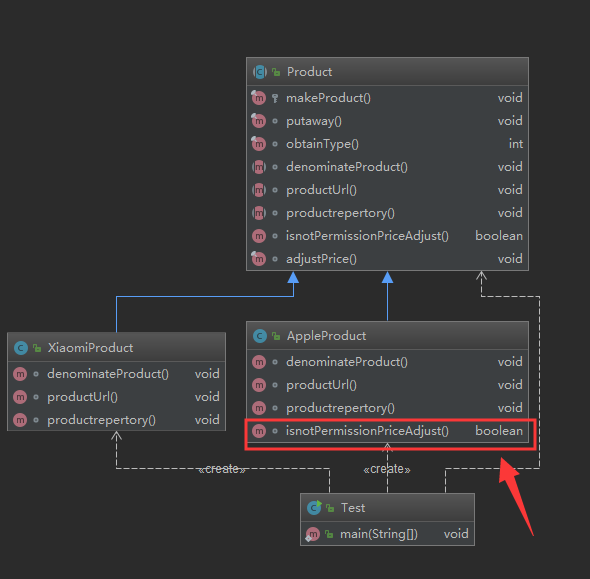
可以看到,AppleProduct中继承了isnotPermissionPriceAdjust这个方法。程序运行结果如下:
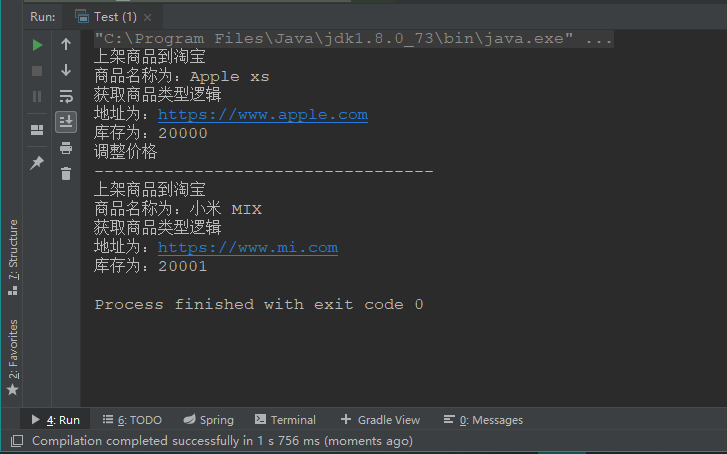
从运行结果可以看到,程序对每一个产品的不同特点做了控制,这也符合定义钩子方法的初衷。
有时候我们对钩子方法的控制可能会提升到应用层,这时候,在具体的实现类中要对钩子的权限做释放,具体做法如下:
对于上面AppleProduct中,可以定义私有的价格调整参数,如下:
private boolean allowAdjustPriceFlag = true;
对钩子方法使用做如下调整:
/**
     * @description: 允许价格调整
     * @auther: WEIQI
     * @date: 2019-12-15 20:11
     * @return: boolean
     */
    @Override
    boolean isnotPermissionPriceAdjust() {
        return this.allowAdjustPriceFlag;
    }
这样应用层程序就可以对算法的逻辑有控制能力。
总结:模板方法模式比较简单,该思想在很多地方可以使用,小伙伴们不妨使用该模式对自己项目中现有的模块试着做调整,这样对于理解模板方法模式会有很大的帮助。
想要了解实时博文,可以关注公众号《编程之艺术》


 浙公网安备 33010602011771号