使用TensorFlow Object Detection API进行目标检测
2017年6月,Google公司开放了TensorFlow Object Detection API。这个项目使用TensorFlow实现了大多数深度学习目标检测框架,其中就包括Faster R-CNN。
一、实现官方给的目标检测的示例教程
1、下载TensorFlow Object Detection API
在github上该API存放在tensorflow/models项目下,下载地址为https://github.com/tensorflow/models。下载tensorflow/models后,应该得到一个models文件夹,models文件夹中还有一个research文件夹。下面的安装命令都是以research文件夹为根目录执行的。
1.1安装protoc
在object_detection/protos中,可以看到一些proto文件,需要使用protoc程序将这些proto文件编译为python文件。
windows系统中:
https://github.com/google/protobuf/releases(选择最新版本的Windows64版本,不然可能会有错),解压后将bin文件夹中的protoc.exe放到C:\Windows下。(用于将protoc.exe所在的目录配置到环境变量当中)。
linux系统中:
下载protoc-3.3.0-linux-x86_64.zip,下载后解压,会得到一个protoc文件,将它复制到系统的可执行目录即可,如在ubutu系统中,可移执行以下命令:
sudo cp bin/protoc /usr/bin/protoc
1.2编译proto文件
在tensorflow-models\research\目录下打开命令行窗口输入以下代码(我是在anaconda prompt中输入)
protoc object_detection/protos/*.proto --python_out=.
如果此时不显示任何信息,则表明运行成功。在research\object_detection\protos下,每一个proto文件都应该会有一个对应的.py文件。具体情况如下:
错误一:在这一步有时候会出错,可以尝试把/*.proto 这部分改成文件夹下具体的文件名,一个一个试,每运行一个,文件夹下应该出现对应的.py结尾的文件。不报错即可,具体操作如下:
protoc object_detection/protos/anchor_generator.proto --python_out=.
把*号换成具体的文件名字,这样就会生成一个.py文件。需要一个一个文件。虽然是笨方法,可是很有效。这样一个一个替换很麻烦,为此,笔者将所有文件的名字附在下面,这样复制粘贴就会很快。
 1 protoc object_detection/protos/anchor_generator.proto --python_out=.
 2 protoc object_detection/protos/argmax_matcher.proto --python_out=.
 3 protoc object_detection/protos/bipartite_matcher.proto --python_out=.
 4 protoc object_detection/protos/box_coder.proto --python_out=.
 5 protoc object_detection/protos/box_predictor.proto --python_out=.
 6 protoc object_detection/protos/eval.proto --python_out=.
 7 protoc object_detection/protos/faster_rcnn.proto --python_out=.
 8 protoc object_detection/protos/faster_rcnn_box_coder.proto --python_out=.
 9 protoc object_detection/protos/graph_rewriter.proto --python_out=.
10 protoc object_detection/protos/grid_anchor_generator.proto --python_out=.
11 protoc object_detection/protos/hyperparams.proto --python_out=.
12 protoc object_detection/protos/image_resizer.proto --python_out=.
13 protoc object_detection/protos/input_reader.proto --python_out=.
14 protoc object_detection/protos/keypoint_box_coder.proto --python_out=.
15 protoc object_detection/protos/losses.proto --python_out=.
16 protoc object_detection/protos/matcher.proto --python_out=.
17 protoc object_detection/protos/mean_stddev_box_coder.proto --python_out=.
18 protoc object_detection/protos/model.proto --python_out=.
19 protoc object_detection/protos/multiscale_anchor_generator.proto --python_out=.
20 protoc object_detection/protos/optimizer.proto --python_out=.
21 protoc object_detection/protos/pipeline.proto --python_out=.
22 protoc object_detection/protos/post_processing.proto --python_out=.
23 protoc object_detection/protos/preprocessor.proto --python_out=.
24 protoc object_detection/protos/region_similarity_calculator.proto --python_out=.
25 protoc object_detection/protos/square_box_coder.proto --python_out=.
26 protoc object_detection/protos/ssd.proto --python_out=.
27 protoc object_detection/protos/ssd_anchor_generator.proto --python_out=.
28 protoc object_detection/protos/string_int_label_map.proto --python_out=.
29 protoc object_detection/protos/train.proto --python_out=.
1.3将Slim加入系统环境变量
在 ‘此电脑’-‘属性’- ‘高级系统设置’ -‘环境变量’-‘系统变量’ 中,将models-master\research\ 和models-master\research\slim 添加进path中。
这个方法好像只适用于linux系统,如果是Windows系统会弹出ImportError: No module named nets错误,此时需要在命令行先跳转到research/slim文件下,然后依次运行以下两行代码:
python setup.py build
python setup.py install
如果运行后出现error: could not create 'build':(当文件已存在时,无法创建该文件)
原因是github下载下来的代码库中有个BUILD文件,而build和install指令需要新建build文件夹,名字冲突导致问题。暂时不清楚BUILD文件的作用。将该文件移动到其他目录或删除掉,再运行上述指令,即可成功安装。
linux系统中:
将slim加入PYTHONPATH
Tensorflow Object Detection API是以slim为基础实现的,需要将slim的目录加入PYTHONPATH后才能正确运行。具体来说,还是在research文件夹下,执行以下命令:
export PYTHONPATH=$PYTHONPATH:'pwd':'pwd'/slim
1.4安装完成测试
在检测API是否正常时,进入目录models-master\research下运行:
run object_detection/builders/model_builder_test.py
>>....................
----------------------------------------------------------------------
Ran 22 tests in 0.462s
OK (skipped=1)
如果出现以上运行结果,说明已安装成功。
2、执行已经训练好的模型
Objec Detection API默认提供了5个预训练模型。它们都是使用COCO数据集训练完成的,结构分别为SSD+MobileNet、SSD+Inception、R-FCN+ResNet101、Faster RCNN+Inception_ResNet。
如何使用这些预训练模型呢?官方已经给了一个用jupyter notebook编写好的例子。用jupyter-notebook打开object_detection_tutorial.ipynb运行示例文件。
#导入一些需要的包和设置环境
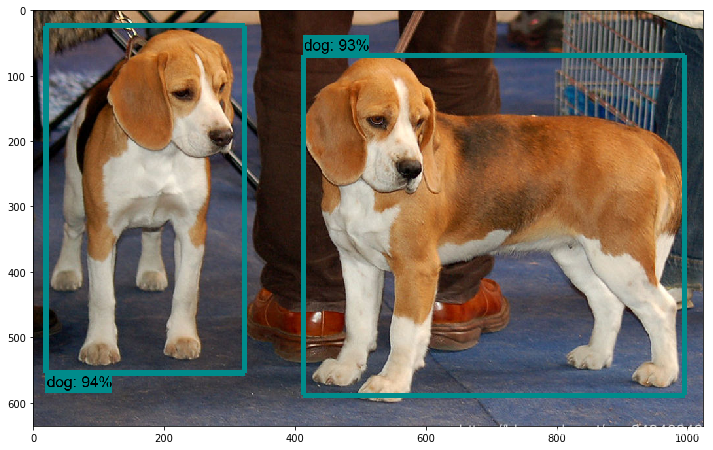
import numpy as np
import tensorflow as tf
import os
import six.moves.urllib as urllib
import sys
import tarfile
import zipfile
from distutils.version import StrictVersion
from collections import defaultdict
from io import StringIO
from matplotlib import pyplot as plt
from PIL import Image
# 这条命令让在使用matplotlib绘图时,不再使用窗口展示出来,而是直接在notebook中显示
%matplotlib inline
#将该模块用到的的一些包导入
from object_detection.utils import ops as utils_ops
from utils import label_map_util
from utils import visualization_utils as vis_util
if StrictVersion(tf.__version__) < StrictVersion('1.9.0'):
raise ImportError('Please upgrade your TensorFlow installation to v1.9.* or later!')


#模型准备,设置需要使用的模型的下载地址
MODEL_NAME = 'ssd_mobilenet_v1_coco_2017_11_17'
MODEL_FILE = MODEL_NAME + '.tar.gz'
DOWNLOAD_BASE = 'http://download.tensorflow.org/models/object_detection/'
#frozen_inference_graph.pb文件就是后面需要导入的文件,它保存了网络的结构和数据
PATH_TO_FROZEN_GRAPH = MODEL_NAME + '/frozen_inference_graph.pb'
# mscoco_label_map.pbtxt文件中保存了index到类别名的映射,该文件就在object_dection/data文件夹下
PATH_TO_LABELS = os.path.join('data', 'mscoco_label_map.pbtxt')

#下载预训练模型
#下载该地址下的文件到本地(当前目录中),可发现该目录中多了一个ssd_mobilenet_v1_coco_2017_11_17.tar.gz文件
opener = urllib.request.URLopener()
opener.retrieve(DOWNLOAD_BASE + MODEL_FILE, MODEL_FILE)
#解压该文件
tar_file = tarfile.open(MODEL_FILE)
for file in tar_file.getmembers():
file_name = os.path.basename(file.name)
if 'frozen_inference_graph.pb' in file_name:
tar_file.extract(file, os.getcwd())#将pb文件提取到当前工作目录下

#下载模型后,将它读取到默认的计算图中(实际读取的是frozen_inference_graph.pb文件)
#新建一个图
detection_graph = tf.Graph()#定义一个图
with detection_graph.as_default():
od_graph_def = tf.GraphDef()#重新定义一个图
#tf.gfile.GFile(filename, mode)获取文本操作句柄,类似于python提供的文本操作open()函数,
#filename是要打开的文件名,mode是以何种方式去读写,将会返回一个文本操作句柄。
with tf.gfile.GFile(PATH_TO_FROZEN_GRAPH, 'rb') as fid:
#将*.pb文件读入serialized_graph
serialized_graph = fid.read()
#将serialized_graph的内容恢复到图中
od_graph_def.ParseFromString(serialized_graph)
#将od_graph_def导入当前默认图中(加载模型)
tf.import_graph_def(od_graph_def, name='')

#载入coco数据集标签文件
category_index = label_map_util.create_category_index_from_labelmap(PATH_TO_LABELS, use_display_name=True)
print(category_index)

#在进行检测之前,定义一个帮助函数,该函数的功能是将图片转换为Numpy数组的形式
def load_image_into_numpy_array(image):
(im_width, im_height) = image.size
return np.array(image.getdata()).reshape((im_height, im_width, 3)).astype(np.uint8)
#或者用PIL中的Image读取可更方便转为Numpy形式
# from PIL import Image
# import numpy as np
# image = Image.open("test_images/image1.jpg") # 用PIL中的Image.open打开图像
# image_arr = np.array(image) # 转化成numpy数组

#对输入图像进行目标检测
PATH_TO_TEST_IMAGES_DIR = 'test_images'
TEST_IMAGE_PATHS = [ os.path.join(PATH_TO_TEST_IMAGES_DIR, 'image{}.jpg'.format(i)) for i in range(1,3 ) ]
# 输出图像的大小(单位是in)
IMAGE_SIZE = (12, 8)

with tf.Session(graph=detection_graph) as sess:
for image_path in TEST_IMAGE_PATHS:
image = Image.open(image_path)
#将图片转换为numpy格式
image_np = load_image_into_numpy_array(image)

#将图片扩展一维,最后进入神经网络的图片格式应该是[1,?,?,3],括号内参数分别为一个batch传入的数量,宽,高,通道数
image_np_expanded = np.expand_dims(image_np,axis = 0)

#获取模型中的tensor
image_tensor = detection_graph.get_tensor_by_name('image_tensor:0')

#boxes变量存放了所有检测框
boxes = detection_graph.get_tensor_by_name('detection_boxes:0')
#score表示每个检测结果的confidence
scores = detection_graph.get_tensor_by_name('detection_scores:0')
#classes表示每个框对应的类别
classes = detection_graph.get_tensor_by_name('detection_classes:0')
#num_detections表示检测框的个数
num_detections = detection_graph.get_tensor_by_name('num_detections:0')

#开始检测
boxes,scores,classes,num_detections = sess.run([boxes,scores,classes,num_detections],
feed_dict={image_tensor:image_np_expanded})

#可视化结果
#squeeze函数:从数组的形状中删除单维度条目,即把shape中为1的维度去掉
vis_util.visualize_boxes_and_labels_on_image_array(
image_np,
np.squeeze(boxes),
np.squeeze(classes).astype(np.int32),
np.squeeze(scores),
category_index,
use_normalized_coordinates=True,
line_thickness=8)
plt.figure(figsize=IMAGE_SIZE)
plt.imshow(image_np)
检测结果如下:

二、训练自己的模型
以VOC 2012数据集为例,介绍如何使用Object Detection API训练新的模型。VOC 2012是VOC2007数据集的升级版,一共有11530张图片,每张图片都有标注,标注的物体包括人、动物(如猫、狗、鸟等)、交通工具(如车、船飞机等)、家具(如椅子、桌子、沙发等)在内的20个类别。
1、下载数据集
首先下载数据集,并将其转换为tfrecord格式。下载地址为:http://host.robots.ox.ac.uk/pascal/VOC/voc2012/VOCtrainval_11-May-2012.tar。
在research文件夹下,创建一个voc文件夹,把VOC2012解压到这个文件夹下,解压后,得到一个VOCdevkit文件夹:

JPEGImages文件中文件夹里存放了全部的训练图片和验证图片。
对于每一张图像,都在Annotations文件夹中存放有对应的xml文件。保存着物体框的标注,包括图片文件名,图片大小,图片边界框等信息,以2007_000027.xml为例:
<annotation>
#数据所在的文件夹名
<folder>VOC2012</folder>
#图片名称
<filename>2007_000027.jpg</filename>
<source>
<database>The VOC2007 Database</database>
<annotation>PASCAL VOC2007</annotation>
<image>flickr</image>
</source>
#图片的宽高和通道
<size>
<width>486</width>
<height>500</height>
<depth>3</depth>
</size>
<segmented>0</segmented>
<object>
#类别名
<name>person</name>
#物体的姿势
<pose>Unspecified</pose>
#物体是否被部分遮挡
<truncated>0</truncated>
##是否为难以辨识的物体,主要指要结合背景才能判断出类别的物体。虽有标注, 但一般忽略这类物体 跳过难以识别的?
<difficult>0</difficult>
#边界框
<bndbox>
<xmin>174</xmin>
<ymin>101</ymin>
<xmax>349</xmax>
<ymax>351</ymax>
</bndbox>
#下面的数据是人体各个部位边界框
<part>
<name>head</name>
<bndbox>
<xmin>169</xmin>
<ymin>104</ymin>
<xmax>209</xmax>
<ymax>146</ymax>
</bndbox>
</part>
<part>
<name>hand</name>
<bndbox>
<xmin>278</xmin>
<ymin>210</ymin>
<xmax>297</xmax>
<ymax>233</ymax>
</bndbox>
</part>
<part>
<name>foot</name>
<bndbox>
<xmin>273</xmin>
<ymin>333</ymin>
<xmax>297</xmax>
<ymax>354</ymax>
</bndbox>
</part>
<part>
<name>foot</name>
<bndbox>
<xmin>319</xmin>
<ymin>307</ymin>
<xmax>340</xmax>
<ymax>326</ymax>
</bndbox>
</part>
</object>
</annotation>
SegmentationClass(标注出每一个像素的类别)和SegmentationObject(标注出每个像素属于哪一个物体)是分割相关的。
2、生成tfrecord文件
把data文件夹下pascal_label_map.pbtxt文件复制到voc文件夹下,这个文件存放着voc2012数据集物体的索引和对应的名字。
在object_detection文件夹中,执行以下命令可将VOC2012数据集转换为tfrecord格式,转换好的tfrecord保存在新建的voc文件夹下,分别为pascal_train.record和pascal_val.record
1 run create_pascal_tf_record.py --data_dir voc/VOCdevkit/ --year=VOC2012 \
2 --set=train --output_path=voc/pascal_train.record
3
4 run create_pascal_tf_record.py --data_dir voc/VOCdevkit/ --year=VOC2012 \
5 --set=val --output_path=voc/pascal_val.record
这里的代码是为VOC2012数据集提前编写好的,如果读者希望使用自己的数据集,有两种方法:
第一种是修改自己的数据集的标注格式,使和VOC2012一模一样(主要是Annotations文件夹,ImageSets\Main文件夹,JPEGImages文件夹),然后即可以直接使用create_pascal_tf_record.py脚本转换了。
另外一种方法就是修改create_pascal_tf_record.py,对读取标签的代码进行修改。
3、下载模型
下载完VOC 2012数据集后,需要选择合适的训练模型。这里以Faster R-CNN + Inception-ResNet_v2模型为例进行介绍。首先下载在COCO数据集上预训练的Faster R-CNN + Inception-ResNet_v2模型。在voc文件中新建一个pretrained文件夹,将下载的模型解压到pretrained中,如图:
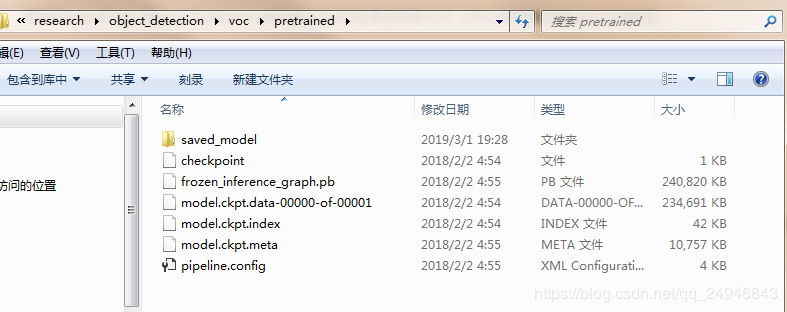
里面包含四个文件分别为:
- model.meta:模型文件,该文件保存了metagraph信息,即计算图的结构;
- model.ckpt.data:权重文件,该文件保存了graph中所有遍历的数据;
- model.ckpt.index:该文件保存了如何将meta和data匹配起来的信息;
- pb文件:将模型文件和权重文件整合合并为一个文件,主要用途是便于发布,详细内容可以参考博客https://blog.csdn.net/yjl9122/article/details/78341689;
- 一般情况下还会有个checkpoint文件,用于保存文件的绝对路径,告诉TF最新的检查点文件(也就是上图中后三个文件)是哪个,保存在哪里,在使用tf.train.latest_checkpoint加载的时候要用到这个信息,但是如果改变或者删除了文件中保存的路径,那么加载的时候会出错,找不到文件;
4、训练模型
Object Detection API是依赖一种特殊的设置文件进行训练的。在object_detection/samples/configs文件夹下,有一些设置文件的示例。可以参考faster_rcnn_inception_resnet_v2_atrous_coco.config文件创建的设置文件。先将faster_rcnn_inception_resnet_v2_atrous_coco.config复制一份到voc文件夹下,命名为faster_rcnn_inception_resnet_v2_atrous_voc.config。
faster_rcnn_inception_resnet_v2_atrous_voc.config文件有7处需要修改:
第一处为num_classes,需要将它修改为VOC2012 中物体类别数,即20.
第二处为eval_config中的num_examples,它表示在验证阶段需要执行的图片数量,修改为VOC 2012验证集的图片数5823(可以在create_pascal_tf_record.py中,输出对应的examples_list长度,就可以知道这个大小)。
还有5处为所有含PATH_TO_BE_CONFIGURED的地方。这些地方需要修改为自己的目录,他们应该分别被修改为:
gradient_clipping_by_norm: 10.0
fine_tune_checkpoint: "voc/pretrained/model.ckpt"#第一处目录修改
from_detection_checkpoint: true
# Note: The below line limits the training process to 200K steps, which we
# empirically found to be sufficient enough to train the pets dataset. This
# effectively bypasses the learning rate schedule (the learning rate will
# never decay). Remove the below line to train indefinitely.
num_steps: 200000
data_augmentation_options {
random_horizontal_flip {
}
}
}

train_input_reader: {
tf_record_input_reader {
input_path: "voc/pascal_train.record"#第二处目录修改
}
label_map_path: "voc/pascal_label_map.pbtxt"#第三处目录修改
}

eval_config: {
num_examples: 5823#验证集图片数修改
# Note: The below line limits the evaluation process to 10 evaluations.
# Remove the below line to evaluate indefinitely.
max_evals: 10
}

eval_input_reader: {
tf_record_input_reader {
input_path: "voc/pascal_val.record"#第四处目录修改
}
label_map_path: "voc/pascal_label_map.pbtxt"#第五处目录修改
shuffle: false
num_readers: 1
}
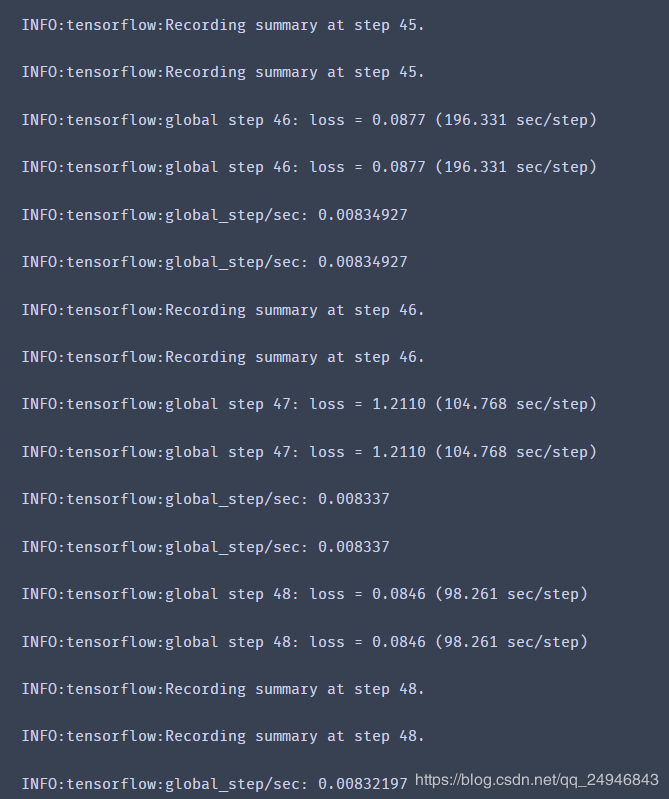
最后在voc文件夹中新建一个train_dir作为保存模型和日志的目录,在object_detection文件夹中使用以下的命令就可以开始训练了:(一个博客说最新的目标检测API在利用model_main.py进行训练时可能无法在GPU上顺利执行,因此我们采取了另外一个策略,也即通过运行legacy文件夹下的train.py文件)
run legacy/train.py --train_dir voc/train_dir/ --pipeline_config_path voc/faster_rcnn_inception_resnet_v2_atrous_pets.config
可看到已经开始训练了:

需要注意的是,如果发生内存和显存不足报错的情况,除了使用较小模型进行训练外,还可以修改配置文件中的以下内容:
image_resizer {
keep_aspect_ratio_resizer {
min_dimension: 600
max_dimension: 1024
}
}
这个部分表示将输入图像进行等比例缩放再进行训练,缩放后的最大边长为1024,最小边长为600.可以将整两个数值改小(我训练的时候就分别改成512和300),使用的显存就会变小。不过这样做也可能导致模型的精度下降,因此我们需要根据自己的情况选择适合的处理方法。
另外由于我们在设置文件中设置的训练步数为200000步,因此整个训练可能会消耗大量时间,这里我训练到20000步就强行终止训练了。
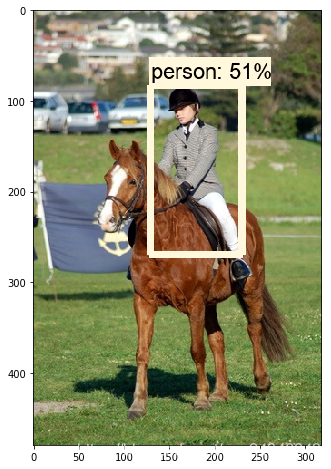
5、导出模型并预测单张图片
如何将train_dir中的checkpoint文件导出并用于单张图片的目标检测?TensorFlow Object Detection API提供了一个export_inference_graph.py脚本用于导出训练好的模型。具体方法是在object_detection目录下执行:
run export_inference_graph.py \
--input_type image_tensor \
--pipeline_config_path voc/faster_rcnn_inception_resnet_v2_atrous_pets.config \
--trained_checkpoint_prefix voc/train_dir/model.ckpt-129 \
--output_directory voc/export/
其中model.ckpt-129表示使用第129步保存的模型。我们需要根据训练文件夹下checkpoint的实际步数改成对应的值。导出的模型是voc/export/frozen_inference_graph.pb文件。
然后可以参考上面我们介绍的jupyter notebook代码,自行编写利用导出模型对单张图片做目标检测的脚本。然后将PATH_TO_FROZEN_GRAPH的值赋值为voc/export/frozen_inference_graph.pb,即导出模型文件。将PATH_TO_LABELS修改为voc/pascal_label_map.pbtxt,即各个类别的名称。其它代码都可以不改变,然后测试我们的图片
 1 import numpy as np
 2 import os
 3 import six.moves.urllib as urllib
 4 import sys
 5 import tarfile
 6 import tensorflow as tf
 7 import zipfile
 8 from distutils.version import StrictVersion
 9 from collections import defaultdict
10 from io import StringIO
11 from matplotlib import pyplot as plt
12 from PIL import Image
13 from object_detection.utils import ops as utils_ops
14 from utils import label_map_util
15 from utils import visualization_utils as vis_util
16 if StrictVersion(tf.__version__) < StrictVersion('1.9.0'):
17 raise ImportError('Please upgrade your TensorFlow installation to v1.9.* or later!')
18
19 %matplotlib inline
20
21 #frozen_inference_graph.pb文件就是后面需要导入的文件,它保存了网络的结构和数据
22 PATH_TO_FROZEN_GRAPH = 'voc/export/frozen_inference_graph.pb'
23 # mscoco_label_map.pbtxt文件中保存了index到类别名的映射,该文件就在object_dection/data文件夹下
24 PATH_TO_LABELS = os.path.join('data', 'pascal_label_map.pbtxt')
25
26 #新建一个图
27 detection_graph = tf.Graph()
28 with detection_graph.as_default():
29 od_graph_def = tf.GraphDef()
30 with tf.gfile.GFile(PATH_TO_FROZEN_GRAPH, 'rb') as fid:
31 serialized_graph = fid.read()
32 od_graph_def.ParseFromString(serialized_graph)
33 tf.import_graph_def(od_graph_def, name='')
34
35 category_index = label_map_util.create_category_index_from_labelmap(PATH_TO_LABELS, use_display_name=True)
36
37 #这个函数也是一个方便使用的帮助函数,功能是将图片转换为Numpy数组的形式
38 def load_image_into_numpy_array(image):
39 (im_width, im_height) = image.size
40 return np.array(image.getdata()).reshape(
41 (im_height, im_width, 3)).astype(np.uint8)
42
43 #检测
44 PATH_TO_TEST_IMAGES_DIR = 'test_images'
45 TEST_IMAGE_PATHS = [ os.path.join(PATH_TO_TEST_IMAGES_DIR, 'image{}.jpg'.format(i)) for i in range(1,3 ) ]
46 # 输出图像的大小(单位是in)
47 IMAGE_SIZE = (12, 8)
48 with tf.Session(graph=detection_graph) as sess:
49 for image_path in TEST_IMAGE_PATHS:
50 image = Image.open(image_path)
51 #将图片转换为numpy格式
52 image_np = load_image_into_numpy_array(image)
53
54 #将图片扩展一维,最后进入神经网络的图片格式应该是[1,?,?,3],括号内参数分别为一个batch传入的数量,宽,高,通道数
55 image_np_expanded = np.expand_dims(image_np,axis = 0)
56
57 #获取模型中的tensor
58 image_tensor = detection_graph.get_tensor_by_name('image_tensor:0')
59
60 #boxes变量存放了所有检测框
61 boxes = detection_graph.get_tensor_by_name('detection_boxes:0')
62 #score表示每个检测结果的confidence
63 scores = detection_graph.get_tensor_by_name('detection_scores:0')
64 #classes表示每个框对应的类别
65 classes = detection_graph.get_tensor_by_name('detection_classes:0')
66 #num_detections表示检测框的个数
67 num_detections = detection_graph.get_tensor_by_name('num_detections:0')
68
69 #开始检测
70 boxes,scores,classes,num_detections = sess.run([boxes,scores,classes,num_detections],
71 feed_dict={image_tensor:image_np_expanded})
72
73 #可视化结果
74 #squeeze函数:从数组的形状中删除单维度条目,即把shape中为1的维度去掉
75 vis_util.visualize_boxes_and_labels_on_image_array(
76 image_np,
77 np.squeeze(boxes),
78 np.squeeze(classes).astype(np.int32),
79 np.squeeze(scores),
80 category_index,
81 use_normalized_coordinates=True,
82 line_thickness=8)
83 plt.figure(figsize=IMAGE_SIZE)
84 plt.imshow(image_np)
电脑配置太低,训练实在是太慢了,训练到一百多步我就人为终止了,所以检测效果并不好。

参考文献:21个项目玩转深度学习
http://www.cnblogs.com/zyly/p/9248394.html
https://blog.csdn.net/comway_Li/article/details/81434358

 浙公网安备 33010602011771号