基于Spring boot的教育论坛的部分板块
基于Spring boot的教育论坛的部分板块
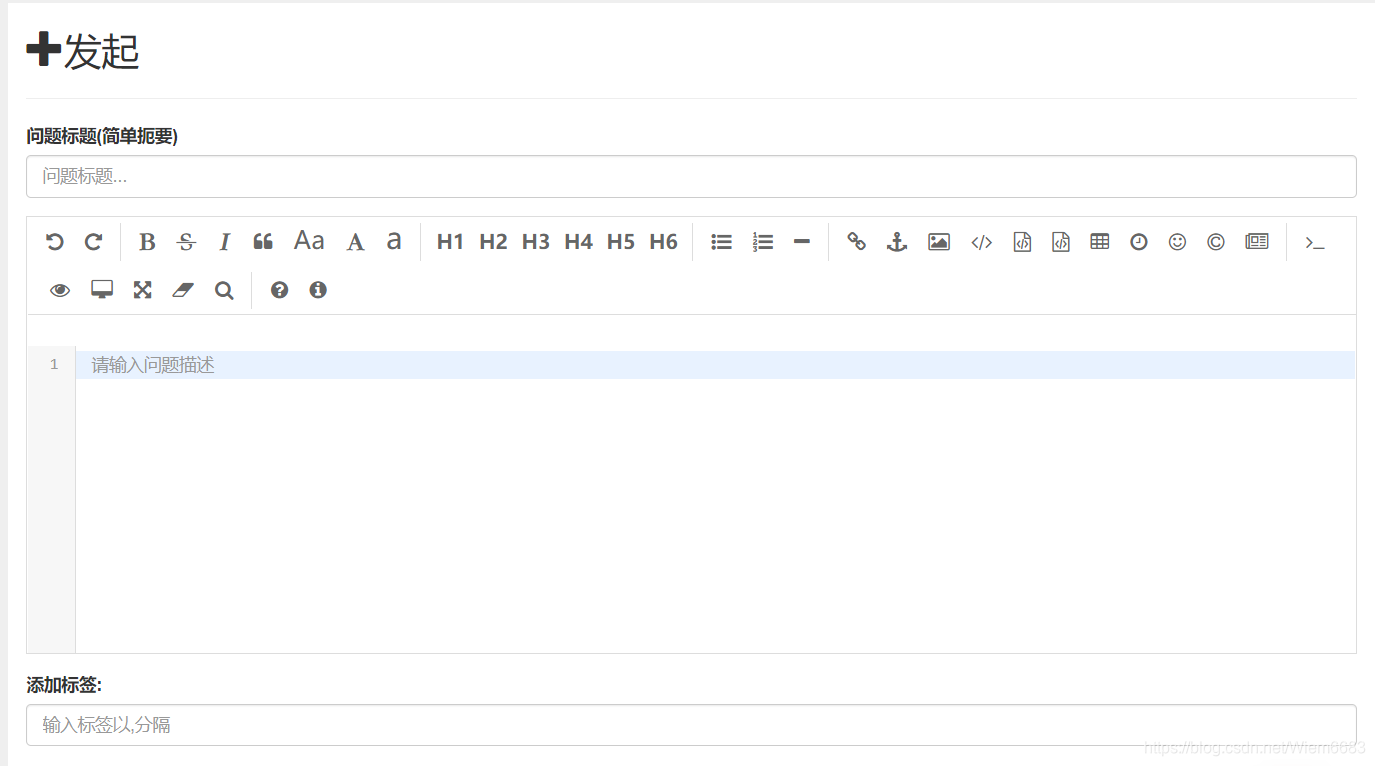
发布问题界面
前端展现(publish.html)
- 将填入的问题相关从前端经过Controller的操作后将数据传入数据库当中里
前端的静态html使用input标签 以及th:value="${ 数据库中变量} "的方法实现传入数据库,其中实现在编辑框中显示字样(使用 placeholder类)
<input type="text" class="form-control" th:value="${title}" id="title" name="title" placeholder="问题标题...">
同等类型的问题描述也是这种传值方式 传到数据库当中
<textarea name="description" id="description" th:text="${description}"
                              class="form-control"
                              cols="30"
                              rows="10"></textarea>
<input type="text" class="form-control" th:value="${tag}" id="tag" name="tag" placeholder="输入标签以,分隔">
后端控制(PublishController.java)
- 使用spring boot 将前端渲染到网页端
@Controller 处理http请求
Spring boot 中Controller 用来响应页面,
@Controller
public class PublishController {
		*需要在网页端实现的一些指令*
}
@Autowired 它可以对类成员变量、方法及构造函数进行标注,完成自动装配的工作。
注入QuestionService UserMapper 的类成员变量 来实现对变量的操作
	@Autowired
    private QuestionService questionService;

    @Autowired
    private UserMapper userMapper;
@GetMapping 用于处理请求方法的GET类型
处理get请求
@PathVariable 接收请求路径中占位符的值 将用户id映射到网址中
QuestionDTO 从传输层拿到用户 的id
Model 在控制器中,数据会存放到Model对象中,当需要生成HTML的时候,模板引擎会根据名字来定位数据 model.addAttribute 往前台传数据,可以传对象,可以传List,通过el表达式 ${}可以获取到,
即实现修改功能 将数据库中的对应数据传输并且渲染到页面上去 即回显
	@GetMapping("/publish/{id}")
	public String edit(@PathVariable(name = "id") Integer id,
                       Model model){
        QuestionDTO question = questionService.getById(id);
        model.addAttribute("title", question.getTitle());
        model.addAttribute("description", question.getDescription());
        model.addAttribute("tag", question.getTag());
        model.addAttribute("id",question.getId());
        //回显
        return "publish";
    }
@PostMapping 用来处理 post请求
HttpServletRequest 对象代表客户端的请求,当客户端通过HTTP协议访问服务器时,HTTP请求头中的所有信息都封装在这个对象中,通过这个对象提供的方法,可以获得客户端请求的所有信息。
@RequestParam 将请求参数绑定到你控制器的方法参数上定义一些 问题相关的参数
同样的引入model 对象 用来将问题的标题、描述、标签传入前台 使前台能够操作数据库的内容
异常情况的处理 当title description tag内容为空时 通过控制层 (PublishController.java)来进行判断 当其中的任何一个为空时 将给前端一个传入一个error 用作前端的提示用户
另一种异常情况为当用户未登录时 即使全部填充也无法 发布 提示用户登录 同样也是返回给前端一个error
如果没有异常 通过前端传来的数据通过传输进数据库中
同时设定用户 的帖子数加一以及用户的活跃度加5
使用数据库的questionService.createOrUpdate(question);方法来实现对现有问题的增删改
最后返回到根目录当中
@PostMapping("/publish")
    public String doPublish(
            @RequestParam("title") String title,
            @RequestParam("description") String description,
            @RequestParam("tag") String tag,
            @RequestParam(value = "id", required = false) Integer id,
            HttpServletRequest request,
            Model model) {
        model.addAttribute("title", title);
        model.addAttribute("description", description);
        model.addAttribute("tag", tag);

        if (title == null || title == "") {
            model.addAttribute("error", "标题不能为空");
            return "publish";
        }
        if (description == null || description == "") {
            model.addAttribute("error", "问题补充不能为空");
            return "publish";
        }
        if (tag == null || tag == "") {
            model.addAttribute("error", "标签不能为空");
            return "publish";
        }

        User user = (User) request.getSession().getAttribute("user");

        if (user == null) {
            model.addAttribute("error", "用户未登陆");
            return "publish";
        }

        Question question = new Question();
        question.setTitle(title);
        question.setDescription(description);
        question.setTag(tag);
        question.setCreator(user.getId());
        question.setId(id);
        if(question.getId()==null)
        {
            user.setQuestionCount(user.getQuestionCount()+1);
            user.setActive(user.getActive()+5);
            userMapper.updateByPrimaryKey(user);
        }
        questionService.createOrUpdate(question);

        return "redirect:/";
    }
}
- DTO 服务层与数据层的传输
	@Data
	public class QuestionDTO {
    private Integer id;
    private String title;
    private String description;
    private String tag;
    private Long gmtCreate;
    private Long gmtModified;
    private Integer creator;
    private Integer viewCount;
    private Integer commentCount;
    private Integer likeCount;
    private Boolean isTop;
    private User user;
}
富文本编辑
集成editor.md 实现富文本编辑
- 实现编辑问题界面的富文本编辑以及问题详情界面的富文本的显示
集成editor.md富文本编辑器
需要在textarea标签的支持下 引入富文本编辑器 要把原先的文本输入框进行隐藏
继承editor.md需要先引入CSS JS 一些静态资源
			  <script type="text/javascript">
                    $(function() {
                        var editor = editormd("question-editor", {
                            width: "100%",
                            height: 350,
                            delay: 0,
                            watch: false,
                            toolbarAutoFixed:true,//将选项框进行固定
                            placeholder: "请输入问题描述",
                            path: "/js/lib/",//引入js的目录
                            emoji: true,//打开表情选项
                            imageUpload: true,//打开图片穿选项
                            imageFormats: ["jpg", "jpeg", "gif", "png", "bmp", "webp"],//设定上传图片的格式
                            imageUploadURL: "/file/upload",//文件上传到的地址
                        });
                    });
                </script>
富文本编辑在发布页面就显示出来了
在问题详情界面实现 富文本的内容的展现
同样也是在textarea标签下 添加editor.ma的markdownToHTML方法 来实现富文本内容在问题详情界面显示
					<script type="text/javascript">
                        $(function () {
                            editormd.markdownToHTML("question-view", {});
                        });
                    </script>
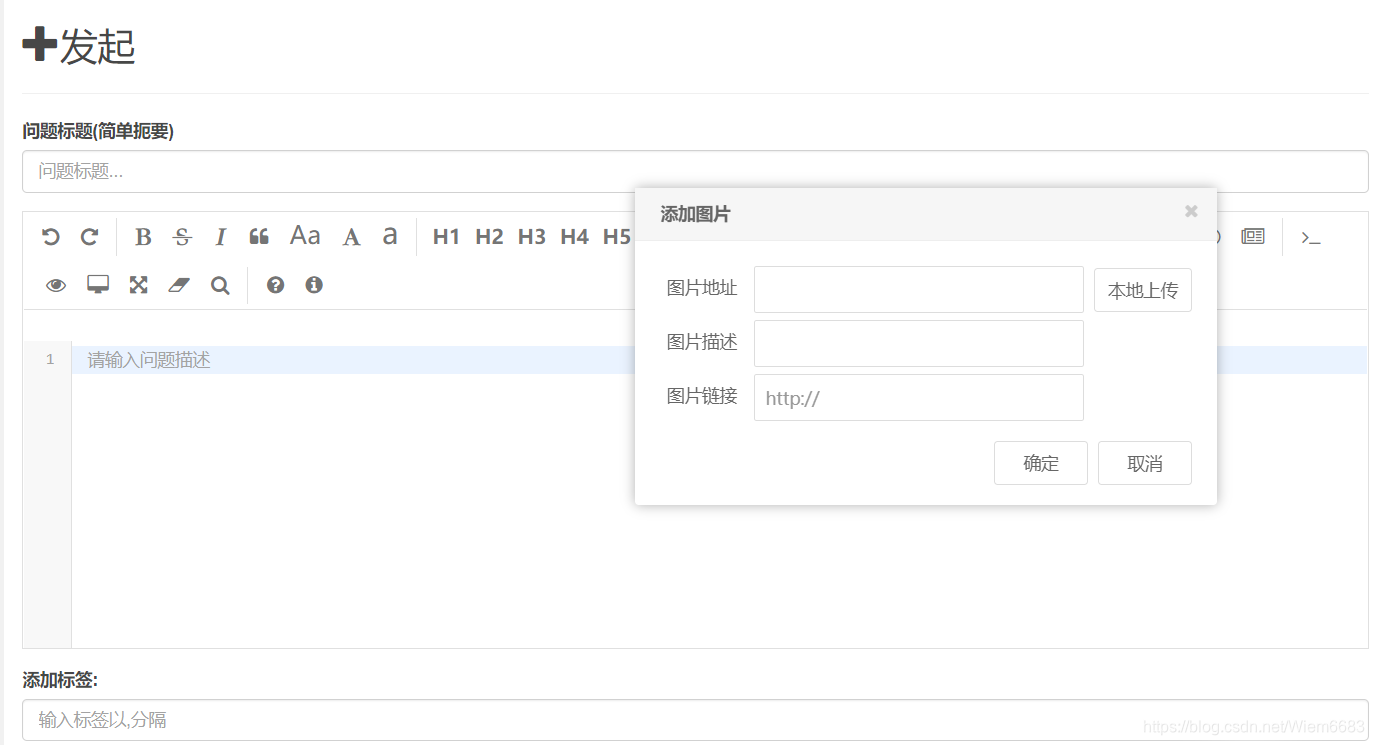
上传图片
- 把上传的图片存入项目的静态目录下
使用java的文件操作
当上传图片时 trim() 方法用于删除字符串的头尾空白符,空白符包括:空格、制表符 tab、换行符等其他空白符等。 然后将图片按照字节流输出
FileOutputStream流是指文件字节输出流,专用于输出原始字节流如图像数据等,其继承OutputStream类,拥有输出流的基本特性
file.getBytes()用来结果utf-8的乱码问题
再将文件使用outputStream将文件流输出
file.transferTo(newFile); 此段代码将文件传输到静态问价里
				if(file != null){
                if(!"".equals(filename.trim())){
                    File newFile = new File(filename);
                    FileOutputStream outputStream = new FileOutputStream(newFile);
                    outputStream.write(file.getBytes());
                    outputStream.close();
                    file.transferTo(newFile);
                 	~~~~~~~
                }
将editor的图片上传选项打开
					imageUpload: true,
                    imageFormats: ["jpg", "jpeg", "gif", "png", "bmp", "webp"],
                    imageUploadURL: "/file/upload",
支持上传网络图片以及本地图片 其中上传的网络图片
application.properties配置文件 在spring boot 让我们可以进行自定义配置,来对默认的配置进行修改,以适应具体的生产情况,当然还包括一些第三方的配置。几乎所有配置都可以写到application.peroperties文件中,这个文件会被SpringBoot自动加载,免去了我们手动加载的烦恼。
在application.properties中将上传文件的配置打开并且更改上传文件大小的限制 因为默认的上传文件的大小限制很小
spring.servlet.multipart.max-file-size=100MB
spring.servlet.multipart.max-request-size=1000MB
OOS
使用阿里云的对象存储把上传的图片同时存储到云端
- 再次进行访问问题详情的时候 直接访问云端的图片的链接
使用云服务来实现图片的上传 阿里云的对象存储OOS 来实现图片的上传和下载
首先需要引入阿里云的云服务依赖 直接在maven中加入依赖
在配置文件application.properties中加入默认配置以实现阿里云的oos技术
aliyun.oss.bucketName=//填入OOS中的buchetName的名字 命名方式需要特殊 不然上传文件时的会找不到bucketname
aliyun.oss.endPoint=//填入阿里云的服务器的地址
aliyun.oss.accessKeyId=//填入获取到的accessKeyid
aliyun.oss.accessKeySecret=//填入获取到的密钥
aliyun.oss.fileHost=//填写OOS的bucket的建立的文件夹 上传的图片将存入文件夹当中
@Component 相当与配置文件中的bean 就是相当与一个配置文件的默认配置
@Deprecated 注解功能 此方法别人已经使用过很多次 为了不产生不必要的麻烦用来此声明来是是实现注解 若某类或某方法加上该注解之后,表示此方法或类不再建议使用,调用时也会出现删除线,但并不代表不能用,只是说,不推荐使用,因为还有更好的方法可以调用。
。
编写阿里云的上传服务模块
public class AliyunOssConfigConstant {
    private static String File_URL;

    @Value("${aliyun.oss.bucketName}")//拿到配置application.properties中的内容
    private String bucketName;
    @Value("${aliyun.oss.endPoint}")
    private String endPoint;
    @Value("${aliyun.oss.accessKeyId}")
    private String accessKeyId;
    @Value("${aliyun.oss.accessKeySecret}")
    private String accessKeySecret;
    @Value("${aliyun.oss.fileHost}")
    private String fileHost;

    public  String upLoad(File file){//上传方法
        boolean isImage = true;//判定是不是图片的变量
        try {
            Image image = ImageIO.read(file);//IO类的读写方法
            isImage = image == null?false:true;
        }catch (Exception e){
            e.printStackTrace();
        }
        //格式化文件上传的时间 并在阿里云的oos里存入相应时间的文件夹中
        SimpleDateFormat format = new SimpleDateFormat("yyyy-MM-dd");
        String dateStr = format.format(new Date());

        if(file == null){
            return null;
        }
        @Deprecated
        OSSClient ossClient = new OSSClient(endPoint,accessKeyId ,accessKeySecret );
        try {
            if(!ossClient.doesBucketExist(bucketName)){
                ossClient.createBucket(bucketName);
                CreateBucketRequest createBucketRequest = new CreateBucketRequest(bucketName);
                //设置bucket为公共读
                createBucketRequest.setCannedACL(CannedAccessControlList.PublicRead);
                ossClient.createBucket(createBucketRequest);
            }
            //设置文件路径,这里再通过时间分成子文件夹
            String fileUrl = fileHost + "/" + (dateStr + "/" + UUID.randomUUID().toString().replace("-", "")+"-"+file.getName());
            //如果是图片
            if(isImage){
                File_URL = "https://" + "image-6683" + "." + endPoint + "/" + fileUrl;//得到一个图片的url 用来完成问题描述时的图片显示
            }else {
                File_URL = "非图片文件不可预览。文件路径为:" + fileUrl;
            }
            //上传文件
            PutObjectResult result = ossClient.putObject(new PutObjectRequest(bucketName, fileUrl, file));
        }catch (Exception e){
            e.printStackTrace();
        }finally {
            if(ossClient != null){
                ossClient.shutdown();
            }
        }
        return File_URL;//返回文件的Url地址
    }
}
Controller层的文件控制管理(FileController.java)
@ResponseBody
    public Map<String,Object> testUpload(@RequestParam("editormd-image-file")MultipartFile file, Model model){
        Map<String,Object> responseResult = new HashMap<>();
        String filename = file.getOriginalFilename();
        System.out.println(filename);
        try {
            if(file != null){
                if(!"".equals(filename.trim())){
                    File newFile = new File(filename);
                    FileOutputStream outputStream = new FileOutputStream(newFile);
                    outputStream.write(file.getBytes());
                    outputStream.close();
                    file.transferTo(newFile);
                    String url = aliyunOssUtil.upLoad(newFile);
                    responseResult.put("success",1);
                    responseResult.put("message","上传成功");
                    responseResult.put("url",url);
                }
            }
        } catch (FileNotFoundException e) {
            responseResult.put("success",0);
            responseResult.put("message","上传失败");
            e.printStackTrace();
        } catch (IOException e) {
            responseResult.put("success",0);
            responseResult.put("message","上传失败");
            e.printStackTrace();
        }
        return responseResult;
    }
}
服务层与管理层的DTO传输
public class FileDTO {
    private int success;
    private String message;
    private String url;
}
标签模块
写入读取数据库中的标签
- 将标签展现在问题详情界面 使用遍历的方法将标签分块展现
通过同样的调用方法将标签展现在问题详情界面上 使用一个th:each=" "方法遍历标签的每一个字符 当存在一个逗号时将它展现出来
				   <div class="col-lg-12 col-md-12 col-sm-12 col-xs-12">
                        <span class="question-tag" th:each="tag : ${question.tag.split(',')}">
                            <a th:text="${tag}" class="community-tag"></a>
                        </span>
                    </div><br>

 浙公网安备 33010602011771号