
SpringCloud(Greenwich版)Stream消息驱动集成RabbitMQ
推荐以下稳定版本号:
Spring Boot: 2.1.9.RELEASE
Spring Cloud: Greenwich.SR3
一、Stream简介
为什么要用Spring Cloud Stream--问题?
比方说我们用到了RabbitMQ和Kafka,由于这两个消息中间件的架构上的不同,像RabbitMQ有exchange,kafka有Topic,partitions分区,这些中间件的差异性导致我们实际项目开发给我们造成了一定的困扰,我们如果用了两个消息队列其中的一种,后面的业务需求,我想往另外一种消息队列进行迁移,这时候无疑就是一个灾难性的,一大推的东西都要重新推到重做,因为它跟我们的系统耦合了,这时候 Spring Cloud Stream 给我们提供了一种解耦合的方式。
Spring Cloud Stream 本质上就是整合了 Spring Boot 和 Spring Integration,实现了一套轻量级的消息驱动的微服务框架。通过使用 Spring Cloud Stream 可以有效简化开发人员对消息中间件的使用复杂度,让系统开发人员可以有更多的精力关注核心业务逻辑的处理。
由于 Spring Cloud Stream 基于 Spring Boot 实现,所以它继承了 Spring Boot 的优点,自动化配置的功能可以帮助让我们快速上手。目前为止,Spring Cloud Stream 只支持 RabbitMQ 与 Kafka 两种消息中间件。
应用模型:
下面我们通过 Spring Cloud Stream 的应用模型框架图来了解一下涉及的几个概念,在下图中有两个微服务A和B,微服务A会通过 Spring Cloud Stream 发布消息,而微服务B是微服务A消息的消费者。
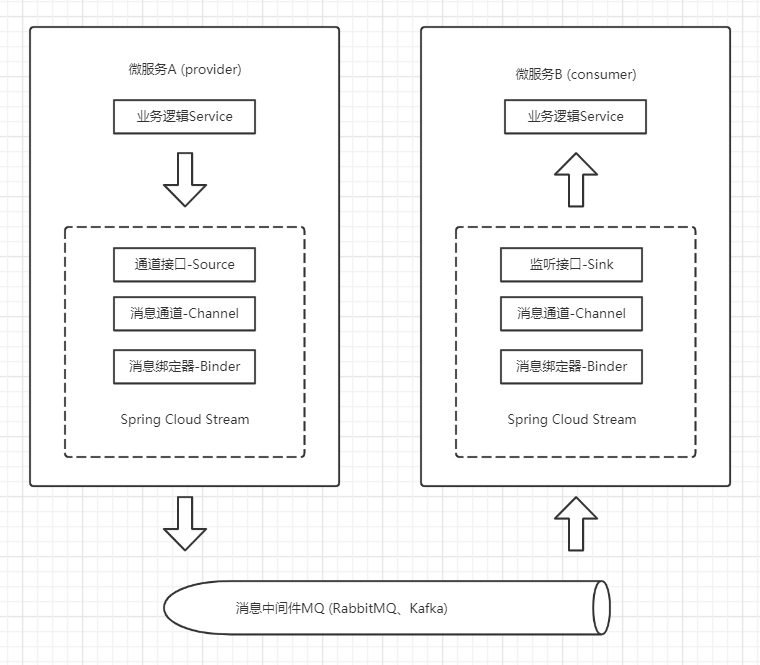
使用 Spring Cloud Stream 进行消息的发送和消费涉及下面四个概念:
-
Binder:通过定义绑定器作为中间层,实现了应用程序与消息中间件细节之间的隔离。
-
Channel:通道是对消息队列的一种抽象,用来存放消息发布者发布的消息或消费者所要消费的消息,通过通道对消息队列在项目配置文件中进行配置。
-
Source和Sink:简单的可以理解为参照对象 Spring Cloud Stream 自身,从 Stream 发布消息就是输出,接收消息就是输入。
常用注解:
| 注解 | 说明 |
|---|---|
| @Input | 用在消息监昕通道接口的方法定义上,用来绑定一个具体的通道。 |
| @Output | 用在消息发送通道接口的方法定义上,用来绑定消息发送的通道。 |
| @StreamListener | 提供了一种简单的模型来处理输入消息,尤其当所要处理的消息包含了强类型信息时。 |
| @EnableBinding | 告诉应用需要触发消息通道的绑定,将我们的应用变成一个Spring Cloud Stream应用。 |
二、Spring Cloud Stream与RabbitMQ整合
在进行案例之前请先确认已经在本地安装了RabbitMQ,我们拿之前Eureka注册中心provider-service和Ribbon集成REST实现负载均衡consumer-service两个项目工程演示。provider-service用于消息发送,consumer-service用于消息接收。
Stream消息驱动之提供者
1)补充build.gradle项目依赖
修改gradle模块provider-service并添加stream-rabbit依赖,如果你想换成kafka的消息中间件支持,直接替换rabbit即可
compile group: 'org.springframework.cloud', name: 'spring-cloud-starter-stream-rabbit'


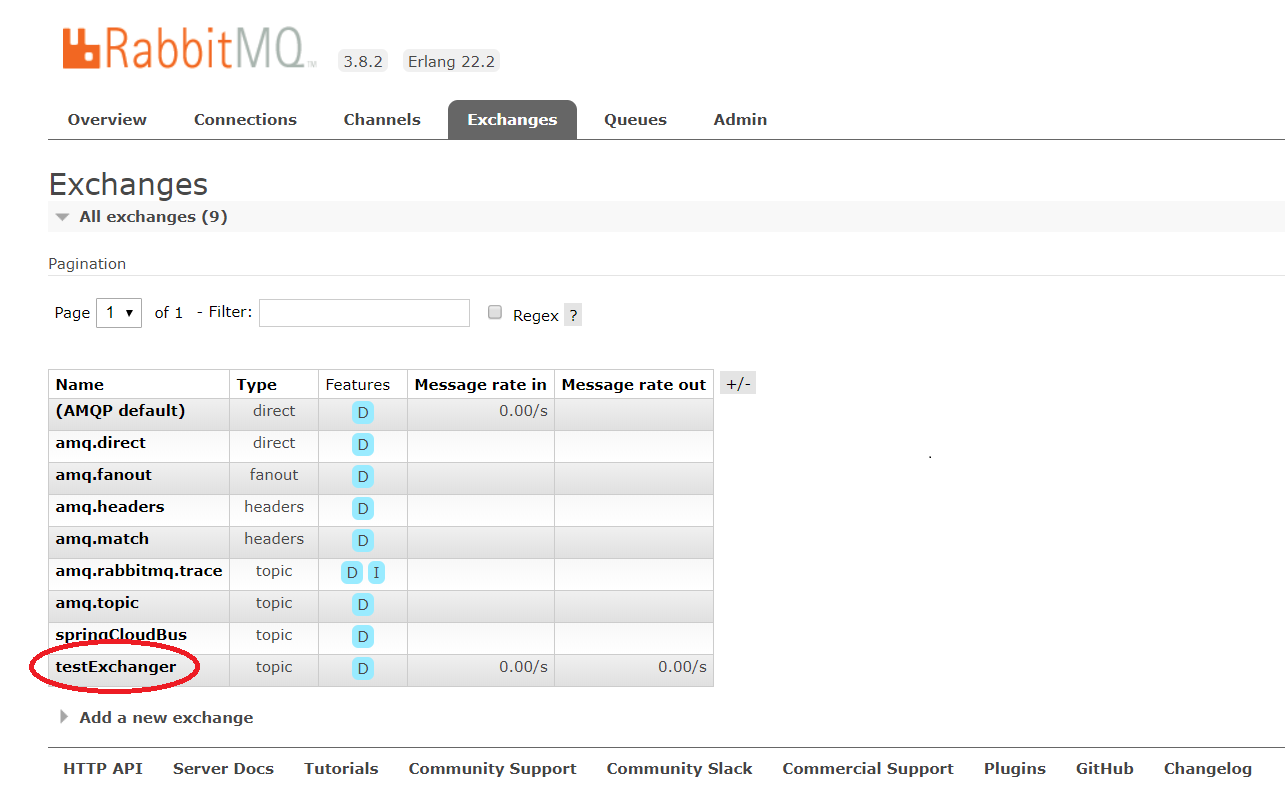
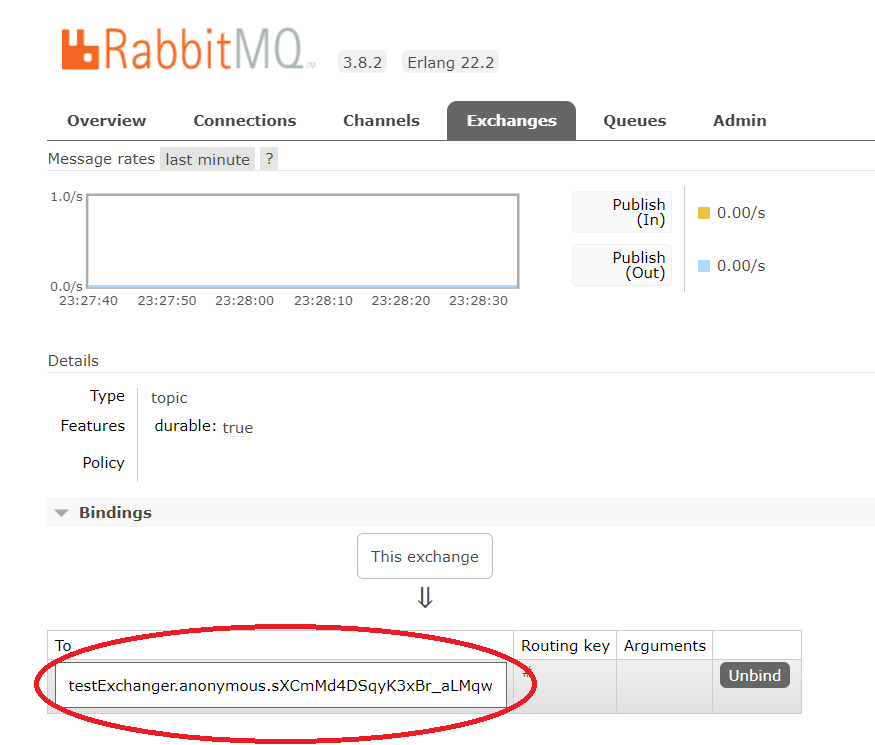
spring:
  cloud:
    stream:
      binders:
        defaultRabbit: #配置要绑定的rabbitmq的服务信息:
          type: rabbit #消息中间件类型
          environment: #设置rabbitmq相关的环境配置:
            spring:
              rabbitmq:
                host: localhost
                port: 5672
                username: guest
                password: guest
      bindings: #绑定服务的整合处理
        output: #发送消息接口SenderMessage中的通道名称
          destination: testExchanger #表示要使用的Exchanger(交换机)名称自定义
          content-type: application/json #消息发送的格式,接收端不用指定格式,但是发送端要
          binders: defaultRabbit #设置要绑定的消息服务的具体设置
package org.wesson.springcloud.eureka;

import org.springframework.boot.SpringApplication;
import org.springframework.boot.autoconfigure.SpringBootApplication;
import org.springframework.cloud.client.discovery.EnableDiscoveryClient;
import org.springframework.cloud.stream.annotation.EnableBinding;
import org.wesson.springcloud.eureka.stream.SenderMessage;

@EnableDiscoveryClient
@SpringBootApplication
@EnableBinding(SenderMessage.class) // 开启绑定输出源发送消息通道的接口
public class ProviderServiceApplication {

    public static void main(String[] args) {
        SpringApplication.run(ProviderServiceApplication.class, args);
    }

}
package org.wesson.springcloud.eureka.stream;

import org.springframework.cloud.stream.annotation.Output;
import org.springframework.messaging.MessageChannel;

public interface SenderMessage {

    /**
     * 定义发送者输出通道名称
     */
    String SENDER = "output";

    @Output(SENDER)
    MessageChannel sendMsg();

}
package org.wesson.springcloud.eureka.controller;

import org.springframework.beans.factory.annotation.Value;
import org.springframework.messaging.MessageChannel;
import org.springframework.messaging.support.MessageBuilder;
import org.springframework.web.bind.annotation.GetMapping;
import org.springframework.web.bind.annotation.RestController;
import org.wesson.springcloud.eureka.stream.SenderMessage;

import javax.annotation.Resource;

@RestController
public class StreamController {

    @Value("${server.port}")
    private String serverPort;

    @Resource(name = SenderMessage.SENDER)
    private MessageChannel channel;

    public StreamController(SenderMessage senderMessage) {
        channel = senderMessage.sendMsg();
    }

    @GetMapping("/sendMsg")
    public String sendMessage() {
        String content = "hello, service provider port is from:" + serverPort;
        System.out.println("------>提供者发送消息内容:" + content);
        boolean isSendSuccess = channel.
                send(MessageBuilder.withPayload(content).build());
        return isSendSuccess ? "发送成功" : "发送失败";
    }

}
Stream消息驱动之消费者
1)补充build.gradle项目依赖
修改gradle模块consumer-service并添加stream-rabbit依赖
compile group: 'org.springframework.cloud', name: 'spring-cloud-starter-stream-rabbit'
spring:
  cloud:
    stream:
      binders:
        defaultRabbit: #配置要绑定的rabbitmq的服务信息:
          type: rabbit #消息中间件类型
          environment: #设置rabbitmq相关的环境配置:
            spring:
              rabbitmq:
                host: localhost
                port: 5672
                username: guest
                password: guest
      bindings: #绑定服务的整合处理
        input:  #接收消息接口ReceiverMessage中的通道名称
          destination: testExchanger #表示要使用的Exchanger(交换机)名称自定义
          binders: defaultRabbit #设置要绑定的消息服务的具体设置
package org.wesson.springcloud.ribbon.stream;

import org.springframework.cloud.stream.annotation.Input;
import org.springframework.messaging.SubscribableChannel;

public interface ReceiverMessage {

    /**
     * 定义接收者输入通道名称
     */
    String RECEIVER = "input";

    @Input(RECEIVER)
    SubscribableChannel receiveMsg();

}
package org.wesson.springcloud.ribbon.listener;

import org.springframework.cloud.stream.annotation.EnableBinding;
import org.springframework.cloud.stream.annotation.StreamListener;
import org.springframework.messaging.Message;
import org.wesson.springcloud.ribbon.stream.ReceiverMessage;

@EnableBinding(ReceiverMessage.class) // 开启绑定输入源接收消息通道的接口
public class DemoStreamListener {

    @StreamListener(target = ReceiverMessage.RECEIVER)
    public void receiveMessage(Message<String> message) {
        System.out.println("------>消费者接收消息内容:" + message.getPayload());
    }

}
5)测试
Step1:运行 eureka-server 启动类,端口为8761
Step2:运行 provider-service 启动类,端口为8081
Step3:运行 consumer-service 启动类,端口为8000
Step4:先访问http://localhost:8761/,注册到的服务如下图:

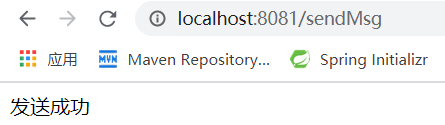
然后打开提供者控制台能够看到输出结果:

接着打开消费者控制台能够看到输入结果:

Step5:


 浙公网安备 33010602011771号