
oracle rac搭建
一、安装前
- 软件及操作系统版本
虚拟机软件:VMware-12.5
操作系统:Centos6.8
Oracle软件:Oracle 11g R2
本篇所有安装介质和文档皆可以在文末关注微信公众号后回复:oraclerac获得
2.配置虚拟机
这里,我们需要在 VMware 的虚拟主机上创建两台虚拟机,其中每台
机器至少需要配置双网卡,一块网卡作为 Public,另一块作为 Private,建议 IP 地址均选择
手动配置,而不是 DHCP 动态分配,且要求指定的 IP 在网络里是唯一的。主机名也分别要求指定为唯一,避免冲突。主机名、IP 地址在前期规划要慎重,一经指定,最好不要轻易改变,避免一些不必要的麻烦。这里列出两台机器前期规划的主机名、IP 地址信息:
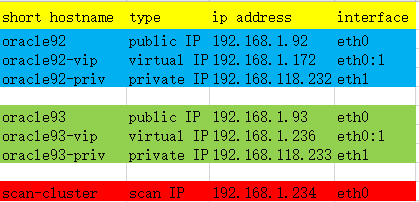
其中,每台机器至少需要配置 3 个 IP 地址,在安装操作系统的过程中,我们需要配置
公网 IP 和私有 IP 即可,虚拟 IP 在安装集群件时分配。Public IP、Virtual IP、SCAN IP 必
须配置在同一网段。SCAN IP 是 Oracle 11g 新推出的,在配置 11g RAC 时需要指定。我们
的 SCAN IP 通过配置 DNS 服务器来实现,在下文中将给出配置步骤。
3.创建虚拟机满足下列条件:
(1)双网卡
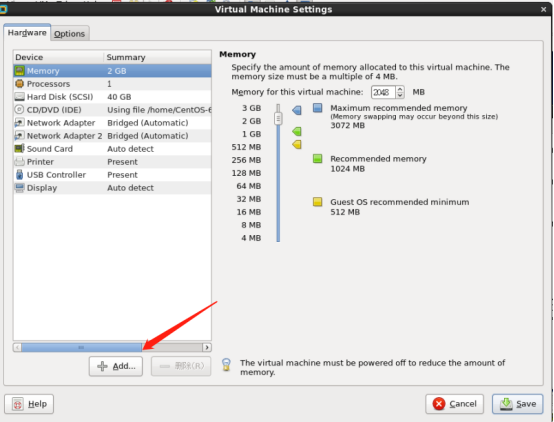
(2)2G内存
(3)2核CPU
(4)iSCSI格式20G硬盘
- 启动虚拟机安装操作系统:
正常装就行swap分区记得留大一点
node1主机名为oracle92
node2主机名为oralce93
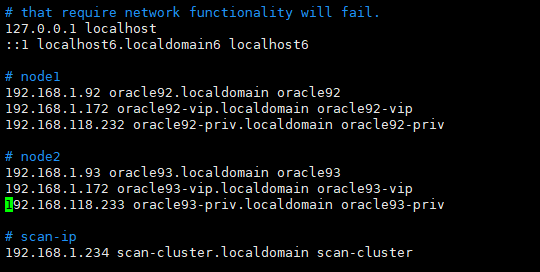
- IP配置及配置hosts文件,双节点保持一致
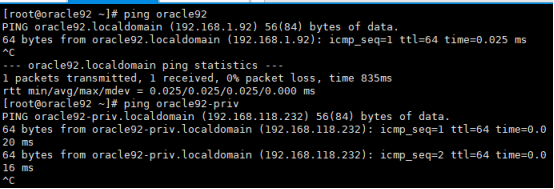
配置检查

此文档不配置DNS
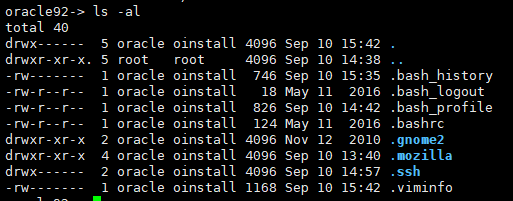
- 建用户、改口令、修改用户配置文件:
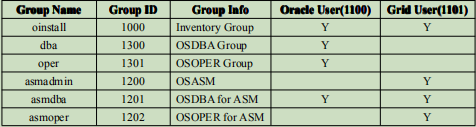
配置 11gR2 RAC 需要安装 Oracle Grid Infrastructure 软件、Oracle 数据库软件,其中 Grid软件等同于 Oracle 10g 的 Clusterware 集群件。Oracle 建议以不同的用户分别安装 Grid Infrastructure 软件、Oracle 数据库软件,我们这里以 grid 用户安装 Grid Infrastructure,oracle用户安装 Oracle 数据库软件。并且 grid、oracle 用户需要属于不同的用户组。在配置 RAC时,还要求这两个用户在 RAC 的不同节点上 uid、gid 要一致。用户、组的对应信息见下表:
执行一下脚本完成成用户、组的创建


 1 #!/bin/bash
 2 #Purpose:Create 6 groups named 'oinstall','dba','asmadmin','asmdba','asmoper','oper', plus 2 users named 'oracle','grid'.
 3 #Also setting the Environment
 4 #variable for oracle user.
 5 #variable for grid user.
 6 #Usage:Log on as the superuser('root'),and then execute the command:#./1preusers.sh
 7 #Author:Asher Huang
 8 echo "Now create 6 groups named 'oinstall','dba','asmadmin','asmdba','asmoper','oper'"
 9 echo "Plus 2 users named 'oracle','grid',Also setting the Environment"
10 groupadd -g 1000 oinstall
11 groupadd -g 1200 asmadmin
12 groupadd -g 1201 asmdba
13 groupadd -g 1202 asmoper
14 useradd -u 1100 -g oinstall -G asmadmin,asmdba,asmoper,dba -d /home/grid -s /bin/bash -c "grid Infrastructure Owner" grid
15 echo "grid" | passwd --stdin grid
16 echo 'export PS1="`/bin/hostname -s`-> "'>> /home/grid/.bash_profile
17 echo "export TMP=/tmp">> /home/grid/.bash_profile
18 echo 'export TMPDIR=$TMP'>>/home/grid/.bash_profile
19 echo "export ORACLE_SID=+ASM1">> /home/grid/.bash_profile
20 echo "export ORACLE_BASE=/u01/app/grid">> /home/grid/.bash_profile
21 echo "export ORACLE_HOME=/u01/app/11.2.0/grid">> /home/grid/.bash_profile
22 echo "export ORACLE_TERM=xterm">> /home/grid/.bash_profile
23 echo "export NLS_DATE_FORMAT='yyyy/mm/dd hh24:mi:ss'" >> /home/grid/.bash_profile
24 echo 'export TNS_ADMIN=$ORACLE_HOME/network/admin' >> /home/grid/.bash_profile
25 echo 'export PATH=/usr/sbin:$PATH'>> /home/grid/.bash_profile
26 echo 'export PATH=$ORACLE_HOME/bin:$PATH'>> /home/grid/.bash_profile
27 echo 'export LD_LIBRARY_PATH=$ORACLE_HOME/lib:/lib:/usr/lib'>>
28 /home/grid/.bash_profile
29 echo 'export CLASSPATH=$ORACLE_HOME/JRE:$ORACLE_HOME/jlib:$ORACLE_HOME/rdbms/jlib'>> /home/grid/.bash_profile
30 echo "export EDITOR=vi" >> /home/grid/.bash_profile
31 echo "export LANG=en_US" >> /home/grid/.bash_profile
32 echo "export NLS_LANG=american_america.AL32UTF8" >> /home/grid/.bash_profile
33 echo "umask 022">> /home/grid/.bash_profile
34 groupadd -g 1300 dba
35 groupadd -g 1301 oper
36 useradd -u 1101 -g oinstall -G dba,oper,asmdba -d /home/oracle -s /bin/bash -c "Oracle Software Owner" oracle
37 echo "oracle" | passwd --stdin oracle
38 echo 'export PS1="`/bin/hostname -s`-> "'>> /home/oracle/.bash_profile
39 echo "export TMP=/tmp">> /home/oracle/.bash_profile
40 echo 'export TMPDIR=$TMP'>>/home/oracle/.bash_profile
41 echo "export ORACLE_HOSTNAME=oracle92.localdomain">> /home/oracle/.bash_profile
42 echo "export ORACLE_SID=devdb1">> /home/oracle/.bash_profile
43 echo "export ORACLE_BASE=/u01/app/oracle">> /home/oracle/.bash_profile
44 echo 'export ORACLE_HOME=$ORACLE_BASE/product/11.2.0/db_1'>> /home/oracle/.bash_profile
45 echo "export ORACLE_UNQNAME=devdb">> /home/oracle/.bash_profile
46 echo 'export TNS_ADMIN=$ORACLE_HOME/network/admin' >> /home/oracle/.bash_profile
47 echo "export ORACLE_TERM=xterm">> /home/oracle/.bash_profile
48 echo 'export PATH=/usr/sbin:$PATH'>> /home/oracle/.bash_profile
49 echo 'export PATH=$ORACLE_HOME/bin:$PATH'>> /home/oracle/.bash_profile
50 echo 'export LD_LIBRARY_PATH=$ORACLE_HOME/lib:/lib:/usr/lib'>> /home/oracle/.bash_profile
51 echo 'export CLASSPATH=$ORACLE_HOME/JRE:$ORACLE_HOME/jlib:$ORACLE_HOME/rdbms/jlib'>> /home/oracle/.bash_profile
52 echo "export EDITOR=vi" >> /home/oracle/.bash_profile
53 echo "export LANG=en_US" >> /home/oracle/.bash_profile
54 echo "export NLS_LANG=american_america.AL32UTF8" >> /home/oracle/.bash_profile
55 echo "export NLS_DATE_FORMAT='yyyy/mm/dd hh24:mi:ss'" >> /home/oracle/.bash_profile
56 echo "umask 022">> /home/oracle/.bash_profile
57 echo "The Groups and users has been created"
58 echo "The Environment for grid,oracle also has been set successfully"
在节点oracle93 上执行该脚本时,需要将grid 用户环境变量ORACLE_SID 修改为+ASM2,
oracle 用户环境变量ORACLE_SID 修改为devdb2,
ORACLE_HOSTNAME 环境变量修改为oracle93.localdomain
[root@oracle92 shell]# id grid
uid=1100(grid) gid=1000(oinstall)
groups=1000(oinstall),1200(asmadmin),1201(asmdba),1202(asmoper)
[root@oracle92 shell]# id oracle
uid=1101(oracle) gid=1000(oinstall)
groups=1000(oinstall),1201(asmdba),1300(dba),1301(oper)
7.建路径、改权限:
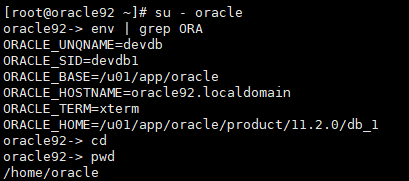
关于 grid、oracle 用户的环境变量配置信息,见下述表格

执行下面脚本来完成相关路径、权限的配置。
#!/bin/bash
#Purpose:Create the necessary directory for oracle,grid users and change the authention to oracle,grid users.
#Usage:Log on as the superuser('root'),and then execute the command:#./2predir.sh
#Author:Asher Huang
echo "Now create the necessary directory for oracle,grid users and change the authention to oracle,grid users..."
mkdir -p /u01/app/grid
mkdir -p /u01/app/11.2.0/grid
mkdir -p /u01/app/oracle
chown -R oracle:oinstall /u01
chown -R grid:oinstall /u01/app/grid
chown -R grid:oinstall /u01/app/11.2.0
chmod -R 775 /u01
echo "The necessary directory for oracle,grid users and change the authention to oracle,grid users has been finished"

8.修改/etc/security/limits.conf,配置 oracle 、 grid 用户的
shell 限制:
执行下面脚本完成。
#!/bin/bash
#Purpose:Change the /etc/security/limits.conf.
#Usage:Log on as the superuser('root'),and then execute the command:#./3prelimits.sh
#Author:Asher Huang
echo "Now modify the /etc/security/limits.conf,but backup it named /etc/security/limits.conf.bak before"
cp /etc/security/limits.conf /etc/security/limits.conf.bak
echo "oracle soft nproc 2047" >>/etc/security/limits.conf
echo "oracle hard nproc 16384" >>/etc/security/limits.conf
echo "oracle soft nofile 1024" >>/etc/security/limits.conf
echo "oracle hard nofile 65536" >>/etc/security/limits.conf
echo "grid soft nproc 2047" >>/etc/security/limits.conf
echo "grid hard nproc 16384" >>/etc/security/limits.conf
echo "grid soft nofile 1024" >>/etc/security/limits.conf
echo "grid hard nofile 65536" >>/etc/security/limits.conf
echo "Modifing the /etc/security/limits.conf has been succeed."
9.修改/etc/pam.d/login配置文件
#!/bin/bash
#Purpose:Modify the /etc/pam.d/login.
#Usage:Log on as the superuser('root'),and then execute the command:#./4prelimits.sh
#Author:Asher Huang
echo "Now modify the /etc/pam.d/login,but with a backup named /etc/pam.d/login.bak"
cp /etc/pam.d/login /etc/pam.d/login.bak
echo "session required /lib/security/pam_limits.so" >>/etc/pam.d/login
echo "session required pam_limits.so" >>/etc/pam.d/login
echo "Modifing the /etc/pam.d/login has been succeed."
10.修改/etc/profile 文件
执行脚本完成
#!/bin/bash
#Purpose:Modify the /etc/profile.
#Usage:Log on as the superuser('root'),and then execute the
command:#./5preprofile.sh
#Author:Asher Huang
echo "Now modify the /etc/profile,but with a backup named
/etc/profile.bak"
cp /etc/profile /etc/profile.bak
echo 'if [ $USER = "oracle" ]||[ $USER = "grid" ]; then' >> /etc/profile
echo 'if [ $SHELL = "/bin/ksh" ]; then' >> /etc/profile
echo 'ulimit -p 16384' >> /etc/profile
echo 'ulimit -n 65536' >> /etc/profile
echo 'else' >> /etc/profile
echo 'ulimit -u 16384 -n 65536' >> /etc/profile
echo 'fi' >> /etc/profile
echo 'fi' >> /etc/profile
echo "Modifing the /etc/profile has been succeed."
11.修改内核配置文件
执行脚本
#!/bin/bash
#Purpose:Modify the /etc/sysctl.conf.
#Usage:Log on as the superuser('root'),and then execute the command:#./6presysctl.sh
#Author:Asher Huang
echo "Now modify the /etc/sysctl.conf,but with a backup named /etc/sysctl.bak"
cp /etc/sysctl.conf /etc/sysctl.conf.bak
echo "fs.aio-max-nr = 1048576" >> /etc/sysctl.conf
echo "fs.file-max = 6815744" >> /etc/sysctl.conf
echo "kernel.shmall = 2097152" >> /etc/sysctl.conf
echo "kernel.shmmax = 2089633792" >> /etc/sysctl.conf
echo "kernel.shmmni = 4096" >> /etc/sysctl.conf
echo "kernel.sem = 250 32000 100 128" >> /etc/sysctl.conf
echo "net.ipv4.ip_local_port_range = 9000 65500" >> /etc/sysctl.conf
echo "net.core.rmem_default = 262144" >> /etc/sysctl.conf
echo "net.core.rmem_max = 4194304" >> /etc/sysctl.conf
echo "net.core.wmem_default = 262144" >> /etc/sysctl.conf
echo "net.core.wmem_max = 1048586" >> /etc/sysctl.conf
echo "net.ipv4.tcp_wmem = 262144 262144 262144" >> /etc/sysctl.conf
echo "net.ipv4.tcp_rmem = 4194304 4194304 4194304" >> /etc/sysctl.conf
echo "Modifing the /etc/sysctl.conf has been succeed."
echo "Now make the changes take effect....."
sysctl -p
12.停止 ntp 服务, 11gR2 新增的检查项
# service ntpd status
ntpd is stopped
# chkconfig ntpd off
# cat /etc/ntp
ntp/ ntp.conf
# cp /etc/ntp.conf /etc/ntp.conf.bak
# rm -rf /etc/ntp.conf
13.节点 2 准备工作:
我们已经在节点1 完成基本准备配置工作,在 节点2 上重复上述 配置hosts文件到 停止ntp准备工作,以完成节点 2 的准备工作。
14.配置oracle,grid用户SSH对等性
虽然在安装软件的过程中,oracle 会自动配置 SSH 对等性,建议在安装软件之前手工配置。
配置 oracle 用户对等性:
节点1:
执行命令:
ssh-keygen -t rsa
ssh-keygen -t dsa
节点2
重复上述操作
返回节点1:
cat ~/.ssh/id_rsa.pub >>~/.ssh/authorized_keys
cat ~/.ssh/id_dsa.pub >>~/.ssh/authorized_keys
ssh oracle93 cat ~/.ssh/id_rsa.pub >>~/.ssh/authorized_keys
ssh oracle93 cat ~/.ssh/id_dsa.pub >>~/.ssh/authorized_keys
scp ~/.ssh/authorized_keys oracle93:~/.ssh/authorized_keys
验证 oracle SSH 对等性:
在 oracle92,oracle93 两个节点上分别执行下述命令,第一次执行时需要口令验证:
ssh oracle92 date
ssh oracle93 date
ssh oracle92-priv date
ssh oracle93-priv date
ssh oracle92.localdomain date
ssh oracle93.localdomain date
ssh oracle92-priv.localdomain date
ssh oracle93-priv.localdomain date
15.重复上述步骤,以grid 用户配置对等性。
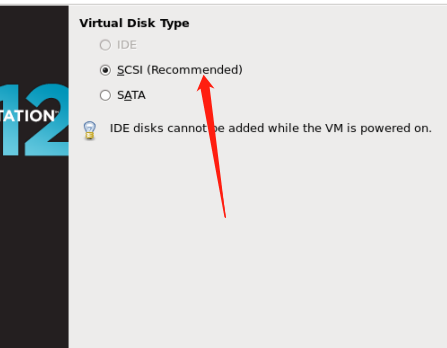
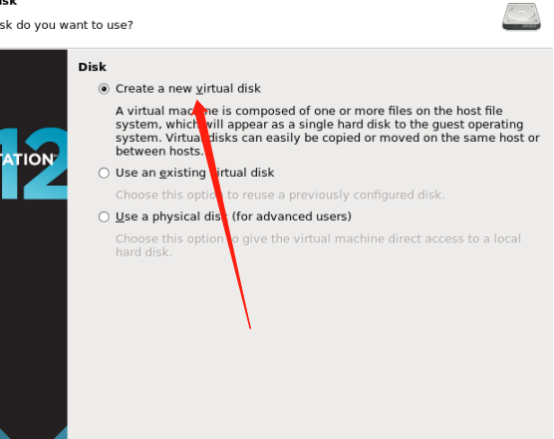
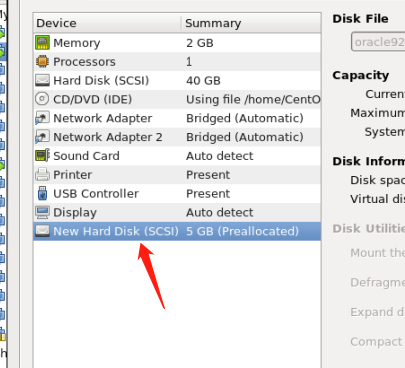
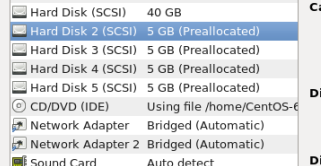
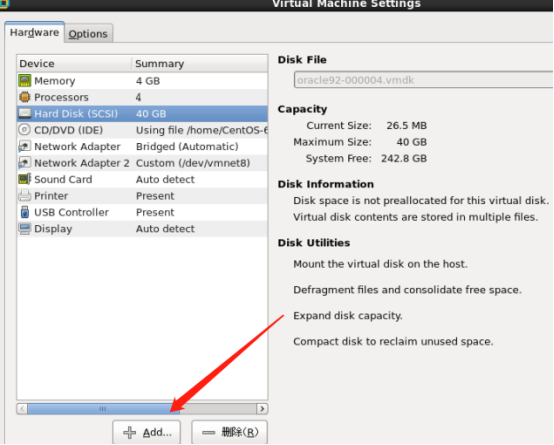
16.配置共享磁盘:
在任意节点上先创建共享磁盘,然后在另外的节点上选择添加已有磁盘。这里选择先在
节点2 节点机器上创建共享磁盘,然后在 节点1 上添加。共创建 4 块硬盘,其中 2 块硬盘,将来用于配置 GRIDDG 磁盘组,专门存放 OCR 和 Voting Disk;1 块磁盘,用于配置 DATA 磁盘组,存放数据库;1 块磁盘,用于配置 FLASH 磁盘组,用于闪回区;
虚拟机关机,然后操作
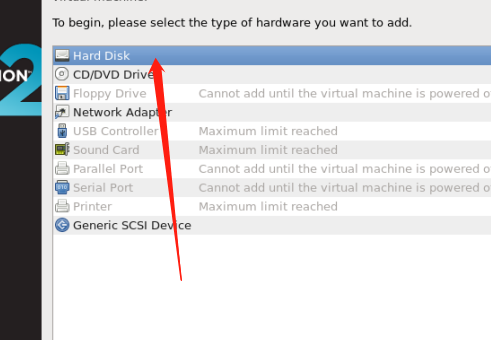
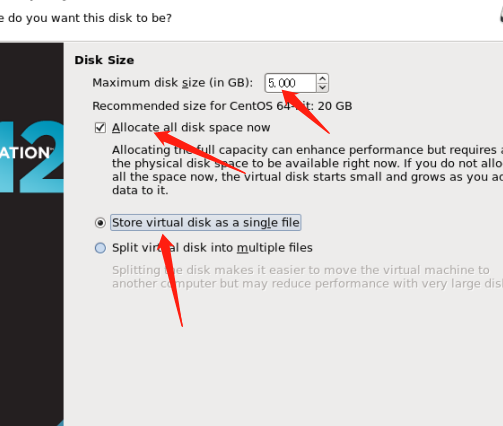

按照此方法添加再添加3块
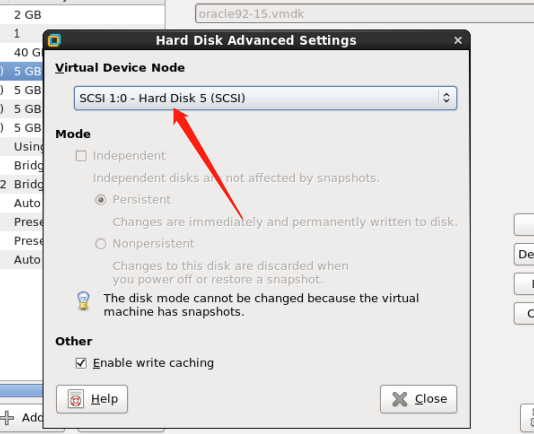
修改磁盘编号
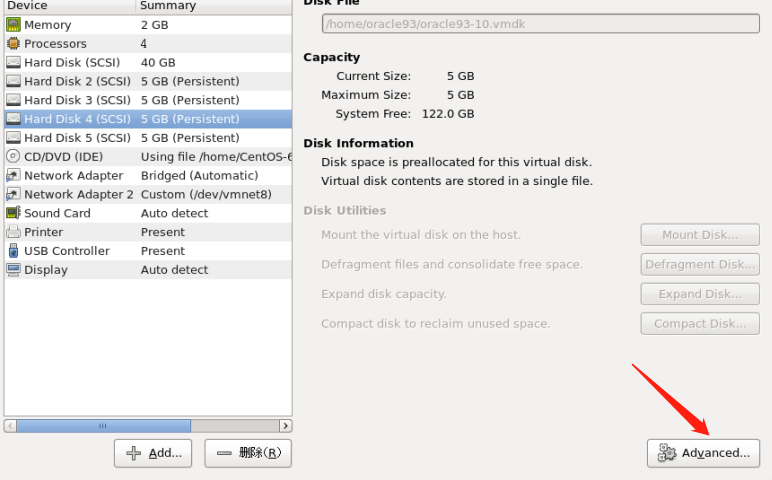
节点一添加节点2创建的磁盘


选择节点创建的xxx.vmdk文件
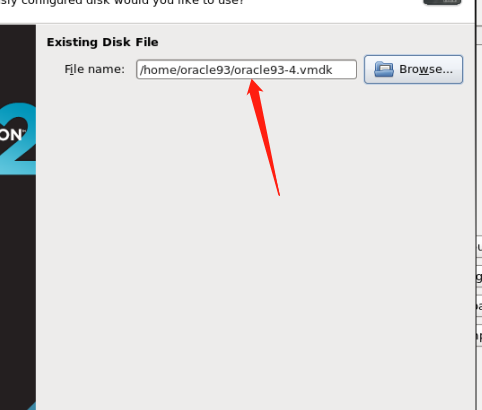
四块都按顺序添加并修改设备编号
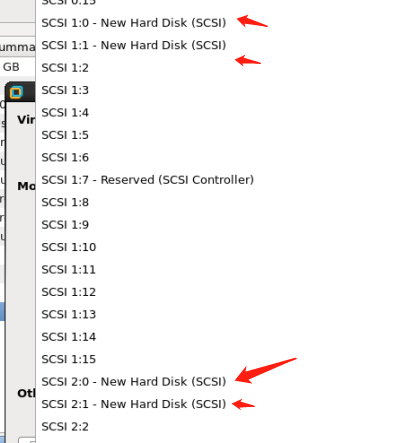
加入4块磁盘
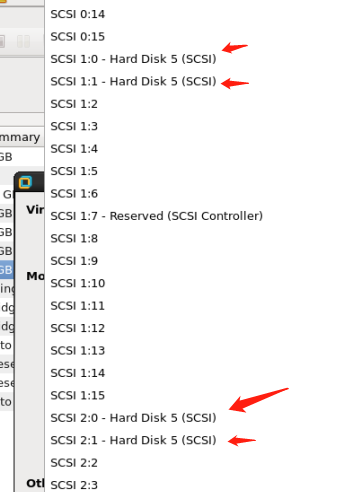
设备编号为:1:0,1:1
2:0,2:1
修改两台虚拟机对应文件VMX文件,
在宿主机vim下面两文件


加入:
disk.locking="false"
diskLib.dataCacheMaxSize = "0"
diskLib.dataCacheMaxReadAheadSize = "0"
diskLib.DataCacheMinReadAheadSize = "0"
diskLib.dataCachePageSize = "4096"
diskLib.maxUnsyncedWrites = "0"

scsi1.shareBus="virtual"

sched.scsi1:0.shares = "normal"
sched.scsi1:0.throughputCap = "none"

sched.scsi1:1.shares = "normal"
sched.scsi1:1.throughputCap = "none"

sched.scsi2:0.shares = "normal"
sched.scsi2:0.throughputCap = "none"

sched.scsi2:1.shares = "normal"
sched.scsi2:1.throughputCap = "none"

scsi1:0.mode = "independent-persistent"
scsi1:0.deviceType = "scsi-hardDisk"

scsi1:1.mode = "independent-persistent"
scsi1:1.deviceType = "scsi-hardDisk"

scsi2:0.mode = "independent-persistent"
scsi2:0.deviceType = "scsi-hardDisk"

scsi2:1.mode = "independent-persistent"
scsi2:1.deviceType = "scsi-hardDisk"
17.启动虚拟机
节点1
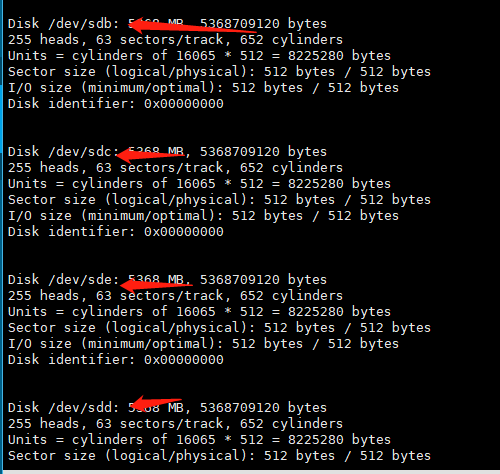
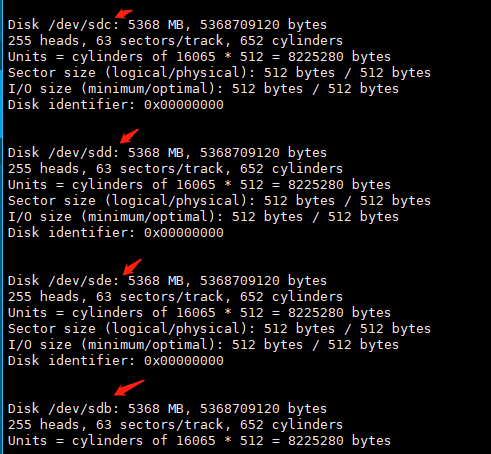
# fdisk -l
节点2
硬盘格式化(只用在一个节点做就可以)
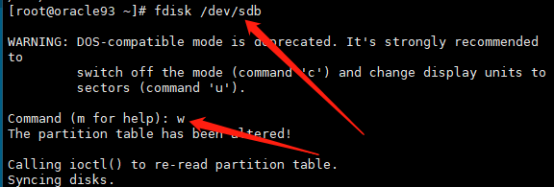
# fdisk /dev/sdb

fdisk /dev/sdb 表示要对/dev/sdb 磁盘进行格式化,其中,输入的命令分别表示:
n 表示新建 1 个分区;
p 表示分区类型选择为 primary partition 主分区;
1 表示分区编号从 1 开始;
起始、终止柱面选择默认值,即 1 和 500;
w 表示将新建的分区信息写入硬盘分区表。
③ 重复上述步骤②,以 root 用户在 node1 上分别格式化其余 3 块磁盘:
④ 格式化完毕之后,在 node1,node2 节点上分别看到下述信息
把剩下的3块盘安装同样的方式格式化
节点2执行,同步磁盘
18.修改/etc/udev/rules.d/60-raw.rules文件
添加如下几行
ACTION=="add", KERNEL=="sdb1", RUN+="/bin/raw /dev/raw/raw1 %N"
ACTION=="add", KERNEL=="sdc1", RUN+="/bin/raw /dev/raw/raw2 %N"
ACTION=="add", KERNEL=="sdd1", RUN+="/bin/raw /dev/raw/raw3 %N"
ACTION=="add", KERNEL=="sde1", RUN+="/bin/raw /dev/raw/raw4 %N"

KERNEL=="raw1", OWNER="grid", GROUP="asmadmin", MODE="660"
KERNEL=="raw2", OWNER="grid", GROUP="asmadmin", MODE="660"
KERNEL=="raw3", OWNER="grid", GROUP="asmadmin", MODE="660"
KERNEL=="raw4", OWNER="grid", GROUP="asmadmin", MODE="660"
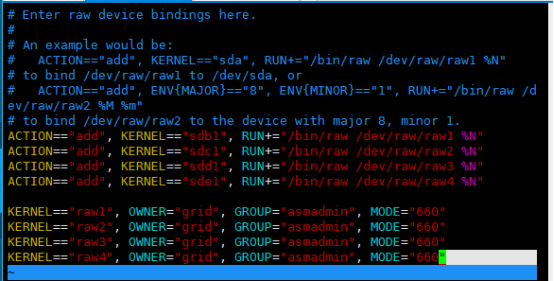
节点2重复
启动udev服务(双节点执行)
Root用户执行:
# start_udev
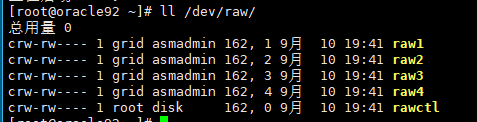
验证裸设备是否建立成功
ls –l /dev/raw
裸设备的用户为grid,组为asmadmin。则裸设备建立成功

一、安装介质
本篇所有安装介质和文档皆可以在文末关注微信公众号后回复:oraclerac获得
oracle.p13390677_112040_Linux-x86-64_1of7.zip
oracle.p13390677_112040_Linux-x86-64_2of7.zip
oracle.p13390677_112040_Linux-x86-64_3of7.zip
其中:
****1of7.zip 和****2of7.zip是 Oracle 软件的安装介质。
****3of7.zip 是 GRID 软件的安装介质
1.分别上传到/home/oralce/
和/home/grid/
然后解压
# unzip 包名
2.先安装一些依赖(双节点):
yum install -y ld-linux.so.2 binutils compat-libstdc++-33 elfutils-libelf elfutils-libelf-devel gcc gcc-c++ glibc glibc-common glibc-devel libaio libaio-devel libgcc libstdc++ libstdc++-devel make numactl sysstat libXp unixODBC unixODBC-devel
上传pdksh-5.2.14-8.i386.rpm 包到节点
# rpm -ivh pdksh-5.2.14-8.i386.rpm
安装
3.安装前预检查配置信息
在安装 GRID 之前,建议先利用 CVU(Cluster Verification Utility)检查 CRS 的安装前环
境。使用 CVU 检查 CRS 的安装前环境:
# pwd
/home/grid/grid
# su -  grid
./runcluvfy.sh stage -pre crsinst -n oracle92,oracle93 -fixup -verbose
提示以root用户执行这个脚本,那我们就执行一下(双节点)


因为我们没有配DNS所有这一步会提示检查失败,不过没关系,其它的检查都通过就ok了

直到此步骤,我们的安装环境已经完全准备 OK!!!
三.安装 Grid Infrastructure
从此步骤开始,我们正式安装 Grid 软件:
① 以 grid 用户登录图形界面,执行/home/grid/grid/runInstaller,进入 OUI 的图形安装界面:
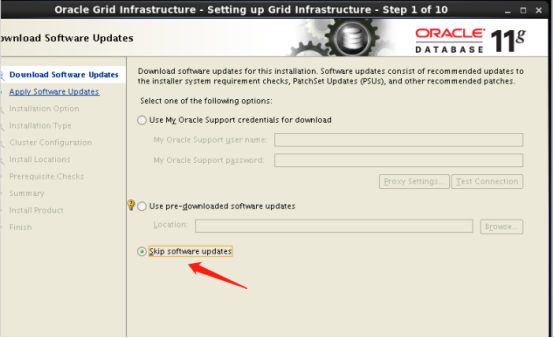
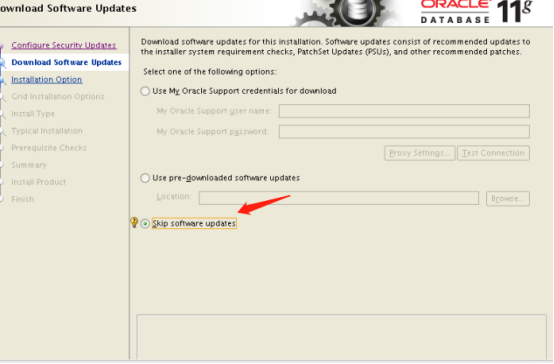
② 进入 OUI 安装界面后,选择第 3 项,跳过软件更新,Next:
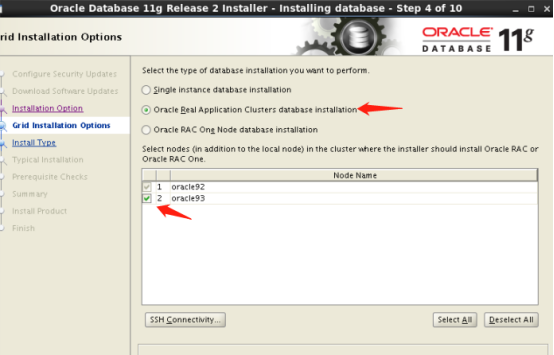
③ 选择集群的 Grid Infrastructure,Next:

④ 选择 advanced Installation,Next:

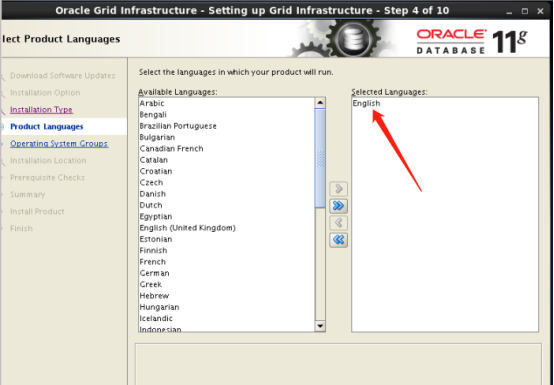
⑤ 语言选择默认,English,Next:
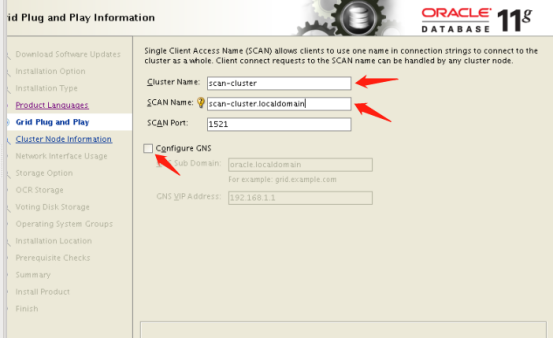
⑥ 去 掉 Configure GNS 选 项 , 按 照 之 前 2.1 节 中 的 表 格 输 入 Cluster
Name:scan-cluster,SCAN Name:scan-cluster.localdomain。Next:
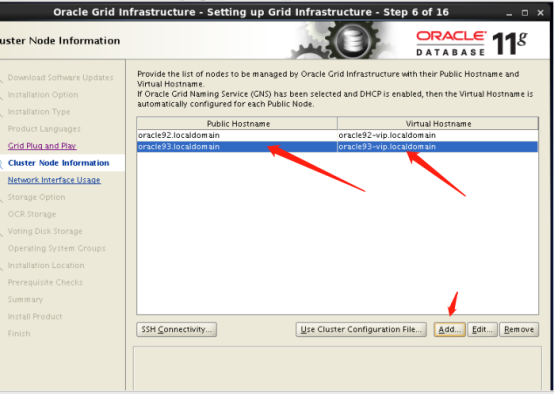
⑦ 单击 Add,添加第 2 个节点,Next:
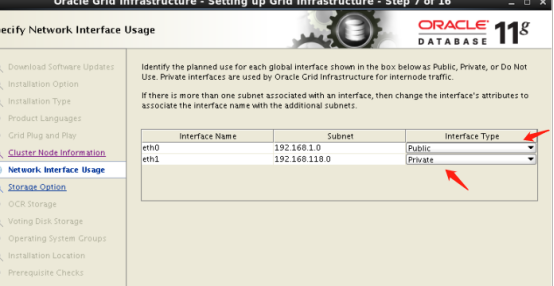
⑧ 确认网络接口,Next(内外网一定不能在一个网段):
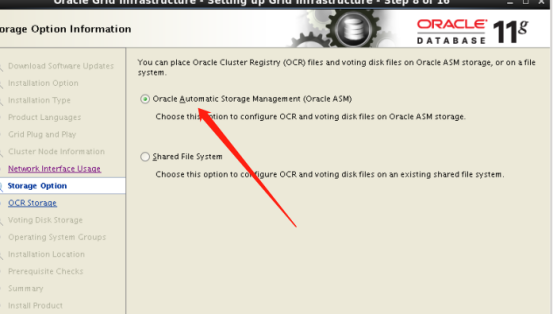
⑨ 选择 ASM,作为存储,Next:
⑩ 输入 ASM 磁盘组名,这里命名为 GRIDDG,冗余策略选择 External 外部,AU 大小
选择默认 1M,ASM 磁盘选择 raw1,raw2。Next:

⑪ 选择给 ASM 的 SYS、ASMSNMP 用户配置为相同的口令,并输入口令,Next:

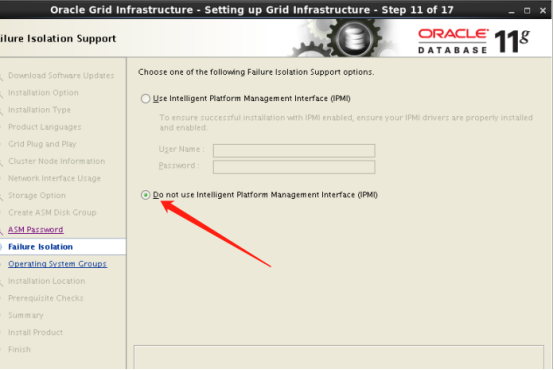
⑫ 选择不使用 IPMI,Next:
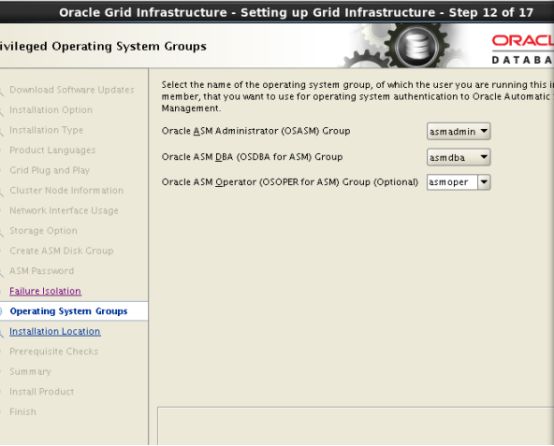
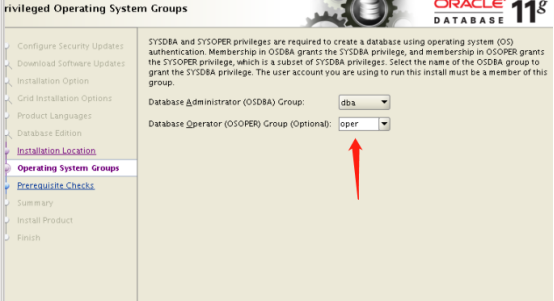
⑬ 给 ASM 指定不同的组,Next:
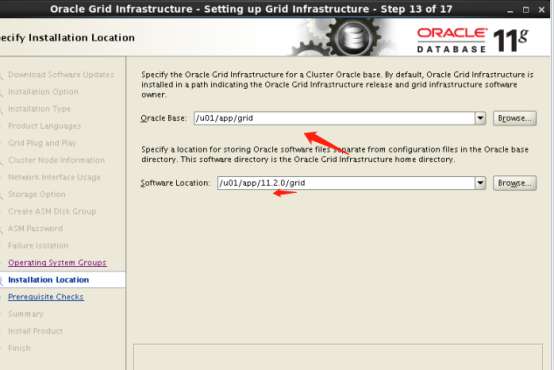
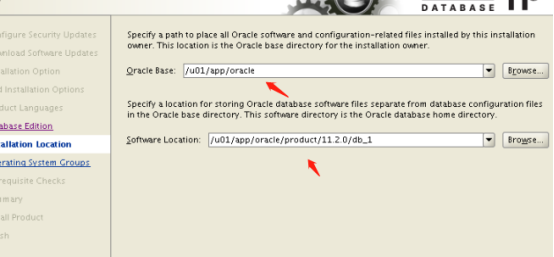
⑭ 选择 GRID 软件的安装路径,其中 ORACLE_BASE,ORACLE_HOME 均选择之经配置好的,可参照 2.5 节中的配置信息。这里需要注意 GRID 软件的 ORACLE_HOME 不
能是 ORACLE_BASE 的子目录。
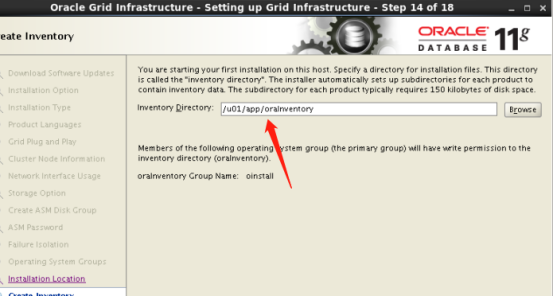
⑮ 选择默认的 Inventory,Next:
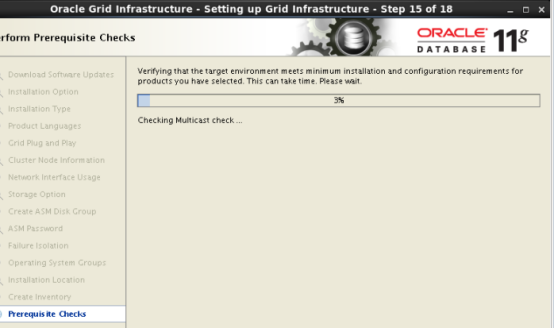
检查
⑯ 检查出现告警,提示在所有节点上缺失 cvuqdisk-1.0.9-1 软件包。
可以选择忽略,直接进入下一步安装。也可以从 grid 安装文件的 rpm 目录下获取该 RPM
包,然后进行安装。
双节点执行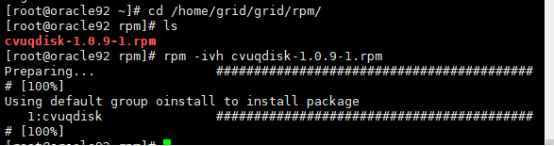
在所有节点上安装完 cvuqdisk-1.0.9-1 软件后,重新执行预检查,不再有警告信息。
⑰ 进入安装 GRID 安装之前的概要信息,Install 进行安装:
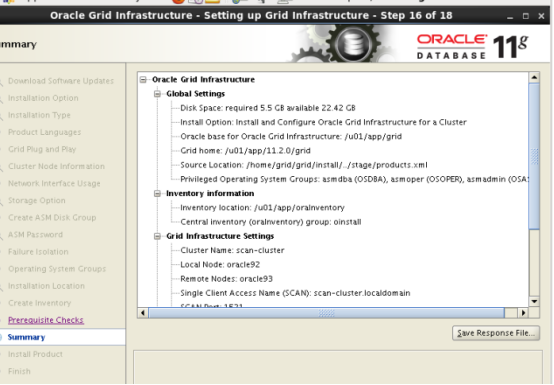
DNS报的错可以选择忽略

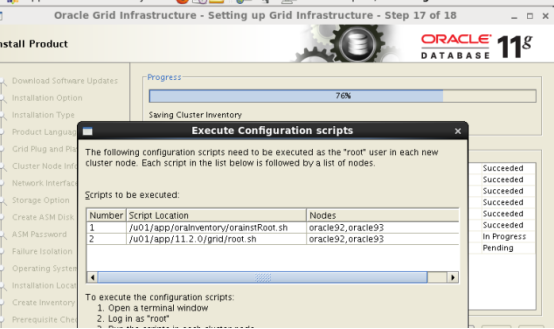
⑱ 根据提示以 root 用户分别在两个节点上执行脚本:

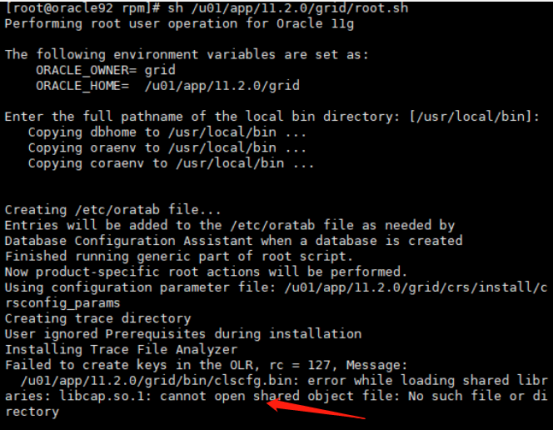

报错了。。。。。
原因:说是找不到 libcap.so.1 这个包
解决办法
执行
# ln -s /lib64/libcap.so.2.16 /lib64/libcap.so.1
然后再执行
./root.sh
需要等
如果报这个错
执行命令
# cd /software/app/11.2.0/grid/crs/install/
# ./roothas.pl  -deconfig -force -verbose

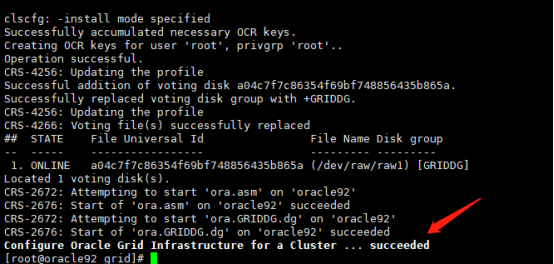
节点1执行成功后节点2执行

⑲ 执行完上述脚本之后,单击 OK,等待安装完成,Next,进入下一步。

⑳ 最后,单击 close,完成 GRID 软件在双节点上的安装。
如果你看到OCVU错误的话,没有关系,这个错误是由Oracle自身的BUG造成的,它并不会影响我们之后RAC的使用,因此点击“OK”,忽略掉它就可以啦。
至此,GRID 集群件安装成功!!!
四、安装 Oracle e 软件
从此步骤开始,我们正式安装 oracle 软件:
① 以 oracle 用户登录图形界面,执行/home/oracle/database/runInstaller,进入 OUI 的图形
安装界面:

② 进入 OUI 安装界面后,选择第 3 项,跳过软件更新,Next:
③ 选择第 2 项,只安装 oracle 软件,Nex

④ 选择第 2 项,安装 oracle RAC,选择所有节点,Next:
⑤ 语言选择默认,English,Next:

⑥ 选择第 1 项,安装企业版软件,Next:

⑦ 选择 oracle 软件的安装路径,其中 ORACLE_BASE,ORACLE_HOME 均选择之前已
经配置好的,可参照 2.5 节中的配置信息。Next:
⑧ 选择 oracle 用户组,Next:
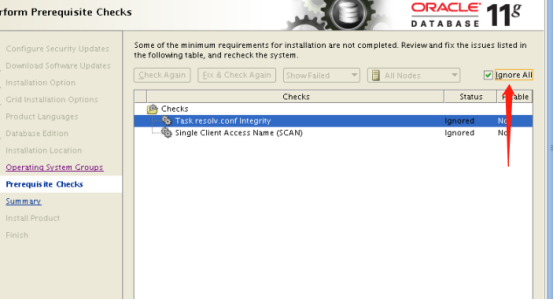
⑨ 执行安装前的预检查,Next:

执行Oracle软件安装前的预检查,这里出现了一个警告,其原因在于,如果使用DNS服务的话,RAC可以设置多个Scan IP,而我们用的是/etc/hosts文件,那么RAC环境下就只允许设置一个Scan IP了,这并不影响我们之后的使用,所以这里点击ignore all将该警告忽略掉即可。
⑩ 安装概要信息,Install:

⑪ 根据提示以 root 用户分别在两个节点上执行脚本,Next:
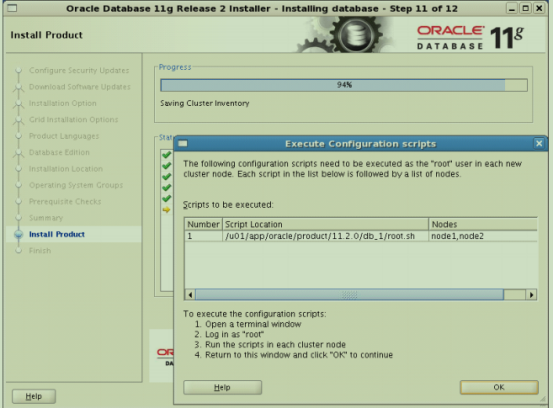
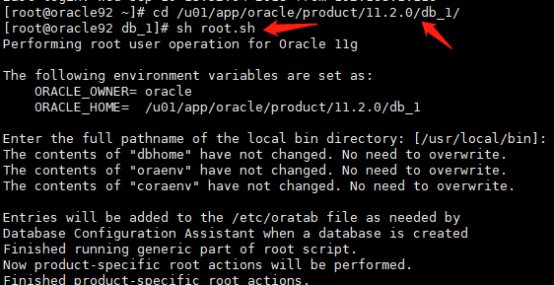
执行/u01/app/oracle/product/11.2.0/db_1/root.sh 脚本
⑫ 最后,单击 close,完成 oracle 软件在双节点上的安装。
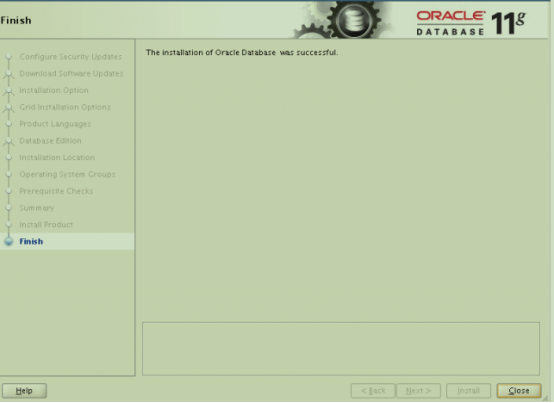
至此,我们在 RAC 双节点上完成 oracle 软件的安装!!!
五 创建 ASM ASM ASM ASM 磁盘组
以 grid 用户创建 ASM 磁盘组,创建的 ASM 磁盘组为下一步创建数据库提供存储。
① grid 用户登录图形界面,执行 asmca 命令来创建磁盘组:

② 进入 ASMCA 配置界面后,单击 Create,创建新的磁盘组:

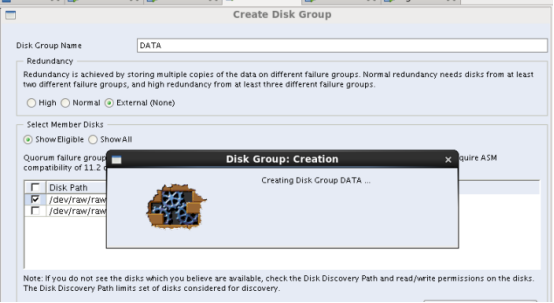
③ 输入磁盘组名 DATA,冗余策略选择 External,磁盘选择 raw3,单击 OK:
④ DATA 磁盘组创建完成,单击 OK:

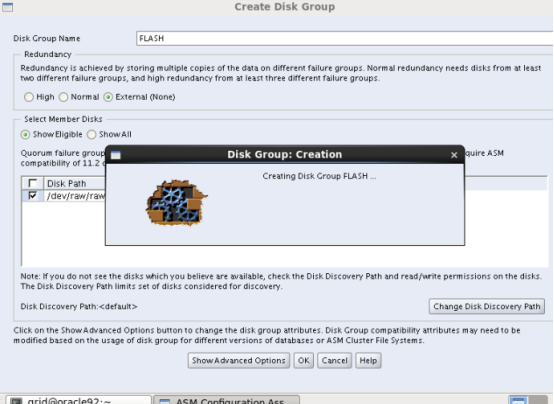
⑤ 继续创建磁盘组,磁盘组名 FLASH,冗余策略选择 External,磁盘选择 raw4

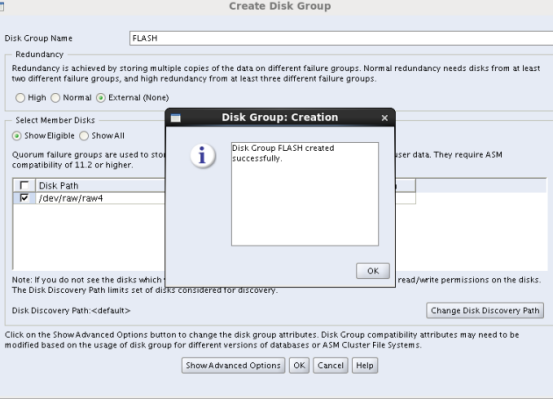
⑥ 最后,完成 DATA、FLASH 磁盘组的创建,Exit 推出 ASMCA 图形配置界面:
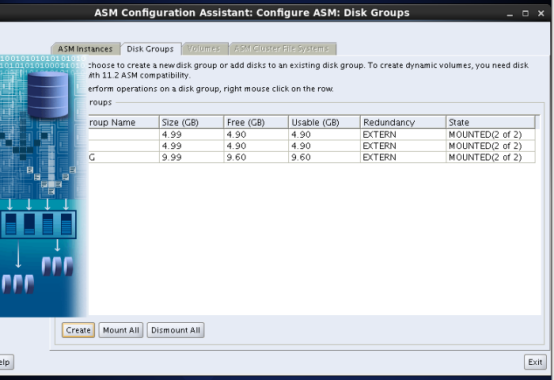
至此,利用 ASMCA 创建好 DATA、FLASH 磁盘组。且,可以看到连同之前创建的
GRIDDG 3 个磁盘组均已经被 RAC 双节点 MOUNT。
六 创建 RAC 数据库
接下来,使用 DBCA 来创建 RAC 数据库。
① 以 oracle 用户登录图形界面,执行 dbca,进入 DBCA 的图形界面,选择第 1 项,创
建 RAC 数据库:


② 选择创建数据库选项,Next:

③ 选择创建通用数据库,Next:
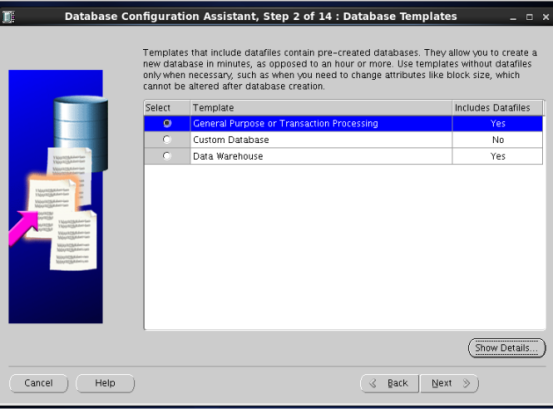
④ 配置类型选择 Admin-Managed,输入数据库名 devdb,选择双节点,Next:

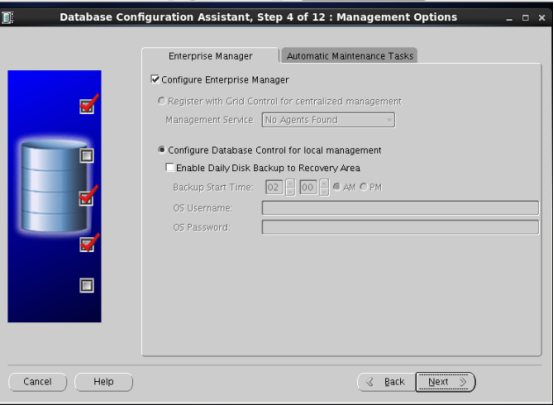
⑤ 选择默认,配置 OEM、启用数据库自动维护任务,Next:
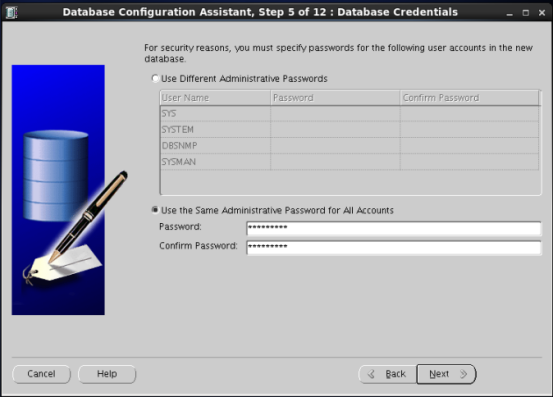
⑥ 选择数据库用户使用同一口令,Next:
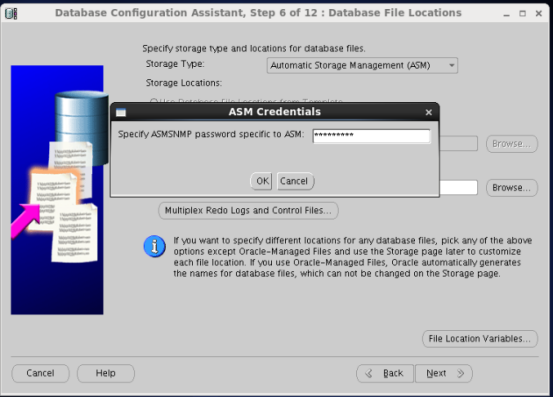
⑦ 数据库存储选择 ASM,使用 OMF,数据区选择之前创建的 DATA 磁盘组,Next:

输入创建的密码
⑧ 指定数据库闪回区,选择之前创建好的 FLASH 磁盘组,Next:

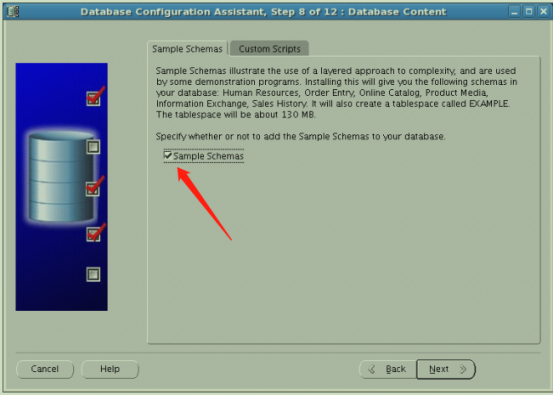
⑨ 选择创建数据库自带 Sample Schema,Next:
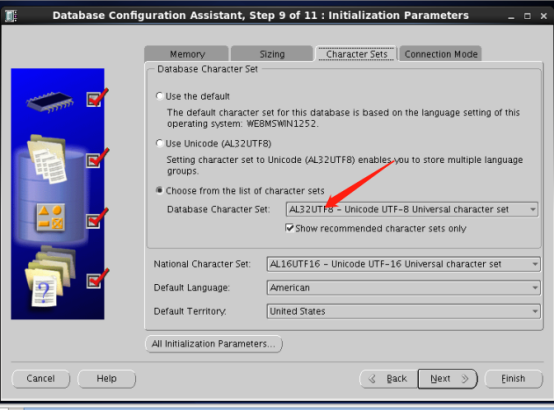
⑩ 选择数据库字符集,AL32UTF8,Next:
⑪ 选择默认数据库存储信息,直接 Next:

⑫ 单击,Finish,开始创建数据库,Next:
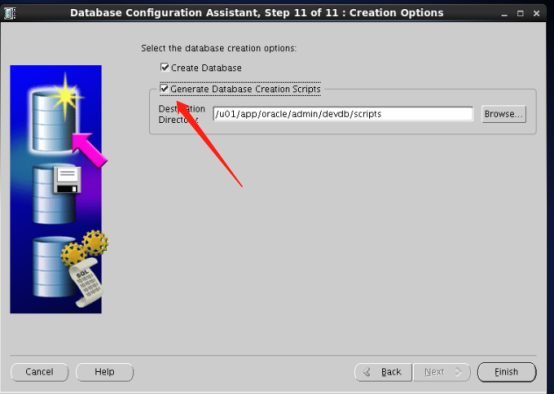
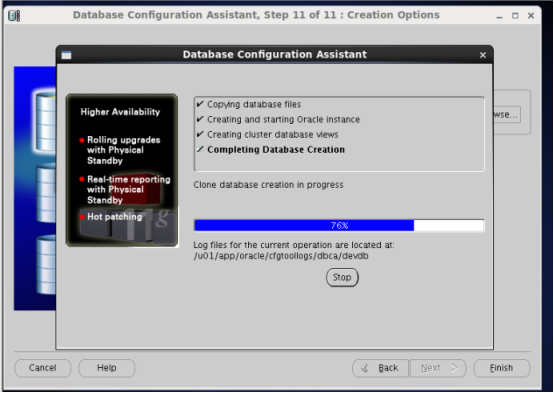
创建数据库可能持续时间稍长:

做到这一步赶紧多截两个图吧

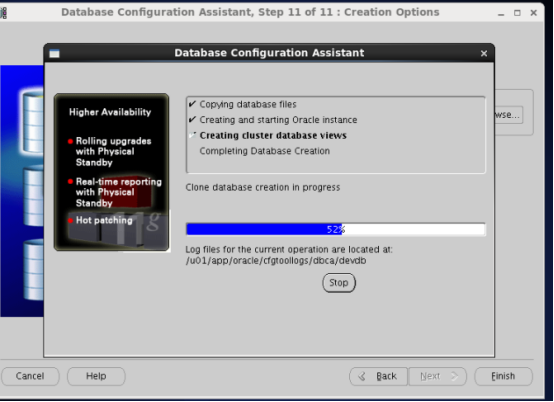
⑬ 完成创建数据库。
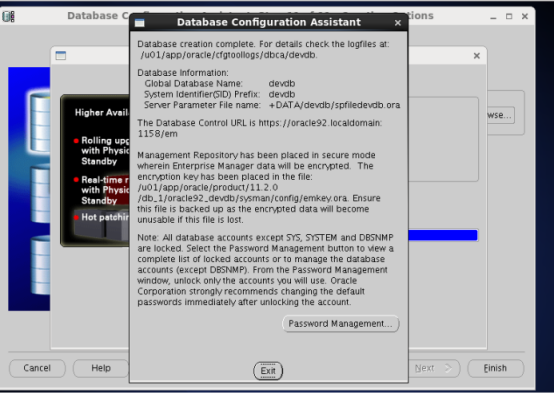
至此,我们完成创建 RAC 数据库!!!
七 Oracle RAC检验
之前安装任何软件都是放在node1节点上面的,为了验证RAC下“单节点安装,全节点可用”的真实性,我们使用oracle用户登录oracle93节点,并以sysdba用户登入数据库。
# su - oracle
$ sqlplus / as sysdba
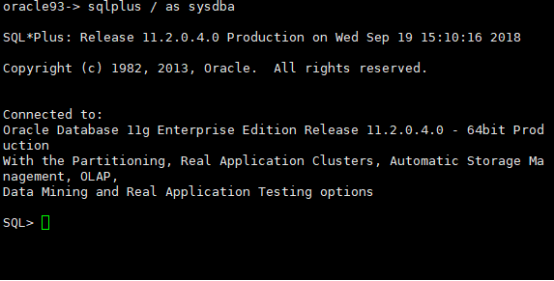
可见,我们在node2上成功登入了数据库!
2、在node2上以sysdba身份创建表空间、用户。
SQL> create tablespace racdata datafile '+DATA' size 100m autoextend on next 10m maxsize unlimited nologging extent management local uniform size 1024k segment space management auto;

SQL> create user ucase identified by 123456 default tablespace racdata temporary tablespace TEMP profile DEFAULT;

SQL> grant connect to ucase;
Grant succeeded.
SQL> grant resource to ucase;
Grant succeeded.
SQL> grant dba to ucase;
Grant succeeded.
SQL> grant alter tablespace to ucase;
Grant succeeded.
SQL> grant select any dictionary to ucase;
Grant succeeded.
SQL> grant unlimited tablespace to ucase;
Grant succeeded.
至此,我们在node2节点上成功创建了一个表空间,并创建了一个新的用户。
3、接着,我们退出数据库,并以oracle身份登陆oracle92节点,且以刚刚在oracle93节点上创建的用户尝试登录数据库。
# su - oracle
$ sqlplus
SQL*Plus: Release 11.2.0.4.0 Production on Wed Sep 19 15:16:28 2018
Copyright (c) 1982, 2013, Oracle. All rights reserved.
Enter user-name: ucase
Enter password: 123456
Connected to:
Oracle Database 11g Enterprise Edition Release 11.2.0.4.0 - 64bit Production
With the Partitioning, Real Application Clusters, Automatic Storage Management, OLAP,
Data Mining and Real Application Testing options
SQL>
SQL> show user;
USER is "UCASE"
可见,使用在node2节点上创建的用户,成功地登陆了node1节点上的数据库。
这个文档是我一周半的心血。
个人公众号:度一聊,不定期推送干货,及有用资源。


 浙公网安备 33010602011771号