


python 词云
【学习笔记】wordCloud的基本使用
最近研究NLP,结果用wordCloud展示效果很好,学习了一下,其实很简单,github上有英文词云的实例可以参考,详见:https://amueller.github.io/word_cloud/ 。下面分Wordcloud类的使用,github上的英文词云例子,自行做的中文词云例子分别记录一下:
一、WordCloud类
-
class wordcloud.WordCloud(
-
font_path=None,
-
width=400,
-
height=200,
-
margin=2,
-
ranks_only=None,
-
prefer_horizontal=0.9,
-
mask=None, scale=1,
-
color_func=None,
-
max_words=200,
-
min_font_size=4,
-
stopwords=None,
-
random_state=None,
-
background_color='black',
-
max_font_size=None,
-
font_step=1,
-
mode='RGB',
-
relative_scaling=0.5,
-
regexp=None,
-
collocations=True,
-
colormap=None,
-
normalize_plurals=True)
-
-
##参数含义如下:
-
font_path : string //字体路径,需要展现什么字体就把该字体路径+后缀名写上,如:font_path = '黑体.ttf'
-
width : int (default=400) //输出的画布宽度,默认为400像素
-
height : int (default=200) //输出的画布高度,默认为200像素
-
prefer_horizontal : float (default=0.90) //词语水平方向排版出现的频率,默认 0.9 (所以词语垂直方向排版出现频率为 0.1 )
-
mask : nd-array or None (default=None) //如果参数为空,则使用二维遮罩绘制词云。如果 mask 非空,设置的宽高值将被忽略,遮罩形状被 mask 取代。除全白(#FFFFFF)的部分将不会绘制,其余部分会用于绘制词云。如:bg_pic = imread('读取一张图片.png'),背景图片的画布一定要设置为白色(#FFFFFF),然后显示的形状为不是白色的其他颜色。可以用ps工具将自己要显示的形状复制到一个纯白色的画布上再保存,就ok了。
-
scale : float (default=1) //按照比例进行放大画布,如设置为1.5,则长和宽都是原来画布的1.5倍。
-
min_font_size : int (default=4) //显示的最小的字体大小
-
font_step : int (default=1) //字体步长,如果步长大于1,会加快运算但是可能导致结果出现较大的误差。
-
max_words : number (default=200) //要显示的词的最大个数
-
stopwords : set of strings or None //设置需要屏蔽的词,如果为空,则使用内置的STOPWORDS
-
background_color : color value (default=”black”) //背景颜色,如background_color='white',背景颜色为白色。
-
max_font_size : int or None (default=None) //显示的最大的字体大小
-
mode : string (default=”RGB”) //当参数为“RGBA”并且background_color不为空时,背景为透明。
-
relative_scaling : float (default=.5) //词频和字体大小的关联性
-
color_func : callable, default=None //生成新颜色的函数,如果为空,则使用 self.color_func
-
regexp : string or None (optional) //使用正则表达式分隔输入的文本
-
collocations : bool, default=True //是否包括两个词的搭配
-
colormap : string or matplotlib colormap, default=”viridis” //给每个单词随机分配颜色,若指定color_func,则忽略该方法。
#方法:fit_words(frequencies) //根据词频生成词云generate(text) //根据文本生成词云-
generate_from_frequencies(frequencies[, ...]) //根据词频生成词云
-
generate_from_text(text) //根据文本生成词云
-
process_text(text) //将长文本分词并去除屏蔽词(此处指英语,中文分词还是需要自己用别的库先行实现,使用上面的 fit_words(frequencies) )
-
recolor([random_state, color_func, colormap]) //对现有输出重新着色。重新上色会比重新生成整个词云快很多。
-
to_array() //转化为 numpy array
-
to_file(filename) //输出到文件
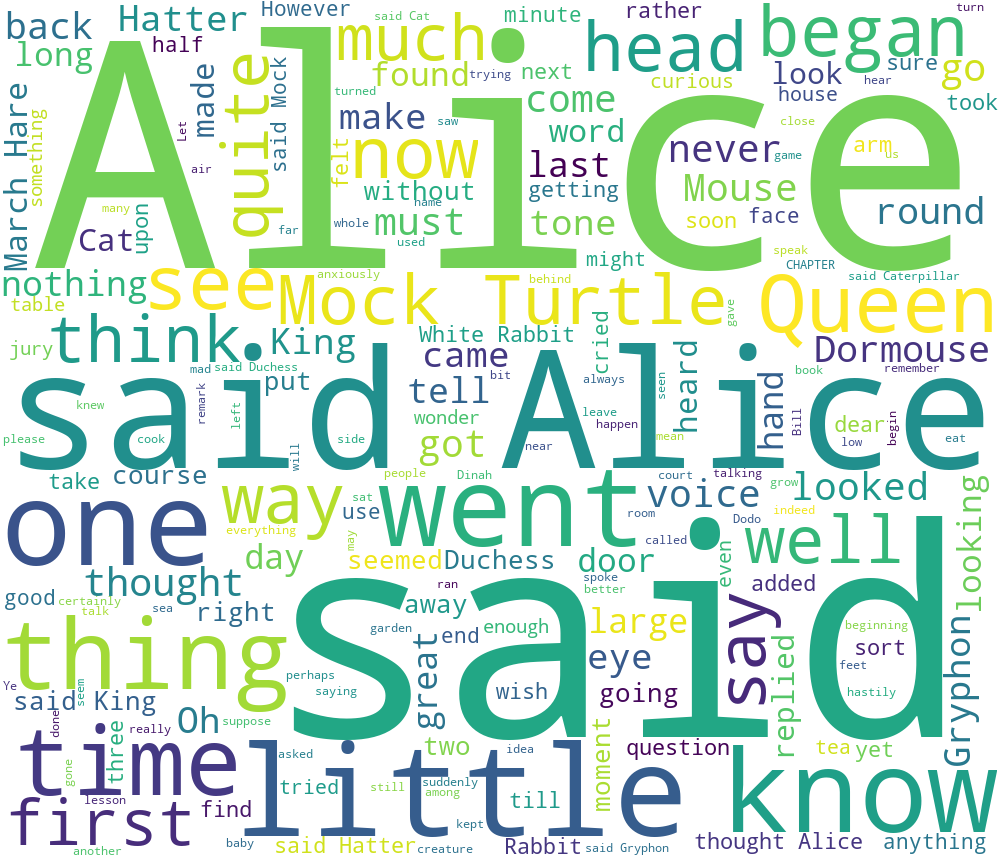
二、GitHub上的英文词云例子
1、简单例子
-
from wordcloud import WordCloud
-
import matplotlib.pyplot as plt
-
-
f = open('../txt/alice.txt', 'r').read()
-
wordcloud = WordCloud(background_color="white",width=1000,height=860,margin=2).generate(f)
-
plt.imshow(wordcloud)
-
plt.axis("off")
-
plt.show()
-
wordcloud.to_file('../picture/example1.png')
运行效果:
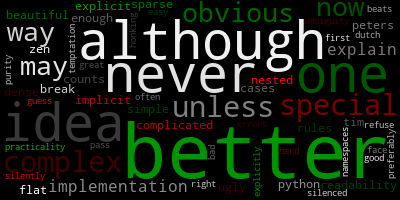
2.设置字体颜色例子
-
# -*- encoding:utf-8 -*-
-
#设置字体颜色例子
-
"""
-
Colored by Group Example
-
========================
-
-
Generating a word cloud that assigns colors to words based on
-
a predefined mapping from colors to words
-
"""
-
-
from wordcloud import (WordCloud, get_single_color_func)
-
import matplotlib.pyplot as plt
-
-
-
class SimpleGroupedColorFunc(object):
-
"""Create a color function object which assigns EXACT colors
-
to certain words based on the color to words mapping
-
-
Parameters
-
----------
-
color_to_words : dict(str -> list(str))
-
A dictionary that maps a color to the list of words.
-
-
default_color : str
-
Color that will be assigned to a word that's not a member
-
of any value from color_to_words.
-
"""
-
-
def __init__(self, color_to_words, default_color):
-
self.word_to_color = {word: color
-
for (color, words) in color_to_words.items()
-
for word in words}
-
-
self.default_color = default_color
-
-
def __call__(self, word, **kwargs):
-
return self.word_to_color.get(word, self.default_color)
-
-
-
class GroupedColorFunc(object):
-
"""Create a color function object which assigns DIFFERENT SHADES of
-
specified colors to certain words based on the color to words mapping.
-
-
Uses wordcloud.get_single_color_func
-
-
Parameters
-
----------
-
color_to_words : dict(str -> list(str))
-
A dictionary that maps a color to the list of words.
-
-
default_color : str
-
Color that will be assigned to a word that's not a member
-
of any value from color_to_words.
-
"""
-
-
def __init__(self, color_to_words, default_color):
-
self.color_func_to_words = [
-
(get_single_color_func(color), set(words))
-
for (color, words) in color_to_words.items()]
-
-
self.default_color_func = get_single_color_func(default_color)
-
-
def get_color_func(self, word):
-
"""Returns a single_color_func associated with the word"""
-
try:
-
color_func = next(
-
color_func for (color_func, words) in self.color_func_to_words
-
if word in words)
-
except StopIteration:
-
color_func = self.default_color_func
-
-
return color_func
-
-
def __call__(self, word, **kwargs):
-
return self.get_color_func(word)(word, **kwargs)
-
-
-
text = """The Zen of Python, by Tim Peters
-
Beautiful is better than ugly.
-
Explicit is better than implicit.
-
Simple is better than complex.
-
Complex is better than complicated.
-
Flat is better than nested.
-
Sparse is better than dense.
-
Readability counts.
-
Special cases aren't special enough to break the rules.
-
Although practicality beats purity.
-
Errors should never pass silently.
-
Unless explicitly silenced.
-
In the face of ambiguity, refuse the temptation to guess.
-
There should be one-- and preferably only one --obvious way to do it.
-
Although that way may not be obvious at first unless you're Dutch.
-
Now is better than never.
-
Although never is often better than *right* now.
-
If the implementation is hard to explain, it's a bad idea.
-
If the implementation is easy to explain, it may be a good idea.
-
Namespaces are one honking great idea -- let's do more of those!"""
-
-
# Since the text is small collocations are turned off and text is lower-cased
-
wc = WordCloud(collocations=False).generate(text.lower())
-
-
color_to_words = {
-
# words below will be colored with a green single color function
-
'#00ff00': ['beautiful', 'explicit', 'simple', 'sparse',
-
'readability', 'rules', 'practicality',
-
'explicitly', 'one', 'now', 'easy', 'obvious', 'better'],
-
# will be colored with a red single color function
-
'red': ['ugly', 'implicit', 'complex', 'complicated', 'nested',
-
'dense', 'special', 'errors', 'silently', 'ambiguity',
-
'guess', 'hard']
-
}
-
-
# Words that are not in any of the color_to_words values
-
# will be colored with a grey single color function
-
default_color = 'grey'
-
-
# Create a color function with single tone
-
# grouped_color_func = SimpleGroupedColorFunc(color_to_words, default_color)
-
-
# Create a color function with multiple tones
-
grouped_color_func = GroupedColorFunc(color_to_words, default_color)
-
-
# Apply our color function
-
wc.recolor(color_func=grouped_color_func)
-
wc.to_file('../picture/example2_colorChanged.png')
-
# Plot
-
plt.figure()
-
plt.imshow(wc, interpolation="bilinear")
-
plt.axis("off")
-
plt.show()
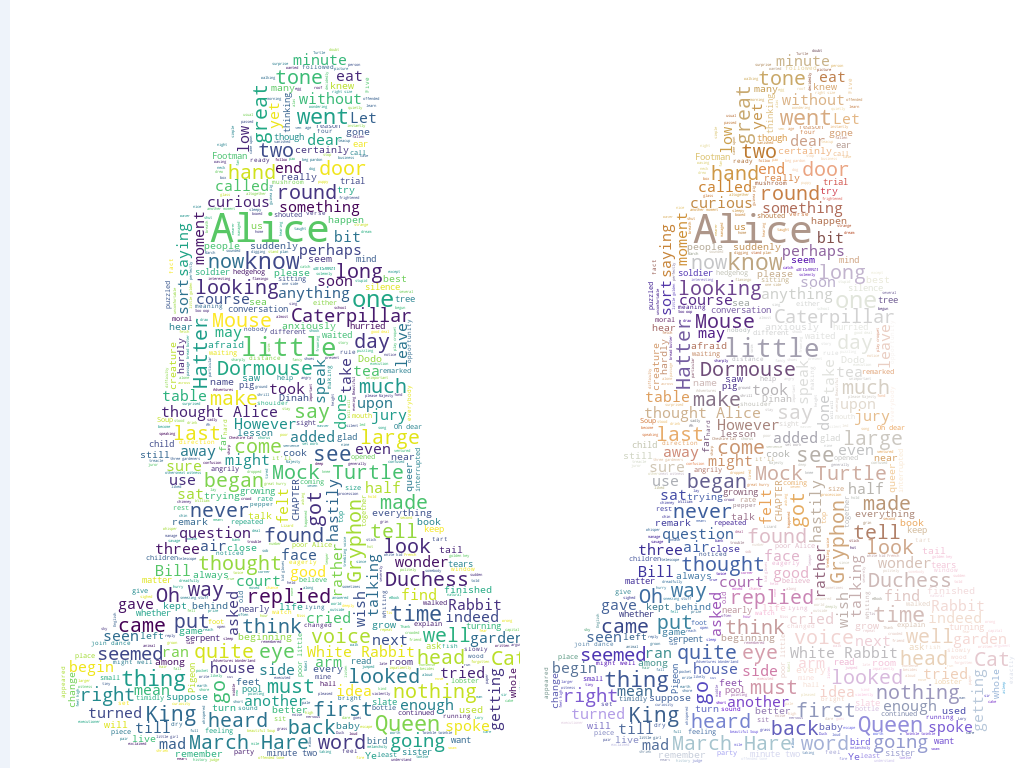
3.利用背景图片生成词云,设置停用词
-
# -*- encoding:utf-8 -*-.
-
#利用背景图片生成词云,设置停用词
-
"""
-
Image-colored wordcloud
-
=======================
-
-
You can color a word-cloud by using an image-based coloring strategy
-
implemented in ImageColorGenerator. It uses the average color of the region
-
occupied by the word in a source image. You can combine this with masking -
-
pure-white will be interpreted as 'don't occupy' by the WordCloud object when
-
passed as mask.
-
If you want white as a legal color, you can just pass a different image to
-
"mask", but make sure the image shapes line up.
-
"""
-
-
from os import path
-
from PIL import Image
-
import numpy as np
-
import matplotlib.pyplot as plt
-
-
from wordcloud import WordCloud, STOPWORDS, ImageColorGenerator
-
-
#源码所在目录
-
d = path.dirname(__file__)
-
-
# Read the whole text.
-
text = open(path.join(d, '../txt/alice.txt')).read()
-
-
# read the mask / color image taken from
-
# http://jirkavinse.deviantart.com/art/quot-Real-Life-quot-Alice-282261010
-
alice_coloring = np.array(Image.open(path.join(d, "../bgPic/alice_color.png")))
-
stopwords = set(STOPWORDS)
-
stopwords.add("said")
-
-
wc = WordCloud(background_color="white", max_words=2000, mask=alice_coloring,
-
stopwords=stopwords, max_font_size=40, random_state=42)
-
# generate word cloud
-
wc.generate(text)
-
-
# create coloring from image
-
image_colors = ImageColorGenerator(alice_coloring)
-
-
# show
-
plt.imshow(wc, interpolation="bilinear")
-
plt.axis("off")
-
plt.figure()
-
wc.to_file(path.join(d, '../picture/alice_colored1.png'))
-
# recolor wordcloud and show
-
# we could also give color_func=image_colors directly in the constructor
-
plt.imshow(wc.recolor(color_func=image_colors), interpolation="bilinear")
-
wc.to_file(path.join(d, '../picture/alice_colored2.png'))
-
plt.axis("off")
-
plt.figure()
-
plt.imshow(alice_coloring, cmap="gray", interpolation="bilinear")
-
plt.axis("off")
-
wc.to_file(path.join(d, '../picture/alice_colored3.png'))
-
plt.show()
运行效果:
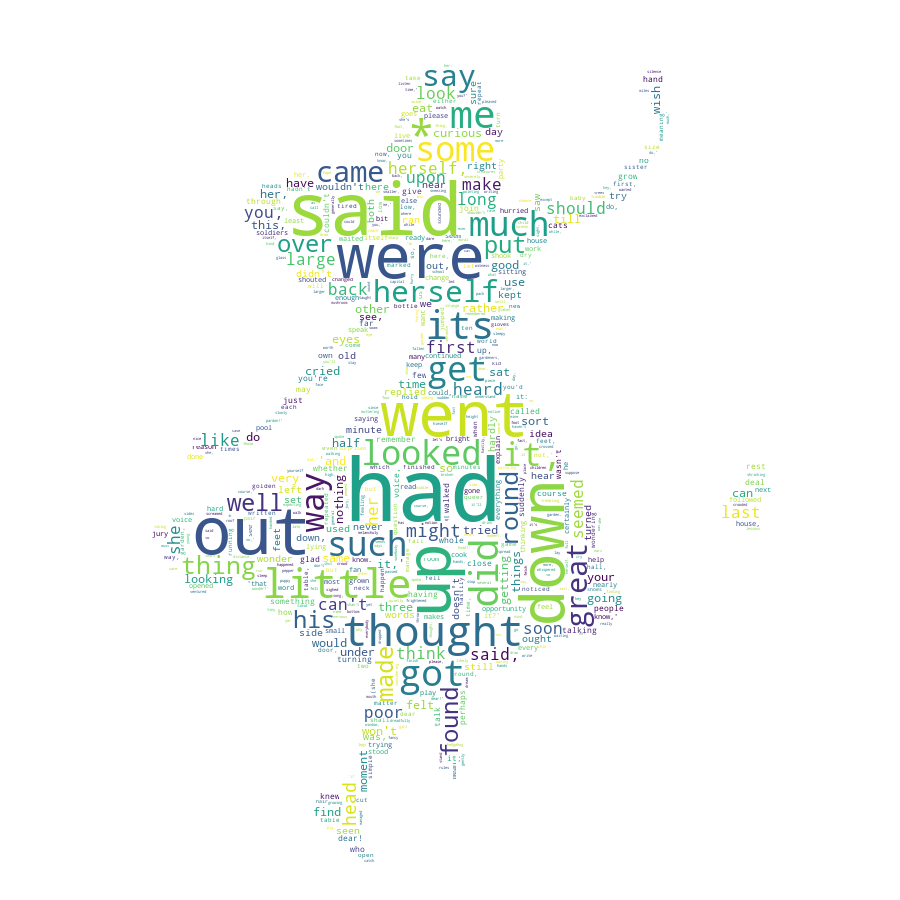
4.使用遮罩,生成任意形状的词云
-
# -*- encoding:utf-8 -*-.
-
"""
-
Masked wordcloud
-
================
-
-
Using a mask you can generate wordclouds in arbitrary shapes.
-
"""
-
-
from os import path
-
from PIL import Image
-
import numpy as np
-
import matplotlib.pyplot as plt
-
-
from wordcloud import WordCloud, STOPWORDS
-
-
d = path.dirname(__file__)
-
-
# Read the whole text.
-
text = open(path.join(d, '../txt/alice.txt')).read()
-
-
# read the mask image
-
# taken from
-
# http://www.stencilry.org/stencils/movies/alice%20in%20wonderland/255fk.jpg
-
alice_mask = np.array(Image.open(path.join(d, "../bgPic/alice_mask.png")))
-
-
stopwords = set(STOPWORDS)
-
stopwords.add("said")
-
-
wc = WordCloud(background_color="white", max_words=2000, mask=alice_mask,
-
stopwords=stopwords)
-
# generate word cloud
-
wc.generate(text)
-
-
# store to file
-
wc.to_file(path.join(d, "../picture/alice.png"))
-
-
# show
-
plt.imshow(wc, interpolation='bilinear')
-
plt.axis("off")
-
plt.figure()
-
plt.imshow(alice_mask, cmap="gray", interpolation='bilinear')
-
plt.axis("off")
-
plt.show()
运行效果:
5.根据词频生成词云
-
import time
-
import multidict as multidict
-
import numpy as np
-
import re
-
from PIL import Image
-
from os import path
-
from wordcloud import WordCloud
-
import matplotlib.pyplot as plt
-
-
def getFrequencyDictForText(sentence):
-
fullTermsDict = multidict.MultiDict()
-
tmpDict = {}
-
-
# making dict for counting frequencies
-
for text in sentence.split(" "):
-
if re.match("a|the|an|the|to|in|for|of|or|by|with|is|on|that|be",text):
-
continue
-
val = tmpDict.get(text,0)
-
tmpDict[text.lower()] = val+1
-
for key in tmpDict:
-
fullTermsDict.add(key,tmpDict[key])
-
return fullTermsDict
-
-
-
-
def makeImage(text):
-
alice_mask = np.array(Image.open("../bgPic/alice_mask.png"))
-
-
-
wc = WordCloud(background_color="white", max_words=1000, mask=alice_mask)
-
# generate word cloud
-
wc.generate_from_frequencies(text)
-
wc.to_file("../picture/freq.png")
-
# show
-
plt.imshow(wc, interpolation="bilinear")
-
plt.axis("off")
-
plt.show()
-
-
d = path.dirname(__file__)
-
-
text = open(path.join(d, '../txt/alice.txt'),encoding='utf-8')
-
text = text.read()
-
makeImage(getFrequencyDictForText(text))
运行效果:
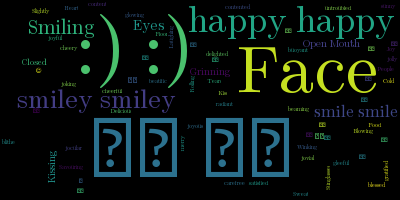
6.使用正则
-
# -*- encoding:utf-8 -*-.
-
"""
-
Emoji Example
-
===============
-
A simple example that shows how to include emoji. Note that this example does not seem to work on OS X, but does
-
work correctly in Ubuntu.
-
-
There are 3 important steps to follow to include emoji:
-
1) Read the text input with io.open instead of the built in open. This ensures that it is loaded as UTF-8
-
2) Override the regular expression used by word cloud to parse the text into words. The default expression
-
will only match ascii words
-
3) Override the default font to something that supports emoji. The included Symbola font includes black and
-
white outlines for most emoji. There are currently issues with the PIL/Pillow library that seem to prevent
-
it from functioning correctly on OS X (https://github.com/python-pillow/Pillow/issues/1774), so try this
-
on ubuntu if you are having problems.
-
"""
-
import io
-
import string
-
from os import path
-
from wordcloud import WordCloud
-
-
d = path.dirname(__file__)
-
-
# It is important to use io.open to correctly load the file as UTF-8
-
text = io.open(path.join(d, '../txt/happy-emoji.txt'),encoding='utf-8').read()
-
-
# the regex used to detect words is a combination of normal words, ascii art, and emojis
-
# 2+ consecutive letters (also include apostrophes), e.x It's
-
normal_word = r"(?:\w[\w']+)"
-
# 2+ consecutive punctuations, e.x. :)
-
ascii_art = r"(?:[{punctuation}][{punctuation}]+)".format(punctuation=string.punctuation)
-
# a single character that is not alpha_numeric or other ascii printable
-
emoji = r"(?:[^\s])(?<![\w{ascii_printable}])".format(ascii_printable=string.printable)
-
regexp = r"{normal_word}|{ascii_art}|{emoji}".format(normal_word=normal_word, ascii_art=ascii_art,
-
emoji=emoji)
-
-
# Generate a word cloud image
-
# The Symbola font includes most emoji
-
font_path = path.join(d, '../fonts', 'Symbola', 'Symbola.ttf')
-
wordcloud = WordCloud(font_path=font_path, regexp=regexp).generate(text)
-
-
# Display the generated image:
-
# the matplotlib way:
-
import matplotlib.pyplot as plt
-
plt.imshow(wordcloud)
-
plt.axis("off")
-
plt.show()
-
wordcloud.to_file('../picture/emojj.png')
运行效果:
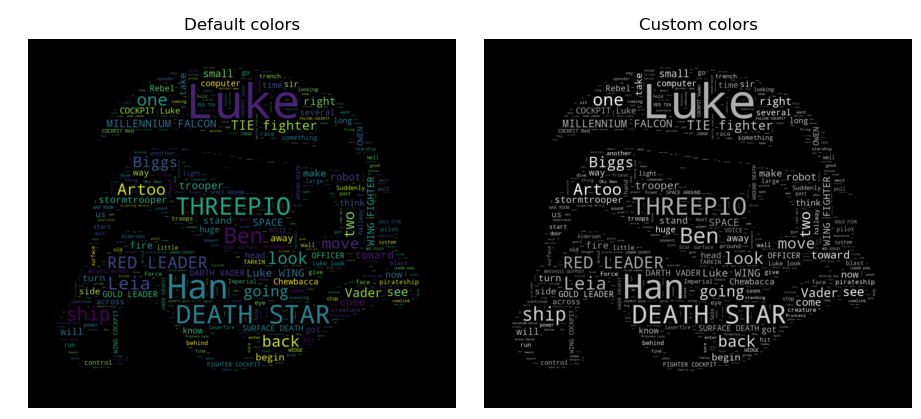
7.使用recolor方法定制 coloring functions
-
"""
-
Using custom colors
-
===================
-
-
Using the recolor method and custom coloring functions.
-
"""
-
-
import numpy as np
-
from PIL import Image
-
from os import path
-
import matplotlib.pyplot as plt
-
import random
-
-
from wordcloud import WordCloud, STOPWORDS
-
-
-
def grey_color_func(word, font_size, position, orientation, random_state=None,
-
**kwargs):
-
return "hsl(0, 0%%, %d%%)" % random.randint(60, 100)
-
-
d = path.dirname(__file__)
-
-
# read the mask image
-
# taken from
-
# http://www.stencilry.org/stencils/movies/star%20wars/storm-trooper.gif
-
mask = np.array(Image.open(path.join(d, "../bgPic/stormtrooper_mask.png")))
-
-
# movie script of "a new hope"
-
# http://www.imsdb.com/scripts/Star-Wars-A-New-Hope.html
-
# May the lawyers deem this fair use.
-
text = open(path.join(d, '../txt/a_new_hope.txt')).read()
-
-
# preprocessing the text a little bit
-
text = text.replace("HAN", "Han")
-
text = text.replace("LUKE'S", "Luke")
-
-
# adding movie script specific stopwords
-
stopwords = set(STOPWORDS)
-
stopwords.add("int")
-
stopwords.add("ext")
-
-
wc = WordCloud(max_words=1000, mask=mask, stopwords=stopwords, margin=10,
-
random_state=1).generate(text)
-
# store default colored image
-
default_colors = wc.to_array()
-
wc.to_file("default_hope.png")
-
plt.title("Custom colors")
-
plt.imshow(wc.recolor(color_func=grey_color_func, random_state=3),
-
interpolation="bilinear")
-
wc.to_file("a_new_hope.png")
-
plt.axis("off")
-
plt.figure()
-
plt.title("Default colors")
-
plt.imshow(default_colors, interpolation="bilinear")
-
plt.axis("off")
-
plt.show()
运行效果:
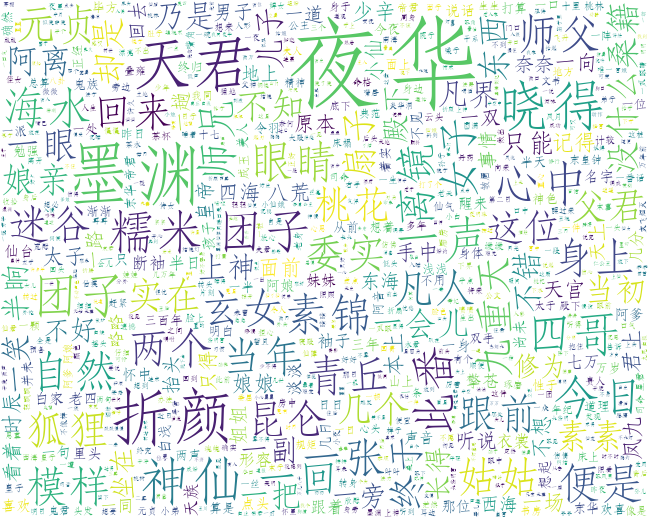
三、中文词云
中文词云需要使用jieba分词先预处理,这里我写了一段小代码作为学习词云的练习:
-
# -*- encoding:utf-8 -*-
-
#Programmed by Mr.Cun
-
#Time:Feb.8.2018
-
-
from os import path
-
from scipy.misc import imread
-
import matplotlib.pyplot as plt
-
import jieba
-
import multidict as multidict
-
import numpy as np
-
from PIL import Image
-
import re
-
-
#如果加载用户词典,jieba词典变为第二词典
-
# jieba.load_userdict("txt\userdict.txt")
-
from wordcloud import WordCloud, ImageColorGenerator
-
-
#获取词频
-
def getFrequencyDictForText(sentence):
-
fullTermsDict = multidict.MultiDict()
-
tmpDict = {}
-
-
# making dict for counting frequencies
-
for text in sentence.split(" "):
-
val = tmpDict.get(text,0)
-
tmpDict[text.lower()] = val+1
-
for key in tmpDict:
-
fullTermsDict.add(key,tmpDict[key])
-
return fullTermsDict
-
-
#添加用户自定义词
-
def add_word(list):
-
for items in list:
-
jieba.add_word(items)
-
-
-
-
d = path.dirname(__file__)
-
stopwords = {}
-
back_coloring_path = "../bgPic/mask.jpg" #遮罩图片
-
text_path = '../txt/sanshengsanshi.txt'
-
font_path = '../fonts/STFANGSO.ttf' #
-
stopwords_path = '../stopwords/stopworsZh1893.txt' # 网上下载的中文停用词表
-
my_words_list = ['白浅','离镜','叠风','少辛','小素锦','二师兄长衫',
-
'离怨','天君','夜华','墨渊','照歌','白真','连宋',
-
'子阑','瑶光','火麒麟','十师兄','乐胥','白凤九','折颜',
-
'素锦','父神','桑籍','擎苍','令羽','司命','天枢','东华',
-
'玄女','阿离','伽昀','玉铛','成玉','央错','金猊兽'] #自定义的词
-
back_coloring = imread(path.join(d, back_coloring_path))#
-
-
#定义词云属性
-
wc = WordCloud(font_path=font_path,
-
background_color="white",
-
max_words=2000,
-
mask=back_coloring,
-
max_font_size=100,
-
random_state=42,
-
width=1000, height=860, margin=2,
-
)
-
-
def jiebaclearText(text):
-
mywordlist = []
-
seg_list = jieba.cut(text, cut_all=False)
-
liststr="/ ".join(seg_list)
-
f_stop_text = open(stopwords_path,'r',encoding='utf-8').read()
-
# f_stop = open(stopwords_path,'r',encoding='utf-8')
-
# # try:
-
# # f_stop_text = f_stop.read()
-
# # f_stop_text=f_stop_text.encode('utf-8')
-
# # finally:
-
# # f_stop.close( )
-
f_stop_seg_list=f_stop_text.split('\n')
-
for myword in liststr.split('/'):
-
if not(myword.strip() in f_stop_seg_list) and len(myword.strip())>1:
-
mywordlist.append(myword)
-
return ''.join(mywordlist)
-
-
-
add_word(my_words_list)
-
text = open(path.join(d, text_path)).read()
-
text = jiebaclearText(text)
-
-
#生成文本词云
-
wc.generate(text)
-
plt.figure()
-
plt.imshow(wc)
-
plt.axis("off")
-
wc.to_file(path.join(d, '../picture/sansheng1.png'))
-
-
#使词云复合遮罩
-
image_colors = ImageColorGenerator(back_coloring)
-
plt.imshow(wc.recolor(color_func=image_colors))
-
plt.axis("off")
-
plt.imshow(back_coloring, cmap="gray")
-
plt.axis("off")
-
wc.to_file(path.join(d,'../picture/sansheng2.png'))
-
#词频词云
-
wc.generate_from_frequencies(getFrequencyDictForText(text))
-
wc.to_file("../picture/sansheng3.png")
-
plt.imshow(wc, interpolation="bilinear")
-
plt.axis("off")
-
plt.show()
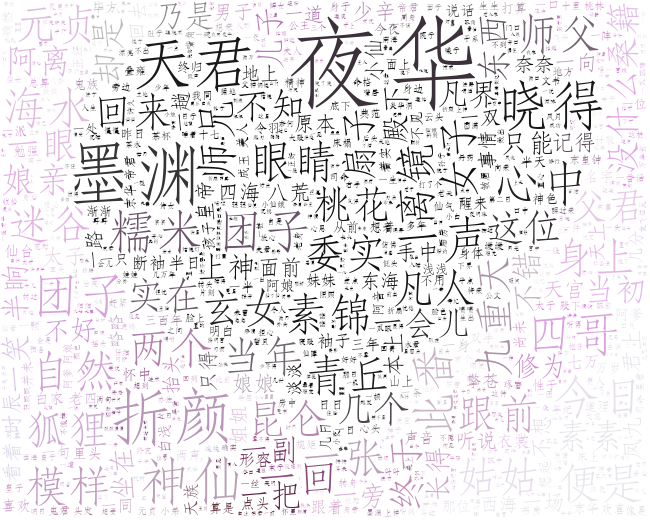
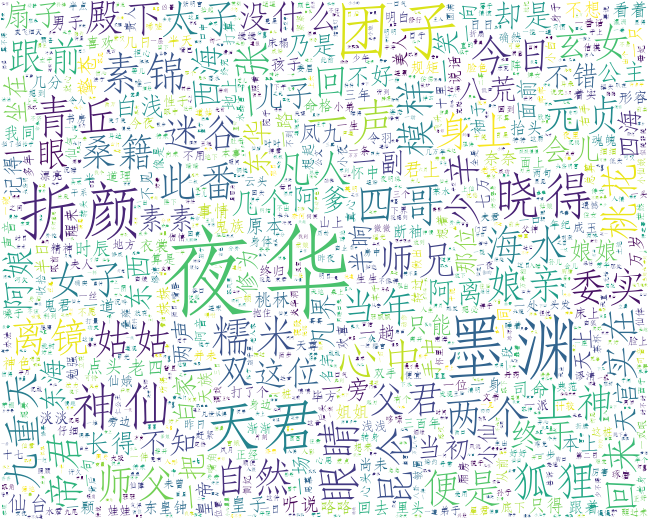
运行效果如下:
原始词云
遮罩词云:
词频词云:

 浙公网安备 33010602011771号