doris02-编译安装
doris02-编译安装
1. 编译
通过前一个, 我们应该已经编译完成了, 完成后的文件在 output/ 目录下
2. 机器要求
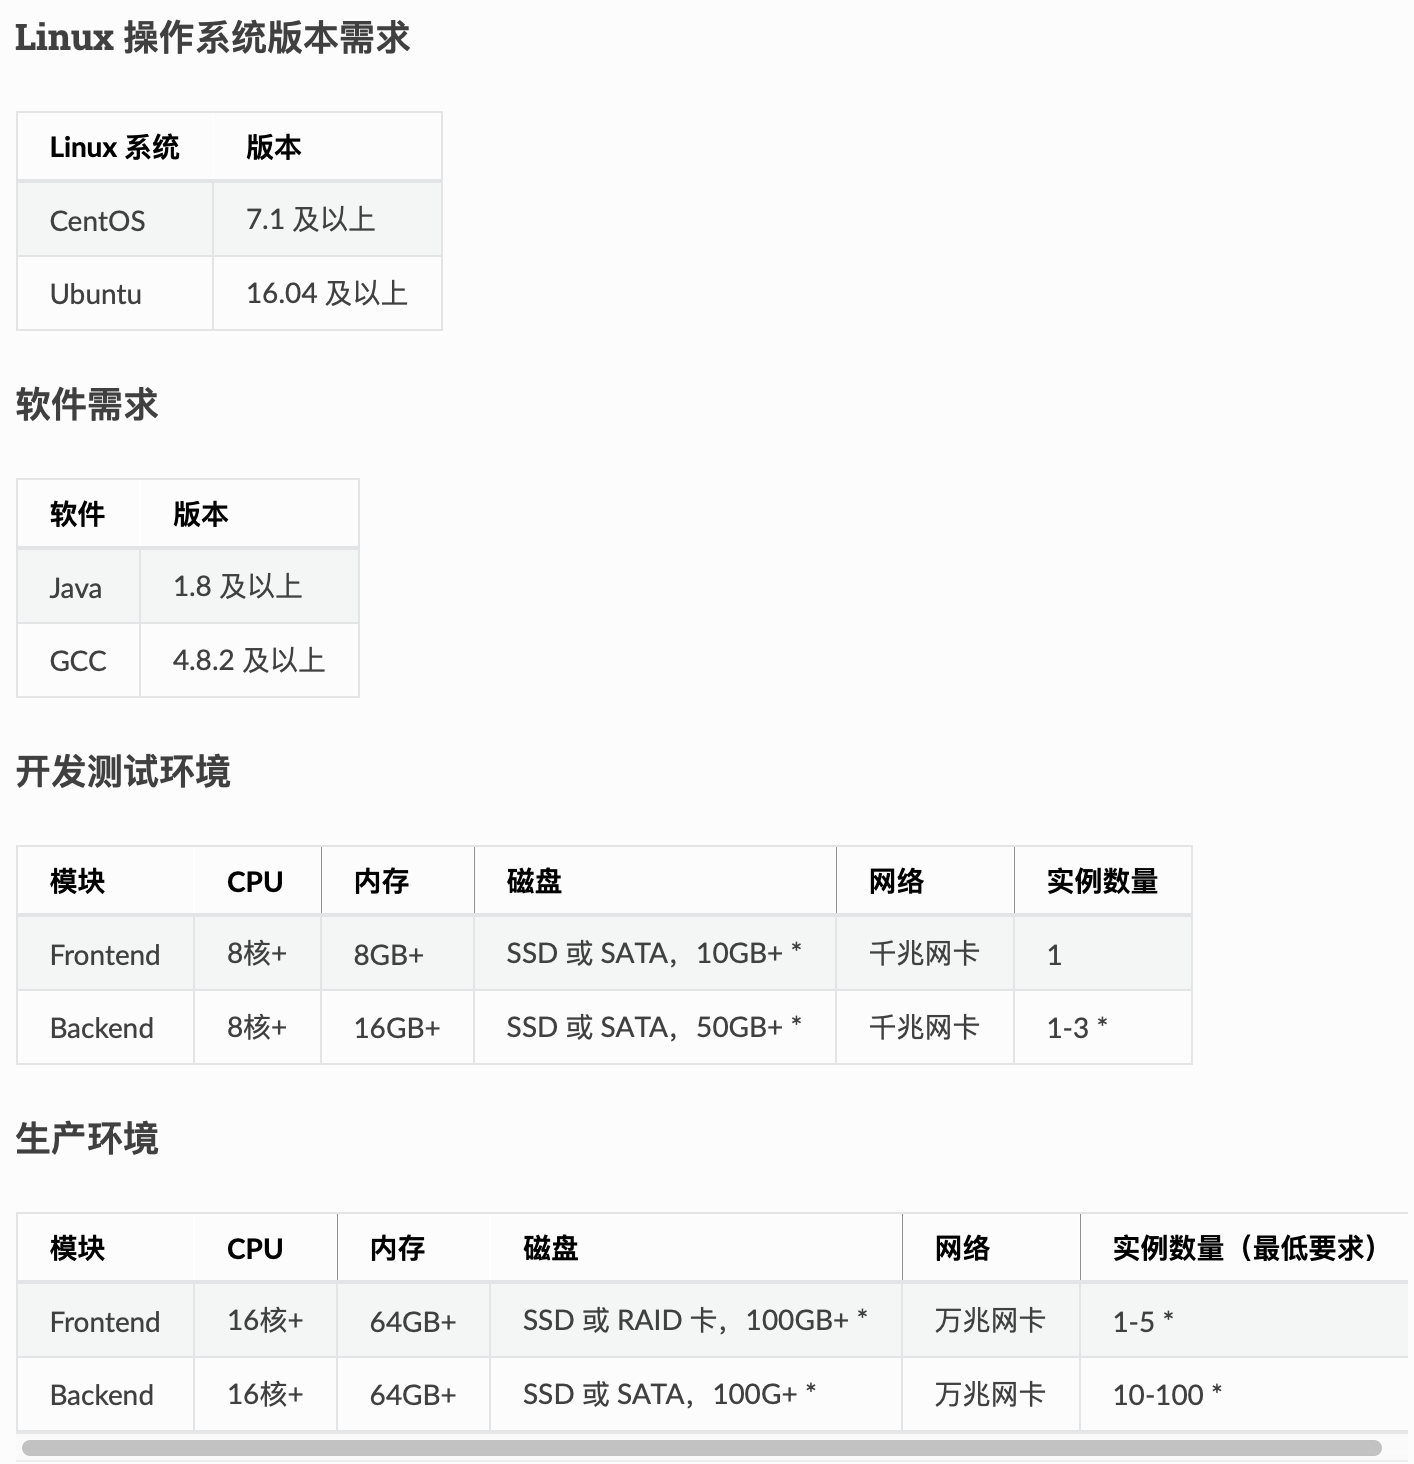
2.1) 软件需求

2.2) 硬件需求
- be总磁盘空间按3副本计算的话, 需要
数据量*3, 然后预留40%作为后台compaction及中间数据存放 - 同一节点可部署多个be, 但如果要求3副本数据, 则必须3个机器部署3个be
- be的数量多少直接决定了查询速度
- fe 分为Folloer(选一个leader) 和 Observer
- FE 节点数据至少为1(1 个 Follower)。当部署 1 个 Follower 和 1 个 Observer 时,可以实现读高可用。当部署 3 个 Follower 时,可以实现读写高可用(HA)。
- Follower 的数量必须为奇数,Observer 数量随意。
- 根据以往经验,当集群可用性要求很高是(比如提供在线业务),可以部署 3 个 Follower 和 1-3 个 Observer。如果是离线业务,建议部署 1 个 Follower 和 1-3 个 Observer。
- 如果 FE 和 BE 混部,需注意资源竞争问题,并保证元数据目录和数据目录分属不同磁盘。
2.3) 关闭swap
root@localhost fe]# free -g
              total        used        free      shared  buff/cache   available
Mem:              5           1           3           0           0           4
Swap:             4           0           4

[root@localhost fe]# cat /proc/vmstat | egrep "dirty|writeback"
nr_dirty 3
nr_writeback 0
nr_writeback_temp 0
nr_dirty_threshold 329179
nr_dirty_background_threshold 109637

[root@localhost fe]# sysctl -w vm.swappiness=0
vm.swappiness = 0

[root@localhost fe]# echo "vm.swappiness = 0" >> /etc/sysc
sysconfig/   sysctl.conf  sysctl.d/

[root@localhost fe]# echo "vm.swappiness = 0" >> /etc/sysctl.conf

[root@localhost fe]# swapoff -a

[root@localhost fe]# free -g
              total        used        free      shared  buff/cache   available
Mem:              5           1           3           0           0           4
Swap:             0           0           0

[root@localhost fe]# sysctl -p
vm.swappiness = 0

[root@localhost fe]# free -g
              total        used        free      shared  buff/cache   available
Mem:              5           1           3           0           0           4
Swap:             0           0           0
[root@localhost fe]#
2.4) 端口开放或关闭防火墙
| 实例名称 | 端口名称 | 默认端口 | 通讯方向 | 说明 |
|---|---|---|---|---|
| BE | be_port | 9060 | FE --> BE | BE 上 thrift server 的端口,用于接收来自 FE 的请求 |
| BE | be_rpc_port | 9070 | BE <--> BE | BE 之间 rpc 使用的端口 |
| BE | webserver_port | 8040 | BE <--> BE | BE 上的 http server 的端口 |
| BE | heartbeat_service_port | 9050 | FE --> BE | BE 上心跳服务端口(thrift),用于接收来自 FE 的心跳 |
| BE | brpc_port* | 8060 | FE<-->BE, BE <--> BE | BE 上的 brpc 端口,用于 BE 之间通讯 |
| FE | http_port * | 8030 | FE <--> FE,用户 | FE 上的 http server 端口 |
| FE | rpc_port | 9020 | BE --> FE, FE <--> FE | FE 上的 thrift server 端口 |
| FE | query_port | 9030 | 用户 | FE 上的 mysql server 端口 |
| FE | edit_log_port | 9010 | FE <--> FE | FE 上的 bdbje 之间通信用的端口 |
| Broker | broker_ipc_port | 8000 | FE --> Broker, BE --> Broker | Broker 上的 thrift server,用于接收请求 |
或者关闭防火情
systemctl stop firewalld
# 关闭开机启动
systemctl disable firewalld.service
2.5) ip绑定
如果机器有多个ip, 比如内网外网, 虚拟机docker等, 需要进行ip绑定, 以便在配置集群时可以正确识别
priority_networks=192.168.206.131/24;10.27.197.26/24
2.6) 修改主机名
hostnamectl set-hostname doris01
hostnamectl set-hostname doris02
3. 启动fe
3.1) 配置环境变量
vim /etc/profile
export DORIS_HOME=/root/doris/fe
3.2) 创建pola-mate
mkdir -p fe/palo-meta
3.3) 修改fe.conf中的JAVA_OPTS
默认 java 最大堆内存为 2GB,建议生产环境调整至 8G 以上。
3.4) 修改ip绑定
priority_networks = 172.20.144.233/24
3.5) 启动
sh bin/start_fe.sh --daemon
日志默认存放在 fe/log/ 目录下
4. 启动be
4.1) 环境变量
vim /etc/profile
export DORIS_HOME=/root/soft/output/be
4.2) 创建storage_root_path, 并配置be.conf
配置 storage_root_path:数据存放目录,使用 ; 分隔(最后一个目录后不要加 ;),其它可以采用默认值。
storage_root_path = /home/palo/data1;/home/palo/data2;/home/palo/data3
5. 添加be
5.1) 使用mysql连接
mysql -h host -P 9030 -uroot
其中 host 为 FE 所在节点 ip;port 为 fe/conf/fe.conf 中的 query_port;默认使用 root 账户,密码为空。
5.2) 添加be
ALTER SYSTEM ADD BACKEND "host:9050";
或者多租户添加be
ALTER SYSTEM ADD FREE BACKEND "host:port";
其中 host 为 BE 所在节点 ip;port 为 be/conf/be.conf 中的 heartbeat_service_port。
如果不添加 FREE 关键字,BE 默认进入自动生成的 cluster,添加了 FREE 关键字后新的 BE 不属于任何 cluster,这样创建新 cluster 的时候就可以从这些空闲的be中选取, 详细见多租户
5.3) 修改可打开文件数
ulimit -n 65535
上述方式在重启系统后失效
或者修改配置文件: /etc/security/limits.conf, 添加
* soft nofile 65535
* hard nofile 65535
* soft nproc 65535
* hard nproc 65535
具体可见博客
否则启动不成功, 日志报错
E0116 01:01:01.520340 5608 storage_engine.cpp:365] File descriptor number is less than 60000. Please use (ulimit -n) to set a value equal or greater than 60000
W0116 01:01:01.520455 5608 storage_engine.cpp:95] engine open failed, res=-123
F0116 01:01:01.521009 5608 doris_main.cpp:161] fail to open StorageEngine, res=open engine failed
5.3) 修改ip绑定
priority_networks = 172.20.144.17/24
5.4) 启动be
sh bin/start_be.sh --daemon
5.5) 查看fe 和 be
在mysql终端中
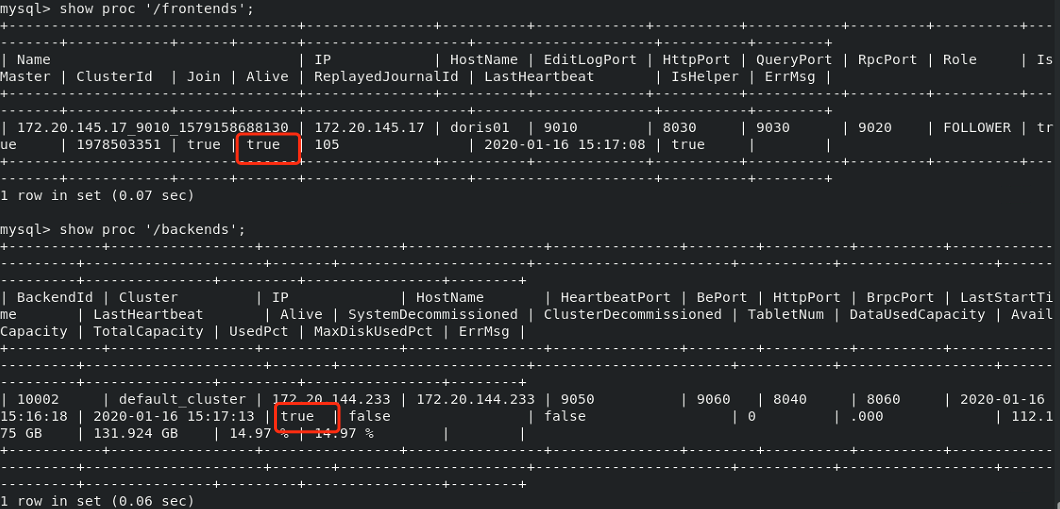
show proc ‘/frontends’;
show proc ‘/backends’;
也可通过前端界面访问:
http://fe_hostname:8030/frontend
http://fe_hostname:fe_http_port/system?path=//frontends
查看be
http://fe_hostname:8030/backend
http://fe_hostname:fe_http_port/system?path=//backends
用户名为root, 密码为空
6. fe高可用部署
https://blog.csdn.net/weixin_43832846/article/details/89320171
http://doris.apache.org/documentation/cn/installing/install-deploy.html#id2
7. 确定集群部署成功
7.1) fe节点启动成功
日志中会看到 transfer from UNKNOWN to MASTER/FOLLOWER/OBSERVER。最终会看到 thrift server started 日志,并且可以通过 mysql 客户端连接到 FE,则表示 FE 启动成功。
或者: http://fe_host:8030/api/bootstrap
结果返回
如果在 fe.log 中查看不到启动失败的信息,也许在 fe.out 中可以看到。
7.2) be节点成功
BE 进程启动后,如果之前有数据,则可能有数分钟不等的数据索引加载时间
BE 尚未加入任何集群,则 BE 日志会定期滚动 waiting to receive first heartbeat from frontend 字样。表示 BE 还未通过 FE 的心跳收到 Master 的地址,正在被动等待。这种错误日志,在 FE 中 ADD BACKEND 并发送心跳后,就会消失。如果在接到心跳后,又重复出现 master client, get client from cache failed.host: , port: 0, code: 7 字样,说明 FE 成功连接了 BE,但 BE 无法主动连接 FE。可能需要检查 BE 到 FE 的 rpc_port 的连通性。
其次,日志中应该每隔 10 秒滚动 finish report task success. return code: 0 的字样,表示 BE 向 FE 的通信正常。
同时,如果有数据查询,应该能看到不停滚动的日志,并且有 execute time is xxx 日志,表示 BE 启动成功,并且查询正常。
或者连接http:
http://be_host:8030/api/health
结果返回
如果在 be.INFO 中查看不到启动失败的信息,也许在 be.out 中可以看到。
7.3) fe, be连通正常
首先确认正常添加了所有节点
show proc '/backends';
show proc '/frontends';
show proc '/brokers';
如果心跳正常,BE 的日志中会显示 get heartbeat, host: xx.xx.xx.xx, port: 9020, cluster id: xxxxxx
如果心跳失败,在 FE 的日志中会出现 backend[10001] got Exception: org.apache.thrift.transport.TTransportException类似的字样,或者其他 thrift 通信异常日志,表示 FE 向 10001 这个 BE 的心跳失败。这里需要检查 FE 向 BE host 的心跳端口的连通性。
如果 BE 向 FE 的通信正常,则 BE 日志中会显示 finish report task success. return code: 0的字样。否则会出现 master client, get client from cache failed 的字样。这种情况下,需要检查 BE 向 FE 的 rpc_port 的连通性。
7.4) 各节点认证
出了fe master外, Follower FE,Observer FE,Backend 都需要通过 ALTER SYSTEM ADD注册到集群中.
FEMater启动的时候, 会在palo-meta/image/VERSION 下创建cluster_id.
其他FE第一次加入集群的时候, 会获取cluster_id, 之后每次重启都会校验, 如果不一致, 则fe自动退出
BE在第一次加入集群的时候, 也会获取cluster_id, 之后重启如果不一致, 则BE拒绝响应FE的心跳.
心跳中同时会包含 Master FE 的 ip。当 FE 切主时,新的 Master FE 会携带自身的 ip 发送心跳给 BE,BE 会更新自身保存的 Master FE 的 ip。

 浙公网安备 33010602011771号