Azure Multiple IP 带你爬出新高度
爬虫爬不动,IP地址不够用,今儿咱们来搞一搞。Azure 虚拟机单网卡多 IP 可以支持在单个网卡上最多绑定256个 IP 地址, 并且同时每个 IP 同时支持内网 IP 和 公网 IP。什么搞一台机器我就能拥有 256 个 公网 IP,是滴小伙伴,这只是第一波福利呦,配合负载均衡使用效果会更好欧,一台机器不够用可以通过负载均衡水平扩展,第二波有没有感动到你。好了废话少说,带你来搞。
架构图:
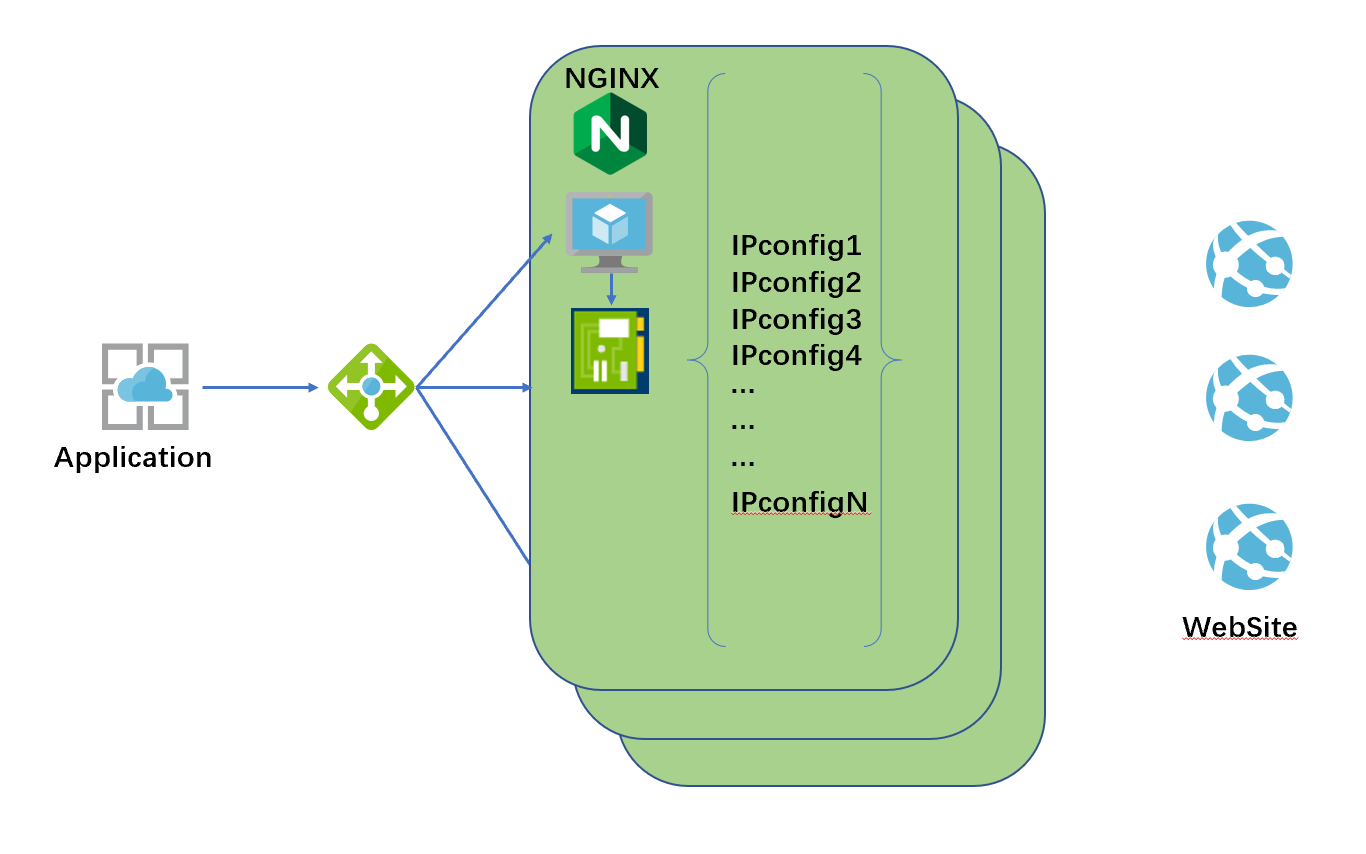
架构说明: 每台 VM 通过单网卡多 IP 方式加载多个公网地址,通过 IPtables 实现 VM 在底层 IP 协议栈传输上的 SNAT (源地址转换)并实现在多个公网 IP 之间负载均衡,VM 上部署 Nginx 实现 Http 层代理功能 (此处真实场景下可以用 socket 代理取代),负载均衡实现 SNAT 的水平扩展,当需要超过 256 个 IP 地址轮询的时候,可以通过多 VM 实现水平扩展。
部署要求:
1. VM 所在 VNet 拥有一个子网该子网空间可容纳预期单 VM 挂载的 IP 地址数量;
2. 一台 Linux 主机,本例以 Ubuntu 14.04 LTS 版本为例
部署方法:
1. 准备多 IP 网卡,
默认情况下在 Portal 中通过向导部署的虚拟机只有一个 IP 地址,如果需要在单网卡中绑定多个 IP 地址,可以创建一个多 IP 网卡将其与 VM 进行绑定,此处不在赘述这些基本操作,直接给出大家多 IP 网卡创建的 ARM 模板,大家可以直接使用创建,然后将其关联到自己环境中的 VM。 其中部署时候的参数说明如下:
IpNumber:创建网卡所绑定的 IP 地址数量
NicName:创建网卡的名称
VnetName:创建网卡所归属的 VNet
SubnetName:创建网卡所归属的 Subnet
PipName:创建网卡所关联的公网 IP 名称前缀
{
    "$schema": "https://schema.management.azure.com/schemas/2015-01-01/deploymentTemplate.json#",
    "contentVersion": "1.0.0.0",
    "parameters": {
        "IpNumber": {
            "type": "Int"
        },
        "NicName": {
            "type": "String"
        },
        "VnetName": {
            "type": "String"
        },
        "SubnetName": {
            "type": "String"
        },
        "PipName": {
            "type": "String"
        }
    },
    "variables": {},
    "resources": [
        {
            "type": "Microsoft.Network/publicIPAddresses",
            "name": "[concat(parameters('PipName'),copyIndex('staticpiploop',1))]",
            "apiVersion": "2016-03-30",
            "location": "[resourceGroup().location]",
            "copy": {
                "name": "staticpiploop",
                "count": "[parameters('IpNumber')]"
            },
            "properties": {
                "publicIPAllocationMethod": "Dynamic",
                "idleTimeoutInMinutes": 4
            },
            "dependsOn": []
        },
        {
            "type": "Microsoft.Network/networkInterfaces",
            "name": "[parameters('NicName')]",
            "apiVersion": "2016-03-30",
            "location": "[resourceGroup().location]",
            "properties": {
                "copy": [
                    {
                        "name": "ipConfigurations",
                        "count": "[parameters('IpNumber')]",
                        "input": {
                            "name": "[concat('IPConfig-',copyIndex('ipConfigurations',1))]",
                            "properties": {
                                "primary": "[less(copyIndex('ipConfigurations'),1)]",
                                "privateIPAllocationMethod": "Dynamic",
                                "publicIPAddress": {
                                    "id": "[concat(resourceGroup().id, '/providers/', reference(concat('Microsoft.Network/publicIPAddresses/', parameters('PipName'), copyIndex('ipConfigurations',1)), '2016-03-30', 'Full').resourceid)]"
                                },
                                "subnet": {
                                    "id": "[concat(resourceId('Microsoft.Network/virtualNetworks', parameters('VnetName')), '/subnets/', parameters('SubnetName'))]"
                                }
                            }
                        }
                    }
                ]
            },
            "dependsOn": []
        }
    ],
    "outputs": {}
}
2. 登入虚拟机,进行网络地址配置
进入 /etc/network/interfaces.d/ 目录,找到 eth0.cfg 并进行编辑,在 Portal 控制台创建网卡所关联的 IP,只有第一个在 VM 操作系统可见,剩余的 IP 需要在该配置文件中添加,格式如下:
auto eth0
iface eth0 inet dhcp
iface eth0 inet static
address 172.25.0.5
netmask 255.255.255.0
iface eth0 inet static
address 172.25.0.6
netmask 255.255.255.0
根据实际网卡中关联的内网 IP 分配以及数量,修改该配置文件,保存重启。重启回来通过 ip addr show 将在 VM 操作系统中看到这些 IP
3. 配置 IPtables
首先打开 VM 操作系统中的 IP Forwaring
sudo sysctl -w net.ipv4.ip_forward=1
按照如下格式添加 IPtables 规则
sudo iptables -t nat -A POSTROUTING -m statistic --mode nth --every (n) --packet 0 -o eth0 -p tcp --dport 80 -j SNAT --to 172.25.0.(m)
sudo iptables -t nat -A POSTROUTING -m statistic --mode nth --every (n-1) --packet 0 -o eth0 -p tcp --dport 80 -j SNAT --to 172.25.0.(m-1)
...
...
...

sudo iptables -t nat -A POSTROUTING -o eth0 -p tcp --dport 80 -j SNAT --to 172.25.0.(n-k)
4. 安装 Nginx 并配置
安装 Nginx
sudo apt-get install nginx
修改 Nginx 默认配置文件 default,本文为了演示为例,配置 Nginx 代理后端为 www.ipflag.com, 该站点返回值可带回访问方的地址,用于示例中验证公网地址轮询。
##
# You should look at the following URL's in order to grasp a solid understanding
# of Nginx configuration files in order to fully unleash the power of Nginx.
# http://wiki.nginx.org/Pitfalls
# http://wiki.nginx.org/QuickStart
# http://wiki.nginx.org/Configuration
#
# Generally, you will want to move this file somewhere, and start with a clean
# file but keep this around for reference. Or just disable in sites-enabled.
#
# Please see /usr/share/doc/nginx-doc/examples/ for more detailed examples.
##

# Default server configuration
upstream backend  {
               server www.ipflag.com;
        }
#
server {
        listen 172.25.0.4:80;
        listen [::]:80 default_server;

        # SSL configuration
        #
        # listen 443 ssl default_server;
        # listen [::]:443 ssl default_server;
        #
        # Note: You should disable gzip for SSL traffic.
        # See: https://bugs.debian.org/773332
        #
        # Read up on ssl_ciphers to ensure a secure configuration.
        # See: https://bugs.debian.org/765782
        #
        # Self signed certs generated by the ssl-cert package
        # Don't use them in a production server!
        #
        # include snippets/snakeoil.conf;

        root /var/www/html;

        # Add index.php to the list if you are using PHP
        index index.html index.htm index.nginx-debian.html;

        server_name _;

        location / {
                # First attempt to serve request as file, then
                # as directory, then fall back to displaying a 404.
                proxy_pass http://backend;
        }

        # pass the PHP scripts to FastCGI server listening on 127.0.0.1:9000
        #
        #location ~ \.php$ {
        #       include snippets/fastcgi-php.conf;
        #
        #       # With php7.0-cgi alone:
        #       fastcgi_pass 127.0.0.1:9000;
        #       # With php7.0-fpm:
        #       fastcgi_pass unix:/run/php/php7.0-fpm.sock;
        #}

        # deny access to .htaccess files, if Apache's document root
        # concurs with nginx's one
        #
        #location ~ /\.ht {
        #       deny all;
        #}
}


# Virtual Host configuration for example.com
#
# You can move that to a different file under sites-available/ and symlink that
# to sites-enabled/ to enable it.
#
#server {
#       listen 80;
#       listen [::]:80;
#
#       server_name example.com;
#
#       root /var/www/example.com;
#       index index.html;
#
#       location / {
#               try_files $uri $uri/ =404;
#       }
#}
配置完成重启 nginx
sudo service nginx restart
5. 配置之负载均衡
将上述 VM 放置在负载均衡后端,此步为基本操作,不在赘述。
6. 验证
使用一台客户端主机,通过 curl 负载均衡的前端地址来查看返回中的 IP 地址是否发生变化
curl http://loadbalancer_public_ip | | grep setCookie
返回值示例,其中 下面示例中 40.83.103.99 就是 VM 网卡上所绑定的公网地址,多次轮询确认地址达到轮询目标。
% Total    % Received % Xferd  Average Speed   Time    Time     Time  Current
                                 Dload  Upload   Total   Spent    Left  Speed
100  1556    0  1556    0     0  20972      0 --:--:-- --:--:-- --:--:-- 21315
function setCookie(c_name, value, expiredays) { // Local function for setting a value of a cookie
setCookie('YPF8827340282Jdskjhfiw_928937459182JAX666', '40.83.103.99', 10);
扩展思考:
为使方案更加健壮,比如确保 VM 上所关联的公网地址都是可用地址,可以增加使用 Azure Automation 等增加一些自动化的脚本比如定期重新启动。VM 想做到自动的水平伸缩可以通过 VMSS 来实现随业务压力的自动水平扩展。这里就不再赘述,大家可以放飞自我,大胆畅想。

 浙公网安备 33010602011771号