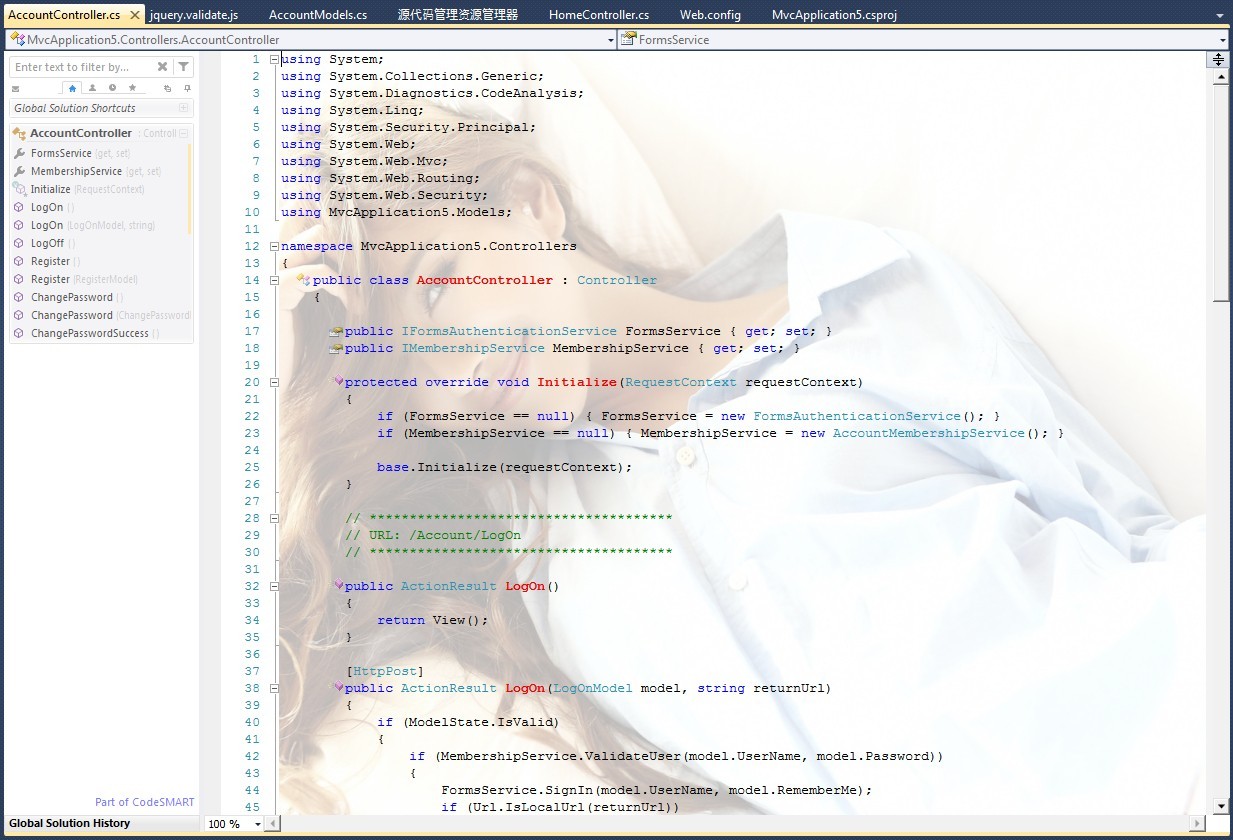
为 Visual Studio 2010 开发扩展插件
之前看到有国外的大神开发了一些非常好玩的 Visual Studio 扩展插件,觉得非常有意思,自己也参考了别人的代码做了一个插件。
首先需要安装 Visual Studio SDK ,安装不需要其它的工具就可以,直接使用 Visual Studio 安装包。
安装完成后打开 Visual Studio 2010,创建一个名为 VSEditorBackgroud 的 VSIX Project:文件(File)-> 新建(New)-> 项目(Project)->Visual C#->Extensibility-> VSIX Project,名称为 VSEditorBackgroud。
添加 Config 类:
using System;
using System.Collections.Generic;
using System.Linq;
using System.Text;
using System.Xml.Serialization;
using System.IO;

namespace VSEditorBackgroud
{
    [Serializable]
    public class Config
    {
        public ImageConfig BackgroundImage;
        private static Config _Config = null;
        [XmlAttribute]
        public double LayerOpacity;
        private static object staticSyncRoot = new object();

        public Config()
        {
            this.LayerOpacity = 0.5;
            this.BackgroundImage = new ImageConfig();
        }

        public static Config CreatePure()
        {
            Config config = new Config();
            return config;
        }

        public static Config CurrentConfig
        {
            get
            {
                lock (staticSyncRoot)
                {
                    XmlSerializer serializer = new XmlSerializer(typeof(Config), new XmlRootAttribute("ImageConfig"));
                    bool IsCreate = false;
                    if (_Config == null)
                    {
                        if (File.Exists(ConfigConsts.ConfigPath))
                        {
                            try
                            {
                                using (StreamReader reader = new StreamReader(ConfigConsts.ConfigPath))
                                {
                                    _Config = (Config)serializer.Deserialize(reader);
                                }
                                IsCreate = true;
                            }
                            catch { }
                        }
                        if (!IsCreate)
                        {
                            _Config = CreatePure();
                            try
                            {
                                using (StreamWriter writer = new StreamWriter(ConfigConsts.ConfigPath, false, ConfigConsts.NoBomUTF8))
                                {
                                    serializer.Serialize(writer, _Config, ConfigConsts.VoidNamespaceMapping);
                                }
                            }
                            catch
                            {
                            }
                        }
                    }
                }
                return _Config;
            }
        }

        [Serializable]
        public class ImageConfig
        {
            [XmlAttribute]
            public double Opacity = 1.0;
            public string Uri = "\t";
        }
    }
}
添加 ConfigConsts 类:
using System;
using System.Collections.Generic;
using System.Linq;
using System.Text;
using System.IO;
using System.Threading;
using System.Xml.Serialization;

namespace VSEditorBackgroud
{
    internal static class ConfigConsts
    {
        public static readonly string ConfigPath = Path.Combine(Environment.GetFolderPath(Environment.SpecialFolder.Personal) + "\\Visual Studio 2010\\Settings", "VSEditorBackgroud.config");
        private static Encoding nobomutf8;

        public static Encoding NoBomUTF8
        {
            get
            {
                if (nobomutf8 == null)
                {
                    Interlocked.CompareExchange<Encoding>(ref nobomutf8, new UTF8Encoding(false), null);
                }
                return nobomutf8;
            }
        }

        public static XmlSerializerNamespaces VoidNamespaceMapping
        {
            get
            {
                XmlSerializerNamespaces namespaces = new XmlSerializerNamespaces();
                namespaces.Add("", "");
                return namespaces;
            }
        }
    }

}
编辑器背景类 EditorBackgroud:
using System.Windows.Controls;
using System.Windows.Media;
using Microsoft.VisualStudio.Text.Editor;
using System.Windows.Media.Imaging;
using System;

namespace VSEditorBackgroud
{
    /// <summary>
    /// Adornment class that draws a square box in the top right hand corner of the viewport
    /// </summary>
    public class EditorBackgroud
    {
        private Image _image;
        private IWpfTextView _view;
        private IAdornmentLayer _adornmentLayer;

        /// <summary>
        /// Creates a square image and attaches an event handler to the layout changed event that
        /// adds the the square in the upper right-hand corner of the TextView via the adornment layer
        /// </summary>
        /// <param name="view">The <see cref="IWpfTextView"/> upon which the adornment will be drawn</param>
        public EditorBackgroud(IWpfTextView view)
        {
            _view = view;

            Config _Config = Config.CurrentConfig;

            //Grab a reference to the adornment layer that this adornment should be added to
            _adornmentLayer = view.GetAdornmentLayer("VSEditorBackgroud");

            _adornmentLayer.Opacity = _Config.LayerOpacity;
            ApplyImageConfig(_Config.BackgroundImage);

            _view.ViewportHeightChanged += delegate { this.onSizeChange(); };
            _view.ViewportWidthChanged += delegate { this.onSizeChange(); };
        }

        private void ApplyImageConfig(Config.ImageConfig config)
        {
            if (config != null)
            {
                try
                {
                    Image image = new Image();
                    string uri = config.Uri;
                    BitmapImage bgImage = new BitmapImage();
                    bgImage.BeginInit();
                    bgImage.CreateOptions = BitmapCreateOptions.IgnoreImageCache;
                    bgImage.CacheOption = BitmapCacheOption.OnLoad;
                    bgImage.UriSource = new Uri(uri);
                    bgImage.EndInit();
                    image.Stretch = Stretch.Fill;
                    image.Opacity = config.Opacity;
                    image.Source = bgImage;
                    this._image = image;
                }
                catch
                {
                }
            }
        }

        public void onSizeChange()
        {
            //clear the adornment layer of previous adornments
            _adornmentLayer.RemoveAllAdornments();

            if (this._image != null && !this._image.Width.Equals(this._view.ViewportWidth))
                this._image.Width = this._view.ViewportWidth;
            if (this._image != null && !this._image.Height.Equals(this._view.ViewportHeight))
                this._image.Height = this._view.ViewportHeight;

            //Place the image in the top right hand corner of the Viewport
            Canvas.SetLeft(_image, _view.ViewportLeft);
            Canvas.SetTop(_image, _view.ViewportTop);

            //add the image to the adornment layer and make it relative to the viewport
            _adornmentLayer.AddAdornment(AdornmentPositioningBehavior.ViewportRelative, null, null, _image, null);
        }
    }
}
EditorFactory 类:
using System.ComponentModel.Composition;
using Microsoft.VisualStudio.Text.Editor;
using Microsoft.VisualStudio.Utilities;

namespace VSEditorBackgroud
{
    #region Adornment Factory
    /// <summary>
    /// Establishes an <see cref="IAdornmentLayer"/> to place the adornment on and exports the <see cref="IWpfTextViewCreationListener"/>
    /// that instantiates the adornment on the event of a <see cref="IWpfTextView"/>'s creation
    /// </summary>
    [Export(typeof(IWpfTextViewCreationListener))]
    [ContentType("text")]
    [TextViewRole(PredefinedTextViewRoles.Document)]
    internal sealed class PurpleBoxAdornmentFactory : IWpfTextViewCreationListener
    {
        /// <summary>
        /// Defines the adornment layer for the scarlet adornment. This layer is ordered
        /// after the selection layer in the Z-order
        /// </summary>
        [Export(typeof(AdornmentLayerDefinition))]
        [Name("VSEditorBackgroud")]
        [Order(After = PredefinedAdornmentLayers.Outlining)]
        [TextViewRole(PredefinedTextViewRoles.Document)]
        public AdornmentLayerDefinition editorAdornmentLayer = null;

        /// <summary>
        /// Instantiates a Wen manager when a textView is created.
        /// </summary>
        /// <param name="textView">The <see cref="IWpfTextView"/> upon which the adornment should be placed</param>
        public void TextViewCreated(IWpfTextView textView)
        {
            new EditorBackgroud(textView);
        }
    }
    #endregion //Adornment Factory
}
修改 source.extension.vsixmanifest 文件的信息:
<?xml version="1.0" encoding="utf-8"?>
<Vsix xmlns:xsi="http://www.w3.org/2001/XMLSchema-instance" xmlns:xsd="http://www.w3.org/2001/XMLSchema" Version="1.0.0" xmlns="http://schemas.microsoft.com/developer/vsx-schema/2010">
  <Identifier Id="3f2ce087-8d13-492c-a207-e1fdbfd1cf58">
    <Name>VSEditorBackgroud</Name>
    <Author>Charles Zhang</Author>
    <Version>1.0.0.5</Version>
    <Description xml:space="preserve">The Visual Studio Editor Backgroud plugin. </Description>
    <Locale>4</Locale>
    <License>license.rtf</License>
    <Icon>icon.ico</Icon>
    <PreviewImage>PreviewImage.jpg</PreviewImage>
    <SupportedProducts>
      <VisualStudio Version="10.0">
        <Edition>Ultimate</Edition>
        <Edition>Premium</Edition>
        <Edition>Pro</Edition>
        <Edition>Express_All</Edition>
      </VisualStudio>
      <VisualStudio Version="11.0">
        <Edition>Ultimate</Edition>
        <Edition>Premium</Edition>
        <Edition>Pro</Edition>
        <Edition>Express_All</Edition>
      </VisualStudio>
    </SupportedProducts>
    <SupportedFrameworkRuntimeEdition MinVersion="4.0" MaxVersion="4.5" />
  </Identifier>
  <References />
  <Content>
    <MefComponent>|%CurrentProject%|</MefComponent>
  </Content>
</Vsix>
在项目中添加一个 PreviewImage.jpg 用做插件的预览图,添加 icon.ico 用做扩展的图标。
编译项目,安装生成的 Vsix 文件。
安装好以后在扩展管理器中的效果如下:

编辑器的效果如下:

以上就是 Visual Studio 2010 开发扩展插件的过程了。


 浙公网安备 33010602011771号