
1.创建SpringMVC项目

配置web.xml
<?xml version="1.0" encoding="UTF-8"?>
<web-app xmlns="http://xmlns.jcp.org/xml/ns/javaee"
         xmlns:xsi="http://www.w3.org/2001/XMLSchema-instance"
         xsi:schemaLocation="http://xmlns.jcp.org/xml/ns/javaee http://xmlns.jcp.org/xml/ns/javaee/web-app_4_0.xsd"
         version="4.0">
    <context-param>
        <param-name>contextConfigLocation</param-name>
        <param-value>/WEB-INF/applicationContext.xml</param-value>
    </context-param>
    <listener>
        <listener-class>org.springframework.web.context.ContextLoaderListener</listener-class>
    </listener>
    <servlet>
        <servlet-name>dispatcher</servlet-name>
        <servlet-class>org.springframework.web.servlet.DispatcherServlet</servlet-class>
        <load-on-startup>1</load-on-startup>
    </servlet>

    <!--修改为"/"捕获所有的URL请求-->
    <servlet-mapping>
        <servlet-name>dispatcher</servlet-name>
        <url-pattern>/</url-pattern>
    </servlet-mapping>
</web-app>
配置dispatcher-servlet.xml
<?xml version="1.0" encoding="UTF-8"?>
<beans xmlns="http://www.springframework.org/schema/beans"
       xmlns:xsi="http://www.w3.org/2001/XMLSchema-instance"
       xmlns:context="http://www.springframework.org/schema/context"
       xsi:schemaLocation="http://www.springframework.org/schema/beans http://www.springframework.org/schema/beans/spring-beans.xsd http://www.springframework.org/schema/context http://www.springframework.org/schema/context/spring-context.xsd">


    <context:component-scan base-package="com.test.controller"></context:component-scan>

    <!-- 配置注解处理器映射器
        功能:寻找执行类Controller
    -->
    <bean class="org.springframework.web.servlet.mvc.method.annotation.RequestMappingHandlerMapping"></bean>

    <!-- 配置注解处理器适配器
        功能:调用controller方法,执行controller
    -->
    <bean class="org.springframework.web.servlet.mvc.method.annotation.RequestMappingHandlerAdapter"></bean>
    <bean class="org.springframework.web.servlet.view.InternalResourceViewResolver">
        <property name="prefix" value="/WEB-INF/jsp/"/>
        <property name="suffix" value=".jsp"/>
    </bean>
</beans>
控制类
package com.test.controller;

import org.springframework.stereotype.Controller;
import org.springframework.web.bind.annotation.RequestMapping;
import org.springframework.web.servlet.ModelAndView;


/**
 * Created by weihu1 on 2018/8/22 11:46
 */
@Controller
@RequestMapping("mvc")
public class WelcomeController {

    @RequestMapping("/hello")
    public String hello(){
        return "welcome";
    }
}
新建jsp
<%--
  Created by IntelliJ IDEA.
  User: weihu1
  Date: 2018/8/22
  Time: 11:47
  To change this template use File | Settings | File Templates.
--%>
<%@ page contentType="text/html;charset=UTF-8" language="java" %>
<html>
<head>
    <title>Title</title>
</head>
<body>
hello
</body>
</html>
RequestMapping
requestMapping(“hello”)
requestMapping(“/hello.do”)
requestMapping(value=”/hello.do”)
    @RequestMapping("/hello")
    public String hello(){
        return "welcome";
    }
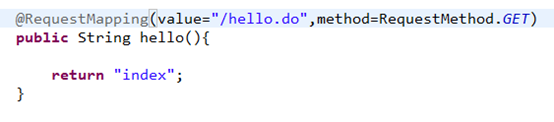
requestMapping(value=”/hello.do”,method=RequestMethod.GET)
requestMapping(value=”/hello.do”,method=RequestMethod.POST)
浏览器直接访问,a标签都是get请求
表单提交(指定post),ajax指定post提交,post提交。

requestMapping(value=”/hello.do”,method={RequestMethod.POST, RequestMethod.GET})

RequestMaping根路径
@RequestMapping(”/user”)

UserController{

requestMapping(“save”)

Save()

requestMapping(“update”)

Update{}

requestMapping(“find”)

Fiind()


}

项目名/user/save.do

@RequestMapping(”/items”)

ItemsController{


requestMapping(“save”)

Save()

requestMapping(“update”)

Update{}

requestMapping(“find”)

Fiind()


}

项目名/items/save.do
自定义根路径

封装参数
分析接受参数类型:
基本类型,int,String等等基本类型。
Pojo类型
包装类型
Springmvc默认支持类型:
HttpSession,HttpRequstServlet,Model等等。
Struts2参数:基于属性封装。
Springmvc参数封装:基于方法进行封装。
基本类型
需求
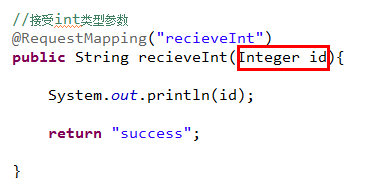
封装int类型参数
页面
页面传递参数都是字符串。

接受参数方法
接受字符串类型
页面

代码

接受数组
分析:批量删除:checkbox复选框。Value必须有值。
页面

代码

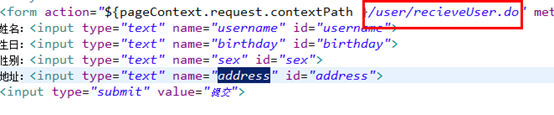
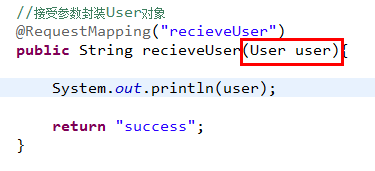
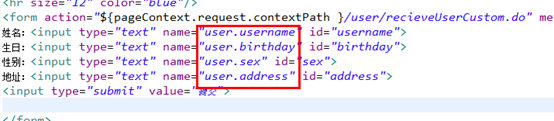
接受Pojo
页面
代码
接受包装类型参数
userCustom{
private user user;
private List<User> userList;
private Map<K,V> maps;
private items items;
}
定义UserCustom

页面
代码

接受集合类型参数
接受list集合

代码:

接受map
页面

代码

有了struts2,为什么还需要sprigmvc?
实现机制:
Struts2是基于过滤器实现的。
Springmvc基于servlet实现。Servlet比过滤器快。
运行速度:
Struts2是多列
请求来了以后,struts2创建多少个对象:
ActionContext,valuestack,UserAction,ActionSuport,ModelDriven
userAction里面属性:User对象,userlist集合等
Springmvc是单列。
参数封装来分析:
Struts基于属性进行封装。
Springmvc基于方法封装。
页面回显
查询所有
@RequestMapping("list")
    public String list(Model model){
        //model    相当于application域对象

        List<User> userList = new ArrayList<User>();

        User user1 = new User();
        user1.setId(1);
        user1.setSex("男");
        user1.setUsername("张山峰");
        user1.setAddress("武当山");
        user1.setBirthday(new Date());

        User user2 = new User();
        user2.setId(2);
        user2.setSex("男2");
        user2.setUsername("张山峰222");
        user2.setAddress("武当山222");
        user2.setBirthday(new Date());

        User user3 = new User();
        user3.setId(3);
        user3.setSex("男3");
        user3.setUsername("张山峰333");
        user3.setAddress("武当山333");
        user3.setBirthday(new Date());

        userList.add(user1);
        userList.add(user2);
        userList.add(user3);

        model.addAttribute("userList", userList);

        return "list";

    }
页面获取

修改

修改代码

回显

URL模版映射
url模版映射可以restfull软件架构。
url模版映射过程

Restfull风格设计

Web.xml拦截方式:在rest目录下所有请求都被拦截,servlet可以拦截目录。

{}:匹配接受页面Url路径参数
@Pathariable:{}里面参数注入后面参数里面

转发和重定向
转发
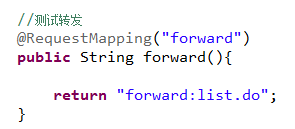
关键字:forward
本类进行转发:
本类方法与方法之间进行forward
转发方式:
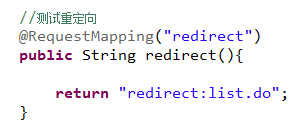
方式一:return ”forward:list.do“;
代码:
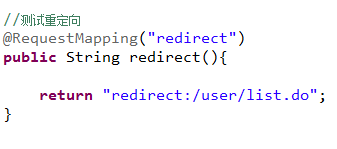
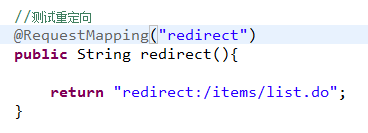
重定向
关键字:redirect
本类进行重定向:
本类方法与方法之间进行redirect
重定向方式:
方式一:return ”redirect:list.do“;
方式二:return ”redirect:/user/list.do“;
跨类进行重定向:
转发方式:return ”redirect:/items/list.do“;

 浙公网安备 33010602011771号