SSM整合_年轻人的第一个增删改查_查找
 分页查询、ajax请求、json数据、通用返回类型
写在前面
SSM整合_年轻人的第一个增删改查_基础环境搭建
SSM整合_年轻人的第一个增删改查_查找
SSM整合_年轻人的第一个增删改查_新增
SSM整合_年轻人的第一个增删改查_修改
SSM整合_年轻人的第一个增删改查_删除
GitHub:https://github.com/say-hey/ssm_crud
Gitee:https://gitee.com/say-hey/ssm_crud
有用吗?对于学完Spring、SpringMVC、Mybatis还无从下手的同学来说这是一个很好引子。对于正在学习同一个案例的同学,可能解决一些问题。对于需要这个案例的同学可以直接获取。
有什么?:xml配置文件编写,引入一个简单的前端框架,使用MyBatis Generator逆向工程生成一些代码,使用框架简单快速搭建一个页面,好用的分页工具PageHelper,简单的前后端分离,发送ajax请求,利用json传递数据,增、删、改、查的简单实现。
简单吗?内容很简单,涉及Java代码不多,但是对于新手来说,最困难的部分是各种环境搭建、配置文件、版本冲突,如果能够根据错误提示动手解决,那就是一大进步。
怎么学?如果有时间可以在B站搜索:ssm整合crud,雷丰阳讲的。如果想看到每个功能的实现过程和源码,可以在这里学习,每个步骤都有注释。也可以作为复习快速浏览。
2、查询
分页查询、ajax请求、json数据、通用返回类型,效果如图
1. 测试分页请求
-
先配置,然后测试,通过之后进行真正的请求
-
使用MyBatis分页插件PageHelper进行分页
-
添加依赖
<!-- mybatis 分页插件pagehelper --> <!-- https://mvnrepository.com/artifact/com.github.pagehelper/pagehelper --> <dependency> <groupId>com.github.pagehelper</groupId> <artifactId>pagehelper</artifactId> <version>5.1.2</version> </dependency> -
mybatis-config.xml添加插件,注意标签顺序<!-- 使用pagehelper插件 --> <plugins> <plugin interceptor="com.github.pagehelper.PageInterceptor"> <!-- 分页合理化,如果超出总页数,只显示最后一页,合理显示 --> <property name="reasonable" value="true"/> </plugin> </plugins> -
index.jsp最上面添加转发请求<!-- 测试用 --> <!-- 来到这个页面直接去展示员工的控制器--> <jsp:forward page="/emps"></jsp:forward> -
Controller
package com.ssm.controller; import com.github.pagehelper.PageHelper; import com.github.pagehelper.PageInfo; import com.ssm.bean.Employee; import com.ssm.service.EmployeeService; import org.springframework.beans.factory.annotation.Autowired; import org.springframework.stereotype.Controller; import org.springframework.ui.Model; import org.springframework.web.bind.annotation.RequestMapping; import org.springframework.web.bind.annotation.RequestParam; import java.util.List; /** * 处理员工增删改查请求 */ @Controller public class EmployeeController { @Autowired EmployeeService employeeService; /** * 测试 * 查询所有员工数据 * 访问index.jsp首页查询所有数据并分页,将数据返回并跳转到list.jsp页面展示 * @param pn 页码,默认第一页 * @param model 传递出去的数据 * @return */ @RequestMapping("/emps") public String testGetEmps(@RequestParam(value = "pn", defaultValue = "1")Integer pn, Model model){ //使用分页插件 //在使用之前只需要调用,传入页码,每页大小 PageHelper.startPage(pn, 5); //startPage后面紧跟的就是一个分页查询 List<Employee> emps = employeeService.getAll(); //使用pageInfo包装查询后的结果,包括查询出来的数据,员工列表 //封装员工,设置连续显示页码 PageInfo<Employee> info = new PageInfo<>(emps, 5); //只需要将pageinfo交给页面,里面封装了详细分页信息 model.addAttribute("pageInfo", info); return "list"; } } -
Service
package com.ssm.service; import com.ssm.bean.Employee; import com.ssm.dao.EmployeeMapper; import org.springframework.beans.factory.annotation.Autowired; import org.springframework.stereotype.Service; import java.util.List; @Service public class EmployeeService { @Autowired EmployeeMapper employeeMapper; /** * 查询所有员工数据 * @return */ public List<Employee> getAll() { //查询所有 return employeeMapper.selectByExampleWithDept(null); } } -
在
com.ssm.test中进行测试注意@WebAppConfiguration
package com.ssm.test; import com.github.pagehelper.PageInfo; import com.ssm.bean.Employee; import org.junit.jupiter.api.BeforeEach; import org.junit.jupiter.api.Test; import org.junit.jupiter.api.extension.ExtendWith; import org.springframework.beans.factory.annotation.Autowired; import org.springframework.mock.web.MockHttpServletRequest; import org.springframework.test.context.ContextConfiguration; import org.springframework.test.context.junit.jupiter.SpringExtension; import org.springframework.test.context.web.WebAppConfiguration; import org.springframework.test.web.servlet.MockMvc; import org.springframework.test.web.servlet.MvcResult; import org.springframework.test.web.servlet.request.MockMvcRequestBuilders; import org.springframework.test.web.servlet.setup.MockMvcBuilders; import org.springframework.web.context.WebApplicationContext; import java.util.List; //添加springmvc到spring容器 @WebAppConfiguration //如果您想在测试中使用Spring测试框架功能(例如)@MockBean,则必须使用@ExtendWith(SpringExtension.class)。它取代了不推荐使用的JUnit4@RunWith(SpringJUnit4ClassRunner.class) @ExtendWith(SpringExtension.class) @ContextConfiguration(locations = {"classpath:applicationContext.xml","classpath:springmvc.xml"}) public class MvcTest { //传入springmvc的IOC,需要加注解 @Autowired WebApplicationContext context; //虚拟mvc请求,获取请求结果 MockMvc mockMvc; //每次使用都初始化 //junit4使用@Before,junit5使用@BeforeEach,在@Test方法之前运行 @BeforeEach() public void initMockMvc() { //创建MockMVC,模拟mvc请求 mockMvc = MockMvcBuilders.webAppContextSetup(context).build(); } @Test public void testPage() throws Exception { //模拟发送请求拿到返回值,get,参数第八页,返回值 MvcResult result = mockMvc.perform(MockMvcRequestBuilders.get("/emps").param("pn", "8")).andReturn(); //请求成功后,请求域中会有pageInfo,取出 验证 MockHttpServletRequest request = result.getRequest(); PageInfo pageInfo = (PageInfo) request.getAttribute("pageInfo"); System.out.println("当前页码:" + pageInfo.getPageNum()); System.out.println("总页码:" + pageInfo.getPages()); System.out.println("总记录数:" + pageInfo.getTotal()); System.out.println("在页面连续显示页码"); int[] nums = pageInfo.getNavigatepageNums(); for (int i : nums) { System.out.print(i + " "); } System.out.println(); //员工数据也封装在pageinfo中 List<Employee> list = pageInfo.getList(); for(Employee e : list) { System.out.println( e.getEmpId() + "--" +e.getEmpName() + "--" + e.getEmail()); } } } -
输出
当前页码:8
总页码:202
总记录数:1010
在页面连续显示页码
6 7 8 9 10
36--b242634--b242634@123.com
37--26a8135--26a8135@123.com
38--5c13f36--5c13f36@123.com
39--da7c437--da7c437@123.com
40--28a4438--28a4438@123.com
2. 搭建分页页面
使用任意方法创建页面,或者如下所示。主要内容是一个表格,可以查看Bootstrap教程,复制需要的样式,然后粘贴,稍微修改。
-
在
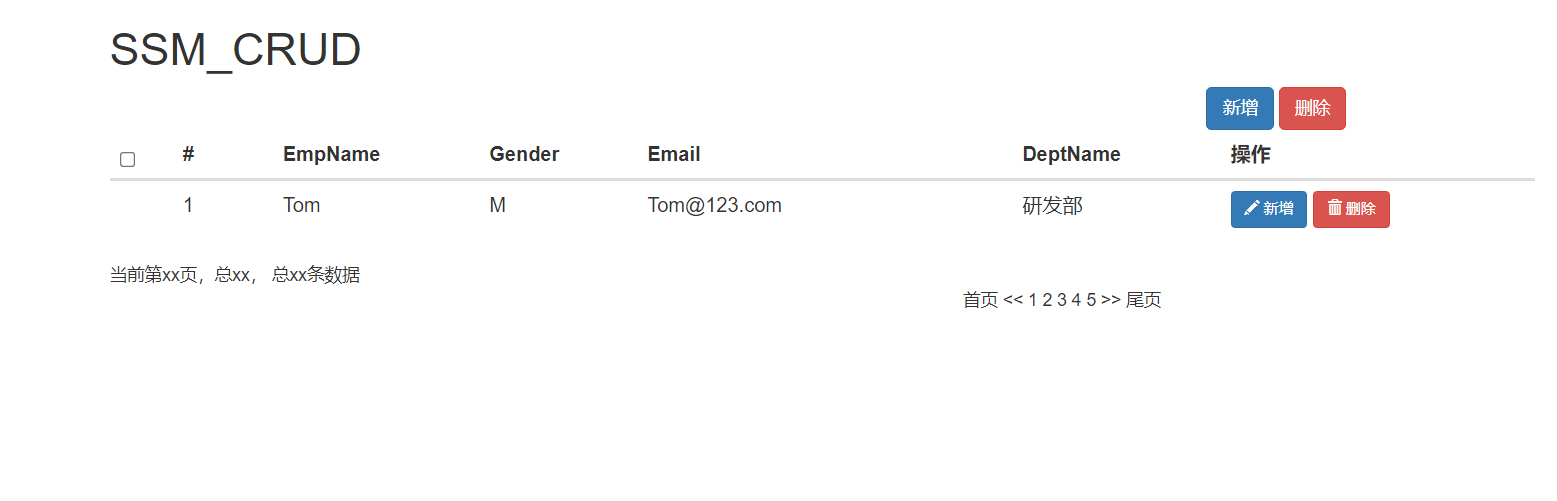
list.jsp页面,添加下面代码<%@ page language="java" contentType="text/html; charset=UTF-8" pageEncoding="UTF-8"%> <%-- 是否忽略EL表达式,默认true,导致不能访问jsp域,PATH不生效--%> <%@ page isELIgnored="false"%> <html> <head> <title>员工列表</title> <% /* 设置路径 以“/”开始的相对路径是从服务下开始查找http://localhost:8080 */ pageContext.setAttribute("PATH", request.getContextPath()); %> <script src="${PATH}/static/jquery-1.12.4.js"></script> <script src="${PATH}/static/bootstrap-3.3.7-dist/js/bootstrap.min.js"></script> <link href="${PATH}/static/bootstrap-3.3.7-dist/css/bootstrap.min.css" rel="stylesheet"> </head> <body> <!-- row行必须包含在container中 --> <div class="container"> <!-- 定义row行 --> <!-- 标题 --> <div class="row"> <!-- 定义col列 --> <div class="col-md-12"> <h1>SSM_CRUD</h1> </div> </div> <!-- 按钮 --> <div class="row"> <div class="col-md-2 col-md-offset-9"> <button class="btn btn-primary" id="emp_add_modal_btn">新增</button> <button class="btn btn-danger" id="emp_del_modal_btn">删除</button> </div> </div> <!-- 显示表格 --> <div class="row"> <div class="col-md-12"> <table class="table table-hover" id="emps_table"> <!-- table table-striped--> <!-- 对表格分组 table-thead-tbody-tfoot --> <thead> <tr> <th> <input type="checkbox" id="check_all"> </th> <th>#</th> <th>EmpName</th> <th>Gender</th> <th>Email</th> <th>DeptName</th> <th>操作</th> </tr> </thead> <tbody> <!-- 手动添加数据测试 --> <tr> <td></td> <td style="width: 80px">1</td> <td>Tom</td> <td>M</td> <td style="width: 300px">Tom@123.com</td> <td>研发部</td> <td> <button class="btn btn-primary btn-sm"> <span class="glyphicon glyphicon-pencil" aria-hidden="true"></span> 新增 </button> <button class="btn btn-danger btn-sm"> <span class="glyphicon glyphicon-trash" aria-hidden="true"></span> 删除 </button> </td> </tr> </tbody> </table> </div> </div> <!-- 分页数据 暂时占据位置,之后需要拼接--> <div class="row"> <div class="col-md-4" id="page_info_area"> 当前第xx页,总xx, 总xx条数据 </div> <div class="col-md-6 col-md-offset-7" id="page_nav_area"> 首页 << 1 2 3 4 5 >> 尾页 </div> </div> </div> </body> </html> -
效果如下
3. 显示分页数据(JSTL)
-
添加JSTL表达式,然后从域中取出数据遍历到表格中
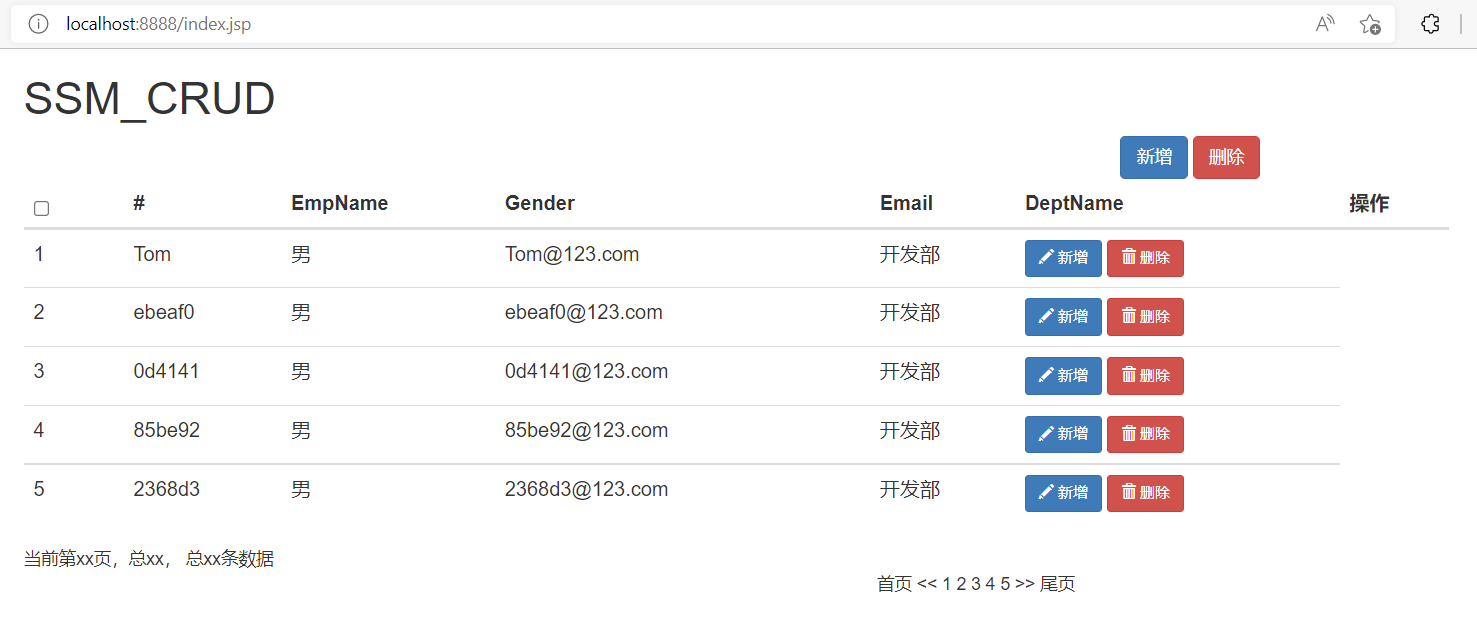
<%@ page language="java" contentType="text/html; charset=UTF-8" pageEncoding="UTF-8" %> <%-- 是否忽略EL表达式,默认true,导致不能访问jsp域,PATH不生效--%> <%@ page isELIgnored="false" %> <%-- 添加JSTL表达式 --%> <%--报错的可以把jstl引入改成:<%@ taglib uri="http://java.sun.com/jstl/core_rt" prefix="c" %>--%> <%--<%@ taglib prefix="c" uri="http://java.sun.com/jsp/jstl/core"%>--%> <%@ taglib prefix="c" uri="http://java.sun.com/jstl/core_rt"%> <html> <head> <title>员工列表</title> <% /* 设置路径 以“/”开始的相对路径是从服务下开始查找http://localhost:8080 */ pageContext.setAttribute("PATH", request.getContextPath()); %> <script src="${PATH}/static/jquery-1.12.4.js"></script> <script src="${PATH}/static/bootstrap-3.3.7-dist/js/bootstrap.min.js"></script> <link href="${PATH}/static/bootstrap-3.3.7-dist/css/bootstrap.min.css" rel="stylesheet"> </head> <body> <!-- row行必须包含在container中 --> <div class="container"> <!-- 定义row行 --> <!-- 标题 --> <div class="row"> <!-- 定义col列 --> <div class="col-md-12"> <h1>SSM_CRUD</h1> </div> </div> <!-- 按钮 --> <div class="row"> <div class="col-md-2 col-md-offset-9"> <button class="btn btn-primary" id="emp_add_modal_btn">新增</button> <button class="btn btn-danger" id="emp_del_modal_btn">删除</button> </div> </div> <!-- 显示表格 --> <div class="row"> <div class="col-md-12"> <table class="table table-hover" id="emps_table"> <!-- table table-striped--> <!-- 对表格分组 table-thead-tbody-tfoot --> <thead> <tr> <th> <input type="checkbox" id="check_all"> </th> <th>#</th> <th>EmpName</th> <th>Gender</th> <th>Email</th> <th>DeptName</th> <th>操作</th> </tr> </thead> <tbody> <%-- 手动添加数据测试 --%> <%-- <tr> <td></td> <td style="width: 80px">1</td> <td>Tom</td> <td>M</td> <td style="width: 300px">Tom@123.com</td> <td>研发部</td> <td> <button class="btn btn-primary btn-sm"> <span class="glyphicon glyphicon-pencil" aria-hidden="true"></span> 新增 </button> <button class="btn btn-danger btn-sm"> <span class="glyphicon glyphicon-trash" aria-hidden="true"></span> 删除 </button> </td> </tr>--%> <!-- jstl表达式,取出后台发送数据 --> <c:forEach items="${pageInfo.list}" var="p"> <tr> <td style="width: 80px">${p.empId}</td> <td>${p.empName}</td> <td>${p.gender=="M"?"男":"女"}</td> <td style="width: 300px">${p.email}</td> <td>${p.department.deptName}</td> <td> <button class="btn btn-primary btn-sm"> <span class="glyphicon glyphicon-pencil" aria-hidden="true"></span> 新增 </button> <button class="btn btn-danger btn-sm"> <span class="glyphicon glyphicon-trash" aria-hidden="true"></span> 删除 </button> </td> </tr> </c:forEach> </tbody> </table> </div> </div> <!-- 分页数据 暂时占据位置,之后需要拼接--> <div class="row"> <div class="col-md-4" id="page_info_area"> 当前第xx页,总xx, 总xx条数据 </div> <div class="col-md-6 col-md-offset-7" id="page_nav_area"> 首页 << 1 2 3 4 5 >> 尾页 </div> </div> </div> </body> </html> -
访问测试
上述方法是使用JSP页面混合JSTL语言,高耦合。对于分页栏,也可以用相似的方法,使用Bootstrap样式,利用JSTL语句遍历PageHelper数据,具体可以看
https://www.bilibili.com/video/BV17W411g7zP?p=15。
4. 返回分页json数据(Ajax)
-
使用json格式可以适用更多场景,需要引入
<!-- springmvc 返回json数据,@ResponseBody --> <!-- https://mvnrepository.com/artifact/com.fasterxml.jackson.core/jackson-databind --> <dependency> <groupId>com.fasterxml.jackson.core</groupId> <artifactId>jackson-databind</artifactId> <version>2.10.1</version> </dependency> -
注释掉以前的
/emps重新编写方法,添加@ResponseBody注解,将分页部分移到Service中EmployeeController
    @ResponseBody
    @RequestMapping("/emps")
    public PageInfo getEmpsWithJson(@RequestParam(value = "pn",defaultValue = "1")Integer pn) {
        PageInfo pageInfo = employeeService.getPage(pn);
        return pageInfo;
    }
EmployeeService
public PageInfo getPage(Integer pn) { // 分页查询 PageHelper.startPage(pn, 5); List<Employee> emps = getAll(); PageInfo<Employee> pageInfo = new PageInfo<>(emps, 5); return pageInfo; } -
访问
/emps,得到如下数据{"pageNum":1,"pageSize":5,"size":5,"startRow":1,"endRow":5,"total":1010,"pages":202,"list":[{"empId":1,"empName":"Tom","gender":"M","email":"Tom@123.com","dId":1,"department":{"deptId":1,"deptName":"开发部"}},{"empId":2,"empName":"ebeaf0","gender":"M","email":"ebeaf0@123.com","dId":1,"department":{"deptId":1,"deptName":"开发部"}},{"empId":3,"empName":"0d4141","gender":"M","email":"0d4141@123.com","dId":1,"department":{"deptId":1,"deptName":"开发部"}},{"empId":4,"empName":"85be92","gender":"M","email":"85be92@123.com","dId":1,"department":{"deptId":1,"deptName":"开发部"}},{"empId":5,"empName":"2368d3","gender":"M","email":"2368d3@123.com","dId":1,"department":{"deptId":1,"deptName":"开发部"}}],"prePage":0,"nextPage":2,"isFirstPage":true,"isLastPage":false,"hasPreviousPage":false,"hasNextPage":true,"navigatePages":5,"navigatepageNums":[1,2,3,4,5],"navigateFirstPage":1,"navigateLastPage":5,"lastPage":5,"firstPage":1}
5. 通用返回类型
-
上面的方法只能传递PageHelper分页数据,如果是添加、删除操作,不能通知页面是否成功,所以要封装一个类,用来传递所有消息。
-
在
com.ssm.bean中创建类package com.ssm.bean; import java.util.HashMap; import java.util.Map; /** * 通用返回类型 */ public class Msg { //状态码 2333成功 5555失败 private Integer code; //提示信息 private String msg; //用户返回给浏览器的数据 private Map<String,Object> extend = new HashMap<>(); //增加两个静态方法,一个成功,一个失败,再加一个添加数据的方法 public static Msg success() { Msg result = new Msg(); result.setCode(2333); result.setMsg("ʅ(´◔౪◔)ʃ"); return result; } public static Msg fail() { Msg result = new Msg(); result.setCode(5555); result.setMsg("o(゚Д゚)っ啥!"); return result; } //添加查询出来的数据, public Msg add(String key,Object value) { // getExtend()就是Map的get方法,用于获取当前类的属性,然后再返回当前类,可以链式调用 this.getExtend().put(key, value); return this; } public Integer getCode() { return code; } public void setCode(Integer code) { this.code = code; } public String getMsg() { return msg; } public void setMsg(String msg) { this.msg = msg; } public Map<String, Object> getExtend() { return extend; } public void setExtend(Map<String, Object> extend) { this.extend = extend; } } -
修改
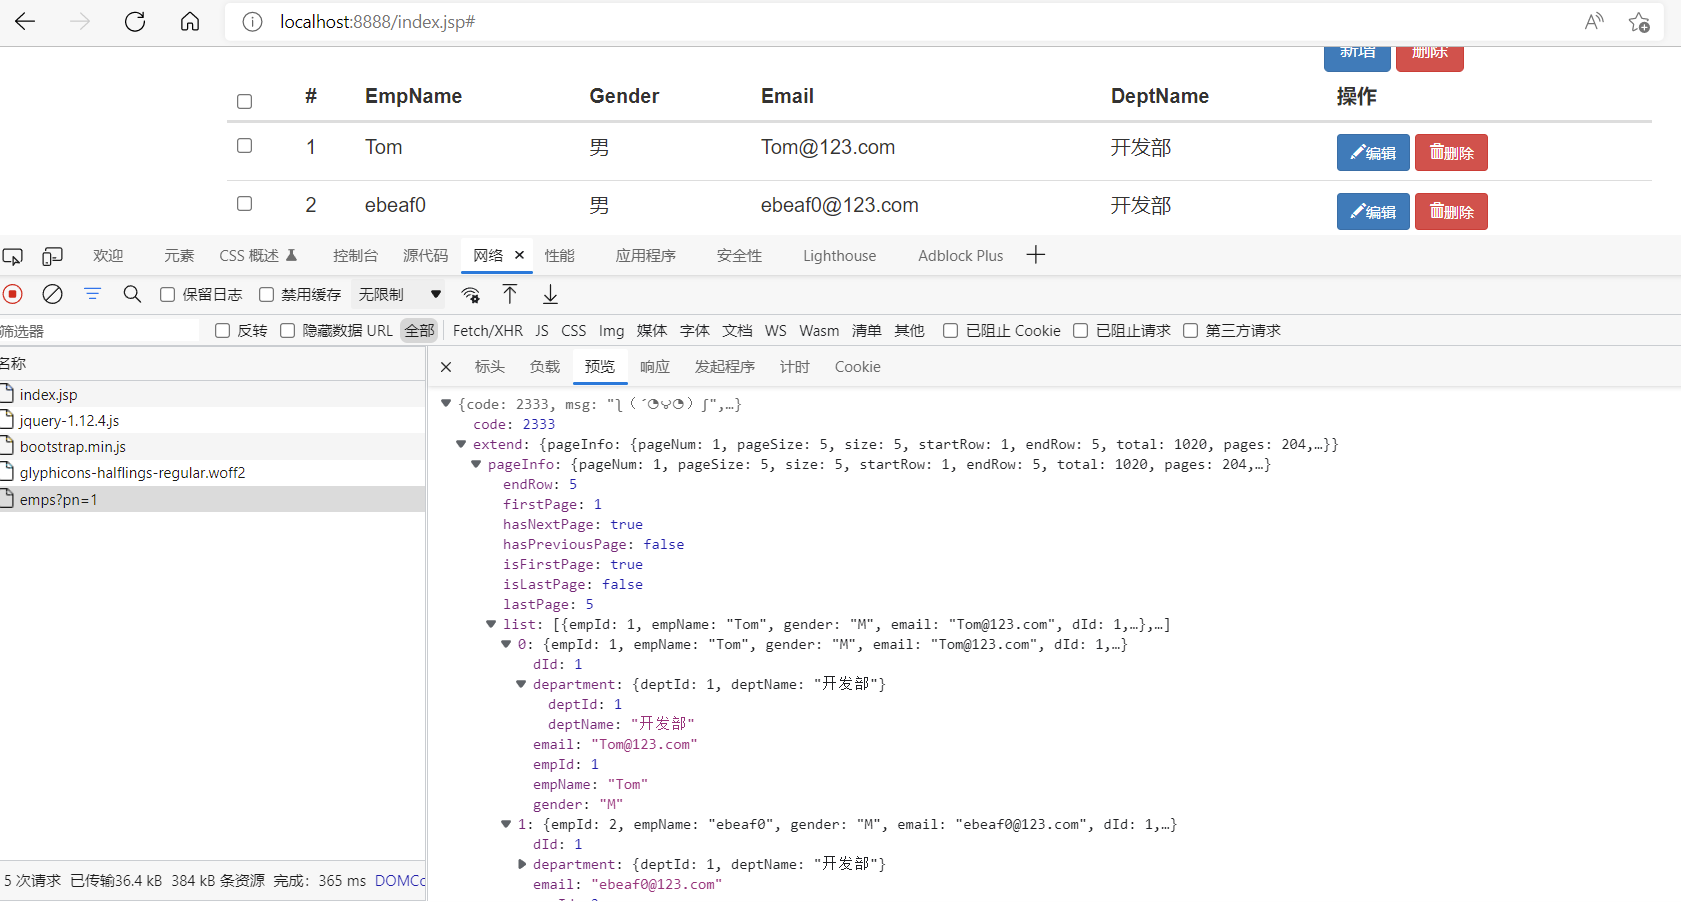
/emps方法返回值类型@ResponseBody @RequestMapping("/emps") public Msg getEmpsWithJson(@RequestParam(value = "pn",defaultValue = "1")Integer pn) { PageInfo pageInfo = employeeService.getPage(pn); return Msg.success().add("pageInfo", pageInfo); } -
访问
/emps{"code":2333,"msg":"ʅ(´◔౪◔)ʃ","extend":{"PageInfo":{"pageNum":1,"pageSize":5,"size":5,"startRow":1,"endRow":5,"total":1010,"pages":202,"list":[{"empId":1,"empName":"Tom","gender":"M","email":"Tom@123.com","dId":1,"department":{"deptId":1,"deptName":"开发部"}},{"empId":2,"empName":"ebeaf0","gender":"M","email":"ebeaf0@123.com","dId":1,"department":{"deptId":1,"deptName":"开发部"}},{"empId":3,"empName":"0d4141","gender":"M","email":"0d4141@123.com","dId":1,"department":{"deptId":1,"deptName":"开发部"}},{"empId":4,"empName":"85be92","gender":"M","email":"85be92@123.com","dId":1,"department":{"deptId":1,"deptName":"开发部"}},{"empId":5,"empName":"2368d3","gender":"M","email":"2368d3@123.com","dId":1,"department":{"deptId":1,"deptName":"开发部"}}],"prePage":0,"nextPage":2,"isFirstPage":true,"isLastPage":false,"hasPreviousPage":false,"hasNextPage":true,"navigatePages":5,"navigatepageNums":[1,2,3,4,5],"navigateFirstPage":1,"navigateLastPage":5,"firstPage":1,"lastPage":5}}}
6. 构建员工列表
使用任意方法创建页面,或者如下所示
-
现在可以使用json数据,利用ajax发送请求,获取数据然后渲染到页面,就可以将分离前后端
-
新建一个
index.jsp,将原始index.jsp给名为index2.jsp将
list.jsp中的表格复制过来,并删掉JSTL相关语句<%-- 解决乱码 --%> <%@ page language="java" contentType="text/html; charset=UTF-8" pageEncoding="UTF-8"%> <%-- 是否忽略EL表达式,默认true,导致不能访问jsp域,PATH不生效--%> <%@ page isELIgnored="false" %> <html> <meta http-equiv="Content-Type" content="text/html; charset=UTF-8" /> <head> <% /* 设置路径 以“/”开始的相对路径是从服务下开始查找http://localhost:8080 */ pageContext.setAttribute("PATH", request.getContextPath()); %> <script src="${PATH}/static/jquery-1.12.4.js"></script> <script src="${PATH}/static/bootstrap-3.3.7-dist/js/bootstrap.min.js"></script> <link href="${PATH}/static/bootstrap-3.3.7-dist/css/bootstrap.min.css" rel="stylesheet"> </head> <body> <div class="container"> <!-- 定义row行 --> <!-- 标题 --> <div class="row"> <!-- 定义col列 --> <div class="col-md-12"> <h1>SSM_CRUD</h1> </div> </div> <!-- 按钮 --> <div class="row"> <div class="col-md-2 col-md-offset-9"> <button class="btn btn-primary" id="emp_add_modal_btn">新增</button> <button class="btn btn-danger" id="emp_del_modal_btn">删除</button> </div> </div> <!-- 显示表格 --> <div class="row"> <div class="col-md-12"> <table class="table table-hover" id="emps_table"> <!-- table table-striped--> <!-- 对表格分组 table-thead-tbody-tfoot --> <thead> <tr> <th> <input type="checkbox" id="check_all"> </th> <th>#</th> <th>EmpName</th> <th>Gender</th> <th>Email</th> <th>DeptName</th> <th>操作</th> </tr> </thead> <tbody> </tbody> </table> </div> </div> <!-- 分页数据 暂时占据位置,之后需要拼接--> <div class="row"> <div class="col-md-4" id="page_info_area"> </div> <div class="col-md-6 col-md-offset-7" id="page_nav_area"> </div> </div> </div> </body> </html> -
创建ajax请求
    <script type="text/javascript">
        $(function() {
            $.ajax({
                url : "${PATH}/emps",
                // data : "pn=" + pn,
                data : "pn=1",
                type : "GET",
                success : function(result) {
                    console.log(result)
                    //1.解析并显示员工数据
                    build_emps_table(result);
                    //2.解析并显示分页信息
                    build_page_info(result);
                    //3.解析并显示分页栏
                    build_page_nav(result);
                }
            });
        });
            //构建员工表
        function build_emps_table(result) {
            //每次构建之前要清空
            $("#emps_table tbody").empty();

            //获取到员工列表
            var emps = result.extend.pageInfo.list;
            //利用jQuery的each遍历,index:索引 item:当前对象
            $.each(emps, function(index, item) {
                //alert(item.empName);
                //创建出要展示的<td>标签
                var checkboxTd = $("<td><input type='checkbox' class='check_item'/></td>");
                var empIdTd = $("<td></td>").append(item.empId);
                var empNameTd = $("<td></td>").append(item.empName);
                var genderTd = $("<td></td>").append(
                    item.gender == "M" ? "男" : "女");
                var emailTd = $("<td></td>").append(item.email);
                var deptNameTd = $("<td></td>")
                    .append(item.department.deptName);

                //1. 在修改删除按钮上统一添加 类标识 edit_btn  delete_btn
                var editBtn = $("<button></button>").addClass(
                    "btn btn-primary btn-sm edit_btn").append("<span></span>")
                    .addClass("glyphicon glyphicon-pencil").append("编辑");

                //2. 在 编辑/删除 按钮上添加当前所选对象id.或者从这个的父层查找第一个tr第一个td的值
                editBtn.attr("edit-id",item.empId);
                var delBtn = $("<button></button>").addClass(
                    "btn btn-danger btn-sm delete_btn").append("<span></span>")
                    .addClass("glyphicon glyphicon-trash").append("删除");
                delBtn.attr("del-id",item.empId);

                //将俩个按钮放到td中去
                var btnTd = $("<td></td>").append(editBtn).append(" ").append(
                    delBtn);
                //append方法执行完之后还返回原来的元素,就是tr,可以继续添加
                $("<tr></tr>").append(checkboxTd).append(empIdTd).append(empNameTd).append(
                    genderTd).append(emailTd).append(deptNameTd).append(
                    btnTd)
                    //添加到
                    .appendTo("#emps_table tbody")
            });
        }

    </script>
7. 构建分页条
-
构建分页条,将请求提取为方法
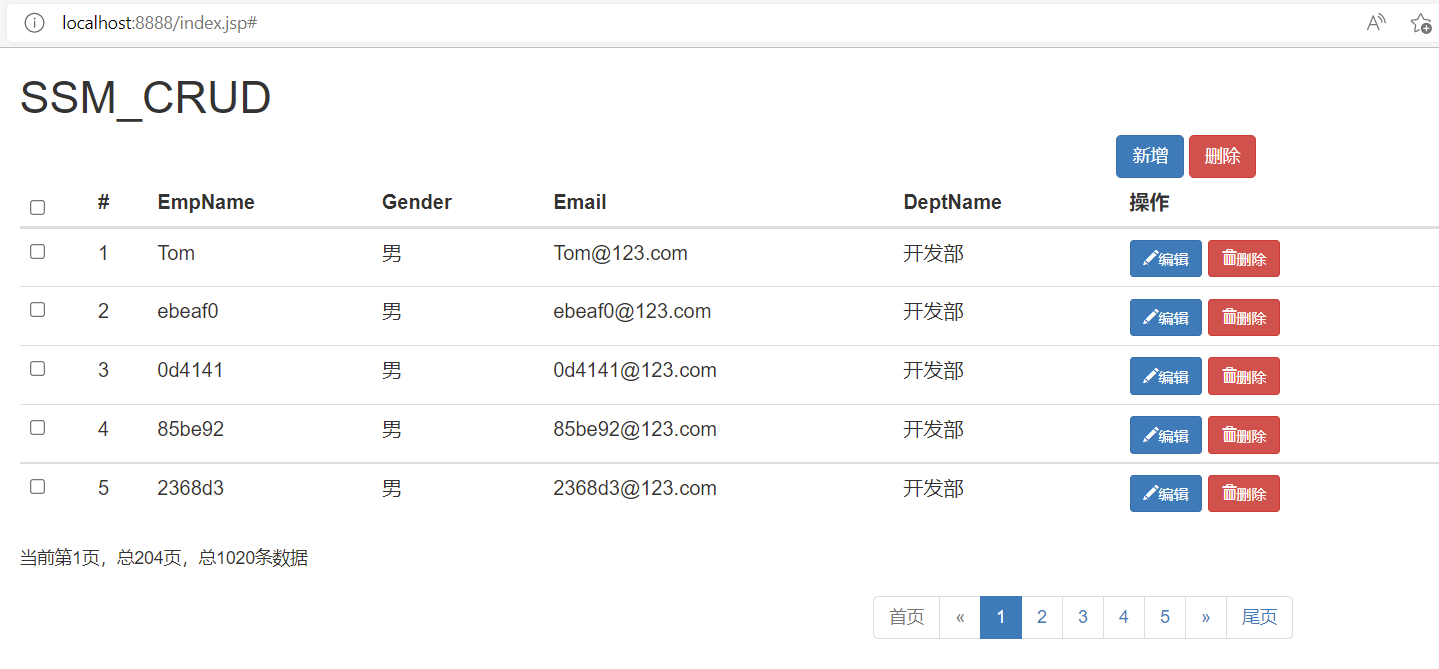
<script type="text/javascript"> //1.页面加载完成后,直接发送ajax请求,要到分页数据 $(function() { //页面加载后去首页 to_page(1); }); //2.查询指定页数据 function to_page(pn) { $.ajax({ url : "${PATH}/emps", data : "pn=" + pn, type : "GET", success : function(result) { //console.log(result) //1.解析并显示员工数据 build_emps_table(result); //2.解析并显示分页信息 build_page_info(result); //3.解析并显示分页栏 build_page_nav(result); } }); } //构建员工表 function build_emps_table(result) { //每次构建之前要清空 $("#emps_table tbody").empty(); //获取到员工列表 var emps = result.extend.pageInfo.list; //利用jQuery的each遍历,index:索引 item:当前对象 $.each(emps, function(index, item) { //alert(item.empName); //创建出要展示的<td>标签 var checkboxTd = $("<td><input type='checkbox' class='check_item'/></td>"); var empIdTd = $("<td></td>").append(item.empId); var empNameTd = $("<td></td>").append(item.empName); var genderTd = $("<td></td>").append( item.gender == "M" ? "男" : "女"); var emailTd = $("<td></td>").append(item.email); var deptNameTd = $("<td></td>") .append(item.department.deptName); //1. 在修改删除按钮上统一添加 类标识 edit_btn delete_btn var editBtn = $("<button></button>").addClass( "btn btn-primary btn-sm edit_btn").append("<span></span>") .addClass("glyphicon glyphicon-pencil").append("编辑"); //2. 在 编辑/删除 按钮上添加当前所选对象id.或者从这个的父层查找第一个tr第一个td的值 editBtn.attr("edit-id",item.empId); var delBtn = $("<button></button>").addClass( "btn btn-danger btn-sm delete_btn").append("<span></span>") .addClass("glyphicon glyphicon-trash").append("删除"); delBtn.attr("del-id",item.empId); //将俩个按钮放到td中去 var btnTd = $("<td></td>").append(editBtn).append(" ").append( delBtn); //append方法执行完之后还返回原来的元素,就是tr,可以继续添加 $("<tr></tr>").append(checkboxTd).append(empIdTd).append(empNameTd).append( genderTd).append(emailTd).append(deptNameTd).append( btnTd) //添加到 .appendTo("#emps_table tbody") }); } //解析构建分页信息 function build_page_info(result) { //每次构建之前要清空 $("#page_info_area").empty(); $("#page_info_area").append( "当前第" + result.extend.pageInfo.pageNum + "页,总" + result.extend.pageInfo.pages + "页,总" + result.extend.pageInfo.total + "条数据"); //(后面用到)全局参数,获取总记录数,用来跳到最后一页 totalRecord = result.extend.pageInfo.total; currentPage = result.extend.pageInfo.pageNum; } //构建分页栏 function build_page_nav(result) { //每次构建之前要清空 $("#page_nav_area").empty(); var nav = $("<nav></nav>"); var ul = $("<ul></ul>").addClass("pagination"); //首页,尾页,上一页,下一页 var firstPageLi = $("<li></li>").append( $("<a></a>").append("首页").attr("href", "#")); var lastPageLi = $("<li></li>").append( $("<a></a>").append("尾页").attr("href", "#")); var prePageLi = $("<li></li>").append( $("<a></a>").append($("<span></span>").append("«"))); var nextPageLi = $("<li></li>").append( $("<a></a>").append($("<span></span>").append("»"))); //var prePageLi = $("<li></li>").append($("<a></a>").append("«")); //var nextPageLi = $("<li></li>").append($("<a></a>").append("»")); //判断是否有前一页,如果没有则禁用,否则才添加点击事件 if (result.extend.pageInfo.hasPreviousPage == false) { firstPageLi.addClass("disabled"); prePageLi.addClass("disabled"); } else { //为首页上一页添加点击事件 firstPageLi.click(function() { to_page(1); }) prePageLi.click(function() { to_page(result.extend.pageInfo.pageNum - 1); }) } //判断是否有后一页,如果没有则禁用,否则才添加点击事件 if (result.extend.pageInfo.hasNextPage == false) { lastPageLi.addClass("disabled"); nextPageLi.addClass("disabled"); } else { //为下一页尾页添加点击事件 lastPageLi.click(function() { to_page(result.extend.pageInfo.pages); }) nextPageLi.click(function() { to_page(result.extend.pageInfo.pageNum + 1); }) } //1.添加首页和前一页 ul.append(firstPageLi).append(prePageLi); //连续显示的页 $.each(result.extend.pageInfo.navigatepageNums, function(index, item) { //2.添加连续的页 var numLi = $("<li></li>").append( $("<a></a>").append(item).attr("href", "#")); //设置当前页激活状态,如果当前页就是被遍历的页,添加激活样式 if (result.extend.pageInfo.pageNum == item) { numLi.addClass("active"); } //添加点击事件,这个li被点击就跳转 新请求会将数据再次渲染,页面就乱了,需清空 numLi.click(function() { to_page(item); }); ul.append(numLi); }); //3.添加下一页和尾页 ul.append(nextPageLi).append(lastPageLi); //4.将整个分页栏添加到合适位置 $("#page_nav_area").append(ul); } </script>
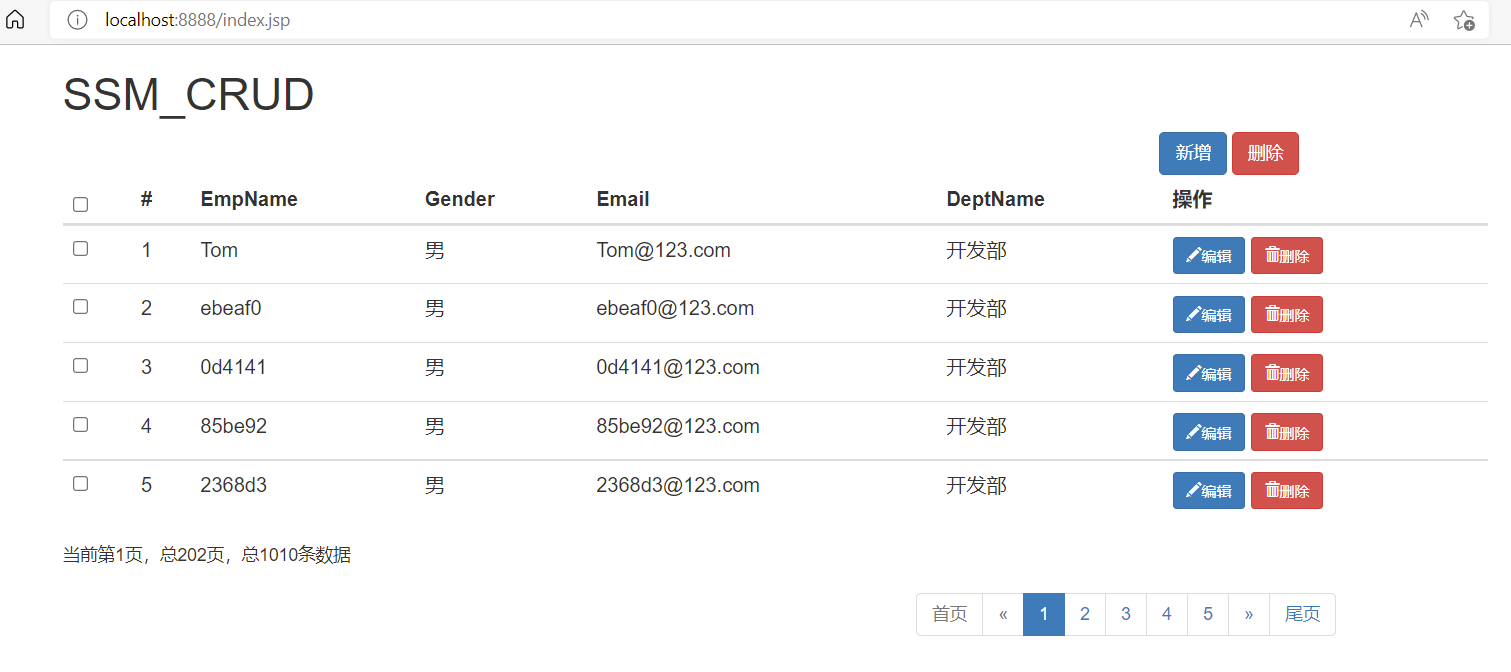
8. 页面效果

 浙公网安备 33010602011771号