
laravel5.4新特性
http://www.cnblogs.com/webskill/category/1067140.html
laravel 5.4 新特性
component and slot
使用:
1.component panel
2.其中header和body需要传入变量
3.views.components.index 中 需要引用component模版panel
@component('components.panel')
@slot('title')
hello world
@endslot
@slot('content')
have a nice day
@endslot
@endcomponent
4.如果要传入默认content
panel.blade.php修改如下:
index.blade.php修改如下
@component('components.panel')
@slot('title')
hello world
@endslot
have a nice day
@endcomponent
//可多来几个:
@component('components.panel')
@slot('title')
hello world
@endslot
have a nice day123
@endcomponent
5.还可以这样给默认值:title默认为laravel
panel.blade.php修改如下:
index.blade.php修改如下
@component('components.panel')
have a nice day
@endcomponent
laravel 邮件
本文使用qq邮箱
env邮件配置:
MAIL_FROM_ADDRESS = 17******92@qq.com
MAIL_FROM_NAME = listen~
MAIL_DRIVER=smtp
MAIL_HOST=smtp.qq.com
MAIL_PORT=465
MAIL_USERNAME=17*******2@qq.com
MAIL_PASSWORD= ****** //这个是你的qq授权码
MAIL_ENCRYPTION=ssl
MAIL_ENCRYPTION=ssl
-
创建邮件类
php artisan make:mail welcomeToMiya
-
修改welcomeToMiya.php视图
public function build()
{
return $this->view('email.welcome');
} -
使用
//发送邮件
Route::get('/mail',function(){
\Illuminate\Support\Facades\Mail::to('2861166132@qq.com')->send(new \App\Mail\welcomeToLaravist());
}); -
传参 修改 welcomeToMiya.php
public $user;
public function __construct(User $user)
{
$this->user = $user;
} -
传参 修改 web.php
//发送邮件
Route::get('/mail',function(){
$user = \App\User::find(1);
\Illuminate\Support\Facades\Mail::to('2861166132@qq.com')->send(new \App\Mail\welcomeToLaravist($user));
});
发邮件还可以这样:
public function sendTo($user,$subject,$view,$data){
//也可以使用Mail::send
Mail::send($view,$data,function ($message) use ($user,$subject){
$message->to($user->email)->subject($subject);
});
}
使用sendcloud:
参考github: https://github.com/NauxLiu/Laravel-SendCloud
notification 通知
= mail篇 ### =
public function via($notifiable)
{
return ['mail'];
}
1.新建notification类
php artisan make:notification PostNotification
2.设置路由
//notification 注意默认发送到user模型中的email邮箱账号 所以要确认user邮箱可用
Route::get('/notification',function(){
$user = \App\User::find(1);
$post = \App\Post::find(2);
$user->notify(new \App\Notifications\PostNotification($post));
});
3.访问/notification 收到邮件
4.常用设置方法 PostNotification.php
public function toMail($notifiable)
{
return (new MailMessage)
->subject('A post published'.$this->post->title) //自定义主体
->success() //定义按钮颜色
->line('The introduction to the notification.')
->action('Notification Action', url('/'))
->line('Thank you for using our application!');
}
=database篇 ### =
将通知都存储在数据库里
1.修改PostNotification.php
public function via($notifiable)
{
//return ['mail'];
return ['database'];
}
2.创建notification迁移文件
php artisan notifications:table
php artisan migrate
3.PostNotification.php 中可添加 toDatabase方法 如果没写的话默认用的是toArray方法
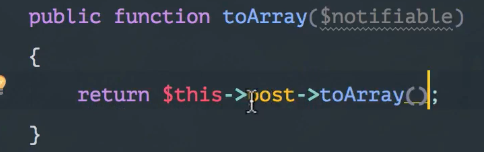
4.修改web.php
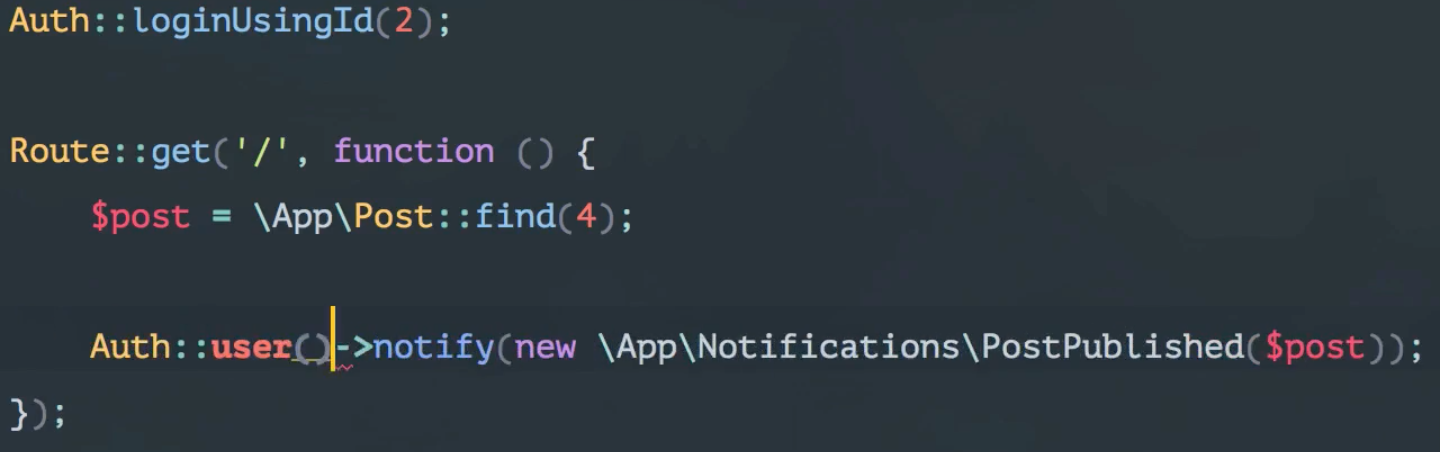
5.查看当前用户下的notifications
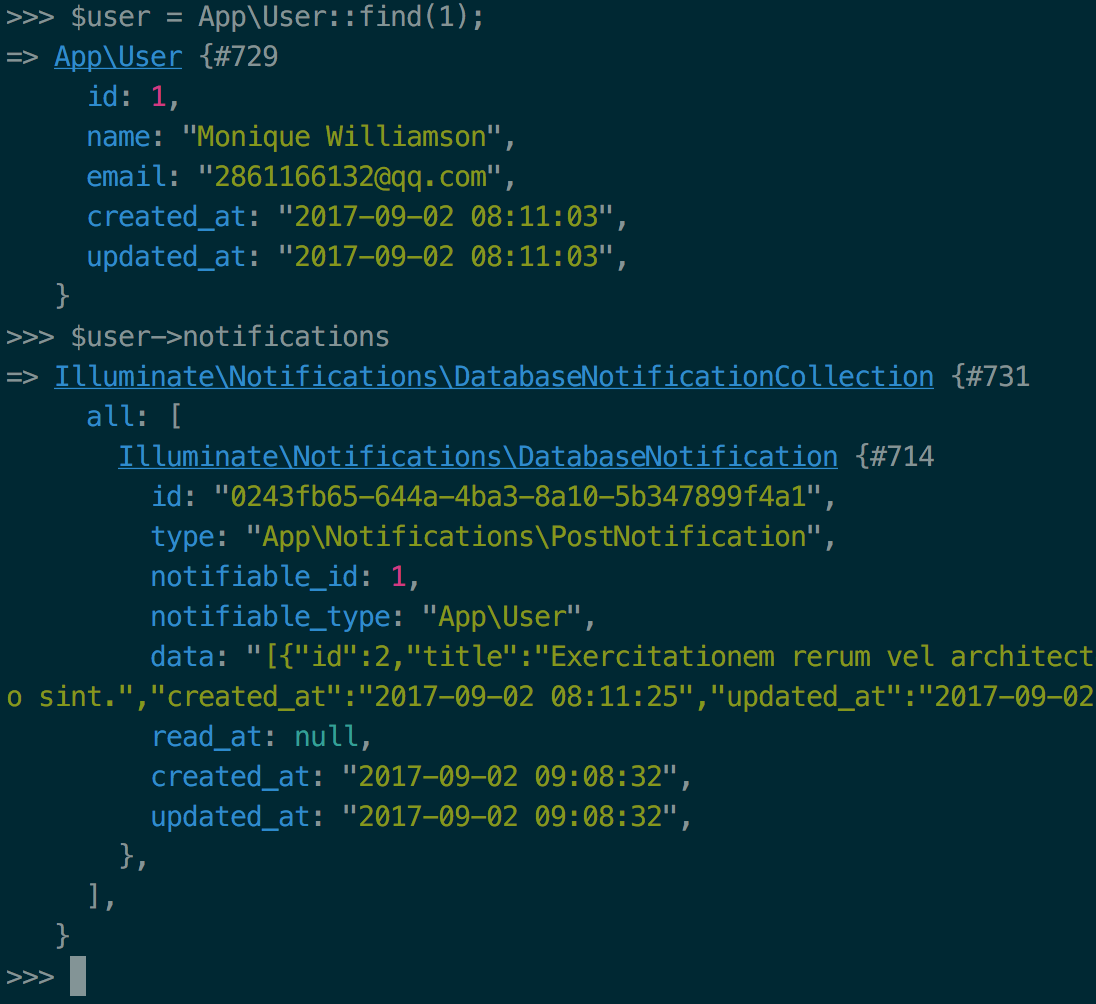
6.新建一个notification
php artisan make:notification UserSubscribe
7.UserSubscribe.php 修改如下
public function via($notifiable)
{
return ['database'];
}
/**
* Get the array representation of the notification.
*
* @param mixed $notifiable
* @return array
*/
public function toArray($notifiable)
{
return [
'subscribed_at' => Carbon::now()
];
}
8.修改web.php
//notification
Route::get('/notification', function () {
$user = \App\User::find(1);
$post = \App\Post::find(2);
//$user->notify(new \App\Notifications\PostNotification($post));
$user->notify(new \App\Notifications\UserSubscribe());
});
9.再次查看当前用户的notifications
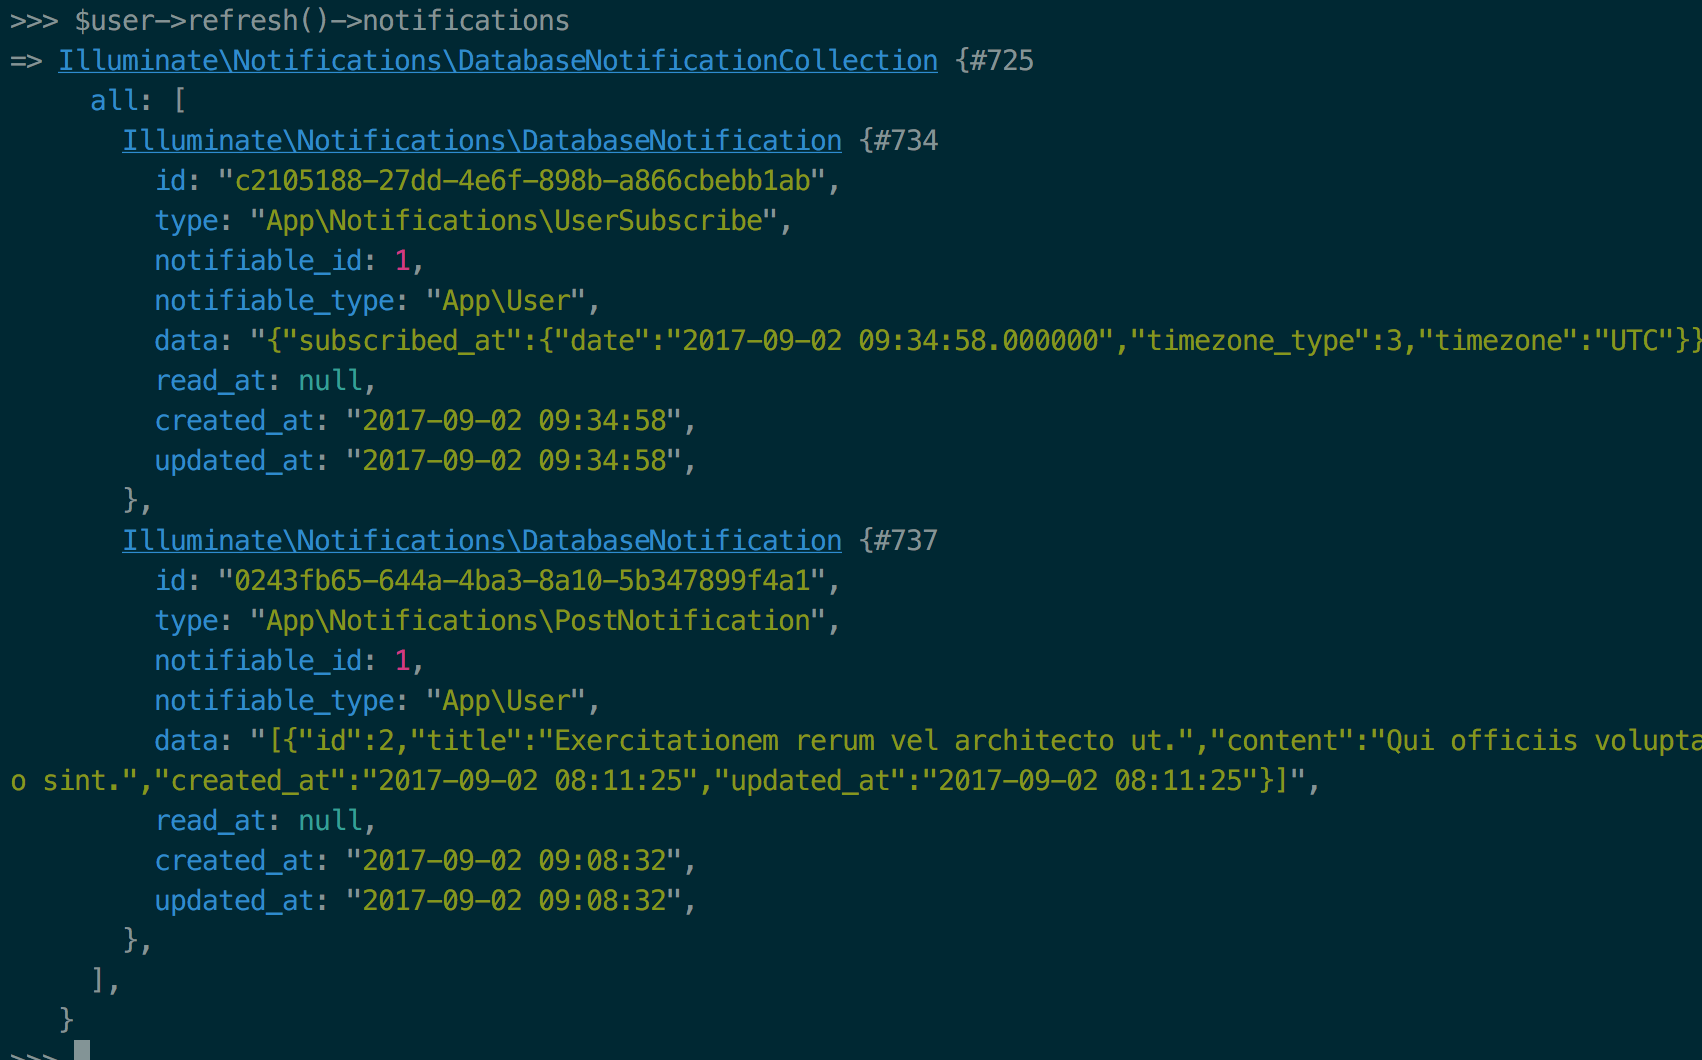
10.列出未读notifications并标识为已读
web.php
//notification
Route::get('/show-notification', function () {
return view('notifications.index');
});
//标识未读
Route::delete('user/notification',function (){
Auth::user()->unreadNotifications->markAsRead();
return redirect()->back();
});
notifications.index.blade
@extends('app')
@section('content')
我的通知:
@foreach(Auth::user()->unreadNotifications as $notification)
@include('notifications/'.snake_case( class_basename($notification->type) ))
@endforeach
@stop
user_subscribe.blade.php
user
post_notification.blade.php
post
标识某条已读
$user->refresh()->unreadNotifications->where('id','57bb0e0e-8d35-4da8-850b-121a5317c9b9')->first()->markAsRead();
总结:
database
- php artisan make:notification someNotification
- 对于需要传入的参数做修改 例如依赖模式 Post $post
- php artisan notification:table
- 获取notification $user->notifications
- 标识已读 所有的 $user->unreadNotifications->markAsRead()
单条标识:$user->refresh()->unreadNotifications->where('id','57bb0e0e-8d35-4da8-850b-121a5317c9b9')->first()->markAsRead();
laravel 邮件使用markdown
php artisan make:mail lessonPublished --markdown="emails.published"
这个命令不仅创建了email类文件 还生成了视图文件 并把视图也写好了 return $this->markdown('emails.published'')
可根据需要修改 也可修改email markdown模版 php artisan vendor:publish
发送邮件
Route::get("sendmail",function(){
$email = new \App\Mail\LessionPublished(\App\User::first());
Mail::to(\App|User::first())->send($email);
})
toggle
toggle方法主要用于多对多关系中,attach detach 比如点赞 收藏
1.user表
2.post表 title content
3.中间表 favoriate user_id post_id
4.user中定义关系
public function favorites(){
return $this->belongsToMany(Post::class,'favoriates'); //第二个参数中间表
}
5.关联关系
做法一:
在tinker中操作
$user = App\User::find(1);
$post = App\Post::find(2);
$user->favorite()->attach($post);
查看结果:$user->refresh()->favorite
//取消收藏
$user->favorite()->detach($post);
做法二:toggle 不用去判断用户有没有收藏该文章 用户收藏了则取消收藏 反之则收藏
$user->favorite()->toggle($post);
实时facade###
-
创建一个目录叫services
创建一个weibo类<?php
namespace App\Services;
class weibo
{
protected $http;public function __construct(Http $http)
{
$this->http = $http;
}public function publish($status){
$this->http->post($status);
}
}
创建一个Http类
<?php
namespace App\Services;
class Http
{
public function __construct()
{
}
public function post($status){
return dd('I post a post'.$status);
}
}
路由修改
use Facades\App\Services\weibo;
//facade
Route::get('facade',function (){
weibo::publish('这是一条微博');
});
现在访问就有了:"I post a post这是一条微博"
事件监听
方法一:
web.php
Event::listen('eloquent.created: App\post',function(){
dump('A post was created');
});
Route::get('/event53',function(){
\App\post::create(['title'=>'Title','content'=>'My Body']);
});
方法二:
注释掉
Event::listen('eloquent.created: App\post',function(){
dump('A post was created');
});
post模型中定义事件
<?php
namespace App;
use App\Events\PostWasPublished;
use Illuminate\Database\Eloquent\Model;
class post extends Model
{
protected $guarded = array();
protected $events = [
'created' => PostWasPublished::class
];
}
修改EventServiceProvider.php 中的$listen属性 创建事件和事件监听文件
protected $listen = [
'App\Events\PostWasPublished' => [
'App\Listeners\PostWasPublishedListener',
],
];
执行 php artisan event:generate
** 还可以依赖注入 **
App\Events\PostWasPublished.php
public $post;
public function __construct($post)
{
$this->post = $post;
}
App\Listeners\PostWasPublishedListener.php
public function handle(PostWasPublished $event)
{
dump($event->post->toArray());
}
方法三:普通路由触发event
app/Providers/EventServiceProvider.php
protected $listen = [
'App\Events\UserSignUp' => [
'App\Listeners\UserSignUpListener',
],
];
UserSignUp.php
use App\User;
public $user;
public function __construct(User $user)
{
$this->user = $user;
}
UserSignUpListener.php
public function handle(UserSignUp $event)
{
dd($event->user->name);
}
web.php
Route::get('/eventroute',function(){
$user = \App\User::find(1);
event(new \App\Events\UserSignUp($user));
});
console command
php artisan make:command hello
进入app/console/commands/hello.php
修改singniture和handle
protected $signature = 'lara:hello';
public function handle()
{
$this->info('hello my girl');
}
app/console/kernel.php $commands属性修改 添加刚才的类
App\Console\Commands\hello::class
传参:php artisan lara:hello alice
protected $signature = 'lara:hello{name=Bool}'; //? 可有可无
protected $signature = 'lara:hello{name=Bool}'; //? 可有可无
public function handle()
{
$this->info('hello my girl '.$this->argument('name'));
}
默认值:protected $signature = 'lara:hello{name=Bool}';
定时任务
新建一个test.sh
!/bin/bash
echo "hello world";
php test.php
test.php
this is a test for crontab
$ cronatab -e
* * * * * /var/www/test.sh 2>&1 >> /var/www/test.log
laravel 定时任务:
$ php artisan make:conmmand logInfo
修改 ap/console/command/logInfo.php
protected $description = 'log Info';
public function handle()
{
Log::info('It works');
}
kernel中注册 app/console/kernel.php
protected $commands = [
//
hello::class,
logInfo::class
];
/**
* Define the application's command schedule.
*
* @param \Illuminate\Console\Scheduling\Schedule $schedule
* @return void
*/
protected function schedule(Schedule $schedule)
{
$schedule->command('log:info')
->everyMinute();
}
$ crontab -e
* * * * * php /var/www/lara/leaning/artisan schedule:run >> /dev/null 2>&1
middleware###
php artisan make:middleware isAdminMiddleware
user表增加is_admin字段 值为 Y/N
模型user.php
public function isAdmin(){
return $this->is_admin == 1;
}
修改isAdminMiddleware
public function handle($request, Closure $next)
{
info( $request->user()); //等价于 Auth::user()
if($request->user() && $request->user()->isAdmin()){
return $next($request);
}
return redirect('/');
}
web.php
Auth::loginUsingId(2);
Route::group(['prefix'=>'admin','middleware'=>'isAdmin'],function (){
Route::get('users',function (){
return 'admin only';
});
});
controller中可以这样设置
public function __construct(){
$this->middleware('admin',['only'=>['store','update']]);
}
app/Http/Kernel.php
protected $routeMiddleware = [
'isAdmin' => isAdminMiddleware::class
];
}
视图绑定变量###
app下新建一个类 Status
<?php
namespace App;
class Status
{
public function total(){
return 45;
}
}
路由以前的做法是这样
Route::get('/status',function(\App\Status $status){
return view('status',compact('status'));
});
status.blade.php
Status
{{$status->total()}}
模板绑定变量这样写:
路由:不传递任何变量
Route::get('/status',function(){
return view('status');
});
模板中注入变量:status.blade.php
@inject('status','App\Status')
本地化Model Factory###
tinker:
factory(User::class,5)->create() //会写库
//或
factory(User::class,5)->make() //不会写库
App/Providers/AppServiceProvider.php
use Faker\Generator as FakerGenerator;
use Faker\Factory as FakerFactory;
public function boot()
{
$this->app->singleton(FakerGenerator::class,function (){
return FakerFactory::create('zh_CN');
});
}
再次用tinker生成的数据就是中文的了
DB::table('users')->truncate() 会将user表的数据全部删除
分页###
路由:
Route::get('/lessons',function(){
$lessons = \App\Lesson::paginate(15);
return view('lessons',compact('lessons'));
});
模板
@extends('app')
@section('content')
Lessons
@foreach($lessons->chunk(3) as $row)
@foreach($row as $lesson)
{{ $lesson->title }}
{{$lesson->intro}}
@endforeach
@endforeach
{!! $lessons->render() !!}
{{ $lessons->appends(['type'=>'article'])->links('vendor.pagination.bootstrap-4') }}
@stop
分页两种方式都可以
{!! $lessons->render() !!}
造测试数据 给article分配userId###
$factory->define(\App\Article::class, function (Faker\Generator $faker) {
$userIds= \App\User::pluck('id')->toArray();
return [
'title' => $faker->sentence,
'content' => $faker->paragraph,
'user_id' => $faker->randomElements($userIds)[0]
];
});
find 可以传入 id 也可以传入数组
App\User::find([2,3])
with eager loading###
user.php
public function posts(){
return $this->hasMany(Post::class)
}
路由:获取当前用户下的所有post
这里的post只的就是对应的关系
$posts = \App\User::with('posts')->get()
多态关联###
应用场景:评论属于文章 属于lesson
php artisan make:model comment -m
comment migration
public function up()
{
Schema::create('comments', function (Blueprint $table) {
$table->increments('id');
$table->integer('commentable_id');
$table->string('commentable_type');
$table->text('body');
$table->timestamps();
});
}
comment.php 模型
class comment extends Model
{
public function commentable(){
return $this->morphTo();
}
}
post.php 模型
use App\comment;
class post extends Model
{
protected $guarded = array();
protected $events = [
'created' => PostWasPublished::class
];
public function comments(){
return $this->morphMany(comment::class,'commentable');
}
}
lesson.php 模型
class Lesson extends Model
{
protected $guarded = array();
public function comments(){
return $this->morphMany(comment::class,'commentable');
}
}
使用:
-
给某个lesson添加评论
$lesson = App\Lesson::find(1);
$lesson->unguard();
$lesson->comments()->create(["body"=>"nice lesson"]); -
通过评论来查看属于哪个post
$comment = App\comment::find(1);
$comment->commentable
有用的小方法###
- dd( $article->created_at->diffForHumans() ); //几分钟前
- Config::get('database.default');
- app('config')['database']['default']
- Hash::make('password')
- app('hash')->make('password')
- config('services')
- \Auth::login($user) //自动登录
- Auth::check() //检查是否登录
- 密码;bcrypt(str_random(16))
- model中设置 $hidden = ['title'] //有时您可能想要限制能出现在数组或 JSON 格式的属性数据,比如密码字段。只要在模型里增加 hidden 属性即可
acl权限
AuthServiceProvider.php
public function boot()
{
$this->registerPolicies();
Gate::define('show-post',function ($user,$article){
return $user->id ### $article->user_id;
});
}
controller.php 测试当前用户是否有权限(当前post的id是否是当前用户)访问当前post,如果没权限访问则报错403
public function show($id){
$article = Article::findOrFail($id);
//dd( $article->created_at->diffForHumans() );
//12 minits ago 如果需要中文可以
//可以在app/Providers/AppServiceProvider.php的boot()方法加上:
//\Carbon\Carbon::setLocale('zh');
if(Gate::denies('show-post',$article)){
abort(403,'sorry');
};
//也可以这么写
// $this->authorize('show-post',$article);
return view('articles.show',compact('article'));
}
如果要在blade中运用 则全部注释掉
public function show($id){
$article = Article::findOrFail($id);
//dd( $article->created_at->diffForHumans() );
//12 minits ago 如果需要中文可以
//可以在app/Providers/AppServiceProvider.php的boot()方法加上:
//\Carbon\Carbon::setLocale('zh');
//if(Gate::denies('show-post',$article)){
//abort(403,'sorry');
//};
//也可以这么写
// $this->authorize('show-post',$article);
return view('articles.show',compact('article'));
}
模版中使用
@extends('app')
@section('content')
{{$article->title}}
@can('show-post',$article)
编辑
@endcan
@stop
使用policy###
policy的使用是为了更方便的创建用户权限规则 避免了在AuthServiceProvider中定义一长串的规则
php artisan make:policy ArticlePolicy
添加policy 规则:
public function editArticle($user,$article){
return $user->id ### $article->user_id;
}
AuthServiceProvider.php中注册该ArticlePolicy
protected $policies = [
'App\Article' => 'App\Policies\ArticlePolicy',
];
控制器使用:
if(Gate::denies('editArticle',$article)){
abort(403,'sorry');
};
模版中使用:
@extends('app')
@section('content')
{{$article->title}}
@can('editArticle',$article)
编辑
@endcan
@stop
用户权限
php artisan make:model Permission
php artisan make:model Role
php artisan make:migration create_roles_table --create=roles
编辑迁移文件:
public function up()
{
Schema::create('roles', function (Blueprint $table) {
$table->increments('id');
$table->string('name');//admin.member
$table->string('label')->nullable();//注册会员
$table->timestamps();
});
Schema::create('permissions', function (Blueprint $table) {
$table->increments('id');
$table->string('name');//admin.member
$table->string('label')->nullable();//注册会员
$table->timestamps();
});
Schema::create('permission_role', function (Blueprint $table) {
$table->integer('permission_id')->unsigned();
$table->integer('role_id')->unsigned();
$table->foreign('permission_id')
->references('id')
->on('permissions')
->onDelete('cascade');
$table->foreign('role_id')
->references('id')
->on('roles')
->onDelete('cascade');
$table->primary(['permission_id','role_id']);
});
Schema::create('role_user', function (Blueprint $table) {
$table->integer('user_id')->unsigned();
$table->integer('role_id')->unsigned();
$table->foreign('user_id')
->references('id')
->on('users')
->onDelete('cascade');
$table->foreign('role_id')
->references('id')
->on('roles')
->onDelete('cascade');
$table->primary(['user_id','role_id']);
});
}
定义关系:
-
role.php
public function permissions(){
return $this->belongsToMany(Permission::class);
}
public function givePermission(Permission $permission){
return $this->permissions()->save($permission);
} -
permission.php
public function roles(){
return $this->belongsToMany(Role::class);
} -
user.php
public function roles(){
return $this->belongsToMany(Role::class);
}public function hasRole($role){
//如果传入的是字符串
if( is_string($role) ){
return $this->roles->contains('name',$role);
}
//如果传入的是collection intersect 只的是 $role 和 $this->roles()有没有交集
return !!$role->intersect( $this->roles )->count();
}
tinker 创建一个role 一个permission 并把permission指派给这个role$role->givePermission($permission)
也可以直接
$role->permissions()->save($permission)
$user->roles()->save($role) 给用户分配角色
$user->roles()->detach($role) 删除角色
authServiceProvider.php
public function boot()
{
$this->registerPolicies();
foreach ( $this->getPermission() as $permission ){
Gate::define( $permission->name,function (User $user) use($permission){
return $user->hasRole($permission->roles);
});
}
}
protected function getPermission(){
return Permission::with('roles')->get();
}
blade中这样使用:
@can('edit')
编辑edit
@endcan
service container:
class Barz{}
class Foo{
public $bar;
public function __construct(Barz $barz)
{
$this->bar = $barz;
}
}
//如果有app绑定的优先找绑定的
App::bind('Foo',function (){
dd(12);
return new Foo(new BarZ());
});
Route::get('container',function (Foo $foo){
dd($foo);
});
App绑定后路由里不再需要依赖注入
Route::get('container1',function (){
dd(app('Foo'));
});
service实战 向IOC 容器添加自己的类
- 添加一个自己的类
App\Services\Billing\Stripe.php
<?php
namespace App\Services\Billing;
class Stripe
{
public function charge(){
dd('charged') ;
}
}
-
新建一个provider
php artisan make:provider BillingServiceProvider
-
注入服务 BillingServiceProvider.php , 注意要在app.php中注入这个provider
public function register()
{
$this->app->bind('billing',function(){
return new Stripe();
});
} -
访问 两种方法均可:
Route::get('container2',function (){
dd(app('billing')->charge());
});//或
Route::get('container2',function (\App\Services\Billing\Stripe $stripe){
dd($stripe->charge());
});
结合interface
重构代码:
-
定义接口:App\Billing\BillingInterface.php
public function charge(array $data); -
定义类:App\Biling\PingBilling.php
class PingBilling implements BillingInterface{
public function charge($data){
//todo
}
} -
声明serviceprovider 把PingBilling这个类放到ioc container中 BillingServiceProvider
$this->app->bind('billing','App\Biling\PingBilling')
- app.php 添加 BillingServiceProvider
控制器中调用 app('billing')->charge($data)
=facade### =
每个facade例如 Route 类 返回的其实都是个字符串,关键是继成了Facade类, Facade有个 __callStatic 方法,在一个类中执行一个不存在的静态方法时 该方法会被触发
Facade.php
public static function __callStatic($method, $args)
{
$instance = static::getFacadeRoot();
if (! $instance) {
throw new RuntimeException('A facade root has not been set.');
}
return $instance->$method(...$args);
}
__callStatic 执行了 $instance = static::getFacadeRoot(); 生成一个实例,解析的结果是 app('mailer')
public static function getFacadeRoot()
{
//static::getFacadeAccessor() 指的就是 mailer, 这句解析的结果就是 app('mailer') 其实就是Mailer这个类,到这里就必然有个provider绑定mailer 可在provider中查找
return static::resolveFacadeInstance(static::getFacadeAccessor());
}
目标:我希望我创建一个AjaxResponse的facade,这样能直接在controller中这样使用:
\AjaxResponse::success();
返回
{
code: "0"
result: {
}
}
步骤:
-
step1: 在app/Services文件夹中创建类
<?php namespace App\Services;
class AjaxResponse {
protected function ajaxResponse($code, $message, $data = null)
{
$out = [
'code' => $code,
'message' => $message,
];if ($data !== null) {
$out['result'] = $data;
}return response()->json($out);
}public function success($data = null)
{
$code = ResultCode::Success;
return $this->ajaxResponse(0, '', $data);
}public function fail($message, $extra = [])
{
return $this->ajaxResponse(1, $message, $extra);
}
}这个AjaxResponse是具体的实现类
-
step2: 创建provider
<?php namespace App\Providers;
use Illuminate\Support\ServiceProvider;
class AjaxResponseServiceProvider extends ServiceProvider {
public function register()
{
$this->app->singleton('AjaxResponseService', function () {
return new \App\Services\AjaxResponse();
});
}
}
这里我们在register的时候定义了这个Service名字为AjaxResponseService -
step3:在app/Facades文件夹中创建类
<?php namespace App\Facades;
use Illuminate\Support\Facades\Facade;
class AjaxResponseFacade extends Facade {
protected static function getFacadeAccessor() { return 'AjaxResponseService'; }
}
-
step4:好了,下面我们只需要到app.php中挂载上这两个东东就可以了
<?php
return [
...
'providers' => [
...
'App\Providers\RouteServiceProvider','App\Providers\AjaxResponseServiceProvider',
],
'aliases' => [
...'Validator' => 'Illuminate\Support\Facades\Validator',
'View' => 'Illuminate\Support\Facades\View','AjaxResponse' => 'App\Facades\AjaxResponseFacade',
],
];
使用name和email登录
postLogin 方法:
$field = filter_var($request->input('username'), FILTER_VALIDATE_EMAIL) ? 'email' : 'username';
$request->merge([$field => $request->get('username')]);
if(Auth::guard('admin')->attempt( $request->only($field, 'password'),
$request->remember)
){
//if successful,then intend the user to their intended location
return redirect()->intended(route('admin.dashboard'));
}else{
//if unsuccessful,then redirect back to the login with the form data
return redirect()->back()->withInput($request->only('username','remember'));
}
api
$lessons = Lesson::all();
\Response::json([
'status' => 'success',
'status_code' => 200,
'data' => $lessons->toArray()
]);
= 字段映射 ### =
$lessons = Lesson::all();
\Response::json([
'status' => 'success',
'status_code' => 200,
'data' => $this->transform($lessons->toArray())
]);
public function transform($lessons){
return array_map(function($lesson){
return [
'title' => $lesson['title'],
'content' => $lesson['body'],
'is_free' => (boolean)$lesson['free']
];
},$lessons);
}
注意 这个transform 是处理 collection的数据 all()
如果要处理elequent model 比如 Lesson::find(1)这样的数据需要这么处理transform方法,collection 用transformCollection方法:
public function transformCollection($lessons){
return array_map([$this,'transform'],$lessons);
}
public function transform($lesson){
return [
'title' => $lesson['title'],
'content' => $lesson['body'],
'is_free' => (boolean)$lesson['free']
];
}
= 代码重构 ### =
比如有个article也需要使用transform
-
新建一个类 App\Transformer\Transformer.php
<?php
namespace App\Transformer;
abstract class Transformer
{
/**
* @param $items
* @return array
*/
public function transformCollection($items){
return array_map([$this,'transform'],$items);
}/**
* @param $item
* @return mixed
*/
public abstract function transform($item);//抽象方法不用写大括号
} -
新建LessonTransform 并继承Transformer类 App\Transformer\LessonTransform .php
namespace App\Transformer;class LessonTransformer extends Transformer
{
/**
* @param $lesson
* @return array
*/
public function transform($lesson){
return [
'title' => $lesson['title'],
'content' => $lesson['intro']
];
}
} -
Lesson控制器中依赖注入 并调用Transformer中的方法
protected $lessonTransformer;
public function __construct(LessonTransformer $lessonTransformer)
{
$this->lessonTransformer = $lessonTransformer;
}
/**
* Display a listing of the resource.
*
* @return \Illuminate\Http\Response
*/
public function index()
{
$lessons = Lesson::all();
return \Response::json([
'status' => 'success',
'status_code' => 200,
'data' => $this->lessonTransformer->transformCollection($lessons->toArray())
]);
}public function show($id)
{
$lesson = Lesson::find($id);
return \Response::json([
'status' => 'success',
'status_code' => 200,
'data' => $this->lessonTransformer->transform($lesson)
]);
}
= 错误提示 ### =
1.新建一个ApiController.php
<?php
namespace App\Http\Controllers;
use Illuminate\Http\Request;
class ApiController extends Controller
{
protected $statusCode = 200;
/**
* @return int
*/
public function getStatusCode(): int
{
return $this->statusCode;
}
/**
* @param int $statusCode
*/
public function setStatusCode(int $statusCode)
{
$this->statusCode = $statusCode;
return $this;
}
public function responseNotFound( $message = 'Not Found' ){
return $this->responseError($message);
}
private function responseError($message){
return $this->response([
'status' => 'fail',
'status_code' => $this->getStatusCode(),
'message' => $message
]);
}
public function response($data){
return \Response::json($data);
}
}
2.控制器:LessonController.php 集成ApiController.php
public function show($id)
{
$lesson = Lesson::find($id);
if( !$lesson ) {
return $this->setStatusCode(500)->responseNotFound();
}
return $this->response([
'status' => 'success',
'data' => $this->lessonTransformer->transform($lesson)
]);
}
这时候访问 transformer/2689 就会返回ApiController中的错误信息
{
"status": "fail",
"status_code": 404,
"message": "Not Found"
}
= postman禁用token ### =
app\kernel.php 注释掉verifyCsrfToken.php
api验证有三种:
= auth.basic 基础验证### =
控制器构造方法中:
public function __construct(){
$this->middleware('auth.basic',['only'=>['store','update']]);
}
laravel 有用的小方法
[http://www.cnblogs.com/webskill/p/7463488.html ]
laravel package
-
根目录下新建目录 packages/Laravist/Hasher/src
-
composer 自动加载 并 设置命名空间
"autoload": {
"classmap": [
"database/seeds",
"database/factories"
],
"psr-4": {
"App\": "app/",
"Laravist\Hasher\":"package/Laravist/Hasher/src/"
}
}, -
src下新建一个类:Md5Hasher.php
<?php
namespace Laravist\Hasher;
class Md5hasher
{
public function make($value,array $options = []){
$salt = isset($options['salt']) ? $options['salt'] : '';
return hash('md5',$value.$salt);
}
public function check($value,$hashvalue,array $options = []){
$salt = isset($options['salt']) ? $options['salt'] : '';
return hash('md5',$value.$salt) ### $hashvalue;
}
} -
加载这个类:
php artisan make:provider Md5HashProvider 移到 src下 -
Md5HashProvider 中注册使用方法:
public function register()
{
$this->app->singleton('md5hash',function (){
return new Md5hasher();
});
} -
tinker中使用
app('md5hasher')->make('password')
自定义错误提示
resources/lang/en/validation.php
找到custom
将
'custom' => [
'attribute-name' => [
'rule-name' => 'custom-message',
],
],
改成:
'custom' => [
'name' => [
'required' => '用户名不能为空',
],
],
使用第三方插件 markdown
-
hyperDown github上 找到Parser.php app下新建文件 App\Markdown\Parser.php 注意命名空间
-
App\Markdown\Markdown.php
<?php
namespace App\Markdown;
class Markdown
{
protected $parser;public function __construct(Parser $parser)
{
$this->parser = $parser;
}
public function markdown($text){
$html = $this->parser->makeHtml($text);
return $html;
}
}composer dump-autoload
-
控制器中使用
protected $markdown;
public function __construct(Markdown $markdown)
{
$this->markdown = $markdown;
$this->middleware('auth',['only'=>['create','store','edit','update']]);
}
public function show($id)
{
$discussion = Discussion::findOrFail($id);
$html = $this->markdown->markdown($discussion->body) ;
return view('forum.detail',compact('discussion','html'));
} -
view中使用
storage###
图片上传使用 storage_path('app/public') 这种的时候 默认图片上传到 storage/app/public 下面 , 需要 php artisan storage:link 链到 public目录下
模糊查询###
$topics = \App\Topic::select(['id','name'])
->where('name','like','%'.$request->query('q').'%')
->get();
helper###
App下建 Support/hellper.php
比如 Auth::guard('api')->user()->id 用的非常多,把它做成helper
helper.php
<?php
if(!!function_exists('user')){
function user($driver=null){
if ($driver){
return app('auth')->guard($driver)->user();
}
return app('auth')->user();
}
}
composer.json
"autoload": {
"files":[
"App/Support/helper.php"
],
"classmap": [
"database/seeds",
"database/factories"
],
"psr-4": {
"App\": "app/"
}
},
可直接在控制器或blade中使用 user() 或者 user('api')
with 和 wherehas###
with: 选择所有的model, 每个model 关联的translations 根据条件进行过滤,结果只有 title like $query 的translations不为空, 其他model的translations为空
return $this->model->with([
'translations' => function($q)use($query){
$q->where('title','like',"%{$query}%")
->select('product_id','title');
}
])
wherehas: 选出满足条件的 model, 不是所有的model
$this->model->whereHas('translations', function($q)use($query){
$q->where('title', 'like', "%{$query}%");
})->get();

 浙公网安备 33010602011771号