python 与rabbitmq
| 一、rabbitmq简介、安装 |
简介:
MQ全称为Message Queue, 消息队列(MQ)是一种应用程序对应用程序的通信方法。应用程序通过读写出入队列的消息(针对应用程序的数据)来通信,而无需专用连接来链接它们。消息传递指的是程序之间通过在消息中发送数据进行通信,而不是通过直接调用彼此来通信,直接调用通常是用于诸如远程过程调用的技术。排队指的是应用程序通过 队列来通信。队列的使用除去了接收和发送应用程序同时执行的要求。
RabbitMQ是一个由erlang开发的AMQP(Advanced Message Queue )的开源实现的产品,遵循Mozilla Public License开源协议,RabbitMQ是一个消息代理,从“生产者”接收消息并传递消息至“消费者”,期间可根据规则路由、缓存、持久化消息。“生产者”也即message发送者以下简称P,相对应的“消费者”乃message接收者以下简称C,message通过queue由P到C,queue存在于RabbitMQ,可存储尽可能多的message,多个P可向同一queue发送message,多个C可从同一个queue接收messag。
安装(linux)
创建一个admin用户:rabbitmqctl add_user admin 1234qwer
设置该用户为administrator角色:rabbitmqctl set_user_tags admin administrator
设置权限:rabbitmqctl  set_permissions  -p  '/'  admin '.' '.' '.'
重启rabbitmq服务: service rabbitmq-server restart
| 二、rabbitmq python API |


#!/usr/bin/env python3
#_*_ coding:utf-8 _*_
#Author:wd
import pika
connection = pika.BlockingConnection(pika.ConnectionParameters(
    host='10.0.0.241',port=5672)) #创建连接
channel = connection.channel()#建立管道


channel.queue_declare(queue='hello')#声明queue

# n RabbitMQ a message can never be sent directly to the queue, it always needs to go through an exchange.
channel.basic_publish(exchange='',
                      routing_key='hello',
                      body='Hello World!')
print(" Sent 'Hello World!'")
connection.close()
消费者:
#!/usr/bin/env python3
#_*_ coding:utf-8 _*_
#Author:wd
import pika
connection = pika.BlockingConnection(pika.ConnectionParameters(
    host='10.0.0.241',port=5672))#建立连接
channel = connection.channel()#建立管道

channel.queue_declare(queue='hello')#声明从那个管道接受消息


def callback(ch, method, properties, body):#回调函数,收到消息后执行的函数,body指消息主题
    print(" [x] Received %r" % body)


channel.basic_consume(callback,
                      queue='hello',
                      no_ack=True) #如果设置no_ack=Flase,会把消费的消息重写添加到队列中

print(' [*] Waiting for messages.')
channel.start_consuming()#阻塞模式
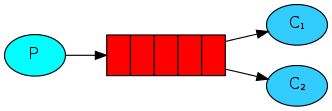
2.work模式(轮询)
- 在这种模式下,RabbitMQ会默认把p发的消息依次分发给连接该条队列的各个消费者(c),跟负载均衡差类似,如果在消费者段设置了no_ack=Flase(默认),也就是确认消息,如果在回调函数中不手动进行确认,那么该消息将一直存在,此时我们需要在回调函数周手动确认消息接收完毕,此时队列中的消息才会被删除。
- 假如消费者处理消息需要15秒,当消费者断开了,那这个消息处理明显还没处理完,并设置了no_ack=Flase(默认),此时该条消息会发给下一个消费者。
- 上面的效果消费端断了就转到另外一个消费端去了,但是生产者怎么知道消费端断了呢? 因为生产者和消费者是通过socket连接的,socket断了,就说明消费端断开了。
生产者:
#!/usr/bin/env python3
#_*_ coding:utf-8 _*_
#Author:wd
import pika
import time

connection = pika.BlockingConnection(pika.ConnectionParameters(
    '10.0.0.241'))
channel = connection.channel()

# 声明queue
channel.queue_declare(queue='task_queue')


message = "Hello World! %s" % time.time()
channel.basic_publish(exchange='',
                      routing_key='task_queue',
                      body=message,
                      )
print(" [x] Sent %r" % message)
connection.close()
消费者:
#!/usr/bin/env python3
#_*_ coding:utf-8 _*_
#Author:wd
import pika, time

connection = pika.BlockingConnection(pika.ConnectionParameters(
    '10.0.0.241'))
channel = connection.channel()

def callback(ch, method, properties, body):
    print(" [x] Received %r" % body)
    time.sleep(10)
    print(" [x] Done")
    print("method.delivery_tag", method.delivery_tag)
    ch.basic_ack(delivery_tag=method.delivery_tag)#主动向服务器发确认消息,此时delivery_tag为消费消息的tag号


channel.basic_consume(callback,
                      queue='task_queue',
                     # no_ack=True 如果在回掉函数中手动确认必须把no_ack设置为Flase或者不带该参数
                      )

print(' [*] Waiting for messages. To exit press CTRL+C')
channel.start_consuming()
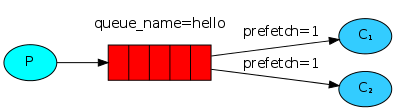
公平的分发消息:
在实际的应用中,每个客户端的消费消息的能力是不一样的,如果Rabbit只管按顺序把消息发到各个消费者身上,不考虑消费者负载的话,很可能出现,一个机器配置不高的消费者那里堆积了很多消息处理不完,同时配置高的消费者却一直很轻松。为解决此问题,可以在各个消费者端,配置perfetch=1,意思就是告诉RabbitMQ在我这个消费者当前消息还没处理完的时候就不要再给我发新消息了。如下图:
消费者:
#!/usr/bin/env python3
#_*_ coding:utf-8 _*_
#Author:wd
import pika
import time

connection = pika.BlockingConnection(pika.ConnectionParameters(
    host='10.0.0.241'))
channel = connection.channel()

channel.queue_declare(queue='task_queue')
print(' [*] Waiting for messages. To exit press CTRL+C')


def callback(ch, method, properties, body):
    print(" [x] Received %r" % body)
    time.sleep(body.count(b'.'))
    print(" [x] Done")
    ch.basic_ack(delivery_tag=method.delivery_tag)


channel.basic_qos(prefetch_count=1)#设置消费的条数为1,当当前消费者有一条消息未消费完时,该消费者不会主动接受消息了。
channel.basic_consume(callback,
                      queue='task_queue')

channel.start_consuming()
| 三、消息持久化 |
当rabbitmq队列中有很多消息,此时rabbitmq server宕机了,会导致数据丢下,那么如何将消息进行持久化呢。分两步:
1.持久化管道:
在生产者和消费者两端声明管道时候加参数:
channel.queue_declare(queue='hello2', durable=True)
2.持久化消息:
在生产者端设置properties参数:
properties=pika.BasicProperties( delivery_mode=2, )# 消息持久化
完整的demo:
生产者:
import pika

connection = pika.BlockingConnection(pika.ConnectionParameters(
               'localhost',5672))  # 默认端口5672,可不写
channel = connection.channel()
#声明queue
channel.queue_declare(queue='hello2', durable=True)
channel.basic_publish(exchange='',
                      routing_key='hello2',
                      body='Hello World!',
                      properties=pika.BasicProperties(
                          delivery_mode=2,  # make message persistent
                          )
                      )

print(" [x] Sent 'Hello World!'")
connection.close()
消费者:
import pika
import time

connection = pika.BlockingConnection(pika.ConnectionParameters(
               'localhost'))
channel = connection.channel()
channel.queue_declare(queue='hello2', durable=True)

def callback(ch, method, properties, body):
    print(" [x] Received %r" % body)
    time.sleep(10)
    ch.basic_ack(delivery_tag = method.delivery_tag)  # 告诉生产者,消息处理完成

channel.basic_qos(prefetch_count=1)  # 类似权重,按能力分发,如果有一个消息,就不在给你发
channel.basic_consume(  # 消费消息
                      callback,  # 如果收到消息,就调用callback
                      queue='hello2',
                      # no_ack=True  # 一般不写,处理完接收处理结果。宕机则发给其他消费者
                      )

print(' [*] Waiting for messages. To exit press CTRL+C')
channel.start_consuming()
| 四、rabbitmq发布/订阅的三种模式 |
之前的例子都基本都是1对1的消息发送和接收,即消息只能发送到指定的queue里,但有些时候你想让你的消息被所有的Queue收到,类似广播的效果,这时候就要用到exchange了,定义的类型有三种:
- fanout: 所有绑定到此exchange的queue都可以接收消息
- direct: 通过routingKey和exchange决定的那个唯一的queue可以接收消息
- topic: 所有符合routingKey(此时可以是一个表达式)的routingKey所bind的queue可以接收消息
TIPS:以上三种模式都是广播形式,时时接收,如果消费者不在线该条消息将不会再次接收,类似收音机。
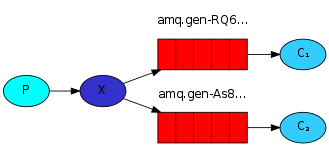
1.fanout
fanout模式是纯广播模式,所有绑定了相同的exchange的消费者都能收到来自生产者的一条消息,收取消息时需要queue和exchange绑定,因为消费者不是和exchange直连的,消费者是连在queue上,queue绑定在exchange上,消费者只会在queu里收消息。如下图:
demo:
发布者:
import pika
import sys

connection = pika.BlockingConnection(pika.ConnectionParameters(
        host='localhost'))
channel = connection.channel()
# 注意:这里是广播,不需要声明queue
channel.exchange_declare(exchange='logs',  # 声明广播管道
                         type='fanout')

# message = ' '.join(sys.argv[1:]) or "info: Hello World!"
message = "info: Hello World!"
channel.basic_publish(exchange='logs',
                      routing_key='',  # 注意此处空,必须有
                      body=message)
print(" [x] Sent %r" % message)
connection.close()
订阅者:
import pika

connection = pika.BlockingConnection(pika.ConnectionParameters(
        host='localhost'))
channel = connection.channel()

channel.exchange_declare(exchange='logs',
                         type='fanout')
# 不指定queue名字,rabbit会随机分配一个名字,exclusive=True会在使用此queue的消费者断开后,自动将queue删除
result = channel.queue_declare(exclusive=True)
# 获取随机的queue名字
queue_name = result.method.queue
print("random queuename:", queue_name)

channel.queue_bind(exchange='logs',  # queue绑定到转发器上
                   queue=queue_name)

print(' [*] Waiting for logs. To exit press CTRL+C')

def callback(ch, method, properties, body):
    print(" [x] %r" % body)

channel.basic_consume(callback,
                      queue=queue_name,
                     )

channel.start_consuming()
2.direct模式
RabbitMQ还支持根据关键字发送,即:队列绑定关键字,发送者将数据根据关键字发送到消息exchange,exchange根据 关键字 判定应该将数据发送至指定队列,此时的关键字由参数routing_key指定。模式如下图:

发布者:
#!/usr/bin/env python3
#_*_ coding:utf-8 _*_
#Author:wd
import pika
from random import randint
credentials = pika.PlainCredentials('admin','1234qwer')#使用用户名密码连接
connection = pika.BlockingConnection(pika.ConnectionParameters(
        host='10.0.0.241',port=5672,virtual_host='/',credentials=credentials))
channel = connection.channel()

channel.exchange_declare(exchange='direct_logs',
                         type='direct')#声明type类型

index=randint(0,3)
log_level=['info','wraning','error','nothing']
message ='{}--->Hello World!'.format(log_level[index])
channel.basic_publish(exchange='direct_logs',
                      routing_key=log_level[index],   #发消息随机绑定一个关键字
                      body=message)
print(" [x] Sent %r:%r" % (log_level[index], message))
订阅者:
#!/usr/bin/env python3
#_*_ coding:utf-8 _*_
#Author:wd
import pika
credentials = pika.PlainCredentials('admin','1234qwer')#使用用户名密码连接
connection = pika.BlockingConnection(pika.ConnectionParameters(
        host='10.0.0.241',port=5672,virtual_host='/',credentials=credentials))
channel = connection.channel()

channel.exchange_declare(exchange='direct_logs',
                         type='direct')

result = channel.queue_declare(exclusive=True)#随机生成队列名字,断开后删除
queue_name = result.method.queue
# 获取运行脚本所有的参数


channel.queue_bind(exchange='direct_logs',
                   queue=queue_name,
                   routing_key='info')#只绑定了info关键字,接受只接受info关键字的消息

print(' [*] Waiting for logs. To exit press CTRL+C')

def callback(ch, method, properties, body):
    print(" [x] %r:%r" % (method.routing_key, body))

channel.basic_consume(callback,
                      queue=queue_name,
                      )

channel.start_consuming()
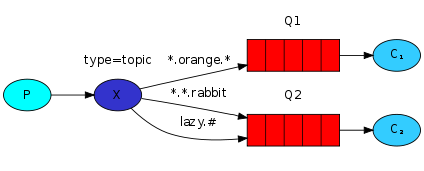
3.topic(主题)模式
topic相比于dirct而言,提供了更为详细的消息接受规则,可使用*、#等来匹配关键字来接受消息。
发往主题类型的转发器的消息不能随意的设置选择键(routing_key),必须是由点隔开的一系列的标识符组成。标识符可以是任何东西,但是一般都与消息的某些特性相关。一些合法的选择键的例子:"stock.usd.nyse", "nyse.vmw","quick.orange.rabbit".你可以定义任何数量的标识符,上限为255个字节。
绑定键和选择键的形式一样。主题类型的转发器背后的逻辑和直接类型的转发器很类似:一个附带特殊的选择键将会被转发到绑定键与之匹配的队列中。需要注意的是:关于绑定键有两种特殊的情况。
*可以匹配一个标识符。
#可以匹配0个或多个标识符。
例如:#.a会匹配a.a,aa.a,aaa.a等
*.a会匹配a.a,b.a,c.a等
注:使用RoutingKey为#,Exchange Type为topic的时候相当于使用fanout
topic消费模式如下图:
demo:
发布者:
#!/usr/bin/env python3
#_*_ coding:utf-8 _*_
#Author:wd
import pika
import sys
credentials = pika.PlainCredentials('admin','1234qwer')
connection = pika.BlockingConnection(pika.ConnectionParameters(
    host='10.0.0.241',port=5672,virtual_host="/",credentials=credentials))
channel = connection.channel()

channel.exchange_declare(exchange='topic_logs',
                         type='topic')

routing_key = sys.argv[1] if len(sys.argv) > 1 else 'anonymous.info'
message = ' '.join(sys.argv[2:]) or 'Hello World!'
channel.basic_publish(exchange='topic_logs',
                      routing_key=routing_key,
                      body=message)
print(" [x] Sent %r:%r" % (routing_key, message))
connection.close()
订阅者:
#!/usr/bin/env python3
#_*_ coding:utf-8 _*_
#Author:wd
import pika
import sys
credentials = pika.PlainCredentials('admin','1234qwer')
connection = pika.BlockingConnection(pika.ConnectionParameters(
    host='10.0.0.241',port=5672,virtual_host="/",credentials=credentials))
channel = connection.channel()
channel.exchange_declare(exchange='topic_logs',
                         type='topic')

result = channel.queue_declare(exclusive=True)
queue_name = result.method.queue

binding_keys = sys.argv[1:]
if not binding_keys:
    sys.stderr.write("Usage: %s [binding_key]...\n" % sys.argv[0])
    sys.exit(1)

for binding_key in binding_keys:#循环绑定routing_key,如果绑定*.info,就接受以.info结尾的routing_key所发的消息。
    channel.queue_bind(exchange='topic_logs',
                       queue=queue_name,
                       routing_key=binding_key)

print(' [*] Waiting for logs. To exit press CTRL+C')


def callback(ch, method, properties, body):
    print(" [x] %r:%r" % (method.routing_key, body))


channel.basic_consume(callback,
                      queue=queue_name,
                      )

channel.start_consuming()
| 五、rabbitmq应用场景(简单RPC) |
RPC,即 Remote Procedure Call(远程过程调用),说得通俗一点就是:调用远程计算机上的服务,就像调用本地服务一样。真正的RPC有更为标准的定义,这里我们可以使用rabbitmq来实现简单的RPC模型,其原理图如下:
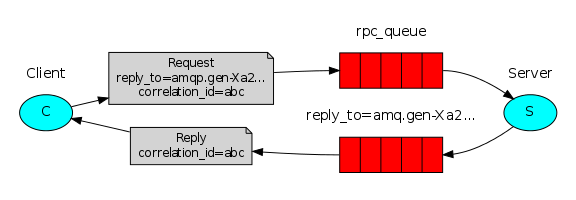
上述图中,client和server对于rabbitmq来说都具有两个角色,即:即是生产者又是消费者。client端通过生产者角色发送命令,服务端此时充当消费者接受客户端的命令消息,当接受到消息以后又以生产者角色发送命令结果给客户端,此时客户端是消费者接受客户端的消息。
过程:
- 客户端 Client 设置消息的 routing key 为 Service 的队列 op_q,设置消息的 reply-to 属性为返回的 response 的目标队列 reponse_q,设置其 correlation_id 为以随机UUID,然后将消息发到 exchange。比如channel.basic_publish(exchange='', routing_key='op_q', properties=pika.BasicProperties(reply_to = reponse_q, correlation_id = self.corr_id),body=request)
- Exchange 将消息转发到 Service 的 op_q
- Service 收到该消息后进行处理,然后将response 发到 exchange,并设置消息的 routing_key 为原消息的 reply_to 属性,以及设置其 correlation_id 为原消息的 correlation_id
- ch.basic_publish(exchange='', routing_key=props.reply_to, properties=pika.BasicProperties(correlation_id = props.correlation_id), body=str(response))Exchange 将消息转发到 reponse_q
- Client 逐一接受 response_q 中的消息,检查消息的 correlation_id 是否为等于它发出的消息的correlation_id,是的话表明该消息为它需要的response。
代码实现:
clinet:
import pika
import uuid

class FibonacciRpcClient(object):
    def __init__(self):
        self.connection = pika.BlockingConnection(pika.ConnectionParameters(
                host='localhost'))

        self.channel = self.connection.channel()

        result = self.channel.queue_declare(exclusive=True)
        self.callback_queue = result.method.queue

        self.channel.basic_consume(self.on_response, no_ack=True,
                                   queue=self.callback_queue)

    def on_response(self, ch, method, props, body):
        if self.corr_id == props.correlation_id:
            self.response = body

    def call(self, n):
        self.response = None
        self.corr_id = str(uuid.uuid4())
        self.channel.basic_publish(exchange='',
                                   routing_key='rpc_queue',
                                   properties=pika.BasicProperties(
                                         reply_to = self.callback_queue,
                                         correlation_id = self.corr_id,
                                         ),
                                   body=str(n))
        while self.response is None:
            self.connection.process_data_events()
        return int(self.response)

fibonacci_rpc = FibonacciRpcClient()

print(" [x] Requesting fib(30)")
response = fibonacci_rpc.call(30)
print(" [.] Got %r" % response)
server:
import pika
import time
connection = pika.BlockingConnection(pika.ConnectionParameters(
        host='localhost'))

channel = connection.channel()

channel.queue_declare(queue='rpc_queue')

def fib(n):
    if n == 0:
        return 0
    elif n == 1:
        return 1
    else:
        return fib(n-1) + fib(n-2)

def on_request(ch, method, props, body):
    n = int(body)

    print(" [.] fib(%s)" % n)
    response = fib(n)

    ch.basic_publish(exchange='',
                     routing_key=props.reply_to,
                     properties=pika.BasicProperties(correlation_id = \
                                                         props.correlation_id),
                     body=str(response))
    ch.basic_ack(delivery_tag = method.delivery_tag)

channel.basic_qos(prefetch_count=1)
channel.basic_consume(on_request, queue='rpc_queue')

print(" [x] Awaiting RPC requests")
channel.start_consuming()

 浙公网安备 33010602011771号