Java并发编程系列-(2) 线程的并发工具类

目前已经更新完《Java并发编程》,《Docker教程》和《JVM性能优化》,欢迎关注【后端精进之路】,轻松阅读全部文章。
Java并发编程:
- Java并发编程系列-(1) 并发编程基础
- Java并发编程系列-(2) 线程的并发工具类
- Java并发编程系列-(3) 原子操作与CAS
- Java并发编程系列-(4) 显式锁与AQS
- Java并发编程系列-(5) Java并发容器
- Java并发编程系列-(6) Java线程池
- Java并发编程系列-(7) Java线程安全
- Java并发编程系列-(8) JMM和底层实现原理
- Java并发编程系列-(9) JDK 8/9/10中的并发
Docker教程:
JVM性能优化:

2.线程的并发工具类
2.1 Fork-Join
JDK 7中引入了fork-join框架,专门来解决计算密集型的任务。可以将一个大任务,拆分成若干个小任务,如下图所示:
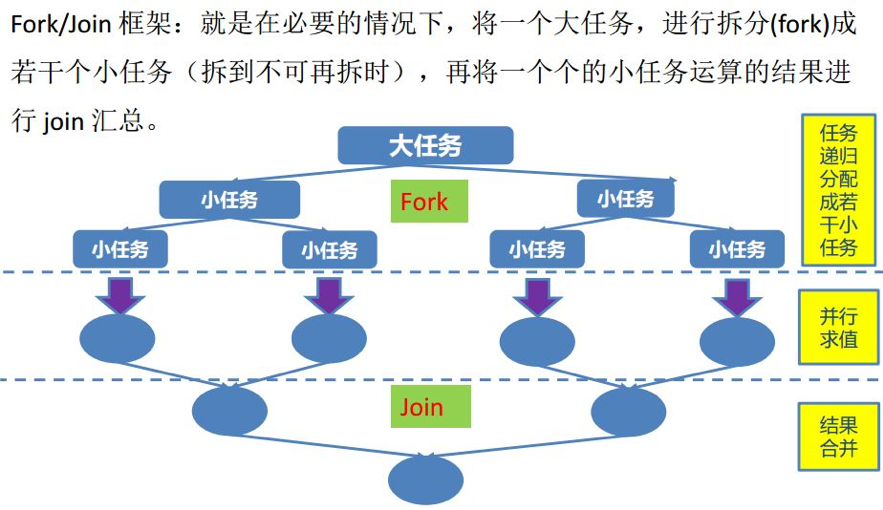
Fork-Join框架利用了分而治之的思想:什么是分而治之?规模为N的问题,N<阈值,直接解决,N>阈值,将N分解为K个小规模子问题,子问题互相对立,与原问题形式相同,将子问题的解合并得到原问题的解.
具体使用中,需要向ForkJoinPool线程池提交一个ForkJoinTask任务。ForkJoinTask任务有两个重要的子类,RecursiveAction类和RecursiveTask类,他们分别表示没有返回值的任务和可以有返回值的任务。
RecursiveAction类
下面的例子中,我们使用RecursiveAction遍历指定目录来寻找特定类型文件,需要实现compute方法。
public class FindDirsFiles extends RecursiveAction{

    private File path;//当前任务需要搜寻的目录

    public FindDirsFiles(File path) {
        this.path = path;
    }

    public static void main(String [] args){
        try {
            // 用一个 ForkJoinPool 实例调度总任务
            ForkJoinPool pool = new ForkJoinPool();
            FindDirsFiles task = new FindDirsFiles(new File("F:/"));

            pool.execute(task);//异步调用

            System.out.println("Task is Running......");
            Thread.sleep(1);
            int otherWork = 0;
            for(int i=0;i<100;i++){
                otherWork = otherWork+i;
            }
            System.out.println("Main Thread done sth......,otherWork="+otherWork);
            task.join();//阻塞的方法
            System.out.println("Task end");
        } catch (Exception e) {
            e.printStackTrace();
        }
    }

	@Override
	protected void compute() {

		List<FindDirsFiles> subTasks = new ArrayList<>();

		File[] files = path.listFiles();
		if(files!=null) {
			for(File file:files) {
				if(file.isDirectory()) {
					subTasks.add(new FindDirsFiles(file));
				}else {
					//遇到文件,检查
					if(file.getAbsolutePath().endsWith("txt")) {
						System.out.println("文件:"+file.getAbsolutePath());
					}
				}
			}
			if(!subTasks.isEmpty()) {
				for(FindDirsFiles subTask:invokeAll(subTasks)) {
					subTask.join();//等待子任务执行完成
				}
			}
		}
	}
}
RecursiveTask类
下面的例子中,利用RecursiveTask来实现数值累加。
public class SumArray {
    private static class SumTask extends RecursiveTask<Integer>{

        private final static int THRESHOLD = MakeArray.ARRAY_LENGTH/10;
        private int[] src; //表示我们要实际统计的数组
        private int fromIndex;//开始统计的下标
        private int toIndex;//统计到哪里结束的下标

        public SumTask(int[] src, int fromIndex, int toIndex) {
            this.src = src;
            this.fromIndex = fromIndex;
            this.toIndex = toIndex;
        }

		@Override
		protected Integer compute() {
			if(toIndex-fromIndex < THRESHOLD) {
				int count = 0;
				for(int i=fromIndex;i<=toIndex;i++) {
			    	//SleepTools.ms(1);
			    	count = count + src[i];
				}
				return count;
			}else {
				//fromIndex....mid....toIndex
				//1...................70....100
				int mid = (fromIndex+toIndex)/2;
				SumTask left = new SumTask(src,fromIndex,mid);
				SumTask right = new SumTask(src,mid+1,toIndex);
				invokeAll(left,right);
//				left.fork();
//				right.fork();
				return left.join()+right.join();
			}
		}
    }


    public static void main(String[] args) {

        ForkJoinPool pool = new ForkJoinPool();
        int[] src = MakeArray.makeArray();

        SumTask innerFind = new SumTask(src,0,src.length-1);

        long start = System.currentTimeMillis();

        pool.invoke(innerFind);//同步调用
        System.out.println("Task is Running.....");

        System.out.println("The count is "+innerFind.join()
                +" spend time:"+(System.currentTimeMillis()-start)+"ms");

    }
}
注意到fork和invokeAll都能达到相同的效果,只是fork将task交给工作线程后立刻返回;但是invokeAll会fork其中一个任务后,同时同步的调用另外一个任务,然后等待两个任务完成,可以参考invokeAll的实现:
ublic static void invokeAll(ForkJoinTask<?> t1, ForkJoinTask<?> t2) {
        int s1, s2;
        t2.fork();
        if (((s1 = t1.doInvoke()) & ABNORMAL) != 0)
            t1.reportException(s1);
        if (((s2 = t2.doJoin()) & ABNORMAL) != 0)
            t2.reportException(s2);
    }
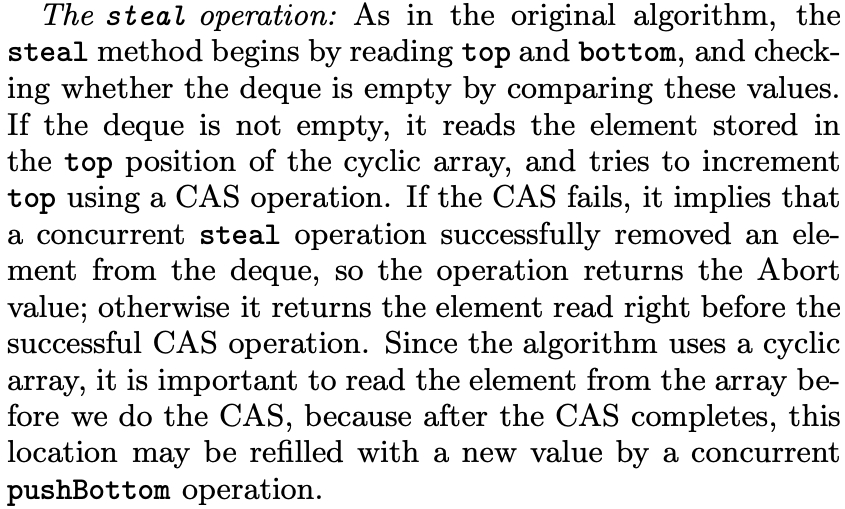
工作密取(Work Stealing)
在后台,fork-join框架使用了一种有效的方法来平衡可用线程的负载,称为工作密取(Work stealing)。每个工作线程都有一个双端队列(deque)来完成任务,一个工作线程将子任务压入其双端队列的队头。当一个工作线程空闲时,它会从另一个双端队列的队尾密取一个任务。
ForkJoinPool内部利用循环数组实现了一个双端队列,称为WorkQueue。对于这个Queue,有3种操作方法,分别是push、pop和poll。对于push和pop操作,只能被拥有该Queue的线程所调用。poll操作被用于其他工作线程从该Queue中获得task。
考虑到多线程steal work的情况,当进行poll操作时,会通过CAS操作来保证多线程下的安全性。如果CAS操作成功,则说明窃取成功。
更多细节可以查看ForkJoinPool的实现以及论文https://www.dre.vanderbilt.edu/~schmidt/PDF/work-stealing-dequeue.pdf。
invoke && execute && submit 区别
invoke是同步调用,它会马上执行执行,并且将task join到当前线程,也就是阻塞当前线程。
    /**
     * Performs the given task, returning its result upon completion.
     * If the computation encounters an unchecked Exception or Error,
     * it is rethrown as the outcome of this invocation.  Rethrown
     * exceptions behave in the same way as regular exceptions, but,
     * when possible, contain stack traces (as displayed for example
     * using {@code ex.printStackTrace()}) of both the current thread
     * as well as the thread actually encountering the exception;
     * minimally only the latter.
     *
     * @param task the task
     * @param <T> the type of the task's result
     * @return the task's result
     * @throws NullPointerException if the task is null
     * @throws RejectedExecutionException if the task cannot be
     *         scheduled for execution
     */
    public <T> T invoke(ForkJoinTask<T> task) {
        if (task == null)
            throw new NullPointerException();
        externalSubmit(task);
        return task.join();
    }
execute和submit是异步调用,它会将Task送到Work Queue中等待运行。如果需要看到运行结果,可以在execute和submit后调用join方法。两者的区别只是submit会返回task,execute返回空值。
    /**
     * Submits a ForkJoinTask for execution.
     *
     * @param task the task to submit
     * @param <T> the type of the task's result
     * @return the task
     * @throws NullPointerException if the task is null
     * @throws RejectedExecutionException if the task cannot be
     *         scheduled for execution
     */
    public <T> ForkJoinTask<T> submit(ForkJoinTask<T> task) {
        return externalSubmit(task);
    }
下面是execute的实现:
    /**
     * Arranges for (asynchronous) execution of the given task.
     *
     * @param task the task
     * @throws NullPointerException if the task is null
     * @throws RejectedExecutionException if the task cannot be
     *         scheduled for execution
     */
    public void execute(ForkJoinTask<?> task) {
        externalSubmit(task);
    }
2.2 CountDownLatch
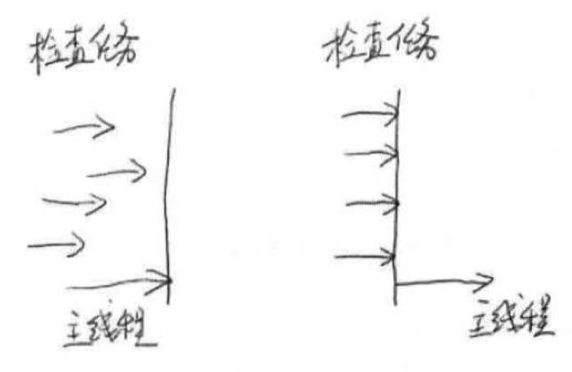
Latch是门栓的意思,顾名思义,CountDownLatch是一个多线程的控制工具类。通常用于让一组线程等待直到倒计时结束,再开始执行。
CountDownLatch的用法如下,
- 初始化count down的次数;
- 在初始化线程中调用countDown对计数器进行减1;
- 工作线程中调用await进行等待,当计时器为0时,工作线程开始工作。
public class UseCountDownLatch {

	static CountDownLatch latch = new CountDownLatch(6);

	// 初始化线程(只有一步,有4个)
    private static class InitThread implements Runnable{

        @Override
        public void run() {
        	System.out.println("Thread_"+Thread.currentThread().getId() +" finish init work......");

        	latch.countDown();//初始化线程完成工作了,countDown方法只扣减一次;

        	// We can add some tasks after the countDown is invoked
            for(int i =0;i<2;i++) {
            	System.out.println("Thread_"+Thread.currentThread().getId() +" ........continue do its work");
            }
        }
    }

    // 业务线程
    private static class BusinessThread implements Runnable{
        @Override
        public void run() {
        	try {
				latch.await();
			} catch (InterruptedException e) {
				e.printStackTrace();
			}

            for(int i =0;i<3;i++) {
            	System.out.println("BusinessThread_"+Thread.currentThread().getId() +" start to do business-----");
            }
        }
    }

    public static void main(String[] args) throws InterruptedException {
    	// 单独的初始化线程,初始化分为2步,需要扣减两次
        new Thread(new Runnable() {
            @Override
            public void run() {
            	SleepTools.ms(1);
                System.out.println("Thread_"+Thread.currentThread().getId() +" finish init work step 1st......");
                latch.countDown();//每完成一步初始化工作,扣减一次

                System.out.println("begin step 2nd.......");
                SleepTools.ms(1);
                System.out.println("Thread_"+Thread.currentThread().getId() +" finish init work step 2nd......");
                latch.countDown();//每完成一步初始化工作,扣减一次
            }
        }).start();

        new Thread(new BusinessThread()).start();

        // Start 3 new init thread
        for(int i=0;i<=3;i++){
            Thread thread = new Thread(new InitThread());
            thread.start();
        }

        latch.await();

        System.out.println("Main do ites work........");
    }
}
2.3 CyclicBarrier
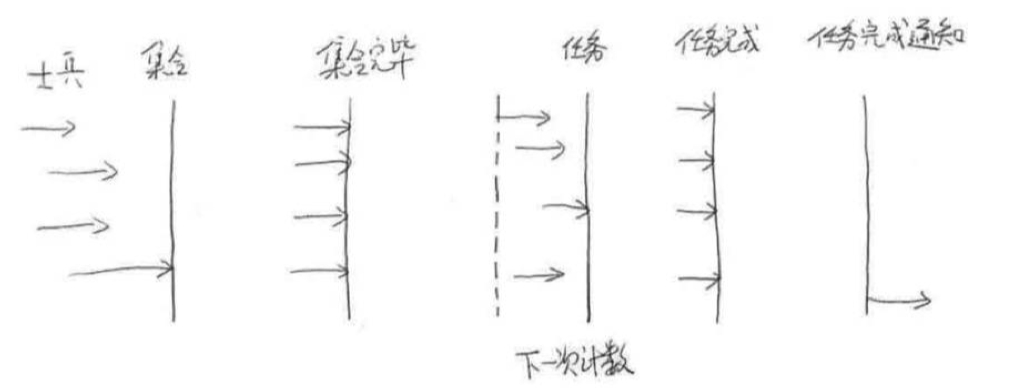
CyclicBarrier类实现了一个集结点,称为屏障(barrier)。当一个线程完成了那部分任务之后,它运行到屏障处,一旦所有线程都到达了这个屏障,屏障就撤销,线程就可以继续运行了。
CyclicBarrier的用法如下:
- 构造一个Barrier,需要给出参与的线程数。JDK里提供了两个构造函数,barrierAction为屏障打开之后需要执行的action。
CyclicBarrier(int parties)

CyclicBarrier(int parties, Runnable barrierAction)
- 每个线程做一些事情,完成后在屏障上调用await等待,
public void run() {
    doSomeWork();
    barrier.await();
    ...
}
- 当所有线程都到达了await后,此时屏障打开。如果有定义屏障打开后执行的action,则会先执行action。然后其他线程继续往下执行await后面的部分。
下面是具体的例子:
在打开屏障后,输出了各个线程的id。
public class UseCyclicBarrier {

	private static CyclicBarrier barrier = new CyclicBarrier(5,new TaskAfterBarrierIsOpenThread());

    private static ConcurrentHashMap<String,Long> resultMap = new ConcurrentHashMap<>();//存放子线程工作结果的容器

    public static void main(String[] args) {
        for(int i=0;i< 5;i++){
            Thread thread = new Thread(new SubThread());
            thread.start();
        }
    }

    //负责屏障开放以后的工作
    private static class TaskAfterBarrierIsOpenThread implements Runnable{

        @Override
        public void run() {
            StringBuilder result = new StringBuilder();
            for(Map.Entry<String,Long> workResult:resultMap.entrySet()){
            	result.append("["+workResult.getValue()+"]");
            }
            System.out.println(" the result = "+ result);
            System.out.println("do other business........");
        }
    }

    //工作线程
    private static class SubThread implements Runnable{

        @Override
        public void run() {
        	long id = Thread.currentThread().getId();//线程本身的处理结果
            resultMap.put(Thread.currentThread().getId()+"",id);
            Random r = new Random();//随机决定工作线程的是否睡眠
            try {
                if(r.nextBoolean()) {
                	Thread.sleep(2000+id);
                	System.out.println("Thread_"+id+" ....do something ");
                }
                System.out.println(id+"....is await");
                barrier.await();
            	Thread.sleep(1000+id);
                System.out.println("Thread_"+id+" ....do its business ");
            } catch (Exception e) {
                e.printStackTrace();
            }

        }
    }
}
注意屏障是可以重复使用的,当所有等待线程被释放后可以被重用。
CountDownLatch和CyclicBarrier对比
countdownlatch的放行由第三者控制,CyclicBarrier放行由一组线程本身控制
countdownlatch放行条件 >= 线程数,CyclicBarrier放行条件 = 线程数
2.4 Semaphore
Semaphore也叫信号量,在JDK1.5被引入,可以用来控制同时访问特定资源的线程数量,通过协调各个线程,以保证合理的使用资源。
Semaphore内部维护了一组虚拟的许可,许可的数量可以通过构造函数的参数指定。
- 访问特定资源前,必须使用acquire方法获得许可,如果许可数量为0,该线程则一直阻塞,直到有可用许可。
- 访问资源后,使用release释放许可。
示例程序如下:
public class MySemaphoreTest {
	static Semaphore semaphore = new Semaphore(4);

	private static class BusinessThread extends Thread {
		String name = "";

		BusinessThread(String name) {
			this.name = name;
		}

		@Override
		public void run() {
			try {
				System.out.println(name + " try to acquire lock...");
				System.out.println(name + " : available Semaphore permits now: " + semaphore.availablePermits());

				semaphore.acquire();

				System.out.println(name + " : got the permit!");

				// Do some business work
				Thread.sleep(1000);

				System.out.println(name + " : release lock...");
				semaphore.release();

			} catch (Exception e) {
				e.printStackTrace();
			}
		}
	}

	public static void main(String[] args) {
		for (int i = 0; i < 6; i++) {
			new BusinessThread((i+1) + "").start();
		}
	}
}
2.5 Exchanger
当两个线程在同一个数据缓冲区的两个实例上工作时,就可以使用Exchanger。典型的情况是,一个线程向缓冲区填入数据,另一个线程消耗这些数据。当他们都完成之后,相互交换缓冲区。
下面的例子中,在两个线程中分别填入数据,然后交换数据,最后打印从对方线程交换得来的数据。
public class UseExchange {
    private static final Exchanger<Set<String>> exchange
    	= new Exchanger<Set<String>>();

    public static void main(String[] args) {

    	//第一个线程
        new Thread(new Runnable() {
            @Override
            public void run() {
            	Set<String> setA = new HashSet<String>();//存放数据的容器
                try {
                	setA.add("1");
                	System.out.println(Thread.currentThread().getName()  + " Add 1 to the set");
                	setA.add("2");
                	System.out.println(Thread.currentThread().getName()  + " Add 2 to the set");
                	setA.add("3");
                	System.out.println(Thread.currentThread().getName()  + " Add 3 to the set");

                	setA = exchange.exchange(setA);//交换setA出去,返回交换来的数据setB

                	/*处理交换后的数据*/
                	System.out.println(Thread.currentThread().getName()  + " print the data after exchange ");
                	setA.forEach(string -> System.out.println(Thread.currentThread().getName() + " print" + string));
                } catch (InterruptedException e) {
                }
            }
        }).start();

      //第二个线程
        new Thread(new Runnable() {
            @Override
            public void run() {
            	Set<String> setB = new HashSet<String>();//存放数据的容器
                try {
                	setB.add("A");
                	System.out.println(Thread.currentThread().getName()  + " Add A to the set");

                	setB.add("B");
                	System.out.println(Thread.currentThread().getName()  + " Add B to the set");

                	setB.add("C");
                	System.out.println(Thread.currentThread().getName()  + " Add C to the set");

                	setB = exchange.exchange(setB);//交换setB出去,返回交换来的数据setA

                	/*处理交换后的数据*/
                	System.out.println(Thread.currentThread().getName()  + " print the data after exchange ");
                	setB.forEach(string -> System.out.println(Thread.currentThread().getName() + " print" + string));
                } catch (InterruptedException e) {
                }
            }
        }).start();
    }
}
2.6 Future、Callable和FutureTask
Future是多线程开发中的一种常见设计模式,核心思想是异步调用。当需要调用一个函数方法时,如果这个函数很慢,需要进行等待,这时可以先处理一些其他任务,在真正需要数据的时候再去尝试获得需要的数据。
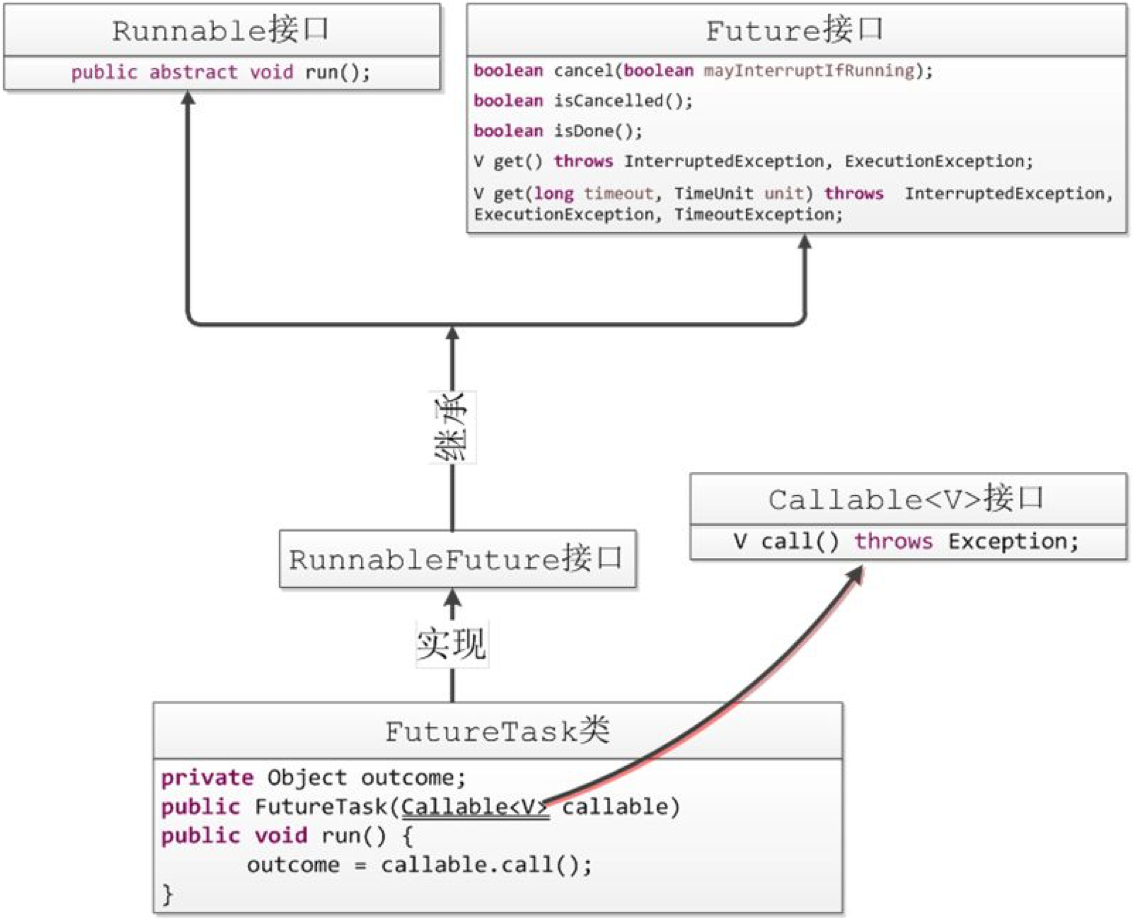
以上是Future的基本结构,RunnableFuture继承了Future和Runnable接口,FutureTask可以接收一个Callable实例作为运行的任务。
Future的使用比较简单,例子如下:
public class UseFuture {

	/*实现Callable接口,允许有返回值*/
	private static class UseCallable implements Callable<Integer>{

		private int sum;
		@Override
		public Integer call() throws Exception {
			System.out.println("Callable子线程开始计算");
			Thread.sleep(2000);
			for(int i=0;i<5000;i++) {
				sum = sum+i;
			}
			System.out.println("Callable子线程计算完成,结果="+sum);
			return sum;
		}

	}

	public static void main(String[] args)
			throws InterruptedException, ExecutionException {

		UseCallable useCallable = new UseCallable();
		FutureTask<Integer> futureTask = new FutureTask<Integer>(useCallable);
		new Thread(futureTask).start();

		Random r = new Random();
		SleepTools.second(1);
		if(r.nextBoolean()) {//随机决定是获得结果还是终止任务
			System.out.println("Get UseCallable result = "+futureTask.get());
		}else {
			System.out.println("中断计算");
			futureTask.cancel(true);
		}
	}
}
注意Future接口中声明了5个方法,分别为:
- cancel方法:用来取消任务,如果取消任务成功则返回true,如果取消任务失败则返回false。参数mayInterruptIfRunning表示是否允许取消正在执行却没有执行完毕的任务,如果设置true,则表示可以取消正在执行过程中的任务。如果任务已经完成,则无论mayInterruptIfRunning为true还是false,此方法肯定返回false,即如果取消已经完成的任务会返回false;如果任务正在执行,若mayInterruptIfRunning设置为true,则返回true,若mayInterruptIfRunning设置为false,则返回false;如果任务还没有执行,则无论mayInterruptIfRunning为true还是false,肯定返回true。
- isCancelled方法:表示任务是否被取消成功,如果在任务正常完成前被取消成功,则返回 true。
- isDone方法:表示任务是否已经完成,若任务完成,则返回true;
- get()方法:用来获取执行结果,这个方法会产生阻塞,会一直等到任务执行完毕才返回;
- get(long timeout, TimeUnit unit):用来获取执行结果,如果在指定时间内,还没获取到结果,就直接返回null。
本文由『后端精进之路』原创,首发于博客 http://teckee.github.io/ , 转载请注明出处
搜索『后端精进之路』关注公众号,立刻获取最新文章和价值2000元的BATJ精品面试课程。


 浙公网安备 33010602011771号