登录认证的两种方式
一.手动输入验证码
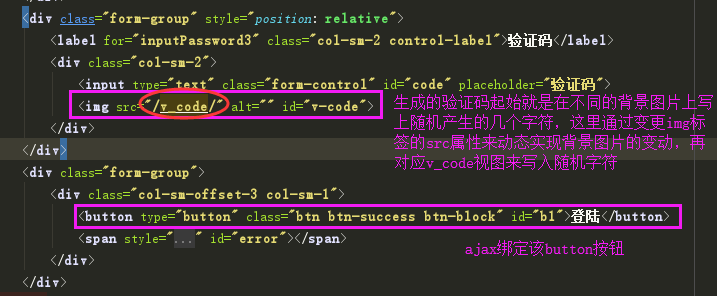


def v_code(request):
    from PIL import Image,ImageDraw,ImageFont
    import random
    #定义一个生成随机颜色代码的内部函数,返回值对应RGB()里面的三个参数值
    def get_color():
        return random.randint(0,255),random.randint(0,255),random.randint(0,255)
    #生成一个图片对象
    img_obj=Image.new(
        'RGB',
        (250,35),
        color=(144,144,144)
    )
    #在图片中加文字
    #生成一个画笔对象
    draw_obj=ImageDraw.Draw(img_obj)
    #加载字体文件
    font_obj=ImageFont.truetype('static/font/kumo.ttf',size=40)
    #for循环五次,每次写一个随机的字符
    tmp_list=[]
    for i in range(5):
        n=str(random.randint(0,9))
        l=chr(random.randint(97,122))
        u=chr(random.randint(65,90))
        r=random.choice([n,l,u])
        tmp_list.append(r)
        draw_obj.text(
            (i*48+20,0),#验证码在图片区的位置
            r,          #内容
            get_color(),#颜色
            font=font_obj
        )
    #得到生成的随机验证码
    v_code_str=''.join(tmp_list)
    #不能使用全局的变量保存验证码,会被覆盖
    #每个请求都应该对应自己的验证码
    request.session['v_code']=v_code_str.upper()
    #加干扰线
    # width = 250  # 图片宽度(防止越界)
    # height = 35
    # for i in range(2):
    #     x1 = random.randint(0, width)
    #     x2 = random.randint(0, width)
    #     y1 = random.randint(0, height)
    #     y2 = random.randint(0, height)
    #     draw_obj.line((x1, y1, x2, y2), fill=get_color())
    #
    # # 加干扰点
    # for i in range(2):
    #     draw_obj.point([random.randint(0, width), random.randint(0, height)], fill=get_color())
    #     x = random.randint(0, width)
    #     y = random.randint(0, height)
    #     draw_obj.arc((x, y, x+4, y+4), 0, 90, fill=get_color())

    #将图片直接在内存中保存
    from io import BytesIO
    tmp=BytesIO()#生成一个io对象
    img_obj.save(tmp,'png')
    data=tmp.getvalue()
    return HttpResponse(data,content_type='image/png')
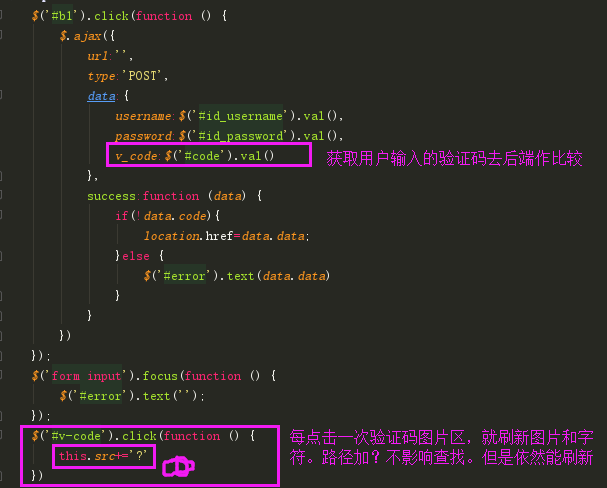
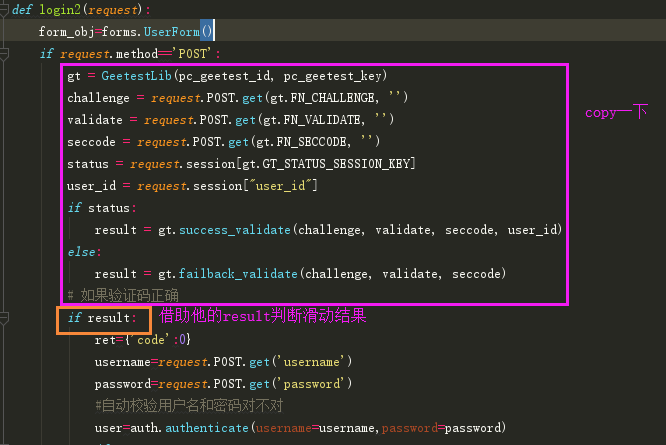
def login(request):
    form_obj=forms.UserForm()
    if request.method=='POST':
        ret={'code':0}
        username=request.POST.get('username')
        password=request.POST.get('password')
        v_code=request.POST.get('v_code','')
        if v_code.upper()==request.session.get('v_code',''):
            #自动校验用户名和密码对不对
            user=auth.authenticate(username=username,password=password)
            if user:
                # 内置的login方法
                # 1. 生成Session数据,存一下user_id 然后把sessionid写入Cookie
                # 后续每一次请求来的时候,AuthenticationMiddleware中的process_request方法中
                # 会自动帮我们取到user_id,然后到数据库中拿出user对象,然后添加到request.user属性中 --> request.user = user
                # 后续我们都可以通过request.user拿到当前的登陆用户对象
                auth.login(request,user)
                ret['data']='/home/'
            else:
                ret['code']=1
                ret['data']='用户名或密码错误'
        else:
            ret['code']=1
            ret['data']='验证码错误'
        return JsonResponse(ret)
    return render(request,'login.html',{'form_obj':form_obj})
二.滑动验证码
<script>
     var handlerPopup = function (captchaObj) {
        // 成功的回调
        captchaObj.onSuccess(function () {
            var validate = captchaObj.getValidate();
            $.ajax({
                url: "", // 进行二次验证
                type: "post",
                data: {
                    username: $("#id_username").val(),
                    password: $("#id_password").val(),
                    geetest_challenge: validate.geetest_challenge,
                    geetest_validate: validate.geetest_validate,
                    geetest_seccode: validate.geetest_seccode
                },
                success: function (data) {
                    if (!data.code) {
                        location.href = data.data;
                    } else {
                        // 有错误
                        $("#login-error").text(data.data);
                    }
                },
                error: function (err) {
                    console.log(err)
                }
            });
        });
         $("#b1").click(function () {
            captchaObj.show();
        });
        // 将验证码加到id为captcha的元素里
        captchaObj.appendTo("#popup-captcha");
        // 更多接口参考:http://www.geetest.com/install/sections/idx-client-sdk.html
    };

    // 验证开始需要向网站主后台获取id,challenge,success(是否启用failback)
    $.ajax({
        url: "/pcgetcaptcha?t=" + (new Date()).getTime(), // 加随机数防止缓存
        type: "get",
        dataType: "json",
        success: function (data) {
            // 使用initGeetest接口
            // 参数1:配置参数
            // 参数2:回调,回调的第一个参数验证码对象,之后可以使用它做appendTo之类的事件
            initGeetest({
                gt: data.gt,
                challenge: data.challenge,
                product: "popup", // 产品形式,包括:float,embed,popup。注意只对PC版验证码有效
                offline: !data.success // 表示用户后台检测极验服务器是否宕机,一般不需要关注
                // 更多配置参数请参见:http://www.geetest.com/install/sections/idx-client-sdk.html#config
            }, handlerPopup);
        }
    });


    $(document).ready(function () {
        // 文档加载完之后自动执行的
        // 当form中的input标签获取光标之后,就清空之前的错误信息
        $("form input").focus(function () {
            $("#login-error").text("");
        });

    })


</script>

 浙公网安备 33010602011771号