vue-cli3 项目svg图批量引用
vue-cli3 svn 导入
安装依赖
npm install svg-sprite-loader -D
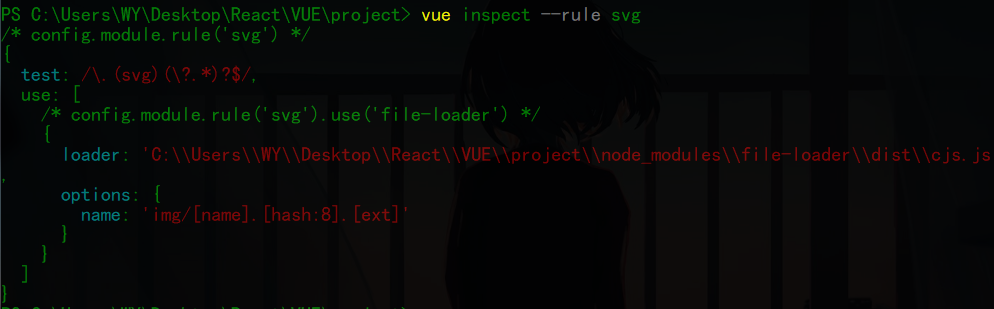
查看webpack 自带的规则
vue inspect --rule svg
修改规则和新增规则,vue.config.js
const path = require('path');
function resolve(dir) {
  return path.join(__dirname, dir)
}

module.exports = {
  chainWebpack(config) {
    // 修改当前项目默认svg 配置,排除icons目录
    config.module.rule('svg')
      .exclude.add(resolve('./src/icons'))
    // 新增一个 rule:添加icons 里面svg
    config.module.rule('icons')
      .test(/\.svg$/)
      .include.add(resolve('./src/icons')).end()
      .use('svg-sprite-loader')
        .loader('svg-sprite-loader')
        .options({symbolId: 'icon-[name]'})
  }
}
注意:修改vue.config.js 是需要重新启动的
创建icons/index.js
// icons/index.js
// webpack 创建一个以svg 目录为上下文的require函数
import Vue from 'vue'
import SvgIcon from '@components/SvgIcon.vue'
// 注册svg 组件
Vue.component(SvgIcon.name, SvgIcon)

const req=require.context('./svg',false,/\.svg$/)
req.keys().map(req);// keys() 会获取所有svg 文件
然后我们将此文件引入到main文件中
创建SvgICon组件,components/SvgIcon.vue
<template>
  <svg :class="svgClass" aria-hidden="true">
    <use :xlink:href="iconName"/>
  </svg>
</template>

<script>
export default {
  name: 'SvgIcon',
  props: {
    iconClass: {
      type: String,
      required: true
    },
    className: {
      type: String,
      default: ''
    }
  },
  computed: {
    iconName() {
      return `#icon-${this.iconClass}`
    },
    svgClass() {
      if (this.className) {
        return 'svg-icon ' + this.className
      } else {
        return 'svg-icon'
      }
    }
  }
}
</script>

<style scoped>
.svg-icon {
  width: 1em;
  height: 1em;
  vertical-align: -0.15em;
  fill: currentColor;
  overflow: hidden;
}
</style>
使用组件
<svg-icon icon-class="qiqiu" />
icon-class 对应的名称,就是我们在icons/svg存放的文件名称
class-name 可以去修改当前图表样式

 浙公网安备 33010602011771号