十二、linux 之 进程管理
1) 在 LINUX 中,每个执行的程序都称为一个进程。每一个进程都分配一个 ID 号(pid,进程号)。
2) 每个进程都可能以两种方式存在的。前台与后台,所谓前台进程就是用户目前的屏幕上可以进行操作的。后台进程 则是实际在操作,但由于屏幕上无法看到的进程,通常使用后台方式执行。
3) 一般系统的服务都是以后台进程的方式存在,而且都会常驻在系统中。直到关机才结束
二、显示系统执行的进程(ps)
2.1 ps指令
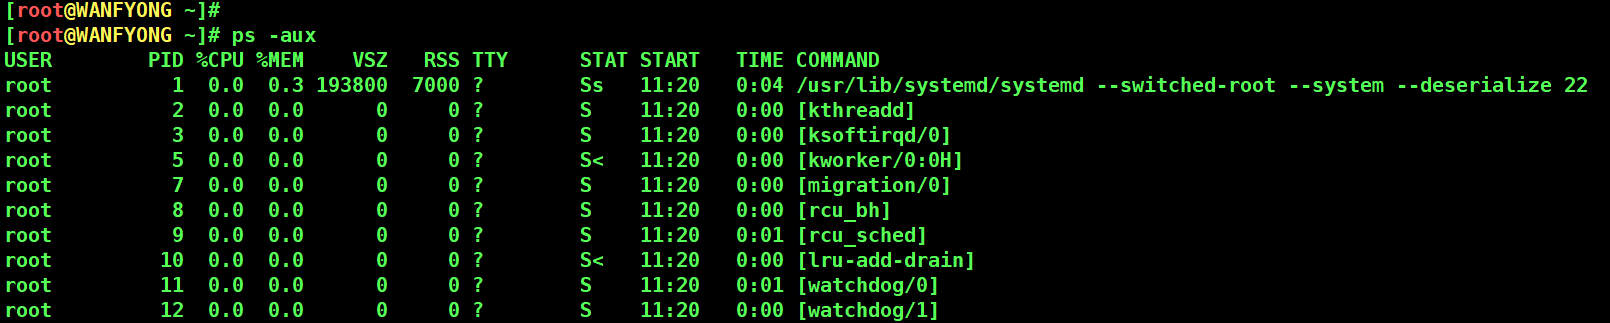
ps 命令是用来查看目前系统中,有哪些正在执行,以及它们执行的状况。可以不加任何参数.
[root@WANFYONG ~]# ps -aux
USER        PID %CPU %MEM    VSZ   RSS TTY      STAT START   TIME COMMAND
root          1  0.0  0.3 193800  7000 ?        Ss   11:20   0:04 /usr/lib/systemd/systemd --switched-root --system --deserialize 22
root          2  0.0  0.0      0     0 ?        S    11:20   0:00 [kthreadd]
root          3  0.0  0.0      0     0 ?        S    11:20   0:00 [ksoftirqd/0]
root          5  0.0  0.0      0     0 ?        S<   11:20   0:00 [kworker/0:0H]
root          7  0.0  0.0      0     0 ?        S    11:20   0:00 [migration/0]
root          8  0.0  0.0      0     0 ?        S    11:20   0:00 [rcu_bh]
root          9  0.0  0.0      0     0 ?        S    11:20   0:01 [rcu_sched]
root         10  0.0  0.0      0     0 ?        S<   11:20   0:00 [lru-add-drain]
root         11  0.0  0.0      0     0 ?        S    11:20   0:01 [watchdog/0]
root         12  0.0  0.0      0     0 ?        S    11:20   0:00 [watchdog/1]
root         13  0.0  0.0      0     0 ?        S    11:20   0:00 [migration/1]
USER:用户名称
PID:进程号
%CPU:进程占用 CPU 的百分比
%MEM:进程占用物理内存的百分比
VSZ:进程占用的虚拟内存大小(单位:KB)
RSS:进程占用的物理内存大小(单位:KB)
TTY:终端名称,缩写 .
STAT:进程状态,
S-睡眠,
s-表示该进程是会话的先导进程,
N-表示进程拥有比普通优先级更低的优先级,
R- 正在运行,
D-短期等待,
Z-僵死进程,
T-被跟踪或者被停止等等
STARTED:进程的启动时间
TIME:CPU 时间,即进程使用 CPU 的总时间
COMMAND:启动进程所用的命令和参数,如果过长会被截断显示[root@WANFYONG ~]# ps -aux | grep sshd root 7545 0.0 0.2 112884 4332 ? Ss 11:21 0:00 /usr/sbin/sshd -D root 9468 0.0 0.2 156764 5504 ? Ss 11:25 0:00 sshd: root@pts/0 root 11793 0.0 0.0 112728 984 pts/0 S+ 14:54 0:00 grep --color=auto sshd [root@WANFYONG ~]#
第一个是 真正的 sshd运行的进程。
第二个是 我们登陆的 sshd 进程
第三个是 我们刚才操作 sshd 指令的进程


# 以全格式显示当前所有的进程,查看进程的父进程。
# 查看 sshd 的父进程信息 ps -ef 是以全格式显示当前所有的进程
# -e 显示所有进程。-f 全格式

[root@WANFYONG ~]# ps -ef | grep sshd
root       7545      1  0 11:21 ?        00:00:00 /usr/sbin/sshd -D
root       9468   7545  0 11:25 ?        00:00:00 sshd: root@pts/0
root      12110   9472  0 15:28 pts/0    00:00:00 grep --color=auto sshd
[root@WANFYONG ~]#
[root@WANFYONG ~]#
[root@WANFYONG ~]# ps -ef | more
UID         PID   PPID  C STIME TTY          TIME CMD
root          1      0  0 11:20 ?        00:00:04 /usr/lib/systemd/systemd --switched-root --system --deserialize 22
UID:用户 ID
PID:进程 ID
PPID:父进程 ID
C:CPU 用于计算执行优先级的因子。数值越大,表明进程是 CPU 密集型运算,执行优先级会降低;数值越小,表 明进程是 I/O 密集型运算,执行优先级会提高
STIME:进程启动的时间
TTY:完整的终端名称
TIME:CPU 时间
CMD:启动进程所用的命令和参数

三、终止进程(kill、killall)
3.1 介绍
若是某个进程执行一半需要停止时,或是已消了很大的系统资源时,此时可以考虑停止该进程。使用 kill 命令来完 成此项任务。
kill [选项] 进程号(功能描述:通过进程号杀死/终止进程)
killall 进程名称 (功能描述:通过进程名称杀死进程,也支持通配符,这在系统因负载过大而变得很慢时很有用)选项:
-9 :表示强迫进程立即停止
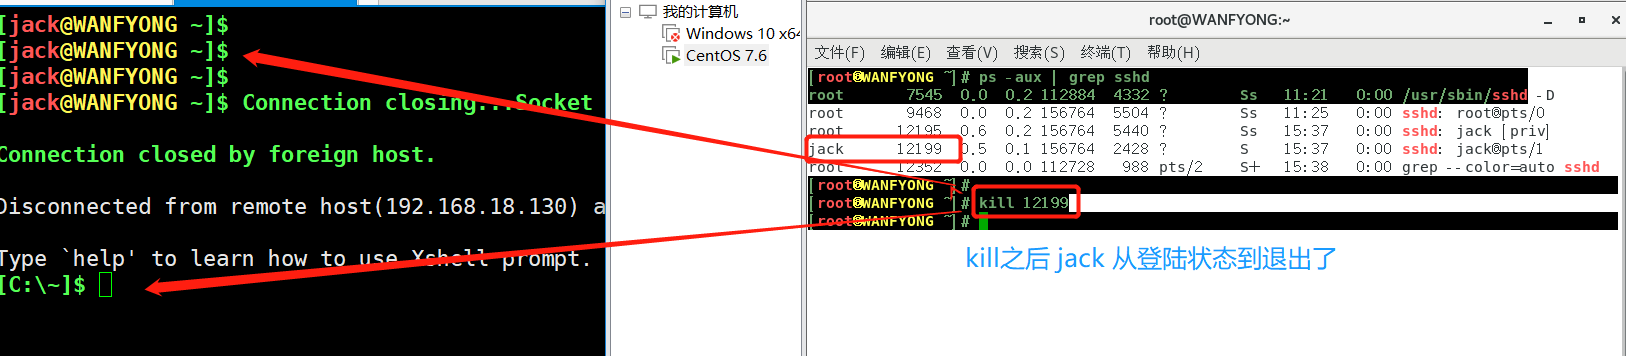
# 1. 踢掉某个非法登录用户 kill 进程号
[root@WANFYONG ~]# ps -aux | grep sshd
root       7545  0.0  0.2 112884  4332 ?        Ss   11:21   0:00 /usr/sbin/sshd -D
root       9468  0.0  0.2 156764  5504 ?        Ss   11:25   0:00 sshd: root@pts/0
root      12195  1.2  0.2 156764  5448 ?        Ss   15:41   0:00 sshd: jack [priv]
jack      12199  0.1  0.1 156764  2436 ?        S    15:41   0:00 sshd: jack@pts/1
root      12352  0.0  0.0 112728   988 pts/0    S+   15:41   0:00 grep --color=auto sshd
[root@WANFYONG ~]#
[root@WANFYONG ~]#kill 12199
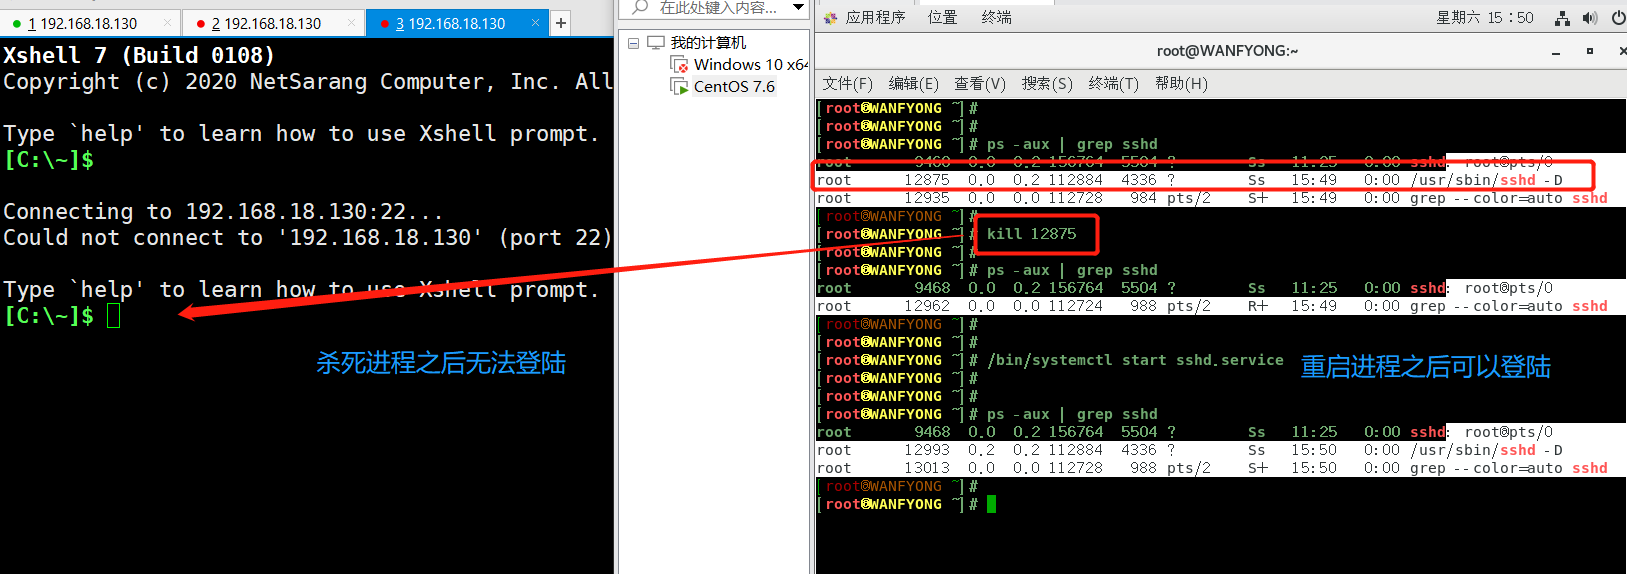
# 2. 终止远程登录服务 sshd, 在适当时候再次重启 sshd 服务
# 终止远程登录服务: kill sshd对应的进程号;
# 重启sshd服务: /bin/systemctl start sshd.service

[root@WANFYONG ~]# ps -aux | grep sshd
root       9468  0.0  0.2 156764  5504 ?        Ss   11:25   0:00 sshd: root@pts/0
root      12875  0.0  0.2 112884  4336 ?        Ss   15:49   0:00 /usr/sbin/sshd -D
root      12935  0.0  0.0 112728   984 pts/2    S+   15:49   0:00 grep --color=auto sshd
[root@WANFYONG ~]#
[root@WANFYONG ~]# kill 12875
[root@WANFYONG ~]#
[root@WANFYONG ~]# ps -aux | grep sshd
root       9468  0.0  0.2 156764  5504 ?        Ss   11:25   0:00 sshd: root@pts/0
root      12962  0.0  0.0 112724   988 pts/2    R+   15:49   0:00 grep --color=auto sshd
[root@WANFYONG ~]#
[root@WANFYONG ~]#
[root@WANFYONG ~]# /bin/systemctl start sshd.service
[root@WANFYONG ~]#
[root@WANFYONG ~]#
[root@WANFYONG ~]# ps -aux | grep sshd
root       9468  0.0  0.2 156764  5504 ?        Ss   11:25   0:00 sshd: root@pts/0
root      12993  0.2  0.2 112884  4336 ?        Ss   15:50   0:00 /usr/sbin/sshd -D
root      13013  0.0  0.0 112728   988 pts/2    S+   15:50   0:00 grep --color=auto sshd
[root@WANFYONG ~]#
[root@WANFYONG ~]#

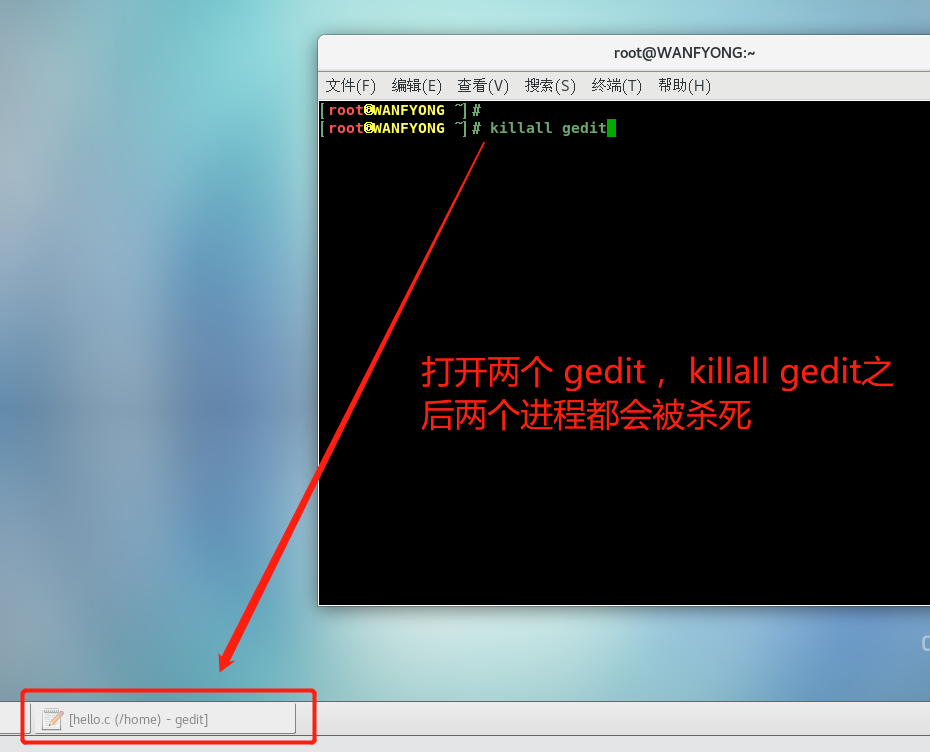
# 3. 终止多个 gedit ,  killall gedit

[root@WANFYONG ~]# killall gedit
[root@WANFYONG ~]#
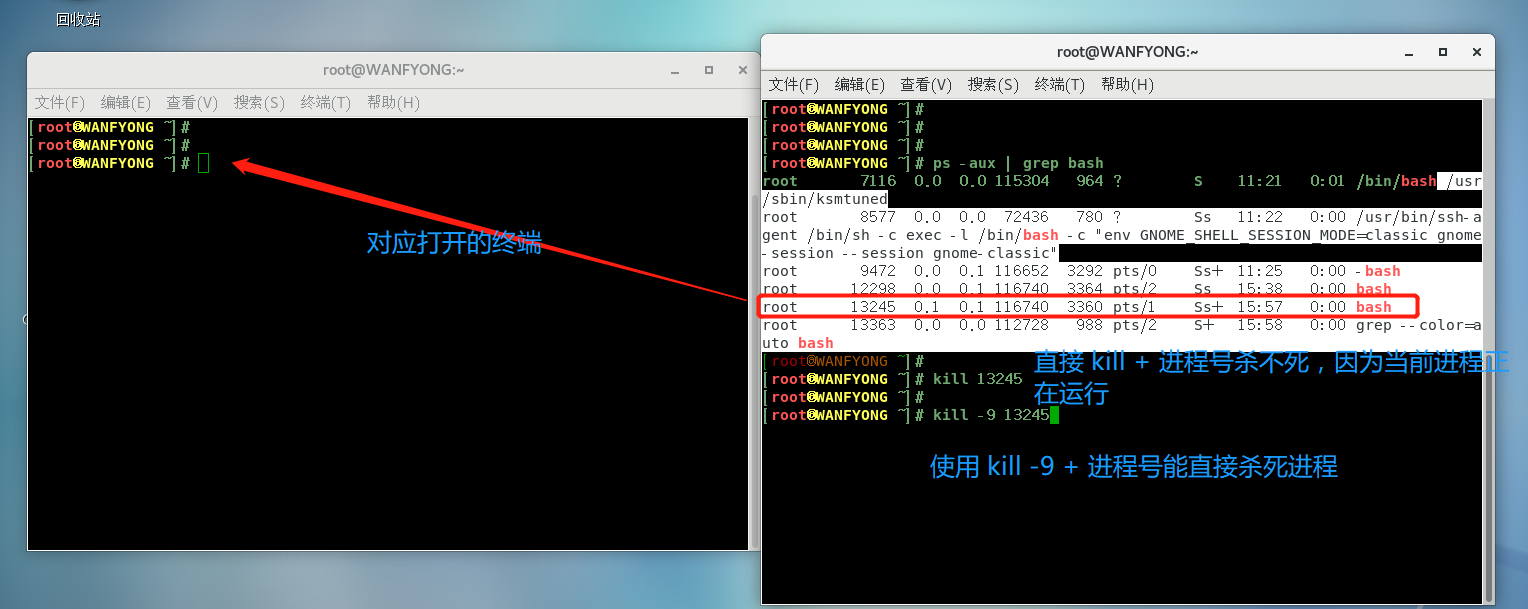
# 4. 强制杀掉一个终端, 指令 kill -9 bash对应的进程号, 此命令还可以直接杀死自己
[root@WANFYONG ~]# ps -aux | grep bash
root       7116  0.0  0.0 115304   964 ?        S    11:21   0:01 /bin/bash /usr/sbin/ksmtuned
root       8577  0.0  0.0  72436   780 ?        Ss   11:22   0:00 /usr/bin/ssh-agent /bin/sh -c exec -l /bin/bash -c "env GNOME_SHELL_SESSION_MODE=classic gnome-session --session gnome-classic"
root       9472  0.0  0.1 116652  3292 pts/0    Ss+  11:25   0:00 -bash
root      12298  0.0  0.1 116740  3364 pts/2    Ss   15:38   0:00 bash
root      13245  0.1  0.1 116740  3360 pts/1    Ss+  15:57   0:00 bash
root      13363  0.0  0.0 112728   988 pts/2    S+   15:58   0:00 grep --color=auto bash
[root@WANFYONG ~]#
[root@WANFYONG ~]# kill 13245
[root@WANFYONG ~]#
[root@WANFYONG ~]# kill -9 13245
[root@WANFYONG ~]#
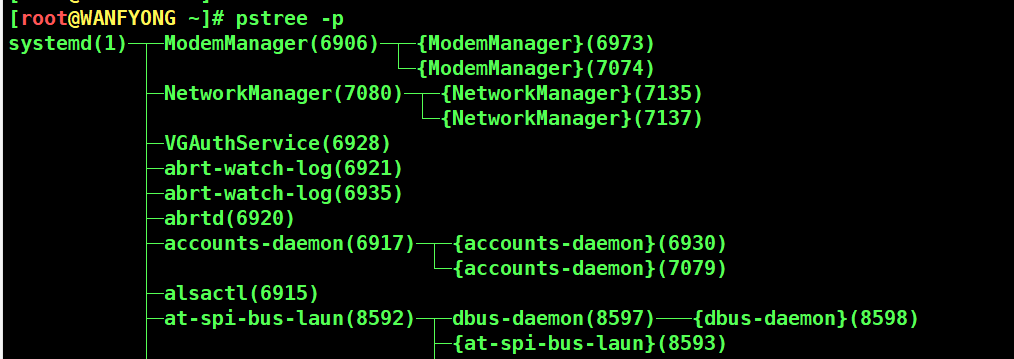
# pstree [选项] ,可以更加直观的来看进程信息
# -p :显示进程的 PID
# -u :显示进程的所属用户
# 1. 请你树状的形式显示进程的 pid
[root@WANFYONG ~]#
[root@WANFYONG ~]# pstree
systemd─┬─ModemManager───2*[{ModemManager}]
        ├─NetworkManager───2*[{NetworkManager}]
        ├─VGAuthService
        ├─2*[abrt-watch-log]
        ├─abrtd
        ├─accounts-daemon───2*[{accounts-daemon}]
        ├─alsactl
        ├─at-spi-bus-laun─┬─dbus-daemon───{dbus-daemon}
        │                 └─3*[{at-spi-bus-laun}]
        ├─at-spi2-registr───2*[{at-spi2-registr}]
...

[root@WANFYONG ~]#
[root@WANFYONG ~]# pstree -p
systemd(1)─┬─ModemManager(6906)─┬─{ModemManager}(6973)
           │                    └─{ModemManager}(7074)
           ├─NetworkManager(7080)─┬─{NetworkManager}(7135)
           │                      └─{NetworkManager}(7137)
           ├─VGAuthService(6928)
           ├─abrt-watch-log(6921)
           ├─abrt-watch-log(6935)
           ├─abrtd(6920)
           ├─accounts-daemon(6917)─┬─{accounts-daemon}(6930)
           │                       └─{accounts-daemon}(7079)
           ├─alsactl(6915)

# 2. 请你树状的形式进程的用户

[root@WANFYONG ~]# pstree -u
systemd─┬─ModemManager───2*[{ModemManager}]
        ├─NetworkManager───2*[{NetworkManager}]
        ├─VGAuthService
        ├─2*[abrt-watch-log]
        ├─abrtd
        ├─accounts-daemon───2*[{accounts-daemon}]
        ├─alsactl
        ├─at-spi-bus-laun─┬─dbus-daemon───{dbus-daemon}
        │                 └─3*[{at-spi-bus-laun}]
        ├─at-spi2-registr───2*[{at-spi2-registr}]

五、服务管理(service)
5.1 介绍
服务(service) 本质就是进程,但是是运行在后台的,通常都会监听某个端口,等待其它程序的请求,比如(mysqld , sshd 防火墙等),因此我们又称为守护进程,是 Linux 中非常重要的知识点。
1) service 服务名 [start | stop | restart | reload | status]
2) 在 CentOS7.0 后 很多服务不再使用 service ,而是 systemctl
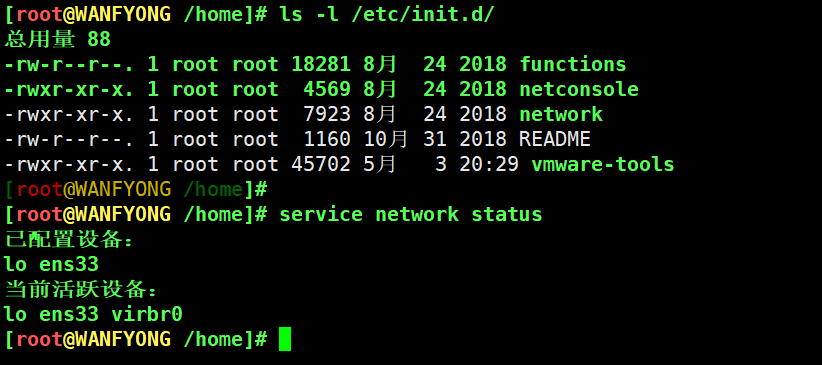
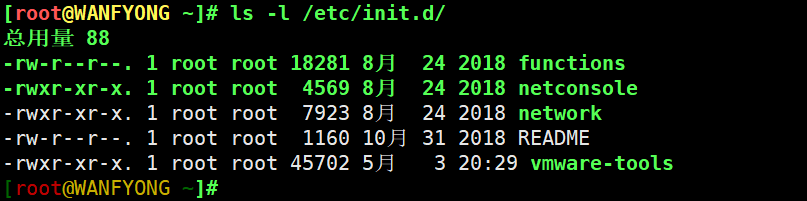
3) service 指令管理的服务在 /etc/init.d 查看
[root@WANFYONG /home]# ls -l /etc/init.d/
总用量 88
-rw-r--r--. 1 root root 18281 8月  24 2018 functions
-rwxr-xr-x. 1 root root  4569 8月  24 2018 netconsole
-rwxr-xr-x. 1 root root  7923 8月  24 2018 network
-rw-r--r--. 1 root root  1160 10月 31 2018 README
-rwxr-xr-x. 1 root root 45702 5月   3 20:29 vmware-tools
[root@WANFYONG /home]#
[root@WANFYONG /home]# service network status
已配置设备:
lo ens33
当前活跃设备:
lo ens33 virbr0
[root@WANFYONG /home]#
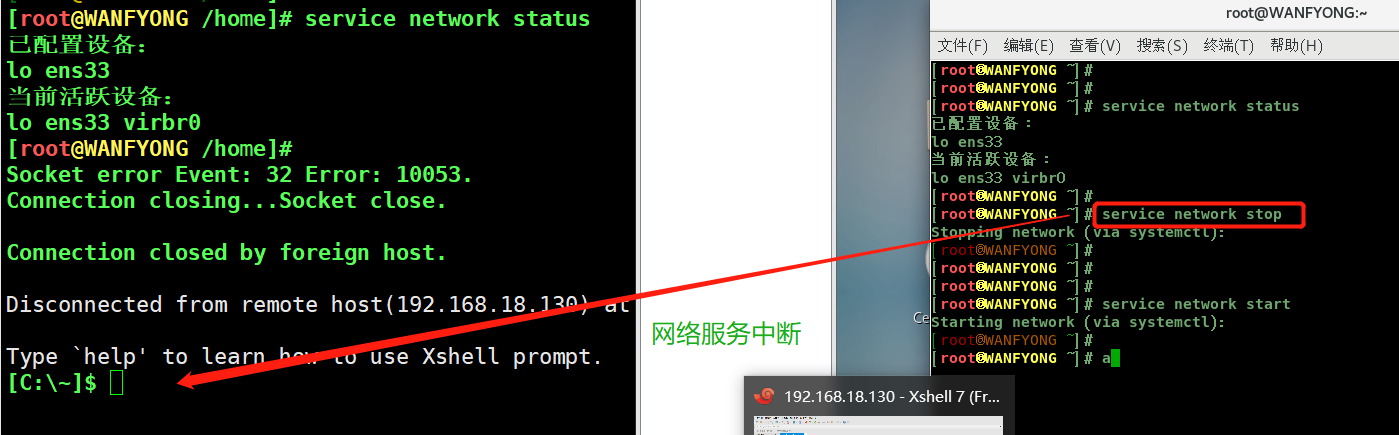
# 请使用 service 指令,查看,关闭,启动 network [注意:在虚拟系统演示,因为网络连接会关闭

[root@WANFYONG ~]# service network status
已配置设备:
lo ens33
当前活跃设备:
lo ens33 virbr0
[root@WANFYONG ~]#
[root@WANFYONG ~]# service network stop
Stopping network (via systemctl):                          [  确定  ]
[root@WANFYONG ~]#
[root@WANFYONG ~]#
[root@WANFYONG ~]#
[root@WANFYONG ~]# service network start
Starting network (via systemctl):                          [  确定  ]
[root@WANFYONG ~]#
[root@WANFYONG ~]#
5.4 查看服务名(setup)
5.4.1 方式一
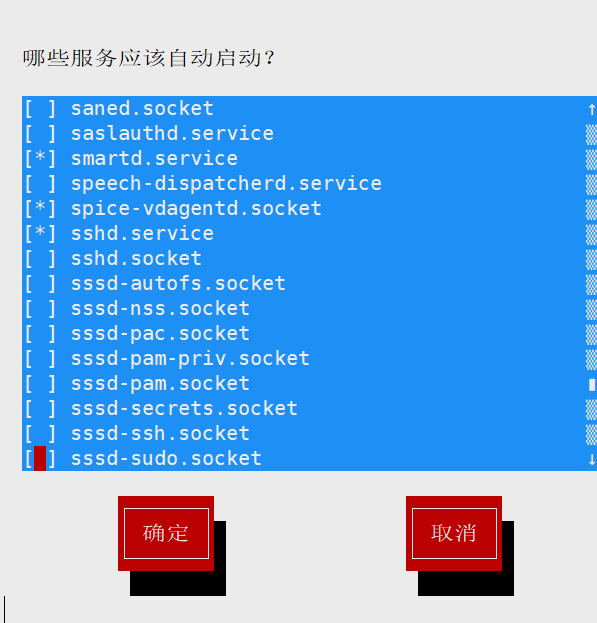
# setup --> 系统服务
# * 号 代表开机自启, 空格一下可以去掉 * 号
# 退出用 Tab 键

[root@WANFYONG ~]# setup
[root@WANFYONG ~]#
# /etc/init.d 看到 service 指令管理的服务

[root@WANFYONG ~]# ls -l /etc/init.d/
总用量 88
-rw-r--r--. 1 root root 18281 8月  24 2018 functions
-rwxr-xr-x. 1 root root  4569 8月  24 2018 netconsole
-rwxr-xr-x. 1 root root  7923 8月  24 2018 network
-rw-r--r--. 1 root root  1160 10月 31 2018 README
-rwxr-xr-x. 1 root root 45702 5月   3 20:29 vmware-tools
[root@WANFYONG ~]#
Linux 系统有 7 种运行级别(runlevel):常用的是级别 3 和 5
运行级别 0:系统停机状态,系统默认运行级别不能设为 0,否则不能正常启动
运行级别 1:单用户工作状态,root 权限,用于系统维护,禁止远程登陆
运行级别 2:多用户状态(没有 NFS),不支持网络
运行级别 3:完全的多用户状态(有 NFS),无界面,登陆后进入控制台命令行模式
运行级别 4:系统未使用,保留
运行级别 5:X11 控制台,登陆后进入图形 GUI 模式
运行级别 6:系统正常关闭并重启,默认运行级别不能设为 6,否则不能正常启动
CentOS 开机流程如下:

通过 chkconfig 命令可以给服务的各个运行级别设置自 启动/关闭
chkconfig 指令管理的服务在 /etc/init.d 查看
注意: Centos7.0 后,很多服务使用 systemctl 管理
# chkconfig 基本语法
# 1) 查看服务 chkconfig --list [| grep xxx]
# 2) chkconfig 服务名 --list
# 3) chkconfig --level 5
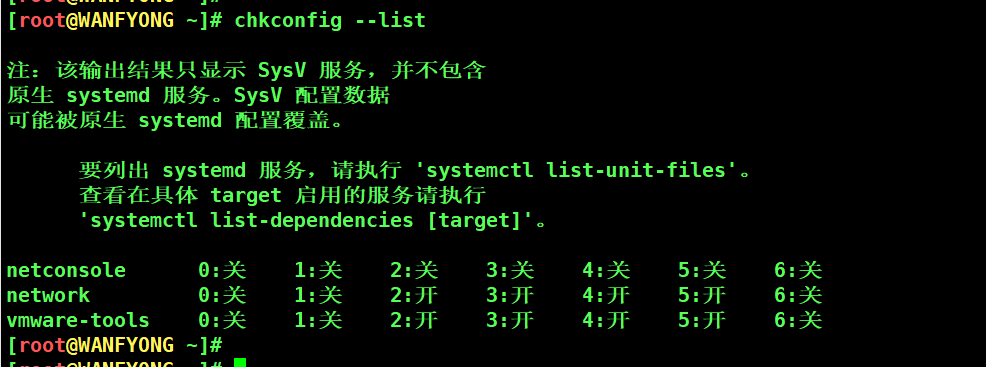
# 1. 查看服务 chkconfig --list | grep xxx

[root@WANFYONG ~]# chkconfig --list

注:该输出结果只显示 SysV 服务,并不包含
原生 systemd 服务。SysV 配置数据
可能被原生 systemd 配置覆盖。

      要列出 systemd 服务,请执行 'systemctl list-unit-files'。
      查看在具体 target 启用的服务请执行
      'systemctl list-dependencies [target]'。

netconsole         0:关    1:关    2:关    3:关    4:关    5:关    6:关
network            0:关    1:关    2:开    3:开    4:开    5:开    6:关
vmware-tools       0:关    1:关    2:开    3:开    4:开    5:开    6:关
[root@WANFYONG ~]#
[root@WANFYONG ~]#
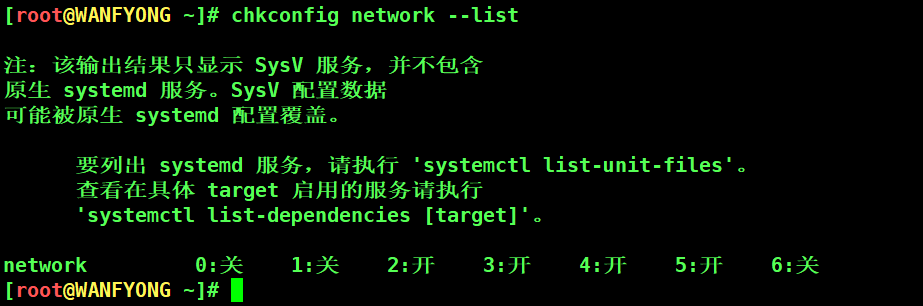
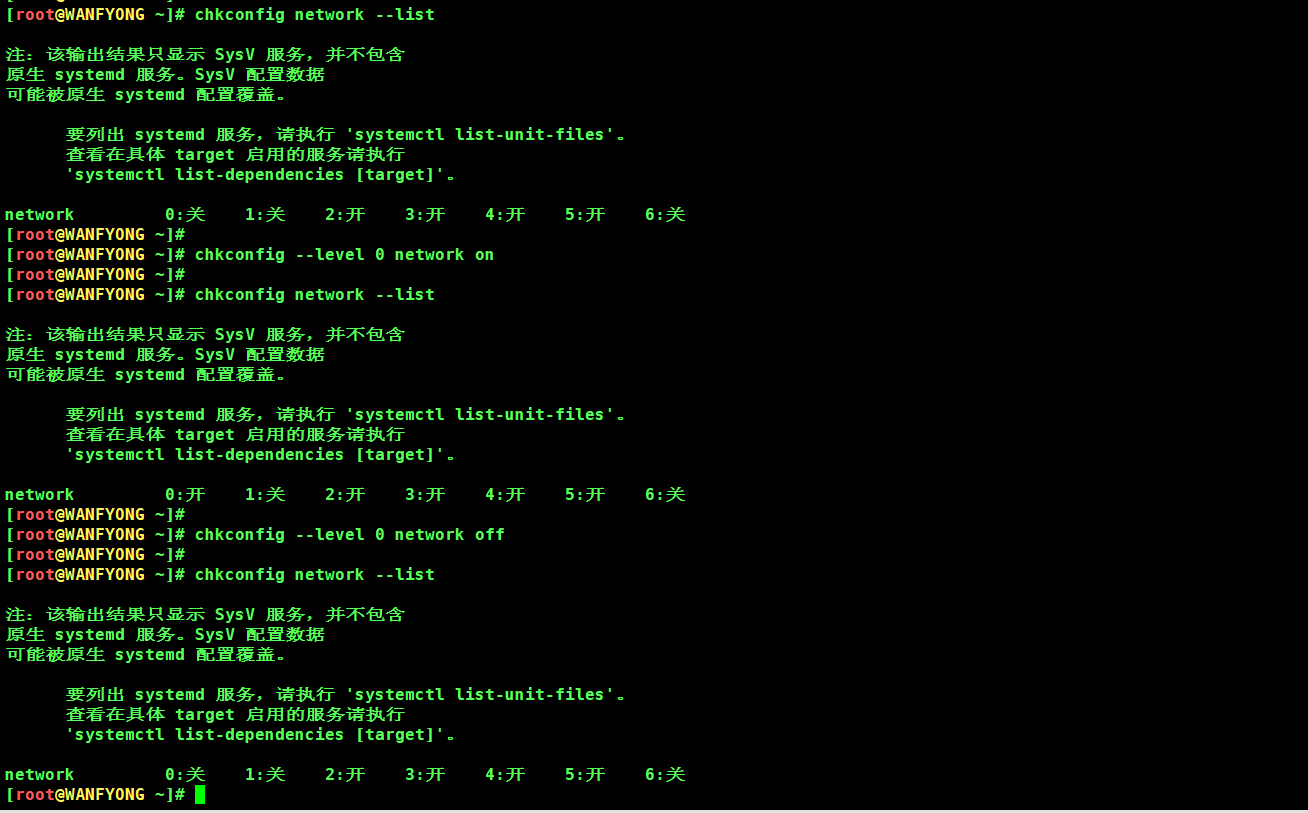
# # 2. chkconfig 服务名 --list

[root@WANFYONG ~]# chkconfig network --list

注:该输出结果只显示 SysV 服务,并不包含
原生 systemd 服务。SysV 配置数据
可能被原生 systemd 配置覆盖。

      要列出 systemd 服务,请执行 'systemctl list-unit-files'。
      查看在具体 target 启用的服务请执行
      'systemctl list-dependencies [target]'。

network            0:关    1:关    2:开    3:开    4:开    5:开    6:关
[root@WANFYONG ~]#
# 3. chkconfig --level 5 服务名 on/off

[root@WANFYONG ~]# chkconfig network --list

注:该输出结果只显示 SysV 服务,并不包含
原生 systemd 服务。SysV 配置数据
可能被原生 systemd 配置覆盖。

      要列出 systemd 服务,请执行 'systemctl list-unit-files'。
      查看在具体 target 启用的服务请执行
      'systemctl list-dependencies [target]'。

network            0:关    1:关    2:开    3:开    4:开    5:开    6:关
[root@WANFYONG ~]#
[root@WANFYONG ~]# chkconfig --level 0 network on
[root@WANFYONG ~]#
[root@WANFYONG ~]# chkconfig network --list

注:该输出结果只显示 SysV 服务,并不包含
原生 systemd 服务。SysV 配置数据
可能被原生 systemd 配置覆盖。

      要列出 systemd 服务,请执行 'systemctl list-unit-files'。
      查看在具体 target 启用的服务请执行
      'systemctl list-dependencies [target]'。

network            0:开    1:关    2:开    3:开    4:开    5:开    6:关
[root@WANFYONG ~]#
[root@WANFYONG ~]# chkconfig --level 0 network off
[root@WANFYONG ~]#
[root@WANFYONG ~]# chkconfig network --list

注:该输出结果只显示 SysV 服务,并不包含
原生 systemd 服务。SysV 配置数据
可能被原生 systemd 配置覆盖。

      要列出 systemd 服务,请执行 'systemctl list-unit-files'。
      查看在具体 target 启用的服务请执行
      'systemctl list-dependencies [target]'。

network            0:关    1:关    2:开    3:开    4:开    5:开    6:关
[root@WANFYONG ~]#
5.7 systemctl 指令
5.7.1 systemctl管理指令
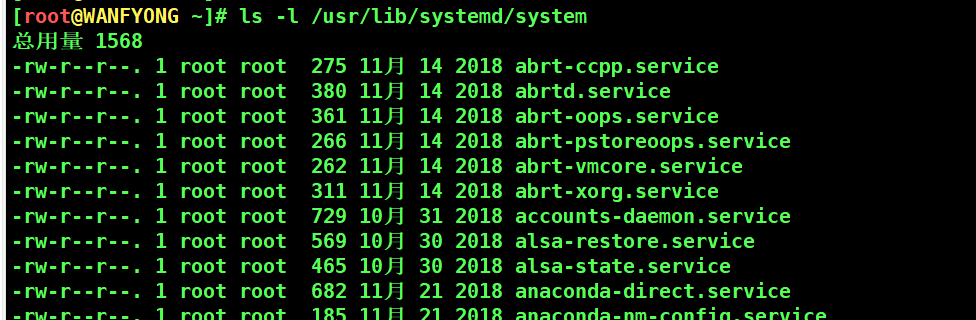
# 基本语法: systemctl [start | stop | restart | status] 服务名
# systemctl 指令管理的服务在 /usr/lib/systemd/system 查看
[root@WANFYONG ~]# ls -l /usr/lib/systemd/system 总用量 1568 -rw-r--r--. 1 root root 275 11月 14 2018 abrt-ccpp.service -rw-r--r--. 1 root root 380 11月 14 2018 abrtd.service -rw-r--r--. 1 root root 361 11月 14 2018 abrt-oops.service -rw-r--r--. 1 root root 266 11月 14 2018 abrt-pstoreoops.service -rw-r--r--. 1 root root 262 11月 14 2018 abrt-vmcore.service -rw-r--r--. 1 root root 311 11月 14 2018 abrt-xorg.service -rw-r--r--. 1 root root 729 10月 31 2018 accounts-daemon.service -rw-r--r--. 1 root root 569 10月 30 2018 alsa-restore.service -rw-r--r--. 1 root root 465 10月 30 2018 alsa-state.service -rw-r--r--. 1 root root 682 11月 21 2018 anaconda-direct.service [root@WANFYONG ~]# ls -l /usr/lib/systemd/system | grep fire -rw-r--r--. 1 root root 657 10月 31 2018 firewalld.service [root@WANFYONG ~]# [root@WANFYONG ~]# ls -l /usr/lib/systemd/system | grep firewalld.service -rw-r--r--. 1 root root 657 10月 31 2018 firewalld.service [root@WANFYONG ~]#

# systemctl list-unit-files [ | grep 服务名] (查看服务开机启动状态, grep 可以进行过滤)
# systemctl enable/disable 服务名 (设置服务开机启动) ,在运行级别 3和5同时起作用,永久生效
# systemctl is-enabled 服务名 (查询某个服务是否是自启动的)
# 1. systemctl list-unit-files [ | grep 服务名] (查看服务开机启动状态, grep 可以进行过滤)

[root@WANFYONG ~]# systemctl list-unit-files | grep firewalld
firewalld.service                             disabled
[root@WANFYONG ~]#

# 2. systemctl enable 服务名 (设置服务开机启动) ,在运行级别 3和5同时起作用

[root@WANFYONG ~]# systemctl list-unit-files | grep firewalld
firewalld.service                             disabled
[root@WANFYONG ~]#
[root@WANFYONG ~]# systemctl enable firewalld
Created symlink from /etc/systemd/system/dbus-org.fedoraproject.FirewallD1.service to /usr/lib/systemd/system/firewalld.service.
Created symlink from /etc/systemd/system/multi-user.target.wants/firewalld.service to /usr/lib/systemd/system/firewalld.service.
[root@WANFYONG ~]# reboot

[root@WANFYONG ~]# systemctl list-unit-files | grep firewalld
firewalld.service                             enabled
[root@WANFYONG ~]#


# 3. systemctl is-enabled 服务名 (查询某个服务是否是自启动的)

[root@WANFYONG ~]# systemctl is-enabled firewalld
enabled
[root@WANFYONG ~]#

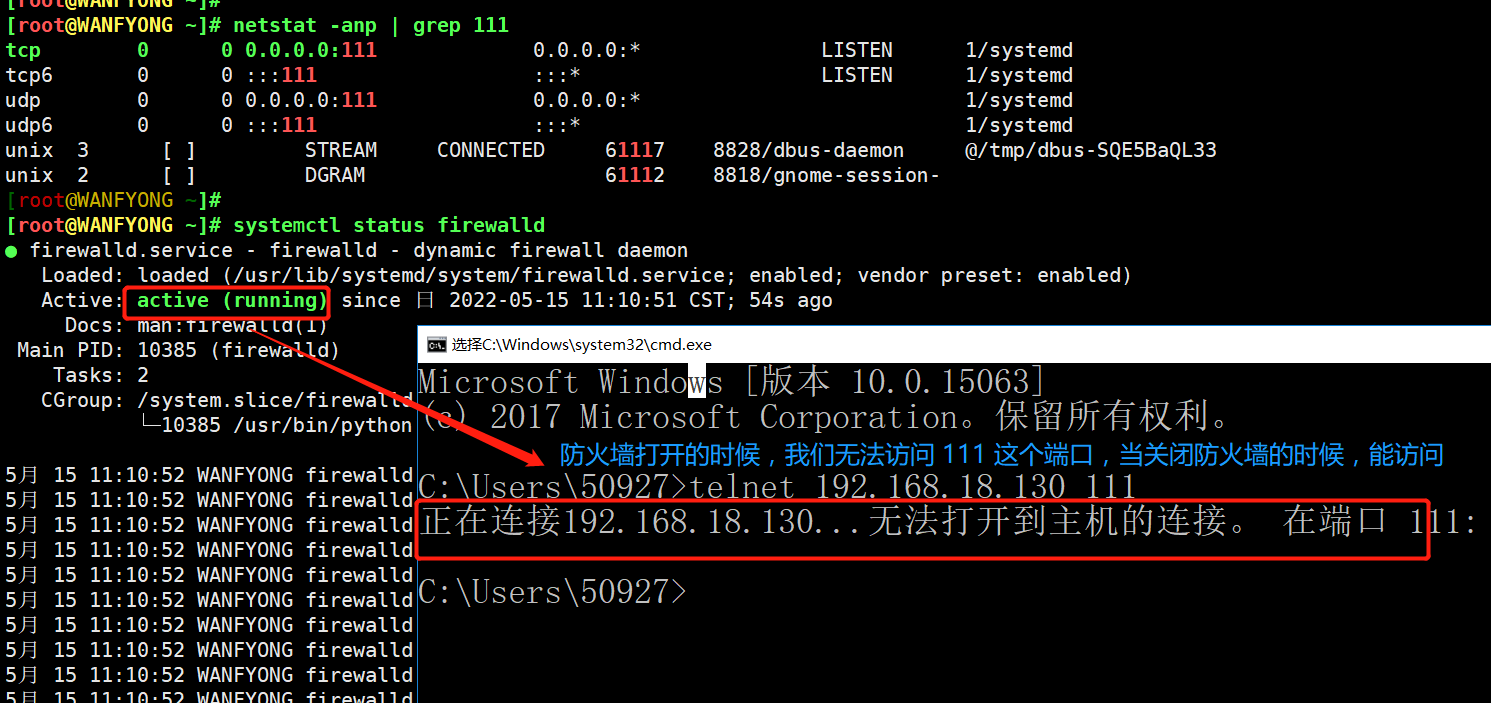
# 查看当前防火墙的状况,关闭防火墙和重启防火墙。
# systemctl status firewalld
# systemctl stop firewalld   临时生效
# systemctl start firewalld  临时生效

[root@WANFYONG ~]# systemctl status firewalld
● firewalld.service - firewalld - dynamic firewall daemon
   Loaded: loaded (/usr/lib/systemd/system/firewalld.service; enabled; vendor preset: enabled)
   Active: active (running) since 日 2022-05-15 10:28:03 CST; 25min ago
     Docs: man:firewalld(1)
 Main PID: 7109 (firewalld)
    Tasks: 2
   CGroup: /system.slice/firewalld.service
           └─7109 /usr/bin/python -Es /usr/sbin/firewalld --nofork --nopid

5月 15 10:28:01 WANFYONG systemd[1]: Starting firewalld - dynamic firewall daemon...
5月 15 10:28:03 WANFYONG systemd[1]: Started firewalld - dynamic firewall daemon.
[root@WANFYONG ~]#
[root@WANFYONG ~]#
[root@WANFYONG ~]# systemctl stop firewalld
[root@WANFYONG ~]#
[root@WANFYONG ~]# systemctl status firewalld
● firewalld.service - firewalld - dynamic firewall daemon
   Loaded: loaded (/usr/lib/systemd/system/firewalld.service; enabled; vendor preset: enabled)
   Active: inactive (dead) since 日 2022-05-15 10:53:54 CST; 3s ago
     Docs: man:firewalld(1)
  Process: 7109 ExecStart=/usr/sbin/firewalld --nofork --nopid $FIREWALLD_ARGS (code=exited, status=0/SUCCESS)
 Main PID: 7109 (code=exited, status=0/SUCCESS)

5月 15 10:28:01 WANFYONG systemd[1]: Starting firewalld - dynamic firewall daemon...
5月 15 10:28:03 WANFYONG systemd[1]: Started firewalld - dynamic firewall daemon.
5月 15 10:53:53 WANFYONG systemd[1]: Stopping firewalld - dynamic firewall daemon...
5月 15 10:53:54 WANFYONG systemd[1]: Stopped firewalld - dynamic firewall daemon.
[root@WANFYONG ~]#
[root@WANFYONG ~]# systemctl start firewalld
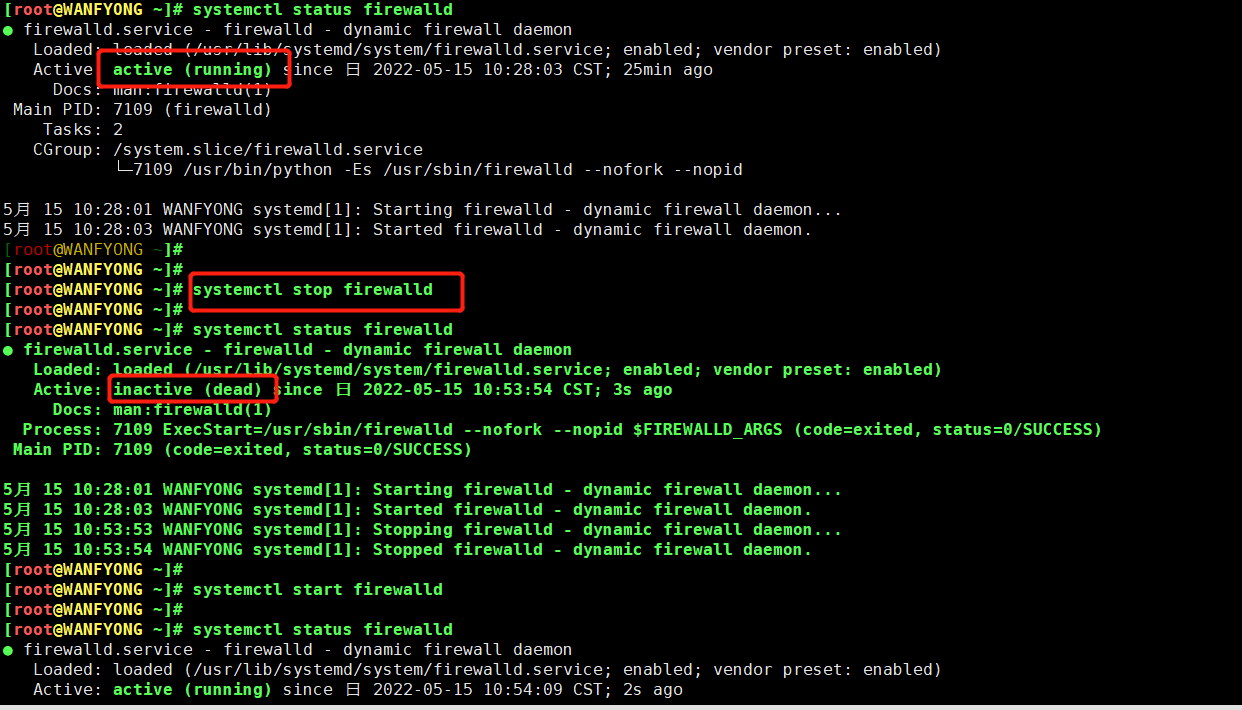
# 关闭或者启用防火墙后,立即生效。
# 这种方式只是临时生效,当重启系统后,还是回归以前对服务的设置。
# 如果希望设置某个服务自启动或关闭永久生效,要使用 systemctl [enable|disable] 服务名
5.7.5 打开或关闭指定端口
5.7.5.1 防火墙在端口中的作用
在真正的生产环境,往往需要将防火墙打开,但问题来了,如果我们把防火墙打开,那么外部请求数据包就不能跟服务器监听端口通讯。这时,需要打开指定的端口。比如 80、22、8080 等,这个又怎么做呢?
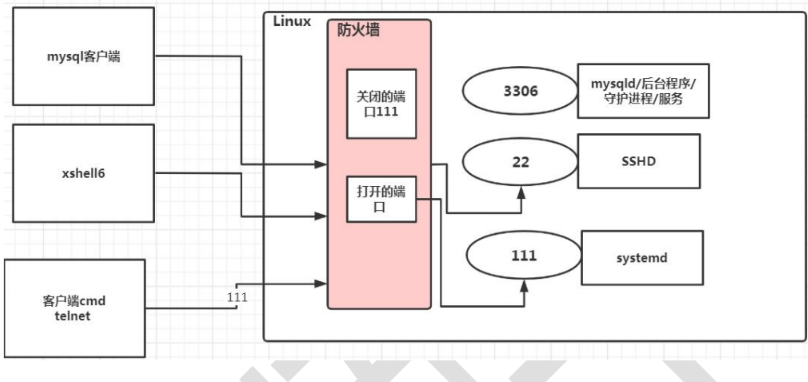
# 1. 打开端口: firewall-cmd --permanent --add-port=端口号/协议
# 2. 关闭端口: firewall-cmd --permanent --remove-port=端口号/协议
# 3. 重新载入,才能生效 : firewall-cmd --reload
# 4. 查询端口是否开放: firewall-cmd --query-port=端口/协议
# 1. 打开端口 111, 需要重新载入防火墙

[root@WANFYONG ~]# firewall-cmd --permanent --add-port=111/tcp
success
[root@WANFYONG ~]#
[root@WANFYONG ~]# firewall-cmd --reload
success
[root@WANFYONG ~]#

# 2. 关闭端口 111, 需要重新载入防火墙

[root@WANFYONG ~]# firewall-cmd --permanent --remove-port=111/tcp
success
[root@WANFYONG ~]#
[root@WANFYONG ~]# firewall-cmd --reload
success
[root@WANFYONG ~]#

top 与 ps 命令很相似。它们都用来显示正在执行的进程。Top 与 ps 最大的不同之处,在于 top 在执行一段时间可以 更新正在运行的的进程。
top [选项]

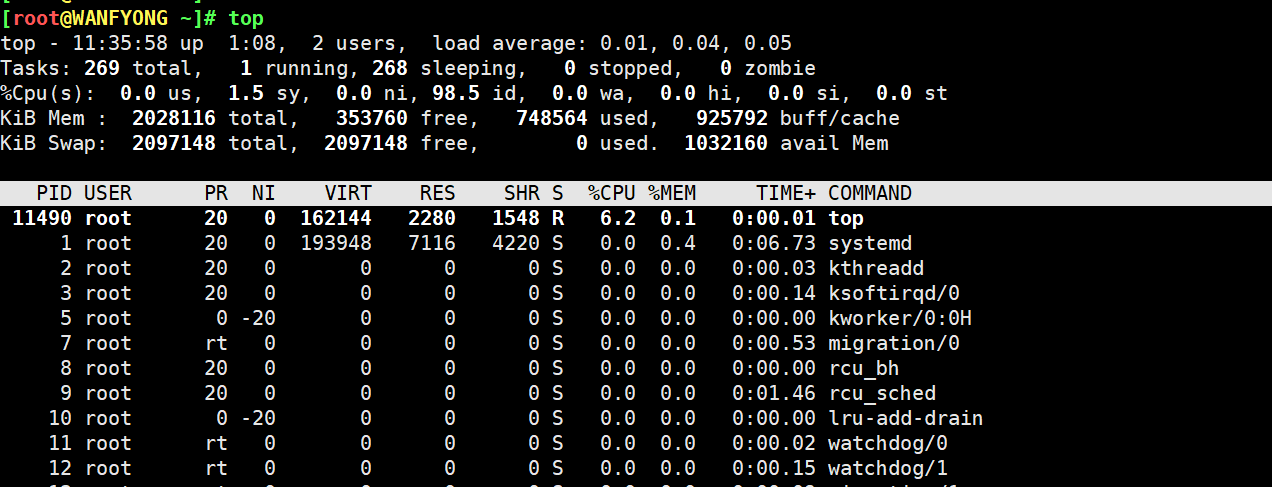
输入 top 之后,再输入下面操作 字符 即可。
P 以cpu使用率排序,默认就这个
M 以内存使用率排序
N 以pid排序
u 监听具体用户
k 终止指定进程
q 退出top
# 1. 监视特定用户, 比如我们监控 root 用户
top:输入此命令,按回车键,查看执行的进程。
u:然后输入 "u" 回车,再输入用户名 root,即可
# 2:终止指定的进程, 比如我们要结束 root 登录
top:输入此命令,按回车键,查看执行的进程。
k:然后输入 "k" 回车,再输入要结束的进程 ID 号
# 指定系统状态更新的时间(每隔 10 秒自动更新), 默认是 3 秒
top -d 10
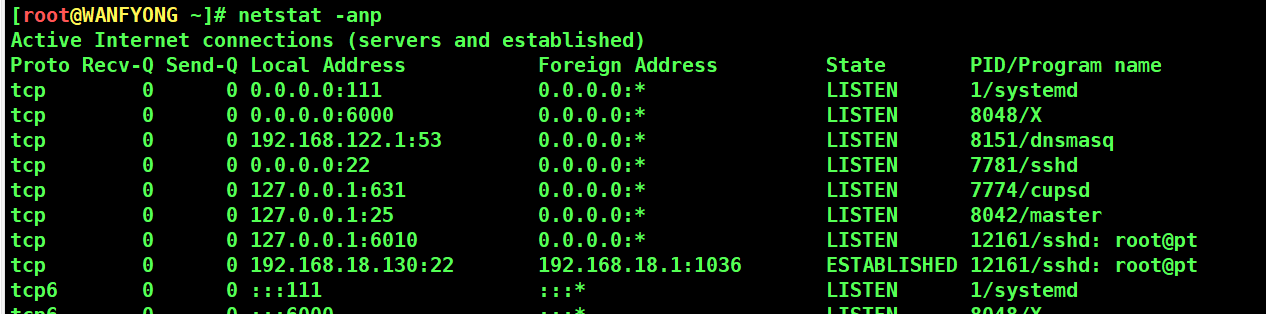
# netstat [选项]
# -an 按一定顺序排列输出
# -p 显示哪个进程在调用
[root@WANFYONG ~]# netstat -anp Active Internet connections (servers and established) Proto Recv-Q Send-Q Local Address Foreign Address State PID/Program name tcp 0 0 0.0.0.0:111 0.0.0.0:* LISTEN 1/systemd tcp 0 0 0.0.0.0:6000 0.0.0.0:* LISTEN 8048/X tcp 0 0 192.168.122.1:53 0.0.0.0:* LISTEN 8151/dnsmasq tcp 0 0 0.0.0.0:22 0.0.0.0:* LISTEN 7781/sshd tcp 0 0 127.0.0.1:631 0.0.0.0:* LISTEN 7774/cupsd tcp 0 0 127.0.0.1:25 0.0.0.0:* LISTEN 8042/master tcp 0 0 127.0.0.1:6010 0.0.0.0:* LISTEN 12161/sshd: root@pt tcp 0 0 192.168.18.130:22 192.168.18.1:1036 ESTABLISHED 12161/sshd: root@pt
# 查看服务名为 sshd 的服务的信息。

[root@WANFYONG ~]# netstat -anp | grep sshd
tcp        0      0 0.0.0.0:22              0.0.0.0:*               LISTEN      7781/sshd
tcp        0      0 127.0.0.1:6010          0.0.0.0:*               LISTEN      8733/sshd: root@pts
tcp        0      0 192.168.18.130:22       192.168.18.1:23120      ESTABLISHED 8733/sshd: root@pts
tcp6       0      0 :::22                   :::*                    LISTEN      7781/sshd
tcp6       0      0 ::1:6010                :::*                    LISTEN      8733/sshd: root@pts
unix  3      [ ]         STREAM     CONNECTED     43863    7781/sshd
unix  2      [ ]         DGRAM                    52697    8733/sshd: root@pts
[root@WANFYONG ~]#


 浙公网安备 33010602011771号