url: "https://webst04.is.autonavi.com/appmaptile?style=6&x={x}&y={y}&z={z}"
satellite() {
this.start = new Cesium.JulianDate.fromDate(new Date()); // 获取当前时间 这不是国内的时间
this.start = Cesium.JulianDate.addHours(this.start, 8, new Cesium.JulianDate()); // 添加八小时,得到我们东八区的北京时间
this.stop = Cesium.JulianDate.addSeconds(this.start, 1000, new Cesium.JulianDate()); // 设置一个结束时间,意思是360秒之后时间结束
this.viewer.clock.startTime = this.start.clone(); // 给cesium时间轴设置开始的时间,也就是上边的东八区时间
this.viewer.clock.stopTime = this.stop.clone(); // 设置cesium时间轴设置结束的时间
this.viewer.clock.currentTime = this.start.clone(); // 设置cesium时间轴设置当前的时间
this.viewer.clock.clockRange = Cesium.ClockRange.LOOP_STOP; // 时间结束了,再继续重复来一遍
//时间变化来控制速度 // 时间速率,数字越大时间过的越快
this.viewer.clock.multiplier = 2;
//给时间线设置边界
this.viewer.timeline.zoomTo(this.start, this.stop);
this.arrStates = [];
this.getRandState(this.arrStates, 1);
this.startFunc();
},
computeCirclularFlight(source, panduan) {
var property = new Cesium.SampledPositionProperty();
if (panduan == 1) { //卫星位置
for (var i = 0; i < source.length; i++) {
var time = Cesium.JulianDate.addSeconds(this.start, source[i].time, new Cesium.JulianDate);
var position = Cesium.Cartesian3.fromDegrees(source[i].lon, source[i].lat, source[i].hei);
// 添加位置,和时间对应
property.addSample(time, position);
}
} else if (panduan == 2) {//轨道位置
for (var i = 0; i < source.length; i++) {
var time = Cesium.JulianDate.addSeconds(this.start, source[i].time, new Cesium.JulianDate);
var position = Cesium.Cartesian3.fromDegrees(source[i].lon, source[i].lat, source[i].phei);
// 添加位置,和时间对应
property.addSample(time, position);
}
}
return property;
},
getRandState(brr, count) {
for (var m = 0; m < count; m++) {
var arr = [];
var t1 = Math.floor(Math.random() * 360);
var t2 = Math.floor(Math.random() * 360);
for (var i = t1; i <= 360 + t1; i += 30) {
var aaa = {
lon: 0,
lat: 0,
hei: 700000,
phei: 700000 / 2,
time: 0
};
aaa.lon = t2;
aaa.lat = i;
aaa.time = i - t1;
arr.push(aaa);
}
brr.push(arr);
}
},
getStatePath(aaa) {
let that = this;
var entity_ty1p = this.computeCirclularFlight(aaa, 2);
var entity_ty1 = this.viewer.entities.add({
availability: new Cesium.TimeIntervalCollection([new Cesium.TimeInterval({
start: that.start,
stop: that.stop
})]),
position: entity_ty1p, //轨道高度
orientation: new Cesium.VelocityOrientationProperty(entity_ty1p),
cylinder: {
HeightReference: Cesium.HeightReference.CLAMP_TO_GROUND,
length: 700000,
topRadius: 0,
bottomRadius: 900000 / 2,
// material: Cesium.Color.RED.withAlpha(.4),
// outline: !0,
numberOfVerticalLines: 0,
// outlineColor: Cesium.Color.RED.withAlpha(.8),
material: Cesium.Color.fromBytes(35, 170, 242, 80)
},
});
entity_ty1.position.setInterpolationOptions({
interpolationDegree: 5,
interpolationAlgorithm: Cesium.LagrangePolynomialApproximation
});
var entity1p = this.computeCirclularFlight(aaa, 1);
//创建实体
var entity1 = this.viewer.entities.add({
// 将实体availability设置为与模拟时间相同的时间间隔。
availability: new Cesium.TimeIntervalCollection([new Cesium.TimeInterval({
start: that.start,
stop: that.stop
})]),
position: entity1p,//计算实体位置属性
//基于位置移动自动计算方向.
orientation: new Cesium.VelocityOrientationProperty(entity1p),
//加载飞机模型
model: {
uri: that.url,//引入3D模型 -- 后面解释如何下载引入
scale: 10000
},
//路径
path: {
resolution: 1,
material: new Cesium.PolylineGlowMaterialProperty({
glowPower: 0.1,
color: Cesium.Color.PINK
}),
width: 5
}
});
//差值器
entity1.position.setInterpolationOptions({
interpolationDegree: 5,
interpolationAlgorithm: Cesium.LagrangePolynomialApproximation
});
},
startFunc() {
let that = this;
for (var i = 0; i < that.arrStates.length; i++) {
that.getStatePath(that.arrStates[i]);
}
},
转载于:https://www.w3xue.com/exp/article/20226/79656.html
3、添加Cesium.Ion.defaultAccessToken =‘your token’是为了解决在加载地球的时候可能会出现只有一片星空没有地球的问题,token可以登录https://ion.cesium.com/signin网站获取,具体如下:
①注册帐号:
![]()
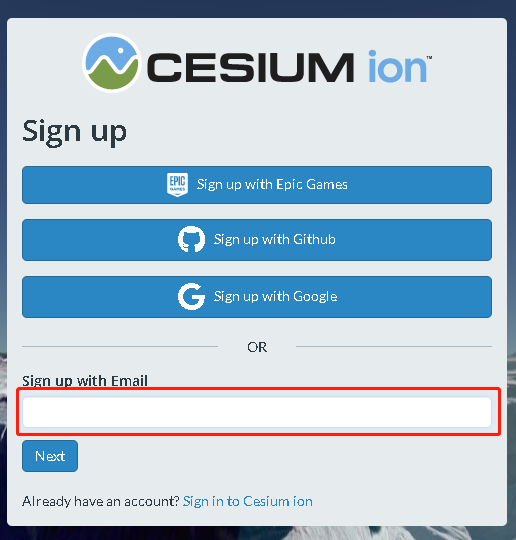
②输入邮箱然后点击next:
![]()
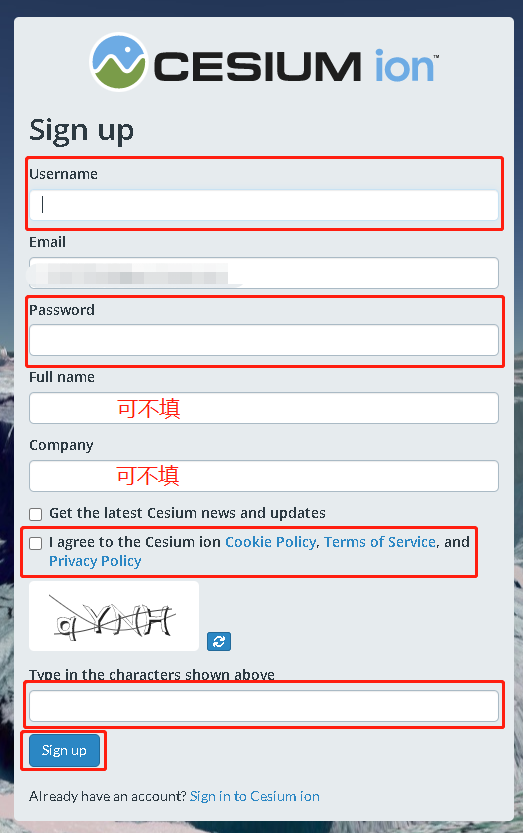
③填写用户名和密码:
![]()
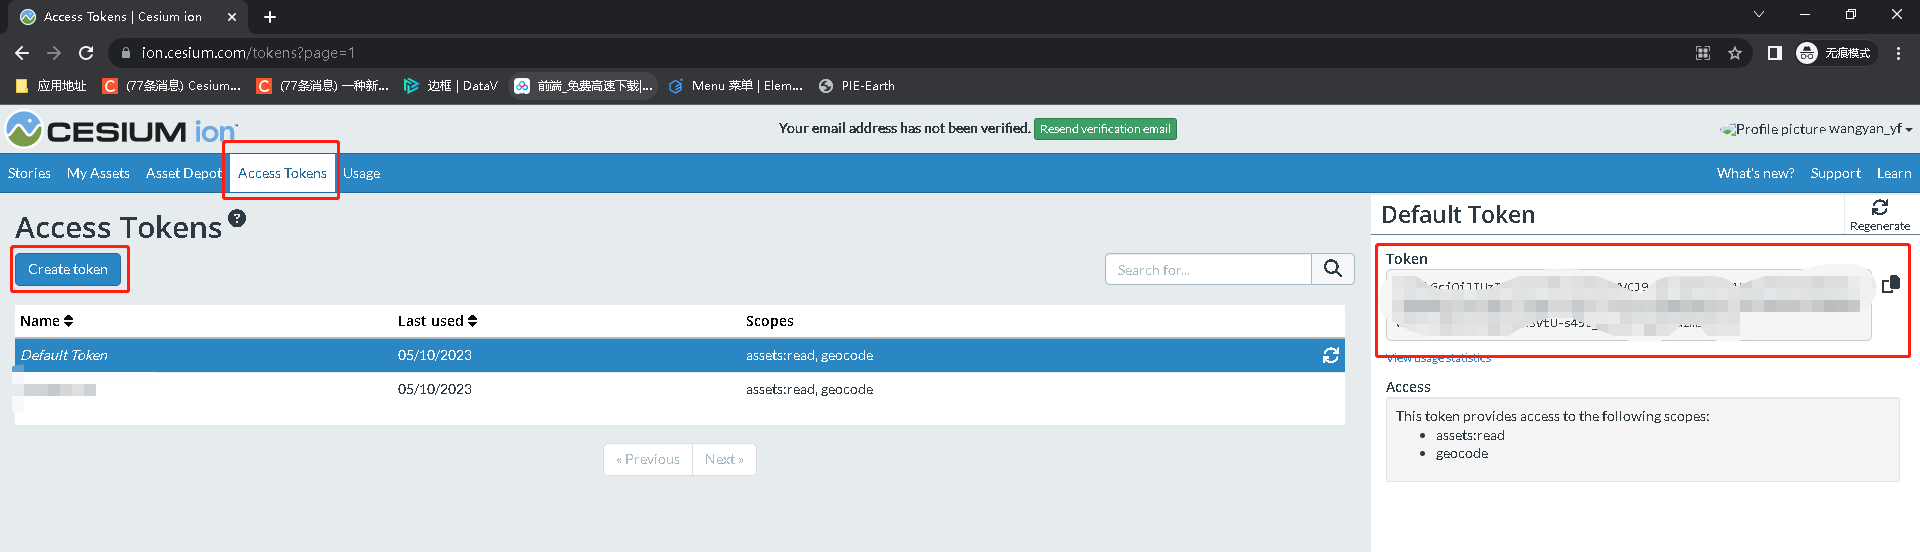
④注册成功后登录获取token:
![]()
4、我在使用的时候卫星绕行是没有问题的,但是3D模型引入时会报如下错
![]()
解决方法:
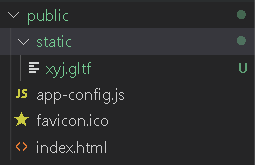
3D模型文件存放于:
![]()
首先在最开始引用:
import modelFile from '../../../public/static/xyj.gltf';
在 data 重新赋值了一下:
data() {
return {
arrStates:[],
start:null,
stop:null,
url: modelFile,
}
},
在vue.config.js文件中配置一下:
configureWebpack: {
module: {
rules: [
{
test: /\.(gltf)$/,
loader: 'url-loader'
}
],
},
},
重新运行项目就可以看到添加的3D模型了。
转载于:https://blog.csdn.net/weixin_42776111/article/details/122072716
5、在下载3D模型时也遇到了问题,在https://sketchfab.com/search?q=satellite&type=models网站下载的3D模型,在使用时报如下错误:
![]()
没有找到原因,于是使用了https://blog.csdn.net/weixin_42776111/article/details/122072716这篇文章中的3D模型。


 浙公网安备 33010602011771号