
kubernetes(27):k8s包管理工具-helm(1)-安装helm
K8s包管理工具-helm(一):helm安装
https://www.cnblogs.com/linuxk/p/10607805.html
https://www.cnblogs.com/panwenbin-logs/p/10217589.html
https://www.qikqiak.com/k8s-book/docs/42.Helm%E5%AE%89%E8%A3%85.html
https://www.cnblogs.com/ericnie/p/8463127.html
1 Helm的简介
每个成功的软件平台都有一个优秀的打包系统,比如 Debian、Ubuntu 的 apt,Redhat、Centos 的 yum。而 Helm 则是 Kubernetes 上的包管理器。
1.1 为什么k8s需要Helm?
Kubernetes 能够很好地组织和编排容器,但它缺少一个更高层次的应用打包工具,而 Helm 就是来干这件事的。
举个例子,我们需要部署一个MySQL服务,Kubernetes则需要部署以下对象:
① 为了能够让外界访问到MySQL,需要部署一个mysql的service;
②需要进行定义MySQL的密码,则需要部署一个Secret;
③Mysql的运行需要持久化的数据存储,此时还需要部署PVC;
④保证后端mysql的运行,还需要部署一个Deployment,以支持以上的对象。
针对以上对象,我们可以使用YAML文件进行定义并部署,但是仅仅对于单个的服务支持,如果应用需要由一个甚至几十个这样的服务组成,需要几十甚至更多的yaml文件,这些yaml分散存放,如果某天进行项目恢复的话,很难知道部署顺序,依赖关系等,而所有这些包括
- 基于yaml配置的集中存放
- 基于项目的打包
- 组件间的依赖
都可以通过helm来进行解决。
1.2 Helm基本概念
Helm 可以理解为 Kubernetes 的包管理工具,可以方便地发现、共享和使用为Kubernetes构建的应用,它包含几个基本概念
- Chart:一个 Helm 包,其中包含了运行一个应用所需要的镜像、依赖和资源定义等,还可能包含 Kubernetes 集群中的服务定义
- Release: 在 Kubernetes 集群上运行的 Chart 的一个实例。在同一个集群上,一个 Chart 可以安装很多次。每次安装都会创建一个新的 release。例如一个 MySQL Chart,如果想在服务器上运行两个数据库,就可以把这个 Chart 安装两次。每次安装都会生成自己的 Release,会有自己的 Release 名称。
- Repository:用于发布和存储 Chart 的仓库。
1.3 Helm组件
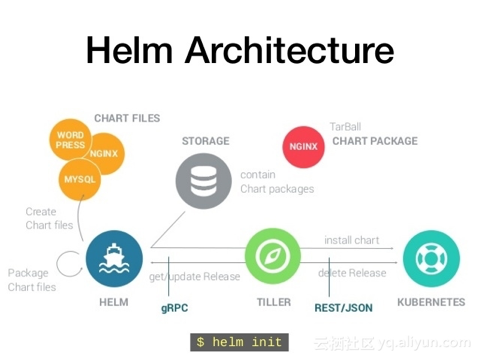
Helm由两部分组成,客户端helm和服务端tiller。
Helm Client 是用户命令行工具,其主要负责如下:
- 本地 chart 开发
- 仓库管理
- 与 Tiller sever 交互
- 发送预安装的 chart
- 查询 release 信息
- 要求升级或卸载已存在的 release
Tiller Server是一个部署在Kubernetes集群内部的 server,其与 Helm client、Kubernetes API server 进行交互。Tiller server 主要负责如下:
- 监听来自 Helm client 的请求
- 通过 chart 及其配置构建一次发布
- 安装 chart 到Kubernetes集群,并跟踪随后的发布
- 通过与Kubernetes交互升级或卸载 chart
简单的说,client 管理 charts,而 server 管理发布 release
1.4 工作流程
首先helm把需要的应用程序包Chart从repository仓库下载到本地。若需定制化操作,则需修改模板文件和values文件,使用模板文件和values文件对配置清单进行赋值。
helm把请求提交给Tiller,Tiller接收到请求后连接apiserver,通过认证授权,apiserver负责完成创建。
创建完成后,这个运行在集群上的实例不再称作Chart,而被称作release。
helm主机中,helm的家目录下若存在需要的Chart包,则以后再创建时不再从网上拉取Chart包,直接使用本地Chart包。
2 部署Helm
Helm的部署方式有两种:预编译的二进制程序和源码编译安装,这里使用二进制的方式进行安装
2.1 下载helm
我们可以在Helm Realese页面下载二进制文件,这里下载的v2.13.1版本,解压后将可执行文件helm拷贝到/usr/local/bin目录下即可,这样Helm客户端就在这台机器上安装完成了。
wget https://storage.googleapis.com/kubernetes-helm/helm-v2.13.1-linux-amd64.tar.gz --no-check-certificate
tar -xf helm-v2.13.1-linux-amd64.tar.gz
cd linux-amd64/
cp helm /usr/bin/  #下载解压完成后,直接将helm执行文件放入PATH环境变量中就可以使用
helm -h
2.2 部署Tiller
helm第一次init时,需要链接api-server并进行认证,所以在运行helm时,会去读取kube-config文件,所以必须确认当前用户存在kube-config文件。
Tiller运行在K8s集群之上,也必须拥有集群的管理权限,也就是需要一个serviceaccount,进行一个clusterrolebinding到cluster-admin。
Tiller的RBAC配置示例链接:
https://github.com/helm/helm/blob/master/docs/rbac.md
#[root@k8s-master ~]# cd helm/
#[root@k8s-master helm]# ls
#[root@k8s-master helm]#  cat  tiller_rbac.yaml
apiVersion: v1
kind: ServiceAccount
metadata:
  name: tiller
  namespace: kube-system
---
apiVersion: rbac.authorization.k8s.io/v1
kind: ClusterRoleBinding
metadata:
  name: tiller
roleRef:
  apiGroup: rbac.authorization.k8s.io
  kind: ClusterRole
  name: cluster-admin
subjects:
  - kind: ServiceAccount
    name: tiller
    namespace: kube-system
[root@k8s-master helm]# kubectl apply -f tiller-rbac.yaml
serviceaccount/tiller created
clusterrolebinding.rbac.authorization.k8s.io/tiller created
[root@k8s-master helm]# kubectl get sa -n kube-system |grep tiller
tiller                               1         7s
[root@k8s-master helm]#
#由于墙的原因,所以我们使用阿里的chart仓库,注意指定的tiller版本需要和helm版本一致
[root@k8s-master helm]# helm init  --service-account tiller  --upgrade -i registry.cn-hangzhou.aliyuncs.com/google_containers/tiller:v2.13.1 --stable-repo-url https://kubernetes.oss-cn-hangzhou.aliyuncs.com/charts
Creating /root/.helm
Creating /root/.helm/repository
Creating /root/.helm/repository/cache
Creating /root/.helm/repository/local
Creating /root/.helm/plugins
Creating /root/.helm/starters
Creating /root/.helm/cache/archive
Creating /root/.helm/repository/repositories.yaml
Adding stable repo with URL: https://kubernetes.oss-cn-hangzhou.aliyuncs.com/charts
Adding local repo with URL: http://127.0.0.1:8879/charts
$HELM_HOME has been configured at /root/.helm.

Tiller (the Helm server-side component) has been installed into your Kubernetes Cluster.

Please note: by default, Tiller is deployed with an insecure 'allow unauthenticated users' policy.
To prevent this, run `helm init` with the --tiller-tls-verify flag.
For more information on securing your installation see: https://docs.helm.sh/using_helm/#securing-your-helm-installation
Happy Helming!
[root@k8s-master helm]# kubectl get pod -n kube-system |grep tiller #查看tiller的pod是否创建成功
tiller-deploy-86b574cb79-4xhwh            1/1     Running     0          22s
[root@k8s-master helm]#
[root@k8s-master helm]# helm version
Client: &version.Version{SemVer:"v2.13.1", GitCommit:"618447cbf203d147601b4b9bd7f8c37a5d39fbb4", GitTreeState:"clean"}
Server: &version.Version{SemVer:"v2.13.1", GitCommit:"618447cbf203d147601b4b9bd7f8c37a5d39fbb4", GitTreeState:"clean"}
[root@k8s-master helm]#
如果希望在安装时自定义一些参数,可以参考一下的一些参数:
- --canary-image:安装canary分支,即项目的Master分支
- --tiller-image:安装指定版本的镜像,默认和helm同版本
- --kube-context:安装到指定的Kubernetes集群
- --tiller-namespace:安装到指定的名称空间,默认为kube-system
Tiller将数据存储在ConfigMap资源当中,卸载或重装不会导致数据丢失,卸载Tiller的方法有以下两种:
(1)kubectl delete deployment tiller-deploy --n kube-system
(2)heml reset
3 helm命令补全
#BASH 请执行
source <(helm completion bash)
echo "source <(helm completion bash)" | sudo tee -a /etc/profile
4 创建第一个chart
[root@k8s-master helm]# helm create hello-helm
Creating hello-helm
[root@k8s-master helm]# tree hello-helm
hello-helm
├── charts
├── Chart.yaml
├── templates
│   ├── deployment.yaml
│   ├── _helpers.tpl
│   ├── ingress.yaml
│   ├── NOTES.txt
│   ├── service.yaml
│   └── tests
│       └── test-connection.yaml
└── values.yaml

3 directories, 8 files
[root@k8s-master helm]#
我们通过查看templates目录下面的deployment.yaml文件可以看出默认创建的 Chart 是一个 nginx 服务,具体的每个文件是干什么用的,我们可以前往 Helm 官方文档进行查看,后面会和大家详细讲解的。比如这里我们来安装 1.7.9 这个版本的 nginx,则我们更改 value.yaml 文件下面的 image tag 即可,将默认的 stable 更改为 1.7.9,为了测试方便,我们把 Service 的类型也改成 NodePort
[root@k8s-master helm]# cd hello-helm/
[root@k8s-master hello-helm]# ls
charts  Chart.yaml  templates  values.yaml
[root@k8s-master hello-helm]# cd templates/
[root@k8s-master templates]# ls
deployment.yaml  _helpers.tpl  ingress.yaml  NOTES.txt  service.yaml  tests
[root@k8s-master templates]# vim deployment.yaml
[root@k8s-master templates]# cd ..
[root@k8s-master hello-helm]# ls
charts  Chart.yaml  templates  values.yaml
[root@k8s-master hello-helm]# vim values.yaml
[root@k8s-master hello-helm]# cat values.yaml
# Default values for hello-helm.
# This is a YAML-formatted file.
# Declare variables to be passed into your templates.

replicaCount: 1

image:
  repository: nginx
  tag: 1.7.9
  pullPolicy: IfNotPresent

nameOverride: ""
fullnameOverride: ""

service:
  type: NodePort
  port: 80

ingress:
  enabled: false
  annotations: {}
    # kubernetes.io/ingress.class: nginx
    # kubernetes.io/tls-acme: "true"
  hosts:
    - host: chart-example.local
      paths: []

  tls: []
  #  - secretName: chart-example-tls
  #    hosts:
  #      - chart-example.local

resources: {}
  # We usually recommend not to specify default resources and to leave this as a conscious
  # choice for the user. This also increases chances charts run on environments with little
  # resources, such as Minikube. If you do want to specify resources, uncomment the following
  # lines, adjust them as necessary, and remove the curly braces after 'resources:'.
  # limits:
  #   cpu: 100m
  #   memory: 128Mi
  # requests:
  #   cpu: 100m
  #   memory: 128Mi

nodeSelector: {}

tolerations: []

affinity: {}
安装下这个 Chart :
[root@k8s-master hello-helm]# cd ..
[root@k8s-master helm]# helm install ./hello-helm
NAME:   cold-llama
LAST DEPLOYED: Tue Sep 24 10:34:37 2019
NAMESPACE: default
STATUS: DEPLOYED

RESOURCES:
==> v1/Deployment
NAME                   READY  UP-TO-DATE  AVAILABLE  AGE
cold-llama-hello-helm  0/1    1           0          0s

==> v1/Pod(related)
NAME                                    READY  STATUS             RESTARTS  AGE
cold-llama-hello-helm-6bc7d7cbfd-rsz4l  0/1    ContainerCreating  0         0s

==> v1/Service
NAME                   TYPE      CLUSTER-IP      EXTERNAL-IP  PORT(S)       AGE
cold-llama-hello-helm  NodePort  10.107.195.201  <none>       80:30369/TCP  0s


NOTES:
1. Get the application URL by running these commands:
  export NODE_PORT=$(kubectl get --namespace default -o jsonpath="{.spec.ports[0].nodePort}" services cold-llama-hello-helm)
  export NODE_IP=$(kubectl get nodes --namespace default -o jsonpath="{.items[0].status.addresses[0].address}")
  echo http://$NODE_IP:$NODE_PORT

[root@k8s-master helm]# kubectl get pods,svc | grep hello-helm

pod/cold-llama-hello-helm-6bc7d7cbfd-rsz4l    1/1     Running   0          5m8s
service/cold-llama-hello-helm   NodePort    10.107.195.201   <none>        80:30369/TCP   5m8s
[root@k8s-master helm]#
等到 Pod 创建完成后,我们可以根据创建的 Service 的 NodePort 来访问该服务了,然后在浏览器中打开http://nodeIP: 30369就可以正常的访问我们刚刚部署的 nginx 应用了。
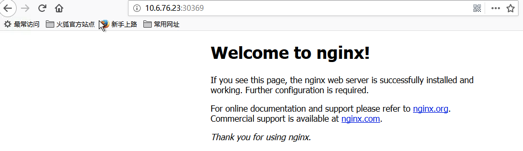
[root@k8s-master helm]# curl -I 10.6.76.23:30369
HTTP/1.1 200 OK
Server: nginx/1.7.9  #指定版本
Date: Tue, 24 Sep 2019 02:41:29 GMT
Content-Type: text/html
Content-Length: 612
Last-Modified: Tue, 23 Dec 2014 16:25:09 GMT
Connection: keep-alive
ETag: "54999765-264"
Accept-Ranges: bytes

[root@k8s-master helm]#
4.1 helm list查看release:
[root@k8s-master helm]# helm list
NAME            REVISION        UPDATED                         STATUS          CHART                   APP VERSION     NAMESPACE
cold-llama      1               Tue Sep 24 10:34:37 2019        DEPLOYED        hello-helm-0.1.0        1.0             default
[root@k8s-master helm]#
4.2 helm packag打包chart:
[root@k8s-master helm]# helm package hello-helm
Successfully packaged chart and saved it to: /root/helm/hello-helm-0.1.0.tgz
[root@k8s-master helm]# pwd
/root/helm
[root@k8s-master helm]# ls
hello-helm  hello-helm-0.1.0.tgz
[root@k8s-master helm]#
然后我们就可以将打包的tgz文件分发到任意的服务器上,通过helm fetch就可以获取到该 Chart 了
4.3 helm delete临时删除release
[root@k8s-master helm]# kubectl get pods,svc,deploy | grep hello-helm

pod/cold-llama-hello-helm-6bc7d7cbfd-rsz4l    1/1     Running   0          9m36s
service/cold-llama-hello-helm   NodePort    10.107.195.201   <none>        80:30369/TCP   9m36s

deployment.extensions/cold-llama-hello-helm    1/1     1            1           9m36s
[root@k8s-master helm]# helm list
NAME            REVISION        UPDATED                         STATUS          CHART                   APP VERSION     NAMESPACE
cold-llama      1               Tue Sep 24 10:34:37 2019        DEPLOYED        hello-helm-0.1.0        1.0             default
[root@k8s-master helm]# helm delete cold-llama
release "cold-llama" deleted
[root@k8s-master helm]# kubectl get pods,svc,deploy | grep hello-helm


pod/cold-llama-hello-helm-6bc7d7cbfd-rsz4l    0/1     Terminating   0          10m
[root@k8s-master helm]# kubectl get pods,svc,deploy | grep hello-helm


[root@k8s-master helm]#
然后我们看到kubernetes集群上的该 nginx 服务也已经被删除了。

 浙公网安备 33010602011771号