
nginx获取客户端真实ip
nginx获取客户端真实ip
https://blog.csdn.net/diyiday/article/details/80827437
https://www.qiansw.com/f5-nginx-proxy-user-ip.html
https://www.cnblogs.com/edward2013/p/5501258.html
https://help.aliyun.com/knowledge_detail/40535.html?spm=5176.2000002.0.0.57554e22UWKxxO
很多时候做用户分析的时候需要客户端真实IP地址,尤其是运营或者日志分析,但很多线上环境呢,都是自建IDC或者云平台。获取客户端真实IP,首先要考虑的是网络环境,例如阿里云就要在slb开启X-Forwareded-For,自建IDC的F5这种网络设备也要开启AutoMap,并传递X-Forwarded-For值,把真实IP透传下去,Nginx这种web服务器才能获取到,建议Nginx做7层转发,这样子分析Nginx日志比tomcat、Apache、PHP要方便。
F5
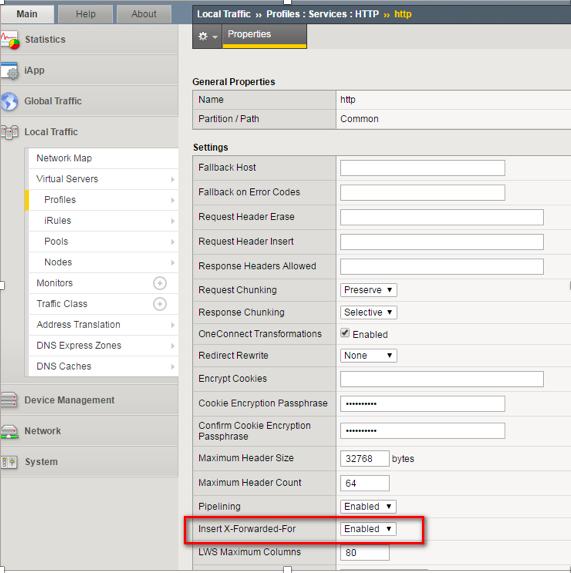
一、登陆F5后选择logical traffic ->profiles->services->http选项
二、在该选项中的service选项卡内点击create按钮创建一个http_profile并设置其中的Insert
X-Forwarded-For项值为enable
三、在local traffic选项卡中设置点击virtual server后点击其中的web虚拟服务器
四、进入该web虚拟server的property选项卡内将type修改成支持7层负载协议即standard并在http profile参数设置选择你刚刚添加的http_profile
五、最后点击update按钮配置生效

方式二:在iRule中开启X-Forwarded-For
when HTTP_REQUEST {
HTTP::header insert "X-Forwarded-For" [IP::client_addr]
}
阿里云SLB
四层接入(非网站防护)
按照以下不同的部署配置场景,选择适合您的源站获取客户端IP方式。
- 高防 > 阿里云ECS
通过TCP端口转发流量的情况,您无需做任何改动。源站服务器上看到的客户端IP就是真实的客户端IP。同时,ECS的安全组配置对象也可以针对真实的客户端IP进行设置。
说明 如使用UDP端口转发,源站ECS将无法获取真实客户端IP。
- 高防 > SLB > ECS
默认支持获取客户端真实IP。
通过TCP端口转发流量的情况,您无需做任何改动。源站服务器上看到的客户端IP就是真实的客户端IP。
七层接入(网站防护)
当一个七层代理服务器(如高防IP)把用户的访问请求转到后端服务器时,源站默认看到的是这个七层代理服务器(如高防IP)的回源IP。而真实的客户端IP会被七层代理服务器放在HTTP头部的X-Forwareded-For字段,格式如下:X-Forwarded-For: 用户真实IP,
高防代理IP。
如果中间经过不止一个代理服务器(如经过了WAF、CDN等等代理服务器),此时HTTP头部的X-Forwarded-For字段的格式如下:X-Forwarded-For: 用户真实IP,
代理服务器1-IP, 代理服务器2-IP, 代理服务器3-IP,
…。
经过多层代理服务器,请求用户的真实IP处于第一个位置,而后面包含所有经过的中间代理服务器的IP。因此,只要获取HTTP头部的X-Forwarded-For字段的内容即可。
Nginx获取真实IP方法
l 确认 http_realip_module 模块已安装。Nginx作为负载均衡获取真实IP是使用http_realip_module模块。
说明
通过一键安装包安装的Nginx默认不安装此模块,可以使用 # nginx -V | grep http_realip_module 查看此模块有无安装。
如果 http_realip_module 模块未安装,需要重新编译Nginx并加装此模块。
--user=admin --group=admin --prefix=/home/admin/webserver --with-http_concat_module --with-http_realip_module --with-http_addition_module --with-http_gzip_static_module --with-http_random_index_module --with-http_stub_status_module --with-http_sub_module --with-http_ssl_module --with-http_flv_module --with-http_sysguard_module --with-http_upstream_check_module --with-http_secure_link_module --with-http_degradation_module --with-http_xslt_module --with-http_v2_module --with-http_image_filter_module --with-http_dyups_module --with-http_dav_module --with-debug --add-module=/home/admin/soft/nginx_install/ngx_devel_kit/ --add-module=/home/admin/soft/nginx_install/lua-nginx-module
作为代理服务器
l 修改Nginx对应server的配置。 在location / {}中添加以下内容。
proxy_set_header Host $host;
proxy_set_header X-Real-IP $remote_addr;
proxy_set_header X-Forwarded-For $proxy_add_x_forwarded_for;
作为web服务器
  location / {
    set_real_ip_from 10.6.76.27;
    real_ip_header X-Forwarded-For;
    real_ip_recursive on;
        }
如果是阿里云ecs
set_real_ip_from ip_range1;
set_real_ip_from ip_range2;
...
set_real_ip_from ip_rangex;
real_ip_header    X-Forwarded-For;
这里的 ip_range1,2,... 指的是高防IP的回源IP地址,需要添加多条。如果高防IP后还有WAF、CDN,则需要写WAF、CDN的回源IP地址,即需要写离源站最近的一层七层代理的回源IP段。
修改日志记录格式
log_format。log_format一般在nginx.conf中的HTTP配置中:
    log_format  json  '$remote_addr - $remote_user [$time_local] "$request" '

                  '$status $body_bytes_sent "$http_referer" '

                  '"$http_user_agent"  $request_time $http_x_forwarded_for ' ;
代理服务器日志
1.81.84.185 - - [25/Jul/2019:12:09:33 +0800] "GET /poweredby.png HTTP/1.1" 304 0 "http://test.corp.XXX.com/" "Mozilla/5.0 (Macintosh; Intel Mac OS X 10.11; rv:68.0) Gecko/20100101 Firefox/68.0" 0.001 1.81.84.185
web服务器日志
    log_format  main  '$remote_addr - $remote_user [$time_local] "$request" '
                      '$status $body_bytes_sent "$http_referer" '
                      '"$http_user_agent" "$http_x_forwarded_for"';
1.81.84.185 - - [25/Jul/2019:12:09:33 +0800] "GET /poweredby.png HTTP/1.1" 304 0 "http://test.corp.zhaonongzi.com/" "Mozilla/5.0 (Macintosh; Intel Mac OS X 10.11; rv:68.0) Gecko/20100101 Firefox/68.0" "1.81.84.185, 1.81.84.185"
可以看出来,通过这样子设置,remote_addr就是我们的真实IP地址
json方式
log_format json '{"@timestamp":"$time_iso8601",'
                     '"host":"$server_addr",'
                     '"request_method": "$request_method", '
                     '"clientip":"$remote_addr",'
                     '"size":$body_bytes_sent,'
                     '"responsetime":$request_time,'
                     '"upstreamtime":"$upstream_response_time",'
                     '"upstreamhost":"$upstream_addr",'
                     '"http_host":"$host",'
                     '"url":"$uri",'
                     '"xff":"$http_x_forwarded_for",'
                     '"referer":"$http_referer",'
                     '"agent":"$http_user_agent",'
                    '"status":"$status"}';
{"@timestamp":"2019-07-25T10:31:15+08:00","host":"10.6.76.27","request_method": "GET", "clientip":"1.80.80.50","size":798,"responsetime":0.010,"upstreamtime":"0.010","upstreamhost":"10.6.76.27:5601","http_host":"kibana.corp.zhaonongzi.com","url":"/api/saved_objects/_find","xff":"1.80.80.50","referer":"http://kibana.corp.zhaonongzi.com/app/kibana","agent":"Mozilla/5.0 (Macintosh; Intel Mac OS X 10.11; rv:68.0) Gecko/20100101 Firefox/68.0","status":"200"}
Apache获取访客真实IP的解决方案
您可以通过安装Apache的mod_rpaf第三方模块,获取访问者真实IP地址。
- 执行以下命令,安装mod_rpaf模块。
wget http://stderr.net/apache/rpaf/download/mod_rpaf-0.6.tar.gztar zxvf mod_rpaf-0.6.tar.gzcd mod_rpaf-0.6;/alidata/server/httpd/bin/apxs -i-c -n mod_rpaf-2.0.somod_rpaf-2.0.c- 修改Apache配置文件/alidata/server/httpd/conf/httpd.conf,在文件最后添加以下内容:
说明 其中, RPAFproxy_ips ip地址不是负载均衡提供的公网IP。具体IP可参考Apache的日志,通常会有两个IP地址。
LoadModule rpaf_module modules/mod_rpaf-2.0.so
RPAFenable On
RPAFsethostname On
RPAFproxy_ips ip地址
RPAFheader X-Forwarded-For
- 添加完成后,执行以下命令重启Apache服务,使配置生效。
/alidata/server/httpd/bin/apachectl restart
mod_rpaf模块配置示例
LoadModule rpaf_module modules/mod_rpaf-2.0.so
RPAFenable On
RPAFsethostname On
RPAFproxy_ips 10.242.230.65 10.242.230.131
RPAFheader X-Forwarded-For
httpd.conf添加%{X-Forwarded-For}i(推荐)
LogFormat "%h %l %u %t \"%r\" %>s %b \"%{Referer}i\" \"%{User-Agent}i\" %{X-Forwarded-For}i" combined
Tomcat获取访客真实IP的解决方案
开启 Tomcat 的 X-Forwarded-For 功能可获取客户端真实IP。
在 tomcat/conf/server.xml 文件中,修改 AccessLogValve 日志记录功能:
<Valve className="org.apache.catalina.valves.AccessLogValve" directory="logs"
prefix="localhost_access_log." suffix=".txt"
pattern="%{X-FORWARDED-FOR}i %l %u %t %r %s %b %D %q %{User-Agent}i %T" resolveHosts="false"/>
在PHP中获取X-Forwarded-For的值
<?php
    $headers = apache_request_headers();
    $real_client_ip = $headers["X-Forwarded-For"];
    echo  "Your IP: ",$real_client_ip;
?>

 浙公网安备 33010602011771号