MyBatis 学习总结 01 快速入门
本文测试源码下载地址: http://onl5wa4sd.bkt.clouddn.com/MyBatis0918.rar
一、Mybatis介绍


MyBatis是一个支持普通SQL查询,存储过程和高级映射的优秀持久层框架。MyBatis消除了几乎所有的JDBC代码和参数的手工设置以及对结果集的检索封装。MyBatis可以使用简单的XML或注解用于配置和原始映射,将接口和Java的POJO(Plain Old Java Objects,普通的Java对象)映射成数据库中的记录。mybatis提供一种“半自动化”的ORM实现。这里的“半自动化”,是相对Hibernate等提供了全面的数据库封装机制的“全自动化”ORM实现而言,“全自动”ORM实现了POJO和数据库表之间的映射,以及 SQL 的自动生成和执行。mybatis的重点是在于POJO与SQL之间的映射关系。
MyBatis官方网址: http://www.mybatis.org
MyBatis官网的简体中文地址,有兴趣的小伙伴去逛逛吧。
MyBatista api 地址:http://tool.oschina.net/apidocs/apidoc?api=mybatis-3.1.1
MyBatis在github上的网址: https://github.com/mybatis/mybatis-3
MyBatis参考PPT: https://wenku.baidu.com/view/86e643d055270722182ef7ae.html
二、mybatis快速入门
1 准备开发环境
1 首先建立项目java web
使用Eclipse创建测试项目,创建的测试项目是Java项目或JavaWeb项目都可以。
使用Eclipse创建JavaWeb项目步骤, File -> New -> Dynamic Web Project 新建一个Java Web项目,项目名字为: MyBatis01
2 添加mybatis所需的jar包
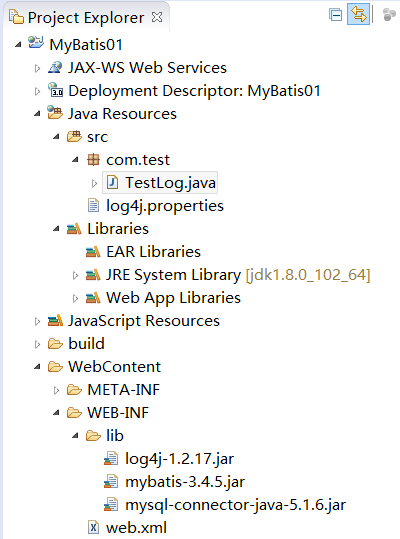
mybatis需要jar包:mybatis-3.4.5.jar
mysql驱动jar包:mysql-connector-java-5.1.6n.jar
日志记录jar包:log4j-1.2.17.jar
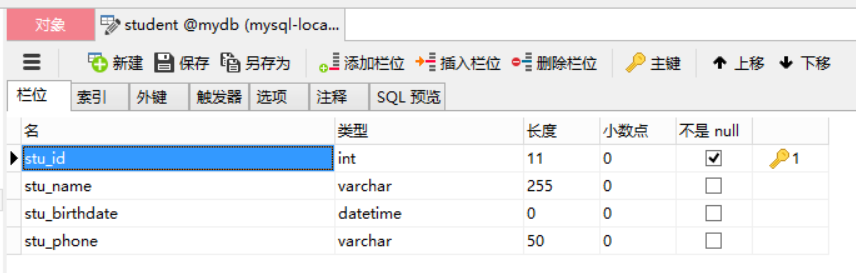
3 创建数据库和表
针对mysql数据库。创建数据库和表的脚本。
DROP database IF EXISTS `myDb`;

create database myDb;

use myDb;

DROP TABLE IF EXISTS `Student`;
CREATE TABLE `Student` (
`stu_id` int(11) NOT NULL AUTO_INCREMENT,
`stu_name` varchar(255) DEFAULT NULL,
`stu_birthdate` datetime DEFAULT NULL,
`stu_phone` varchar(50) DEFAULT NULL,
PRIMARY KEY (`stu_id`)
) ENGINE=InnoDB DEFAULT CHARSET=utf8;
INSERT INTO Student( stu_name , stu_birthdate , stu_phone ) VALUES ( 'zhangsan' , '2000-01-01' , '1350000');
INSERT INTO Student( stu_name , stu_birthdate , stu_phone ) VALUES ( 'lisi' , '2003-01-01' , '1350000');
运行脚本成功后如下图所示:
至此,前期的开发环境准备工作全部完成。还可以使用以下脚本创建一个与 Studnet表同样结构的测试表 student1
create table student1 as select * from student;
只复制源表结构,而不复制源表的数据。
create table student1 as select * from student where 1=2;
2 使用myBatist查询表中的数据
1 添加mybatis的配置文件 mybatis.cfg.xml

<?xml version="1.0" encoding="UTF-8"?> <!DOCTYPE configuration PUBLIC "-//mybatis.org//DTD Config 3.0//EN" "http://mybatis.org/dtd/mybatis-3-config.dtd"> <configuration> <environments default="development"> <environment id="development"> <transactionManager type="JDBC" /> <!-- 配置数据库连接信息 --> <dataSource type="POOLED"> <property name="driver" value="com.mysql.jdbc.Driver" /> <property name="url" value="jdbc:mysql://localhost:3306/myDb?useUnicode=true&characterEncoding=utf8" /> <property name="username" value="root" /> <property name="password" value="123456" /> </dataSource> </environment> </environments> </configuration>
2 定义表对应的实体类
Student 类的代码如下:
package com.bank.MyBatis.pojo;

import java.sql.Timestamp;

public class Student
{
    private Integer stuId;

    private String stuName;

    private java.sql.Timestamp stuBirthdate;

    private String stuPhone;

    public Student(String stuName, Timestamp stuBirthdate, String stuPhone)
    {
        super();
        this.stuName = stuName;
        this.stuBirthdate = stuBirthdate;
        this.stuPhone = stuPhone;
    }

    public Student(){
    }

    public Integer getStuId()
    {
        return stuId;
    }

    public void setStuId(Integer stuId)
    {
        this.stuId = stuId;
    }

    public String getStuName()
    {
        return stuName;
    }

    public void setStuName(String stuName)
    {
        this.stuName = stuName;
    }

    public java.sql.Timestamp getStuBirthdate()
    {
        return stuBirthdate;
    }

    public void setStuBirthdate(java.sql.Timestamp stuBirthdate)
    {
        this.stuBirthdate = stuBirthdate;
    }

    public String getStuPhone()
    {
        return stuPhone;
    }

    public void setStuPhone(String stuPhone)
    {
        this.stuPhone = stuPhone;
    }

    @Override
    public String toString()
    {
        return "Student [stuId=" + stuId + ", stuName=" + stuName + ", stuBirthdate=" + stuBirthdate + ", stuPhone=" + stuPhone + "]";
    }

}
3 定义操作Student表的sql映射文件 StudentMapper.xml
创建一个com.bank.MyBatis.dao包,专门用于存放sql映射文件,在包中创建一个 StudentMapper.xml文件
StudentMapper.xml 文件的内容如下:
<?xml version="1.0" encoding="UTF-8" ?>
<!DOCTYPE mapper PUBLIC "-//mybatis.org//DTD Mapper 3.0//EN" "http://mybatis.org/dtd/mybatis-3-mapper.dtd">
<mapper namespace="student">

    <resultMap id="BaseResultMap" type="com.bank.MyBatis.pojo.Student">
        <id column="stu_id" property="stuId" jdbcType="INTEGER" />
        <result column="stu_name" property="stuName" jdbcType="VARCHAR" />
        <result column="stu_birthdate" property="stuBirthdate"
            jdbcType="TIMESTAMP" />
        <result column="stu_phone" property="stuPhone" jdbcType="VARCHAR" />
    </resultMap>

    <insert id="insert" parameterType="com.bank.MyBatis.pojo.Student">
        insert into student (stu_id,
        stu_name, stu_birthdate, stu_phone)
        values ( default,
        #{stuName},#{stuBirthdate},#{stuPhone} )
    </insert>

    <update id="update" parameterType="com.bank.MyBatis.pojo.Student">
        update student set
        stu_name=#{stuName}, stu_birthdate=#{stuBirthdate},
        stu_phone=#{stuPhone} where stu_id=#{stuId}
    </update>

    <delete id="delete" parameterType="java.lang.Integer">
        delete from student where
        stu_id=#{stuId}
    </delete>

    <select id="queryById" resultMap="BaseResultMap" parameterType="java.lang.Integer">
        select * from student where stu_id=#{stuId}
    </select>

    <select id="query" resultMap="BaseResultMap">
        select * from student
    </select>

</mapper>
4 在 mybatis.conf.xml文件中注册 StudentMapper.xml 文件
<?xml version="1.0" encoding="UTF-8"?> <!DOCTYPE configuration PUBLIC "-//mybatis.org//DTD Config 3.0//EN" "http://mybatis.org/dtd/mybatis-3-config.dtd"> <configuration> <environments default="development"> <environment id="development"> <transactionManager type="JDBC" /> <!-- 配置数据库连接信息 --> <dataSource type="POOLED"> <property name="driver" value="com.mysql.jdbc.Driver" /> <property name="url" value="jdbc:mysql://localhost:3306/myDb?useUnicode=true&characterEncoding=utf8" /> <property name="username" value="root" /> <property name="password" value="123456" /> </dataSource> </environment> </environments> <mappers> <!-- 注册userMapper.xml文件, userMapper.xml位于com.mybatis.mapping这个包下,所以resource写成com/mybatis/mapping/userMapper.xml --> <mapper resource="com/bank/MyBatis/dao/StudentMapper.xml"/> </mappers> </configuration>
连接数据库配置的url地址,可以指定字符串的编码格式为UTF8, 其中 &代表转义字符,可以参考网友的这篇文章。
5 编写测试代码:执行定义的select语句
创建一个TestMyBatis1类,编写如下的测试代码:
package com.bank.test;

import java.io.InputStream;
import java.sql.Timestamp;
import java.text.DateFormat;
import java.text.SimpleDateFormat;
import java.util.Date;
import java.util.List;

import org.apache.ibatis.io.Resources;
import org.apache.ibatis.session.SqlSession;
import org.apache.ibatis.session.SqlSessionFactory;
import org.apache.ibatis.session.SqlSessionFactoryBuilder;
import org.junit.After;
import org.junit.Before;
import org.junit.Test;

import com.bank.MyBatis.pojo.Student;

public class TestMyBatis
{
    // Session工厂
    private SqlSessionFactory sessionFactory;

    /**
     * 初始化Session工厂
     */
    @Before
    public void setUp() throws Exception
    {
        InputStream is = Resources.getResourceAsStream("mybatis.cfg.xml");
        sessionFactory = new SqlSessionFactoryBuilder().build(is);
    }

    @After
    public void tearDown() throws Exception
    {
    }

    @Test
    public void test()
    {
        System.out.println("* sessionFactory=" + sessionFactory);
        Date date = null;

    }

    @Test
    public void testInsert()
    {
        SqlSession session = sessionFactory.openSession();
        //Student stu = new Student("李四", new Date(), "119****");
        Student stu = new Student("李四1", getDate() , "119****");
        session.insert("student.insert", stu);
        session.commit();
        session.close();
    }

    public Timestamp getDate()
    {
        Timestamp ts = new Timestamp(System.currentTimeMillis());
        String tsStr = "";
        DateFormat sdf = new SimpleDateFormat("yyyy-MM-dd HH:mm:ss");
        try {
            tsStr = sdf.format(ts);
            System.out.println(tsStr);
        } catch (Exception e) {
            e.printStackTrace();
        }

        return ts;
    }

    @Test
    public void testUpdate(){
        SqlSession session = sessionFactory.openSession();
        Student stu = new Student("王五222",getDate(), "120****");
        stu.setStuId(1);

        session.update( "student.update", stu);
        session.commit();
        session.close();
    }

    @Test
    public void testDel(){
        SqlSession session = sessionFactory.openSession();
        session.delete( "student.delete", 1);
        session.commit();
        session.close();
    }

    @Test
    public void testQueryById(){
        SqlSession session = sessionFactory.openSession();
        Student stu = (Student) session.selectOne("student.queryById", 2);
        System.out.println(stu);
        session.close();
    }

    @Test
    public void testQuery() {
        SqlSession session = sessionFactory.openSession();
        List<Student> list =  session.selectList("student.query");
        for (Student stu : list) {
            System.out.println("stu => "+stu);
        }

        session.close();
    }


}
6 使用Maven工程创建以上实验。
pom.xml参考内容:
<project xmlns="http://maven.apache.org/POM/4.0.0" xmlns:xsi="http://www.w3.org/2001/XMLSchema-instance"
  xsi:schemaLocation="http://maven.apache.org/POM/4.0.0 http://maven.apache.org/xsd/maven-4.0.0.xsd">
  <modelVersion>4.0.0</modelVersion>

  <groupId>com.bank</groupId>
  <artifactId>MyBatisNew01</artifactId>
  <version>0.0.1-SNAPSHOT</version>
  <packaging>jar</packaging>

  <name>MyBatisNew01</name>
  <url>http://maven.apache.org</url>

  <properties>
    <project.build.sourceEncoding>UTF-8</project.build.sourceEncoding>
  </properties>

  <dependencies>
    <dependency>
      <groupId>junit</groupId>
      <artifactId>junit</artifactId>
      <version>4.8.1</version>
      <scope>test</scope>
    </dependency>

     <dependency>
        <groupId>log4j</groupId>
        <artifactId>log4j</artifactId>
        <version>1.2.17</version>
    </dependency>

     <dependency>
        <groupId>org.mybatis</groupId>
        <artifactId>mybatis</artifactId>
        <version>3.4.5</version>
    </dependency>

    <dependency>
        <groupId>mysql</groupId>
        <artifactId>mysql-connector-java</artifactId>
        <version>5.1.6</version>
    </dependency>


  </dependencies>
</project>
测试完整例子可以从以下地址下载 : http://ovy7j2mnc.bkt.clouddn.com/MyBatisNew01.rar
3 关于查询的返回值类型
<select>元素的返回值设置有两个常用属性:
- resultMap
属性值是已经定义好的<resultMap>元素的id
示例
<resultMap id="BaseResultMap" type="com.icss.mybatis.pojo.Student">
<select id="query" resultMap="BaseResultMap">
- resultType
属性值有以下情况:
1)单一类型,例如<select id="getCount" resultType="java.lang.Integer">
2)组合类型,一般都是pojo类,需要注意查询语句的列名或别名必须要和pojo类的属性名称一致,否则无法映射,例如<select id="query2" resultType="com.icss.mybatis.pojo.Student">
3)Map类型,列值会自动封装为键值对Map集合,键为列名,值为列值,例如<select id="query3" resultType="java.util.HashMap">
resultMap和resultType同时使用是无意义的
4 resultType返回值示例
在 StudentMapper.xml添加如下查询信息
 <select id="getCount" resultType="java.lang.Integer">
         select count(*) from student
   </select>

  <select id="query2" resultType="com.bank.MyBatis.pojo.Student">
            select * from student
   </select>

  <select id="query3" resultType="java.util.HashMap">
       select * from student
  </select>
在TestMyBatis.java添加对应的测试方法如下:
 @Test
    public void testGetCount(){
          SqlSession session = sessionFactory.openSession();
          Integer count =  session.selectOne("student.getCount");
          System.out.println("count=" + count);
    }

    @Test
    public void testQuery2() {
        SqlSession session = sessionFactory.openSession();
        List<Student> list =  session.selectList("student.query2");
        for (Student stu : list) {
            System.out.println("stu => "+stu);
        }

        System.out.println("*** list="+list);

        session.close();
    }

    @Test
    public void testQuery3() {
        SqlSession session = sessionFactory.openSession();
        List<Map>  list =  session.selectList("student.query3");

        for(Map map : list){
            System.out.println(map);
        }

        System.out.println("*** list="+list);

        session.close();
    }
5 关于传入的参数设置
CRUD操作都有可能传入参数,参数类型的设置需要用到parameterType属性,属性值有以下几种情况:
- 单一类型,例如<delete id="delete" parameterType="java.lang.Integer">
- 复合类型,例如<update id="update" parameterType="com.bank.MyBatis.pojo.Student">
- Map集合类型,例如<select id="query4" parameterType="java.util.HashMap" resultMap="BaseResultMap">
在 StudentMapper.xml添加如下查询信息
 <select id="query4" parameterType="java.util.HashMap" resultMap="BaseResultMap">
    <![CDATA[
        select * from student
        where stu_birthdate>=#{startDate} and stu_birthdate<=#{endDate}
    ]]>
 </select>
测试方法为:
 /**
     * timestampStr的格式為  "2017-09-09 11:49:45";
     *
     * */
    public Timestamp getTimestamp(String timestampStr){
          Timestamp ts = null;
          try {
              ts = Timestamp.valueOf(timestampStr);
              System.out.println(ts);
          } catch (Exception e) {
              e.printStackTrace();
          }
        return ts;
    }

    @Test
    public void testQuery4() {
        SqlSession session = sessionFactory.openSession();
        Map<String,Object> map = new HashMap<String, Object>();
        map.put("startDate", getTimestamp("2017-09-18 10:00:00"));
        map.put("endDate", getTimestamp("2017-09-18 20:49:00"));

        List<Student> list =  session.selectList("student.query4",map);

        for (Student stu : list) {
            System.out.println(stu);
        }
        session.close();
    }
6 #和$两种语法
# 可以进行预编译,进行类型匹配,#{变量名} 会转化为 jdbc 的 类型
$ 不进行数据类型匹配,${变量名}就直接把 ${name}替换为 name的内容
例如:
select * from tablename where id = #{id} ,假设id的值为12,其中如果数据库字段id为字符型,那么#{id}表示的就是'12',如果id为整型,那么#{id}就是 12 ,会转化为jdbc的 select * from tablename where id=?,把?参数设置为id的值
select * from tablename where id = ${id} ,如果字段id为整型,Sql语句就不会出错,但是如果字段id为字符型, 那么Sql语句应该写成 select * from table where id = '${id}'
事实上在mybatis中使用${id}这种标识符会直接抛异常,允许直接使用的标识符只能是${value}
如果不需要动态指定SQL语句,应该尽量使用#而不是$,因为$语法容易被SQL注入
${}语法示例
在 StudentMapper.xml添加如下查询信息
     <!-- ${}的用法 -->
    <select id="query5" resultType="java.lang.Integer">
        select ${value} from student
    </select>
测试方法如下所示:
 @Test
    public void testQuery5() {
        SqlSession session = sessionFactory.openSession();
        Integer result = (Integer) session.selectOne("student.query5","max(stu_id)");
        System.out.println("result=" + result);
        session.close();
    }
7 动态SQL语句
在应用中我们经常会做一些动态的拼接条件,但是如果是JDBC我们可以用程序拼接SQL语句,如果mybatis,我们可以使用动态SQL语句。例如按照员工姓名和工资来搜索员工信息,如果如果姓名和工资的检索值为空,则忽略这个检索条件
一般来说,我们都会用where 1=1类似这种写法来实现,但是mybatis就需要动态语句实现。
动态SQL的元素:
- if
- choose(when,otherwise)
- trim
- where
- set
- foreach
8 If元素
在 StudentMapper.xml添加如下查询信息、
<!-- 动态SQL:if标签 -->
<select id="queryByCondition" parameterType="com.icss.mybatis.pojo.Student" resultMap="BaseResultMap">
select * from student where 1=1
<if test="stuName != null and stuName != ''">
    and stu_name=#{stuName}
</if>
<if test="stuBirthdate != null">
    and stu_birthdate=#{stuBirthdate}
</if>
<if test="stuPhone != null and stuPhone != ''">
    and stu_phone=#{stuPhone}
</if>
</select>
当传入的属性值为空或空字符串时将会忽略掉条件
在 StudentMapper.xml添加如下查询信息。
 <!-- 动态SQL:if标签 -->
    <select id="queryByCondition" parameterType="com.bank.MyBatis.pojo.Student" resultMap="BaseResultMap">
        select * from student where 1=1
        <if test="stuName != null and stuName != ''">
            and stu_name=#{stuName}
        </if>
        <if test="stuBirthdate != null">
            and stu_birthdate=#{stuBirthdate}
        </if>
        <if test="stuPhone != null and stuPhone != ''">
            and stu_phone=#{stuPhone}
        </if>
    </select>
like 查询优化
 <!-- 动态SQL:if标签 -->
    <select id="queryByCondition" parameterType="com.bank.MyBatis.pojo.Student" resultMap="BaseResultMap">
        select * from student where 1=1
        <if test="stuName != null and stuName != ''">
            and stu_name=#{stuName}
        </if>
        <if test="stuBirthdate != null">
            and stu_birthdate=#{stuBirthdate}
        </if>
        <if test="stuPhone != null and stuPhone != ''">
            and stu_phone like CONCAT('%',#{stuPhone, jdbcType=VARCHAR},'%' )
        </if>

    </select>
测试方法为:
  @Test
    public void testQuery6() {
        SqlSession session = sessionFactory.openSession();

        Student stu = new Student();
        stu.setStuName("王五2");
        stu.setStuPhone( "120****" );

        List<Student> list =  session.selectList("student.queryByCondition",stu);
        System.out.println("list=" + list);
        session.close();
    }
9 choose元素
在 StudentMapper.xml添加如下查询信息。
 <!-- 动态SQL:choose标签 -->
    <select id="queryByCondition2" parameterType="com.bank.MyBatis.pojo.Student" resultMap="BaseResultMap">
        select * from student where 1=1
        <choose>
            <when test="stuName != null and stuName != ''">
                and stu_name=#{stuName}
            </when>
            <when test="stuBirthdate != null">
                and stu_birthdate=#{stuBirthdate}
            </when>
            <otherwise>
                and stu_phone=#{stuPhone}
            </otherwise>
        </choose>
    </select>
choose元素相当于java语句的if … else if …else语句
测试方法为:
  @Test
    public void testQuery7() {
        SqlSession session = sessionFactory.openSession();

        Student stu = new Student();
        stu.setStuName("王五2");
        stu.setStuPhone( "120****" );

        List<Student> list =  session.selectList("student.queryByCondition2",stu);
        System.out.println("list=" + list);
        session.close();
    }
10 where元素
在 StudentMapper.xml添加如下查询信息。
<!-- 动态SQL:where标签 -->
    <select id="queryByCondition3" parameterType="com.bank.MyBatis.pojo.Student" resultMap="BaseResultMap">
        select * from student
        <where>
            <if test="stuName != null and stuName != ''">
                and stu_name=#{stuName}
            </if>
            <if test="stuBirthdate != null">
                and stu_birthdate=#{stuBirthdate}
            </if>
            <if test="stuPhone != null and stuPhone != ''">
                and stu_phone=#{stuPhone}
            </if>
        </where>
    </select>
使用where元素会自动根据条件的个数增删where语句and运算符,所以不需要写where 1=1之类的语句
测试方法为:
 @Test
    public void testQuery8() {
        SqlSession session = sessionFactory.openSession();

        Student stu = new Student();
        stu.setStuName("王五2");
        stu.setStuPhone( "120****" );

        List<Student> list =  session.selectList("student.queryByCondition3",stu);
        System.out.println("list=" + list);
        session.close();
    }
11 trim元素
在 StudentMapper.xml添加如下查询信息。
<!-- 动态SQL:trim标签 -->
    <select id="queryByCondition4" parameterType="com.bank.MyBatis.pojo.Student" resultMap="BaseResultMap">
        select * from student
        <trim prefix="where" prefixOverrides="and|or">
            <if test="stuName != null and stuName != ''">
                and stu_name=#{stuName}
            </if>
            <if test="stuBirthdate != null">
                and stu_birthdate=#{stuBirthdate}
            </if>
            <if test="stuPhone != null and stuPhone != ''">
                or stu_phone=#{stuPhone}
            </if>
        </trim>
    </select>
trim元素的主要功能是可以在自己包含的内容前加上某些前缀,也可以在其后加上某些后缀,与之对应的属性是prefix和suffix;可以把包含内容的首部某些内容覆盖,即忽略,也可以把尾部的某些内容覆盖,对应的属性是prefixOverrides和suffixOverrides
测试方法为:
 @Test
    public void testQuery9() {
        SqlSession session = sessionFactory.openSession();

        Student stu = new Student();
        stu.setStuName("王五2");
       // stu.setStuPhone( "120****" );
        stu.setStuBirthdate( getTimestamp("2017-09-18 10:00:00"));

        List<Student> list =  session.selectList("student.queryByCondition4",stu);
        System.out.println("list=" + list);
        session.close();
    }
12 foreach元素
foreach的主要用在构建in条件中,它可以在SQL语句中进行迭代一个集合。foreach元素的属性主要有item,index,collection,open,separator,close。item表示集合中每一个元素进行迭代时的别名,index指定一个名字,用于表示在迭代过程中,每次迭代到的位置,open表示该语句以什么开始,separator表示在每次进行迭代之间以什么符号作为分隔符,close表示以什么结束,在使用foreach的时候最关键的也是最容易出错的就是collection属性,该属性是必须指定的,但是在不同情况下,该属性的值是不一样的,主要有以下3种情况:
如果传入的是单参数且参数类型是一个List的时候,collection属性值为list
如果传入的是单参数且参数类型是一个array数组的时候,collection的属性值为array
如果传入的参数是多个的时候,我们就需要把它们封装成一个Map了,当然单参数也可以封装成map,实际上如果你在传入参数的时候,在MyBatis里面也是会把它封装成一个Map的,map的key就是参数名,所以这个时候collection属性值就是传入的List或array对象在自己封装的map里面的key
例子:foreach元素示例-传入单个数组
在 StudentMapper.xml添加如下查询信息。
 <!-- 动态SQL:传入Array数组 -->
    <select id="queryByInArray" resultMap="BaseResultMap">
               select * from student
        <if test="array.length>0">
            where stu_id in
            <foreach collection="array" index="i" item="stuId" open="(" close=")" separator=",">
            #{stuId}
            </foreach>
        </if>
    </select>
测试方法为:
@Test
    public void testQuery10() {
        SqlSession session = sessionFactory.openSession();

        int[] ids = new int[]{2,3,4};
        List<Student> list = session.selectList("student.queryByInArray",ids);

        for (Student item : list) {
            System.out.println(item);
        }

        session.close();

    }
例子:foreach元素示例-传入单个List集合
在 StudentMapper.xml添加如下查询信息。
  <!-- 动态SQL:传入List集合 -->
    <select id="queryByInList" resultMap="BaseResultMap">
        select * from student
        <if test="list.size()>0">
            where stu_id in
            <foreach collection="list" index="i" item="stuId" open="(" close=")" separator=",">
                #{stuId}
            </foreach>
        </if>
    </select>
测试方法为:
 @Test
    public void testQuery11() {
        SqlSession session = sessionFactory.openSession();

        List ids = new ArrayList();
        ids.add(2);
        ids.add(3);
        ids.add(4);
        List<Student> list = session.selectList("student.queryByInList",ids);
        for (Student item : list) {
            System.out.println(item);
        }

        session.close();

    }
例子:foreach元素示例-传入Map集合
在 StudentMapper.xml添加如下查询信息。
 <!-- 动态SQL:传入Map集合包含List集合 -->
    <select id="queryByInMap" resultMap="BaseResultMap">
        select * from student
        <if test="ids.size()>0">
            where stu_id in
                <foreach collection="ids" index="i" item="stuId" open="(" close=")" separator=",">
                #{stuId}
                </foreach>
        </if>
    </select>
测试方法为:
 @Test
    public void testQuery12() {
        SqlSession session = sessionFactory.openSession();

        List ids = new ArrayList();
        ids.add(2);
        ids.add(3);
        Map map = new HashMap();
        map.put("ids", ids);
        List<Student> list = session.selectList("student.queryByInMap",map);

        for (Student item : list) {
            System.out.println(item);
        }

        session.close();
    }
13 set元素
set元素主要是用在更新操作的时候,它的主要功能和where元素其实是差不多的,主要是在包含的语句前输出一个set,然后如果包含的语句是以逗号结束的话将会把该逗号忽略,如果set包含的内容为空的话则会出错。有了set元素我们就可以动态的更新那些修改了的字段
在 StudentMapper.xml添加如下查询信息。
  <!-- 动态SQL:set更新 -->
    <update id="updateByCondition" parameterType="com.bank.MyBatis.pojo.Student">
        update student
        <set>
            <if test="stuName!=null and stuName!=''">
                stu_name=#{stuName},
            </if>
            <if test="stuBirthdate!=null">
                stu_birthdate=#{stuBirthdate},
            </if>
            <if test="stuPhone!=null and stuPhone!=''">
                stu_phone=#{stuPhone}
            </if>
        </set>
        where stu_id=#{stuId}
    </update>
测试方法为:
 @Test
    public void updateByCondition(){
        SqlSession session = sessionFactory.openSession();
        Student stu = new Student();
        stu.setStuName("王五222");
        stu.setStuBirthdate( getDate());
        stu.setStuPhone(  "120****" );
        stu.setStuId(2);

        session.update( "student.updateByCondition", stu);
        session.commit();
        session.close();
    }
三 dao设计
Mybatis允许只声明一个dao接口,而无需写dao实现类的方式实现数据库操作
前提是必须保证Mapper文件中的<mapper>标签的namespace属性值必须要和dao接口的类路径一致,mybatis容器会自动通过动态代理生成接口的实现类
1 Mapper接口
新建 StudentMapper.java
package com.bank.MyBatis.dao;

import java.util.List;

import com.bank.MyBatis.pojo.Student;

public interface StudentMapper
{
    void insert(Student stu);

    void udpate(Student stu);

    void delete(Integer stuId);

    Student queryById(Integer stuId);

    List<Student> query();


}
2 修改StudentMapper.xml 文件
namespace属性值必须是StudentMapper接口的类路径
<?xml version="1.0" encoding="UTF-8" ?>
<!DOCTYPE mapper PUBLIC "-//mybatis.org//DTD Mapper 3.0//EN" "http://mybatis.org/dtd/mybatis-3-mapper.dtd">
<mapper namespace="com.bank.MyBatis.dao.StudentMapper">

    <resultMap id="BaseResultMap" type="com.bank.MyBatis.pojo.Student">
        <id column="stu_id" property="stuId" jdbcType="INTEGER" />
        <result column="stu_name" property="stuName" jdbcType="VARCHAR" />
        <result column="stu_birthdate" property="stuBirthdate"
            jdbcType="TIMESTAMP" />
        <result column="stu_phone" property="stuPhone" jdbcType="VARCHAR" />
    </resultMap>

    <insert id="insert" parameterType="com.bank.MyBatis.pojo.Student">
        insert into student (stu_id,
        stu_name, stu_birthdate, stu_phone)
        values ( default,
        #{stuName},#{stuBirthdate},#{stuPhone} )
    </insert>

    <update id="update" parameterType="com.bank.MyBatis.pojo.Student">
        update student set
        stu_name=#{stuName}, stu_birthdate=#{stuBirthdate},
        stu_phone=#{stuPhone} where stu_id=#{stuId}
    </update>

    <delete id="delete" parameterType="java.lang.Integer">
        delete from student where
        stu_id=#{stuId}
    </delete>

    <select id="queryById" resultMap="BaseResultMap" parameterType="java.lang.Integer">
        select * from student where stu_id=#{stuId}
    </select>

    <select id="query" resultMap="BaseResultMap">
        select * from student
    </select>


</mapper>
测试方法为:
 public Timestamp getDate()
    {
        Timestamp ts = new Timestamp(System.currentTimeMillis());
        String tsStr = "";
        DateFormat sdf = new SimpleDateFormat("yyyy-MM-dd HH:mm:ss");
        try {
            tsStr = sdf.format(ts);
            System.out.println(tsStr);
        } catch (Exception e) {
            e.printStackTrace();
        }

        return ts;
    }

    @Test
    public void testInsert()
    {
        SqlSession session = sessionFactory.openSession();
        StudentMapper studentMapper = session.getMapper(StudentMapper.class);

        Student stu = new Student( );
        stu.setStuName("王五222");
        stu.setStuBirthdate( getDate());
        stu.setStuPhone(  "130****" );
        studentMapper.insert(stu);

        session.commit();
        session.close();
    }
资料参考:
Java:String和Date、Timestamp之间的转换
http://www.cnblogs.com/Matrix54/archive/2012/05/03/2481260.html
如果您觉的本篇文章有用,可以赞助作者一些小额的比特币,用来买咖啡,谢谢。 收款地址:3NTPbsJKRKhe1RE1g2rZdr2dFTDgkBUgUa
注:转载需注明出处及作者名,严禁恶意转载,尊重原作者的劳动成果。

 浙公网安备 33010602011771号