Linux基础-文件管理、链接机制与归档压缩
3.1 shell与终端及命令通用格式和命令帮助
3.1.1 shell与终端
终端:终端是命令行的窗口。
shell:shell是解释器,当我们在终端窗口输入命令后,shell会把指令解释成内核所识别的字符,内核执行完成并且通过shell输出到终端。
内核:执行shell所给的指令。
3.1.2 shell提示符:
打开终端会看到shell提示符:
wmn@strudy:~$
| 字段 | 含义 |
|---|---|
| wmn | 当前登录服务器的用户名 |
| strudy | 服务器的主机名 |
| ~ | 当前所在的目录,~是当前所在位置是用户的家目录 |
| $ | 提示符,$代表的是普通用户,#代表的是root用户(超级用户) |
3.1.3 命令格式与帮助
3.1.3.1 命令格式
通用的命令格式由三部分组成:
| 组成部分 | 含义 |
|---|---|
| command | 执行的命令 |
| [options] | 命令的选项,根据实际情况可有可无 |
| [arguments] | 命令的参数,根据实际情况可有可无 |
3.1.3.2 命令的帮助
- --help/-h:快速查看帮助
应用实例:
1)查看ls的帮助:
wmn@strudy:~$ ls --help
- man: 命令的帮助手册:
常用的章节:
| 章节 | 含义 | 什么时候用 |
|---|---|---|
| 1 | 查看命令的帮助手册,默认的章节 | 查看普通的指令,如ls,tar,grep等用法 |
| 5 | 查看配置文件的手册 | 修改/etc/passwd等文件使用 |
| 8 | 查看系统管理命令的手册 | 使用fdisk分区、iptable等配置查看参数 |
常用的参数:
-f: 查看手册的章节
例子:
1)查看passwd的帮助:
wmn@strudy:~$ man passwd
2)查看passwd的章节:
wmn@strudy:~$ man -f passwd
passwd (1)           - 更改用户密码
passwd (5)           - 密码文件
passwd (1ssl)        - OpenSSL application commands
3)查看passwd的第5章节:
wmn@strudy:~$ man 5 passwd
3.2 Linux的文件管理
3.2.1 Linux的目录
- 目录结构
Linux的目录结构像倒挂的树一样,如下图:
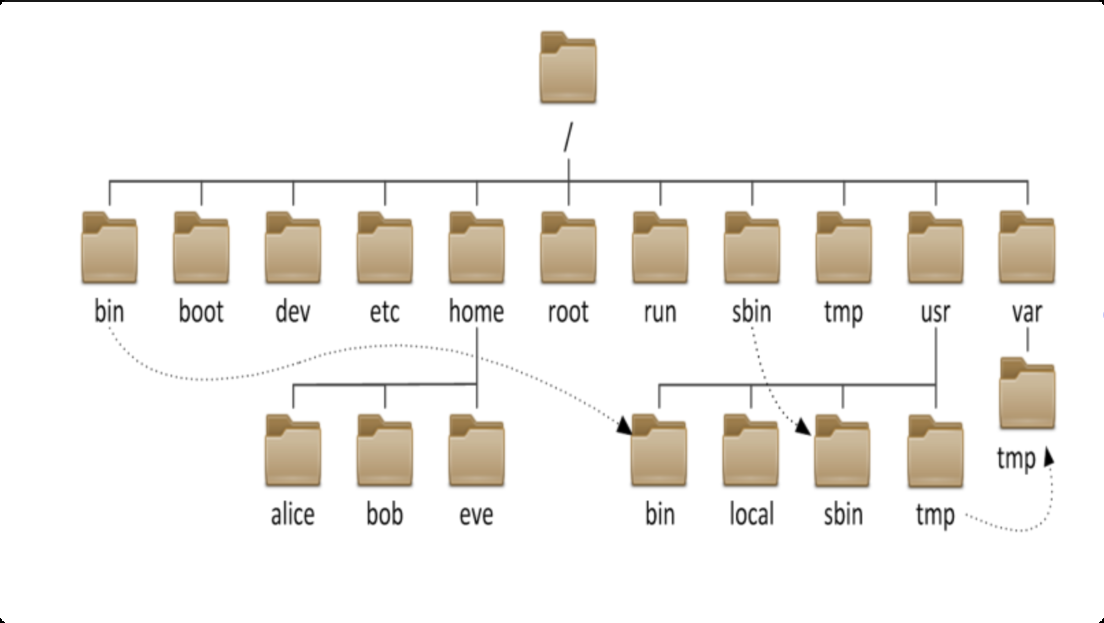
常用的目录:
| 目录名称 | 用途 |
|---|---|
| /etc | 主要存放系统和服务的配置文件 |
| /home | 用于存放普通用户家目录 |
| /root | root用户家目录 |
| /var | 主要存放一些经常数据变化的文件,比如说日志文件、缓存文件等 |
| /tmp | 临时目录,主要用于存放进程运行时临时数据文件,运行完自动删除,或者系统30日自动删除,用户都可以进行存放,但是只能自己删除自己存放的文件 |
| /bin | 主要存放普通用户能执行的二进制指令文件 |
| /sbin | 主要存放超级用户执行的二进制指令文件 |
| /boot | 主要存放系统和引导程序文件。vmlinuz:内核文件。initrd.img:初始化文件。grub:引导程序 |
| /lib | 开发使用的库 |
| /proc | 虚拟目录。主要存放系统正在运行进程的文件,进程不运行自动删除。 |
| /usr | 应用程序安装的位置 |
- 路径:
路径分为相对路径和绝对路径。
| 路径 | 含义 | 例子 |
|---|---|---|
| 绝对路径 | 以/开头的路径是绝对路径 | /etc/sysconfig |
| 相对路径 | 不是以/开头的路径是相对路径 | etc/sysconfig |
路径特殊符号:
| 符号 | 含义 |
|---|---|
| ~ | 家目录 |
| . | 当前目录 |
| .. | 上一级目录 |
| - | 上一次所在的目录,cd能使用 |
3.2.2 文件和目录指令
3.2.2.1 导航与查看
3.2.2.1.0 pwd(查看当前所在的目录)
pwd是查看当前所在的目录。
例子:
wmn@strudy:/etc/default$ pwd
/etc/default
3.2.2.1.1 cd(切换目录)
cd是切换目录,默认是切换到家目录。
- 例子:
切换到绝对路径目录:
wmn@strudy:/etc/default$ cd /etc/default/
wmn@strudy:/etc/default$ pwd
/etc/default
切换到用户的家目录:
wmn@strudy:/etc/default$ cd ~
wmn@strudy:~$ pwd
/home/wmn
或者:
wmn@strudy:/etc/default$ cd
wmn@strudy:~$ pwd
/home/wmn
切换到根目录:
wmn@strudy:~$ cd /
wmn@strudy:/$ pwd
/
切换到相对路径etc目录(当前在/目录)
wmn@strudy:/$ cd etc
wmn@strudy:/etc$ pwd
/etc
切换到上级目录:
wmn@strudy:/etc$ cd ../
wmn@strudy:/$ pwd
/
切换到上一次所在的目录:
wmn@strudy:/$ cd -
/etc
wmn@strudy:/etc$ pwd
/etc
切换到某个用户的家目录:
root@strudy:~# cd ~wmn
root@strudy:/home/wmn# pwd
/home/wmn
3.2.2.1.2 ls(查看目录内容)
ls是查看目录内容,默认是查看当前所在目录的内容。
- 常用的参数:
| 选项 | 说明 |
|---|---|
| -l | 显示详细信息 |
| -a | 显示目录下所有的内容,包括隐藏文件和目录(以.开头) |
| -h | 以人类可查看形式显示信息,一般和-l一起使用才能看出效果 |
| -d | 查看目录本身的信息,不是查看目录内容下的信息 |
| -S | 按照文件大小进行排序,一般和-l一起使用才能看出效果 |
| -t | 按照文件修改时间进行排序,一般和-l一起使用才能看出效果 |
| -r | 逆向排序,一般和-l,-t或-S一起使用才能看出效果 |
- 例子:
查看当前目录下的内容:
wmn@strudy:~$ ls
snap  下载  公共  图片  文档  桌面  模板  视频  音乐
查看/tmp目录下的内容:
wmn@strudy:~$ ls /tmp/
VMwareDnD
snap-private-tmp
systemd-private-417320f212634de38215ead676bbdcf8-ModemManager.service-nG2FqP
systemd-private-417320f212634de38215ead676bbdcf8-chrony.service-EiqwgC
systemd-private-417320f212634de38215ead676bbdcf8-colord.service-o3D4IP
systemd-private-417320f212634de38215ead676bbdcf8-fwupd.service-6JQclp
systemd-private-417320f212634de38215ead676bbdcf8-polkit.service-lO6aPC
systemd-private-417320f212634de38215ead676bbdcf8-power-profiles-daemon.service-zqmBGG
systemd-private-417320f212634de38215ead676bbdcf8-switcheroo-control.service-FbiNSs
systemd-private-417320f212634de38215ead676bbdcf8-systemd-logind.service-BiNo1m
systemd-private-417320f212634de38215ead676bbdcf8-upower.service-hI4LjG
vmware-root_1125-4022177662
查看当前目录下所有内容,包括隐藏文件:
wmn@strudy:~$ ls -a
.   .bash_history  .bashrc  .config  .profile  snap  公共  文档  模板  音乐
..  .bash_logout   .cache   .local   .ssh      下载  图片  桌面  视频
详细显示目录下所有文件内容:
wmn@strudy:~$ ls -la
total 76
drwxr-x--- 15 wmn  wmn  4096 Sep  5 11:46 .
drwxr-xr-x  3 root root 4096 Sep  5 10:47 ..
-rw-------  1 wmn  wmn   524 Sep  5 12:17 .bash_history
-rw-r--r--  1 wmn  wmn   220 Feb 13  2026 .bash_logout
-rw-r--r--  1 wmn  wmn  3771 Feb 13  2026 .bashrc
drwx------ 13 wmn  wmn  4096 Sep  5 12:06 .cache
drwx------ 14 wmn  wmn  4096 Sep  5 11:50 .config
drwx------  4 wmn  wmn  4096 Sep  5 11:40 .local
-rw-r--r--  1 wmn  wmn   807 Feb 13  2026 .profile
drwx------  2 wmn  wmn  4096 Sep  5 11:32 .ssh
drwx------  5 wmn  wmn  4096 Sep  5 12:00 snap
drwxr-xr-x  2 wmn  wmn  4096 Sep  5 11:40 下载
drwxr-xr-x  2 wmn  wmn  4096 Sep  5 11:40 公共
drwxr-xr-x  2 wmn  wmn  4096 Sep  5 11:40 图片
drwxr-xr-x  2 wmn  wmn  4096 Sep  5 11:40 文档
drwxr-xr-x  2 wmn  wmn  4096 Sep  5 11:40 桌面
drwxr-xr-x  2 wmn  wmn  4096 Sep  5 11:40 模板
drwxr-xr-x  2 wmn  wmn  4096 Sep  5 11:40 视频
drwxr-xr-x  2 wmn  wmn  4096 Sep  5 11:40 音乐
以人类可读的形式显示内容信息:
wmn@strudy:~$ ls -lah
total 76K
drwxr-x--- 15 wmn  wmn  4.0K Sep  5 11:46 .
drwxr-xr-x  3 root root 4.0K Sep  5 10:47 ..
-rw-------  1 wmn  wmn   524 Sep  5 12:17 .bash_history
-rw-r--r--  1 wmn  wmn   220 Feb 13  2026 .bash_logout
-rw-r--r--  1 wmn  wmn  3.7K Feb 13  2026 .bashrc
drwx------ 13 wmn  wmn  4.0K Sep  5 12:06 .cache
drwx------ 14 wmn  wmn  4.0K Sep  5 11:50 .config
drwx------  4 wmn  wmn  4.0K Sep  5 11:40 .local
-rw-r--r--  1 wmn  wmn   807 Feb 13  2026 .profile
drwx------  2 wmn  wmn  4.0K Sep  5 11:32 .ssh
drwx------  5 wmn  wmn  4.0K Sep  5 12:00 snap
drwxr-xr-x  2 wmn  wmn  4.0K Sep  5 11:40 下载
drwxr-xr-x  2 wmn  wmn  4.0K Sep  5 11:40 公共
drwxr-xr-x  2 wmn  wmn  4.0K Sep  5 11:40 图片
drwxr-xr-x  2 wmn  wmn  4.0K Sep  5 11:40 文档
drwxr-xr-x  2 wmn  wmn  4.0K Sep  5 11:40 桌面
drwxr-xr-x  2 wmn  wmn  4.0K Sep  5 11:40 模板
drwxr-xr-x  2 wmn  wmn  4.0K Sep  5 11:40 视频
drwxr-xr-x  2 wmn  wmn  4.0K Sep  5 11:40 音乐
按照文件大小进行排序显示内容信息:
1)正向排序
wmn@strudy:~$ ls -lhS /etc/
total 1.2M
-rw-r--r--  1 root                 root                  77K Oct 14  2025 mime.types
-rw-r--r--  1 root                 root                  62K Sep  5 11:53 ld.so.cache
-rw-r--r--  1 root                 root                  31K Mar 20 18:33 brltty.conf
-rw-r--r--  1 root                 root                  13K Mar 16  2025 services
-rw-r--r--  1 root                 root                  12K Nov 21  2025 nanorc
-rw-r--r--  1 root                 root                  11K Feb  3  2026 sensors3.conf
-rw-r--r--  1 root                 root                 9.6K Mar 13 19:02 sudo_logsrvd.conf
-rw-r--r--  1 root                 root                 9.5K Sep  5 11:32 locale.gen
2)逆向排序:
wmn@strudy:~$ ls -lhSr /etc/
total 1.2M
-rw-r--r--  1 root                 root                    0 Apr 23 09:15 subuid-
-rw-r--r--  1 root                 root                    0 Apr 23 09:15 subgid-
-rw-r--r--  1 root                 root                    7 Sep  5 10:47 hostname
-rw-r--r--  1 root                 root                   10 Apr 20 16:46 debian_version
lrwxrwxrwx  1 root                 root                   13 Feb 20  2026 rmt -> /usr/sbin/rmt
-rw-r--r--  1 root                 root                   14 Sep  5 11:32 timezone
lrwxrwxrwx  1 root                 root                   16 Apr 23 09:15 vconsole.conf -> default/keyb
按照修改时间进行排序:
1)正向排序:
wmn@strudy:~$ ls -lht /etc/
total 1.2M
drwxr-xr-x  5 root                 lp                   4.0K Sep  6 15:41 cups
drwxr-xr-x  4 root                 root                 4.0K Sep  5 12:01 ssh
drwxr-xr-x  2 root                 root                 4.0K Sep  5 12:01 rc3.d
drwxr-xr-x  2 root                 root                 4.0K Sep  5 12:01 rc4.d
drwxr-xr-x  2 root                 root                 4.0K Sep  5 12:01 rc5.d
drwxr-xr-x  2 root                 root                 4.0K Sep  5 12:01 rc2.d
2)逆向排序:
wmn@strudy:~$ ls -lhtr /etc/
total 1.2M
-rw-r--r--  1 root                 root                 3.1K Oct 18  2022 protocols
-rw-r--r--  1 root                 root                  911 Oct 18  2022 rpc
-rw-r--r--  1 root                 root                  460 Jan 20  2023 zsh_command_not_found
-rw-r--r--  1 root                 root                 4.4K Apr 16  2024 hdparm.conf
-rw-r--r--  1 root                 root                   27 Jun 13  2024 libao.conf
-rw-r--r--  1 root                 root                   20 Feb 21  2025 fprintd.conf
查看目录详细信息:
wmn@strudy:~$ ls -ld /
drwxr-xr-x 20 root root 4096 Sep  5 10:46 /
- ls -l查看出内容说明:
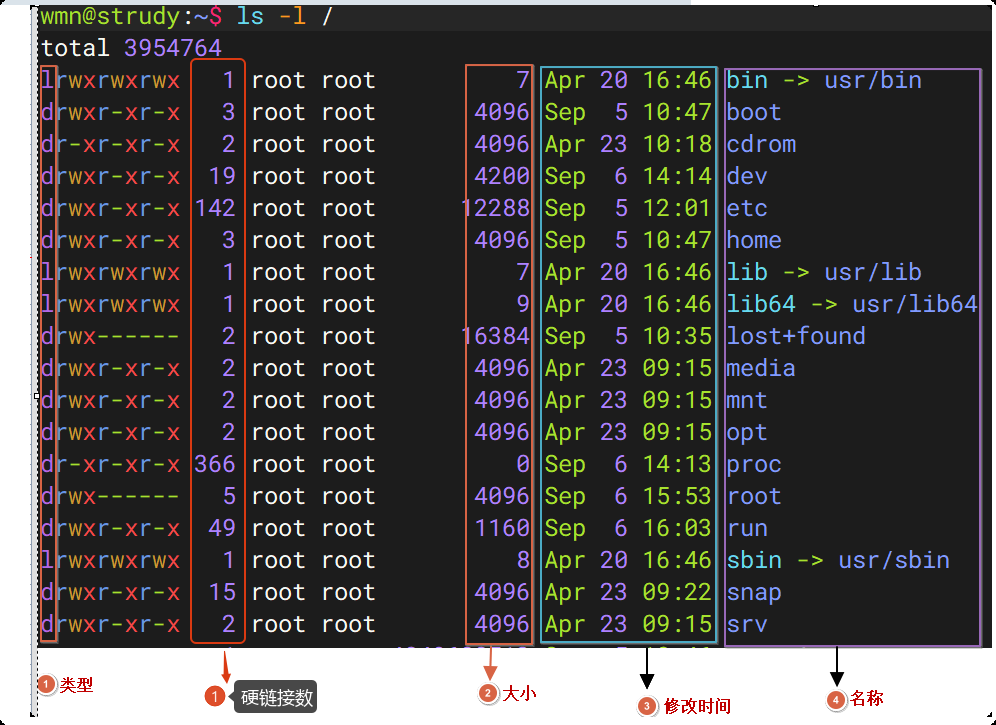
根据上图的序列号进行说明:
| 序列号 | 说明 |
|---|---|
| 序列1 | 显示类型,-是文件类型,d是目录类型,l是链接类型 |
| 序列2 | 默认显示是B |
| 序列3 | 文件或目录最后修改时间 |
3.2.2.1.3 tree(以树形式查看目录)
tree是以树形结构进行查看目录,默认查看目录下所有内容。
- 常见的选项参数:
| 选项 | 说明 |
|---|---|
| -d | 只看目录 |
| -l | 查看目录几级内容 |
- 例子:
查看目录树:
wmn@strudy:~$ tree
.
├── 公共
├── 模板
├── 视频
├── 图片
├── 文档
├── 下载
├── 音乐
├── 桌面
└── snap
    ├── firmware-updater
    │   ├── 226
    │   ├── common
    │   └── current -> 226
    ├── prompting-client
    │   ├── 204
    │   ├── 222
    │   ├── common
    │   └── current -> 222
    └── snapd-desktop-integration
        ├── 361
        ├── common
        └── current -> 361
只查看目录内容下的目录:
wmn@strudy:~$ tree /var -d
查看目录下2级内容:
wmn@strudy:~$ tree -L 2 /etc
查看多个目录的树形结构:
wmn@strudy:~/wmn-dir$ cp -r  dir1 dir1_backup
wmn@strudy:~/wmn-dir$ tree dir1 dir1_backup/
dir1
└── docs
    └── images
dir1_backup/
└── docs
    └── images
3.2.2.2 文件目录操作
3.2.2.2.0 目录文件创建
3.2.2.2.0.1 mkdir创建目录
mkdir默认是创建空目录,可以创建多个空目录。
- 选项参数
| 选项参数 | 用途 |
|---|---|
| -p | 递归创建多级目录 |
- 例子:
创建一个空目录:
wmn@strudy:~/wmn-dir$ mkdir dir1
wmn@strudy:~/wmn-dir$ ls
dir1
创建多个空目录:
wmn@strudy:~/wmn-dir$ mkdir  dir2 dir3 dir4 backup
wmn@strudy:~/wmn-dir$ ls
backup  dir1  dir2  dir3  dir4
递归创建多级目录:
wmn@strudy:~/wmn-dir$ mkdir -p dir1/docs/images
wmn@strudy:~/wmn-dir$ tree dir1
dir1
└── docs
    └── images

3 directories, 0 files
在dir2目录下批量创建dir1到dir10目录:
wmn@strudy:~/wmn-dir$ mkdir dir2/dir{1..10}
wmn@strudy:~/wmn-dir$ tree dir2/
dir2/
├── dir1
├── dir10
├── dir2
├── dir3
├── dir4
├── dir5
├── dir6
├── dir7
├── dir8
└── dir9
在dir3目录下创建dirw和dirm、dirn目录:
wmn@strudy:~/wmn-dir$ mkdir dir3/dir{w,m,n}
wmn@strudy:~/wmn-dir$ tree dir3/
dir3/
├── dirm
├── dirn
└── dirw
3.2.2.2.0.2 touch(创建文件)
touch是创建空文件,该命令没有常用的选项参数。
- 例子:
创建一个空文件:
wmn@strudy:~/wmn-dir$ touch file1.txt
wmn@strudy:~/wmn-dir$ ls
backup  dir1  dir2  dir3  dir4  file1.txt
创建多个空文件:
wmn@strudy:~/wmn-dir$ touch file2.txt file3.txt file4.txt
wmn@strudy:~/wmn-dir$ ls *.txt
file1.txt  file2.txt  file3.txt  file4.txt
在dir4目录下批量创建file01...file10空文件:
wmn@strudy:~/wmn-dir$ touch dir4/file{01..10}
wmn@strudy:~/wmn-dir$ tree dir4/
dir4/
├── file01
├── file02
├── file03
├── file04
├── file05
├── file06
├── file07
├── file08
├── file09
└── file10

1 directory, 10 files
在backup目录下创建file01,file02,file10空文件:
wmn@strudy:~/wmn-dir$ touch  backup/file{01,02,10}
wmn@strudy:~/wmn-dir$ tree backup/
backup/
├── file01
├── file02
└── file10

1 directory, 3 files
3.2.2.2.1 cp(复制文件或目录)
cp是把文件或目录复制到某个目录下,也叫备份,默认是只能复制文件,在覆盖已存在的文件默认是不进行提示的。
- 常用选项参数:
| 选项参数 | 含义 |
|---|---|
| -r | 递归复制目录及目录下的内容 |
| -i | 在复制是出现覆盖提示确认 |
| -v | 显示复制过程 |
- 例子:
把file1.txt复制到同目录下,并且复制名为file1_backup.txt,这种叫改名:
wmn@strudy:~/wmn-dir$ cp file1.txt file1_backup.txt
wmn@strudy:~/wmn-dir$ ls file1*
file1.txt  file1_backup.txt
把file1.txt复制到/tmp目录下:
wmn@strudy:~/wmn-dir$ cp file1.txt /tmp/
wmn@strudy:~/wmn-dir$ ls /tmp/file*
/tmp/file1.txt
把/etc/passwd复制到当前目录下:
wmn@strudy:~/wmn-dir$ cp /etc/passwd .
wmn@strudy:~/wmn-dir$ ls
backup  dir2  dir4       file1_backup.txt  file3.txt  passwd
dir1    dir3  file1.txt  file2.txt         file4.txt
把/etc/passwd文件复制到/tmp目录,并且复制名称为passwd_tmp
wmn@strudy:~/wmn-dir$ cp /etc/passwd /tmp/passwd_tmp
wmn@strudy:~/wmn-dir$ ls /tmp/passwd*
/tmp/passwd_tmp
把dir1目录复制到当前目录下,并且改名为dir1_backup:
wmn@strudy:~/wmn-dir$ cp -r  dir1 dir1_backup
wmn@strudy:~/wmn-dir$ tree dir1 dir1_backup/
dir1
└── docs
    └── images
dir1_backup/
└── docs
    └── images
把dir1目录复制到/tmp目录下:
wmn@strudy:~/wmn-dir$ cp -r dir1 /tmp/
wmn@strudy:~/wmn-dir$ tree /tmp/dir1/
/tmp/dir1/
└── docs
    └── images

3 directories, 0 files
复制/etc/passwd文件到当前目录下,并且显示复制过程:
wmn@strudy:~/wmn-dir$ cp -v /etc/passwd .
'/etc/passwd' -> './passwd'
wmn@strudy:~/wmn-dir$ ls
backup  dir1_backup  dir3  file1.txt         file2.txt  file4.txt
dir1    dir2         dir4  file1_backup.txt  file3.txt  passwd
复制/etc/passwd文件到当前目录下,并且覆盖前提示确认:
wmn@strudy:~/wmn-dir$ cp -i /etc/passwd .
cp:是否覆盖'./passwd'? y
3.2.2.2.2 mv移动
mv含义是移动,把文件或目录移动到某个位置,在Linux中重命名也叫移动。
- 例子:
把file1.txt文件重命名为data.txt:
wmn@strudy:~/wmn-dir$ mv file1.txt data.txt
wmn@strudy:~/wmn-dir$ ls
backup    dir1         dir2  dir4              file2.txt  file4.txt
data.txt  dir1_backup  dir3  file1_backup.txt  file3.txt  passwd
把data.txt移动到/tmp目录下:
wmn@strudy:~/wmn-dir$ mv data.txt /tmp/
wmn@strudy:~/wmn-dir$ ls /tmp/data*
/tmp/data.txt
把所有的txt结尾的文件移动到/tmp目录下:
wmn@strudy:~/wmn-dir$ mv *txt /tmp/
wmn@strudy:~/wmn-dir$ ls /tmp/*txt
/tmp/data.txt   /tmp/file1_backup.txt  /tmp/file3.txt
/tmp/file1.txt  /tmp/file2.txt         /tmp/file4.txt
把dir1目录移动到/tmp目录下:
wmn@strudy:~/wmn-dir$ mv dir1 /var/tmp/
wmn@strudy:~/wmn-dir$ ls /var/tmp/
dir1
当移动已存在的目录会报错:
wmn@strudy:~/wmn-dir$ mv dir1 /tmp/
mv: 无法进行跨设备的移动:'dir1' 至'/tmp/dir1';无法删除目标: 目录非空
3.2.2.2.3 rm(删除文件或目录)
rm是删除意思,默认只能删除文件,注意使用这个指令,删除掉了无法恢复,建议删除之前要进行备份
- 常用的选项:
| 选项 | 说明 |
|---|---|
| -i | 交互式删除:删除前进行确认是否删除 |
| -r | 删除目录 |
| -f | 强制删除 |
- 例子:
删除/tmp/file1.txt文件:
wmn@strudy:~/wmn-dir$ rm /tmp/file1.txt
wmn@strudy:~/wmn-dir$ ls /tmp/*txt
/tmp/data.txt  /tmp/file1_backup.txt  /tmp/file2.txt  /tmp/file3.txt  /tmp/file4.txt
交互式删除文件:
wmn@strudy:~/wmn-dir$ rm -i /tmp/*.txt
rm:是否删除regular empty file '/tmp/data.txt'? y
rm:是否删除regular empty file '/tmp/file1_backup.txt'? y
rm:是否删除regular empty file '/tmp/file2.txt'? y
rm:是否删除regular empty file '/tmp/file3.txt'? y
rm:是否删除regular empty file '/tmp/file4.txt'? y
wmn@strudy:~/wmn-dir$ ls /tmp/*txt
ls: cannot access '/tmp/*txt': No such file or directory
删除目录:
wmn@strudy:~/wmn-dir$ rm -r /tmp/dir1
wmn@strudy:~/wmn-dir$ ls -d /tmp/dir1
ls: cannot access '/tmp/dir1': No such file or directory
删除多个目录:
wmn@strudy:~/wmn-dir$ rm -r dir2 dir3 dir4
wmn@strudy:~/wmn-dir$ ls
backup  dir1_backup  passwd
强制所有的文件和目录: -rf 在生产环境中建议使用,容易把服务器/删除掉,容易跑路。
wmn@strudy:~/wmn-dir$ ls
backup  dir1_backup  passwd
wmn@strudy:~/wmn-dir$ rm -rf *
wmn@strudy:~/wmn-dir$ ls
删除空目录(rmdir):
wmn@strudy:~/wmn-dir$ ls
dir5
wmn@strudy:~/wmn-dir$ rmdir dir5/
wmn@strudy:~/wmn-dir$ ls
3.2.2.4 查看文件内容
3.2.2.4.1 cat(一次性显示整个文件)
cat查看文件内容,它是一次性显示整个文件内容,查看大型文件不建议使用,它适合查看小文件。
- 常用选项参数:
| 选项参数 | 含义 |
|---|---|
| -n | 查看文件显示行号 |
- 例子
查看/etc/hosts文件内容:
[wmn@studry ~]$ cat /etc/hosts
# Loopback entries; do not change.
# For historical reasons, localhost precedes localhost.localdomain:
127.0.0.1   localhost localhost.localdomain localhost4 localhost4.localdomain4
::1         localhost localhost.localdomain localhost6 localhost6.localdomain6
# See hosts(5) for proper format and other examples:
# 192.168.1.10 foo.example.org foo
# 192.168.1.13 bar.example.org bar
查看/etc/hosts并显示行号:
[wmn@studry ~]$ cat -n /etc/hosts
     1  # Loopback entries; do not change.
     2  # For historical reasons, localhost precedes localhost.localdomain:
     3  127.0.0.1   localhost localhost.localdomain localhost4 localhost4.localdomain4
     4  ::1         localhost localhost.localdomain localhost6 localhost6.localdomain6
     5  # See hosts(5) for proper format and other examples:
     6  # 192.168.1.10 foo.example.org foo
     7  # 192.168.1.13 bar.example.org bar
3.2.2.4.2 less(分页查看大文件内容)
less查看文件内容,它适合大文件内容,比如说查看日志文件内容,less的功能比more的功能更强,所以使用less
- less视图使用:
| 按键 | 作用 |
|---|---|
| 空格 | 向下翻页 |
| b | 向上翻页 |
| 向下箭头/回车键 | 向下逐行移动 |
| 向上箭头 | 向上逐行移动 |
| /关键字 | 向下搜索关键字(按n跳到下一个) |
| q | 退出 |
3.2.2.4.3 head和tail
head:显示文件前几行内容
head是显示文件前几行内容,默认是显示文件的前10行内容。
- 选项参数:
| 参数 | 说明 |
|---|---|
| -n 行数或者-n行数或者-行数 | 显示前几行文件内容 |
- 例子:
显示/etc/passwd前10行文件内容:
wmn@strudy:~/wmn-dir$ head /etc/passwd
root:x:0:0:root:/root:/bin/bash
daemon:x:1:1:daemon:/usr/sbin:/usr/sbin/nologin
bin:x:2:2:bin:/bin:/usr/sbin/nologin
sys:x:3:3:sys:/dev:/usr/sbin/nologin
sync:x:4:65534:sync:/bin:/bin/sync
games:x:5:60:games:/usr/games:/usr/sbin/nologin
man:x:6:12:man:/var/cache/man:/usr/sbin/nologin
lp:x:7:7:lp:/var/spool/lpd:/usr/sbin/nologin
mail:x:8:8:mail:/var/mail:/usr/sbin/nologin
news:x:9:9:news:/var/spool/news:/usr/sbin/nologin
显示/etc/passwd的前5行文件内容:
wmn@strudy:~/wmn-dir$ head -n 5 /etc/passwd
root:x:0:0:root:/root:/bin/bash
daemon:x:1:1:daemon:/usr/sbin:/usr/sbin/nologin
bin:x:2:2:bin:/bin:/usr/sbin/nologin
sys:x:3:3:sys:/dev:/usr/sbin/nologin
sync:x:4:65534:sync:/bin:/bin/sync
wmn@strudy:~/wmn-dir$ head -n5 /etc/passwd
root:x:0:0:root:/root:/bin/bash
daemon:x:1:1:daemon:/usr/sbin:/usr/sbin/nologin
bin:x:2:2:bin:/bin:/usr/sbin/nologin
sys:x:3:3:sys:/dev:/usr/sbin/nologin
sync:x:4:65534:sync:/bin:/bin/sync
tail:显示文件后几行内容
tail是显示文件后几行内容,默认也是后10行文件内容,它可以实时跟踪文件的变化,主要用来查看日志的。
- 选项参数:
| 选项参数 | 含义 |
|---|---|
| -n 行数或-行数或-n行数 | 显示文件后几行内容 |
| -f | 实时追踪文件最新内容,ctrl +c结束追踪 |
- 例子:
查看服务器安全日志后10行内容:
1)rockyLinux系统:
wmn@study:~$ sudo tail /var/log/secure
[sudo] wmn 的密码:
Sep  6 14:13:53 study sshd[1369]: Server listening on 0.0.0.0 port 22.
Sep  6 14:13:53 study sshd[1369]: Server listening on :: port 22.
Sep  6 14:13:54 study (systemd)[1437]: pam_unix(systemd-user:session): session opened for user gdm(uid=42) by gdm(uid=0)
Sep  6 14:13:55 study gdm-launch-environment][1409]: pam_unix(gdm-launch-environment:session): session opened for user gdm(uid=42) by (uid=0)
Sep  6 16:29:09 study sshd-session[3340]: Accepted password for wmn from 10.0.0.1 port 64492 ssh2
Sep  6 16:29:09 study (systemd)[3346]: pam_unix(systemd-user:session): session opened for user wmn(uid=1000) by wmn(uid=0)
Sep  6 16:29:10 study sshd-session[3340]: pam_unix(sshd:session): session opened for user wmn(uid=1000) by wmn(uid=0)
Sep  6 16:30:13 study sudo[3402]:     wmn : TTY=pts/0 ; PWD=/home/wmn ; USER=root ; COMMAND=/bin/dnf install -y tree
Sep  6 16:30:13 study sudo[3402]: pam_unix(sudo:session): session opened for user root(uid=0) by wmn(uid=1000)
Sep  6 16:30:31 study sudo[3402]: pam_unix(sudo:session): session closed for user root
2)Ubuntu系统:
wmn@strudy:~/wmn-dir$ sudo tail /var/log/auth.log
[sudo: authenticate] 密码:
2026-09-06T16:37:35.436673+08:00 strudy sudo: wmn : TTY=/dev/pts/1 ; PWD=/home/wmn/\u{684c}\u{9762} ; USER=root ; COMMAND=/usr/bin/apt install tree
2026-09-06T16:37:43.598355+08:00 strudy sudo: pam_unix(sudo:session): session closed for user root
2026-09-06T16:39:51.872628+08:00 strudy pkexec: pam_unix(polkit-1:session): session opened for user root(uid=0) by wmn(uid=1000)
2026-09-06T16:39:51.877031+08:00 strudy pkexec[7572]: wmn: Executing command [USER=root] [TTY=unknown] [CWD=/home/wmn] [COMMAND=/usr/lib/update-notifier/package-system-locked]
2026-09-06T17:17:01.107600+08:00 strudy CRON[7831]: pam_unix(cron:session): session opened for user root(uid=0) by root(uid=0)
2026-09-06T17:17:01.121578+08:00 strudy CRON[7831]: pam_unix(cron:session): session closed for user root
2026-09-06T17:30:01.152332+08:00 strudy CRON[7934]: pam_unix(cron:session): session opened for user root(uid=0) by root(uid=0)
2026-09-06T17:30:01.162349+08:00 strudy CRON[7934]: pam_unix(cron:session): session closed for user root
2026-09-06T18:06:49.759820+08:00 strudy sudo: pam_unix(sudo:session): session opened for user root(uid=0) by wmn(uid=1000)
2026-09-06T18:06:49.762278+08:00 strudy sudo: wmn : TTY=/dev/pts/3 ; PWD=/home/wmn/wmn-dir ; USER=root ; COMMAND=/usr/bin/tail /var/log/auth.log
查看后5行服务器安全日志:
1)Ubuntu系统:
wmn@strudy:~/wmn-dir$ sudo tail -n 5 /var/log/auth.log
2026-09-06T18:06:49.759820+08:00 strudy sudo: pam_unix(sudo:session): session opened for user root(uid=0) by wmn(uid=1000)
2026-09-06T18:06:49.762278+08:00 strudy sudo: wmn : TTY=/dev/pts/3 ; PWD=/home/wmn/wmn-dir ; USER=root ; COMMAND=/usr/bin/tail /var/log/auth.log
2026-09-06T18:06:49.775257+08:00 strudy sudo: pam_unix(sudo:session): session closed for user root
2026-09-06T18:08:28.382217+08:00 strudy sudo: pam_unix(sudo:session): session opened for user root(uid=0) by wmn(uid=1000)
2026-09-06T18:08:28.382741+08:00 strudy sudo: wmn : TTY=/dev/pts/3 ; PWD=/home/wmn/wmn-dir ; USER=root ; COMMAND=/usr/bin/tail -n 5 /var/log/auth.log
2)rockyLinux系统:
wmn@study:~$ sudo tail -5  /var/log/secure
Sep  6 16:30:13 study sudo[3402]: pam_unix(sudo:session): session opened for user root(uid=0) by wmn(uid=1000)
Sep  6 16:30:31 study sudo[3402]: pam_unix(sudo:session): session closed for user root
Sep  6 18:07:16 study sudo[3658]:     wmn : TTY=pts/0 ; PWD=/home/wmn ; USER=root ; COMMAND=/bin/tail /var/log/secure
Sep  6 18:07:16 study sudo[3658]: pam_unix(sudo:session): session opened for user root(uid=0) by wmn(uid=1000)
Sep  6 18:07:16 study sudo[3658]: pam_unix(sudo:session): session closed for user root
实时查看系统的安全日志:
1)ubuntu:
wmn@strudy:~/wmn-dir$ sudo tail -f /var/log/auth.log
2026-09-06T18:10:35.649617+08:00 strudy sshd-session[8160]: Accepted password for wmn from 10.0.0.1 port 53804 ssh2
2026-09-06T18:10:35.654860+08:00 strudy sshd-session[8160]: pam_unix(sshd:session): session opened for user wmn(uid=1000) by wmn(uid=0)
2026-09-06T18:10:35.669171+08:00 strudy systemd-logind[1524]: New session '14' of user 'wmn' with class 'user' and type 'tty'.
2)rockyLinux:
wmn@study:~$ sudo tail -f /var/log/secure
Sep  6 18:11:59 study sshd-session[3688]: Accepted password for wmn from 10.0.0.1 port 53917 ssh2
Sep  6 18:11:59 study sshd-session[3688]: pam_unix(sshd:session): session opened for user wmn(uid=1000) by wmn(uid=0)
3.2.2.4.4 grep根据关键字查找文件
grep是Linux系统中的三剑客之一,它是根据关键字进行搜索文件内容。
- 常用参数:
| 选项参数 | 说明 |
|---|---|
| -i | 忽略大小写 |
| -C | 显示根据匹配关键字的行及上下各几行内容 |
| -c | 统计根据关键字匹配的行数 |
- 例子:
搜索包含fail的行:
wmn@strudy:~/wmn-dir$ grep "fail" /var/log/auth.log
2026-09-06T18:22:08.518674+08:00 strudy unix_chkpwd[8326]: password check failed for user (wmn)
2026-09-06T18:22:08.521514+08:00 strudy sudo: pam_unix(sudo:auth): authentication failure; logname=wmn uid=1000 euid=0 tty=/dev/pts/5 ruser=wmn rhost=  user=wmn
wmn@strudy:~/wmn-dir$ grep "fail" /var/log/auth.log
2026-09-06T18:22:08.518674+08:00 strudy unix_chkpwd[8326]: password check failed for user (wmn)
2026-09-06T18:22:08.521514+08:00 strudy sudo: pam_unix(sudo:auth): authentication failure; logname=wmn uid=1000 euid=0 tty=/dev/pts/5 ruser=wmn rhost=  user=wmn
2026-09-06T18:22:25.041572+08:00 strudy unix_chkpwd[8328]: password check failed for user (wmn)
2026-09-06T18:22:30.120994+08:00 strudy unix_chkpwd[8334]: password check failed for user (wmn)
2026-09-06T18:22:30.123707+08:00 strudy sudo: pam_unix(sudo:auth): authentication failure; logname=wmn uid=1000 euid=0 tty=/dev/pts/5 ruser=wmn rhost=  user=wmn
2026-09-06T18:22:32.142762+08:00 strudy unix_chkpwd[8335]: password check failed for user (wmn)
2026-09-06T18:22:34.508912+08:00 strudy unix_chkpwd[8336]: password check failed for user (wmn)
搜索远程登录服务器成功的日志:
wmn@strudy:~/wmn-dir$ grep -i "accepted" /var/log/auth.log
2026-09-05T12:06:14.196261+08:00 strudy sshd-session[5907]: Accepted password for wmn from 10.0.0.1 port 58489 ssh2
2026-09-05T12:10:45.585713+08:00 strudy sshd-session[6116]: Accepted password for wmn from 10.0.0.1 port 59098 ssh2
2026-09-05T12:16:26.682227+08:00 strudy sshd-session[6280]: Accepted password for wmn from 10.0.0.1 port 59547 ssh2
2026-09-06T16:03:47.101874+08:00 strudy sshd-session[6753]: Accepted password for wmn from 10.0.0.1 port 62817 ssh2
2026-09-06T18:10:35.649617+08:00 strudy sshd-session[8160]: Accepted password for wmn from 10.0.0.1 port 53804 ssh2
显示匹配行的上下3行:
wmn@strudy:~/wmn-dir$ grep -C 3 -i "fail" /var/log/auth.log
2026-09-05T11:54:22.910584+08:00 strudy systemd-logind[1441]: Session c1 logged out. Waiting for processes to exit.
2026-09-05T11:54:22.914136+08:00 strudy systemd-logind[1441]: Removed session c1.
2026-09-05T11:54:33.231921+08:00 strudy systemd-logind[1441]: Removed session 1.
2026-09-05T12:00:30.558291+08:00 strudy dbus-daemon[1386]: [system] Failed to activate service 'org.bluez': timed out (service_start_timeout=25000ms)
2026-09-05T12:01:23.173641+08:00 strudy sudo: pam_unix(sudo:session): session opened for user root(uid=0) by wmn(uid=1000)
2026-09-05T12:01:23.174809+08:00 strudy sudo: wmn : TTY=/dev/pts/2 ; PWD=/home/wmn/\u{684c}\u{9762} ; USER=root ; COMMAND=/usr/bin/apt install openssh-server
2026-09-05T12:01:37.374834+08:00 strudy sudo: pam_unix(sudo:session): session closed for user root
--
2026-09-06T14:42:50.453638+08:00 strudy systemd-logind[1524]: Session c1 logged out. Waiting for processes to exit.
2026-09-06T14:42:50.460627+08:00 strudy systemd-logind[1524]: Removed session c1.
2026-09-06T14:43:00.869770+08:00 strudy systemd-logind[1524]: Removed session 1.
2026-09-06T14:45:38.375766+08:00 strudy dbus-daemon[1451]: [system] Failed to activate service 'org.bluez': timed out (service_start_timeout=25000ms)
2026-09-06T15:17:01.917129+08:00 strudy CRON[6077]: pam_unix(cron:session): session opened for user root(uid=0) by root(uid=0)
2026-09-06T15:17:01.927511+08:00 strudy CRON[6077]: pam_unix(cron:session): session closed for user root
2026-09-06T15:30:01.959497+08:00 strudy CRON[6134]: pam_unix(cron:session): session opened for user root(uid=0) by root(uid=0)
--
2026-09-06T18:10:57.486197+08:00 strudy sudo: pam_unix(sudo:session): session closed for user root
2026-09-06T18:17:01.211230+08:00 strudy CRON[8308]: pam_unix(cron:session): session opened for user root(uid=0) by root(uid=0)
2026-09-06T18:17:01.219662+08:00 strudy CRON[8308]: pam_unix(cron:session): session closed for user root
2026-09-06T18:22:08.518674+08:00 strudy unix_chkpwd[8326]: password check failed for user (wmn)
2026-09-06T18:22:08.521514+08:00 strudy sudo: pam_unix(sudo:auth): authentication failure; logname=wmn uid=1000 euid=0 tty=/dev/pts/5 ruser=wmn rhost=  user=wmn
2026-09-06T18:22:25.041572+08:00 strudy unix_chkpwd[8328]: password check failed for user (wmn)
2026-09-06T18:22:30.120994+08:00 strudy unix_chkpwd[8334]: password check failed for user (wmn)
2026-09-06T18:22:30.123707+08:00 strudy sudo: pam_unix(sudo:auth): authentication failure; logname=wmn uid=1000 euid=0 tty=/dev/pts/5 ruser=wmn rhost=  user=wmn
2026-09-06T18:22:32.142762+08:00 strudy unix_chkpwd[8335]: password check failed for user (wmn)
2026-09-06T18:22:34.508912+08:00 strudy unix_chkpwd[8336]: password check failed for user (wmn)
统计匹配行数:
wmn@strudy:~/wmn-dir$ grep -c "fail" /var/log/auth.log
7
wmn@strudy:~/wmn-dir$ grep -c  -i "accepted" /var/log/auth.log
5
实战中常用的组合:从最近安全日志中找登录失败的日志:
wmn@strudy:~/wmn-dir$ tail -100 /var/log/auth.log |grep "fail"
2026-09-06T18:22:08.518674+08:00 strudy unix_chkpwd[8326]: password check failed for user (wmn)
2026-09-06T18:22:08.521514+08:00 strudy sudo: pam_unix(sudo:auth): authentication failure; logname=wmn uid=1000 euid=0 tty=/dev/pts/5 ruser=wmn rhost=  user=wmn
2026-09-06T18:22:25.041572+08:00 strudy unix_chkpwd[8328]: password check failed for user (wmn)
2026-09-06T18:22:30.120994+08:00 strudy unix_chkpwd[8334]: password check failed for user (wmn)
2026-09-06T18:22:30.123707+08:00 strudy sudo: pam_unix(sudo:auth): authentication failure; logname=wmn uid=1000 euid=0 tty=/dev/pts/5 ruser=wmn rhost=  user=wmn
2026-09-06T18:22:32.142762+08:00 strudy unix_chkpwd[8335]: password check failed for user (wmn)
2026-09-06T18:22:34.508912+08:00 strudy unix_chkpwd[8336]: password check failed for user (wmn)
3.2.2.3 辅助命令
3.2.2.3.1 type(查找命令的类型)
命令分类:
命令分为内置命令、外部程序、别名、函数、关键字等。
内置命令: 它执行比较快,当运行shell时候就把命令加入到了内存中。
外部程序:外部程序命令是需要安装的,执行外部程序命令先去从PATH环境变量中查找命令是否存在,如果存在就加入内存中进行执行,执行速度比较慢。
别名alias: 就是给命令提了个另外一个名字,执行速度比较快。
查找设置别名方式:
1)查找别名:
wmn@strudy:~$ alias
alias alert='notify-send --urgency=low -i "$([ $? = 0 ] && echo terminal || echo error)" "$(history|tail -n1|sed -e '\''s/^\s*[0-9]\+\s*//;s/[;&|]\s*alert$//'\'')"'
alias egrep='egrep --color=auto'
alias fgrep='fgrep --color=auto'
alias grep='grep --color=auto'
alias l='ls -CF'
alias la='ls -A'
alias ll='ls -alF'
alias ls='ls --color=auto'
2)添加别名:
临时添加:
wmn@strudy:~$ alias w='ls -l /etc/passwd'
wmn@strudy:~$ w
-rw-r--r-- 1 root root 2818 Sep  5 12:01 /etc/passwd
查看命令类型:
查看内置命令:
wmn@srudy:~$ type cd
cd is a shell builtin
查看外部程序指令:
wmn@srudy:~$ type -a  passwd
passwd is /usr/bin/passwd
passwd is /bin/passwd
查看别名:
wmn@srudy:~$ type ls
ls is aliased to `ls --color=auto'
查看关键字指令:
wmn@srudy:~$ type for
for is a shell keyword
3.2.2.3.2 file(查看文件真实类型)
文件类型:
在Linux中文件不依赖扩展名来区分文件类型的,主要还是看文件真实情况。
文件类型分为: 文本文件、目录文件、二进制文件、块设备文件、字符设备文件等。
- 例子:
查看文本文件类型:
wmn@srudy:~$ file /etc/passwd
/etc/passwd: ASCII text
查看二进制文件:
wmn@study:~$ file /usr/bin/ls
/usr/bin/ls: ELF 64-bit LSB pie executable, x86-64, version 1 (SYSV), dynamically linked, interpreter /lib64/ld-linux-x86-64.so.2, BuildID[sha1]=26a58fc999a5e6368b74d9a33da93e996ff5800f, for GNU/Linux 3.2.0, stripped
查看目录属性:
wmn@study:~$ file /usr
/usr: directory
查看块设备属性:
wmn@study:~$ file /dev/sda
/dev/sda: block special (8/0)
查看字符设备属性:
wmn@study:~$ file /dev/tty
/dev/tty: character special (5/0)
3.2.2.3.3 which(查看命令所在的位置)
查看cd命令所在的路径:
wmn@study:~$ which cd
/usr/bin/cd
3.2.2.4 文件类型与inode
3.2.2.4.1 使用ls查看到文件类型
使用ls -l 查看的第一个字符是文件类型字符,分别是:
| 首字符 | 文件类型 | 示例 |
|---|---|---|
| - | 普通文件类型 | /etc/passwd |
| d | 目录文件类型 | /etc/ |
| l | 软链接文件类型 | system-release -> rocky-release |
| b | 块设备文件类型 | /dev/sda |
| c | 字符设备文件类型 | /dev/tty |
3.2.2.4.2 inode
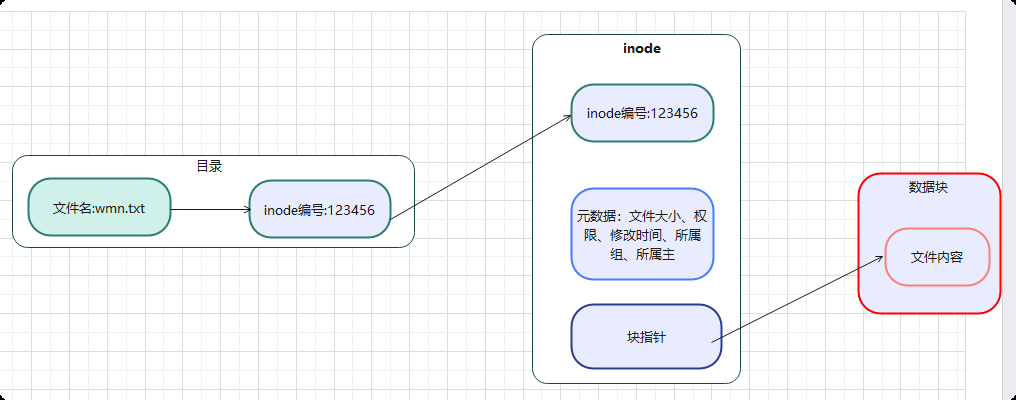
inode是文件的身份证,链接文件名与块数据的主要桥梁,主要记录文件的元数据(文件大小、权限、修改时间、数据块的位置)。
inode有inode编号的,通过ls -i 查看到文件的inode编号,inode编号和文件名是存放在上一级目录中,注意:inode号在同一分区里是唯一的。
查看文件内容原理:
- 文件名和文件inode编号在上一级目录中记录,并且形成对应关系。
- 当我们查看或修改文件内容,通过文件名与inode编号找到对应的inode数据。
- 通过查看inode的数据,确认是否有权限进行文件进行操作。
- 当有权限操作,通过块指针,查找到对应的数据进行对文件进行操作。
查看inode号:
wmn@study:~$ ls -i wmn.txt
145 wmn.txt
wmn@study:~$ ls -il wmn.txt
145 -rw-r--r--. 1 wmn wmn 0 Sep  7 16:59 wmn.txt
#说明:
3.2.4.3 硬链接与软链接
3.2.4.3.1 硬链接
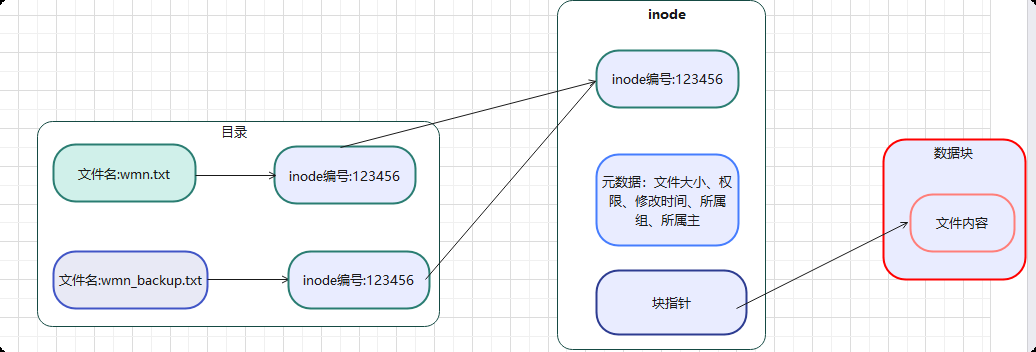
硬链接的特点:
- 硬链接是创建不同文件名,但是使用同一个数据块文件内容的文件,硬链接文件的inode号相同。
- 删除一个文件,另外文件不受影响。
- 修改一个文件内容,其他文件内容也跟着一起使用。
- 硬链接不能是目录,不能跨分区做硬链接。
- 硬链接文件不占用空间,只有一个文件内容占用空间。
硬链接操作:
1)创建硬链接:
wmn@study:~$ ln wmn.txt wmn_backup.txt
wmn@study:~$ ls -li *.txt
145 -rw-r--r--. 2 wmn wmn 0 Sep  7 16:59 wmn.txt
145 -rw-r--r--. 2 wmn wmn 0 Sep  7 16:59 wmn_backup.txt
                这个是硬链接数量
2)修改文件内容:
wmn@study:~$ vim wmn.txt
wmn
222
333
3)查看另一个文件内容是否修改: 也跟着修改
wmn@study:~$ cat wmn_backup.txt
wmn
222
333
4)删除一个,另一个会不会受影响:另外一个文件不受影响。
wmn@study:~$ rm wmn_backup.txt
wmn@study:~$ ls *.txt
wmn.txt
wmn@study:~$ cat wmn.txt
wmn
222
333
5)是否能对目录做硬链接:
wmn@study:~$ ln wmn_dir wmn_dir2
ln: wmn_dir: hard link not allowed for directory
6)是否能跨分区做硬链接:
wmn@study:~$ sudo ln wmn.txt /wmn.txt
ln: failed to create hard link '/wmn.txt' => 'wmn.txt': Invalid cross-device link
3.2.4.3.2 软链接
软链接相当于Windows系统中的快捷方式,在生产环境中软链接链接的源文件要用绝对路径。
软链接原理:
- 当我们创建软链接,重新创建个文件,inode号和文件名都和原文件不一样,是一个新的文件。
- 但是软链接文件的数据块内容存放的是原文件路径。
- 当我们访问软链接文件内容,直接跳到原文件数据块中,读取原文件内容。
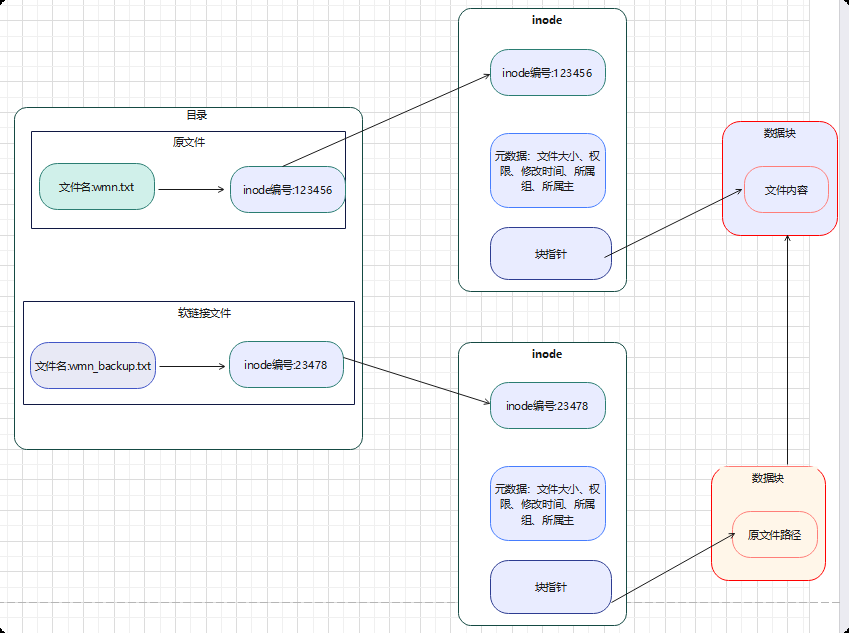
软链接例子:
1)创建软链接:
wmn@study:~$ ln -s /home/wmn/wmn.txt wmn_backup.txt
wmn@study:~$ ls -l *.txt
-rw-r--r--. 2 wmn wmn 12 Sep  7 17:17 wmn.txt
lrwxrwxrwx. 1 wmn wmn 17 Sep  7 17:39 wmn_backup.txt -> /home/wmn/wmn.txt
2)创建个目录软链接:
wmn@study:~$ ln -s /home/wmn/wmn_dir wmn_dir_backup
wmn@study:~$ ls -ld wmn_dir*
drwxr-xr-x. 2 wmn wmn  6 Sep  7 17:20 wmn_dir
lrwxrwxrwx. 1 wmn wmn 17 Sep  7 17:40 wmn_dir_backup -> /home/wmn/wmn_dir
3)跨分区创建软链接:
wmn@study:~$ sudo ln -s /home/wmn/wmn_dir /wmn_dir_backup
[sudo] password for wmn:
wmn@study:~$ sudo ls -ld /wmn_dir_backup
lrwxrwxrwx. 1 root root 17 Sep  7 17:42 /wmn_dir_backup -> /home/wmn/wmn_dir
4)删除原文件是否影响软链接:
wmn@study:~$ rm wmn.txt
wmn@study:~$ ls -l wmn_backup.txt
lrwxrwxrwx. 1 wmn wmn 17 Sep  7 17:39 wmn_backup.txt -> /home/wmn/wmn.txt
wmn@study:~$ cat wmn_backup.txt
cat: wmn_backup.txt: No such file or directory
3.2.4.3.3 硬链接与软链接对比
| 对比 | 软链接 | 硬链接 |
|---|---|---|
| inode | 和源文件不同inode号 | 同一个inode号,同一个数据块 |
| 删除原文件 | 会受到影响 | 不受影响 |
| 目录操作 | 可以给目录做链接 | 不能给目录做链接 |
| 跨分区 | 可以跨分区做链接 | 不可以跨分区做链接 |
| 修改内容 | 修改内容跟着改变 | 修改内容跟着改变 |
| 用途 | 主要用于配置文件备份,防止误删除 | 主要用于版本切换、日志统一路径 |
3.2.2.5 压缩与归档
Linux指令一般用于对文件目录进行归档和压缩,常用的选项:
| 选项 | 说明 |
|---|---|
| c | 创建归档 |
| v | 显示创建的信息 |
| f | 指定文件目录名 |
| x | 解包 |
| z | 以gzip压缩形式进行压缩文件目录 |
| j | 以bzip2压缩形式进行压缩文件目录 |
| J | 以xz压缩形式进行压缩文件目录 |
| a | 根据压缩后缀名,自动选择使用压缩形式 |
| -C | 解压到指定目录 |
| -t | 查看归档的内容 |
压缩形式对比:
| 压缩形式 | 压缩比率 | 压缩速度 | 用途 |
|---|---|---|---|
| gzip | 中等 | 快 | 主要用于日志文件归档使用 |
| bzip2 | 高 | 慢 | 不建议使用 |
| xz | 较高 | 较慢 | 主要用于备份使用,因为压缩比率比较高 |
归档实例:
把/etc目录归档到当前目录下:
wmn@study:~$ sudo tar cf etc.tar /etc
[sudo] password for wmn:
tar: Removing leading `/' from member names
wmn@study:~$ ls *.tar
etc.tar
wmn@study:~$ ls  -l *.tar
-rw-r--r--. 1 root root 27146240 Sep  7 18:02 etc.tar
查看归档内容:
wmn@study:~$ tar tf etc.tar
解包归档的内容:
wmn@study:~$ tar xf etc.tar
wmn@study:~$ ls etc
DIR_COLORS               crypto-policies       group           lvm                       profile                 subgid
DIR_COLORS.lightbgcolor  crypttab              group-          machine-id                profile.d               subgid-
解包到指定的位置:
wmn@study:~$ tar xf etc.tar -C /tmp/
wmn@study:~$ ls /tmp/etc/
DIR_COLORS               crypto-policies       group           lvm                       profile                 subgid
DIR_COLORS.lightbgcolor  crypttab              group-          machine-id                profile.d               subgid-
压缩实例:
使用gzip方式进行压缩:
wmn@strudy:~$ sudo tar zcf etc_gz.tar.gz /etc
tar: 从成员名中删除开头的“/”

wmn@strudy:~$ ls -lh etc_gz.tar.gz
-rw-r--r-- 1 root root 1.3M Sep  7 18:10 etc_gz.tar.gz
使用bzip2方式进行压缩:
需要安装bzip2安装包:
wmn@strudy:~$ sudo apt install bzip2 -y
进行压缩:
wmn@strudy:~$ sudo tar cjf etc_bzip2.tar.bz2 /etc
tar: 从成员名中删除开头的“/”
wmn@strudy:~$ ls -lh etc_bzip2.tar.bz2
-rw-r--r-- 1 root root 1.1M Sep  7 18:12 etc_bzip2.tar.bz2
使用xz的方式进行压缩:
wmn@strudy:~$ sudo tar cJf etc_xz.tar.xz /etc
tar: 从成员名中删除开头的“/”
wmn@strudy:~$ ls -lh etc_xz.tar.xz
-rw-r--r-- 1 root root 894K Sep  7 18:13 etc_xz.tar.xz
根据后缀名自动选择压缩的方式:
wmn@strudy:~/yasuo$ sudo tar caf etc.tar.gz /etc
tar: 从成员名中删除开头的“/”
wmn@strudy:~/yasuo$ ls -lh etc.tar.gz
-rw-r--r-- 1 root root 1.3M Sep  7 18:18 etc.tar.gz
wmn@strudy:~/yasuo$ sudo tar caf etc.tar.bz2 /etc
tar: 从成员名中删除开头的“/”
wmn@strudy:~/yasuo$ ls -lh etc.tar.bz2
-rw-r--r-- 1 root root 1.1M Sep  7 18:18 etc.tar.bz2
wmn@strudy:~/yasuo$ sudo tar caf etc.tar.xz /etc
tar: 从成员名中删除开头的“/”
wmn@strudy:~/yasuo$ ls -lh etc.tar.xz
-rw-r--r-- 1 root root 894K Sep  7 18:18 etc.tar.xz
解压:不管压缩什么方式,直接使用xf就可解压:
wmn@strudy:~/yasuo$ tar xf etc.tar.bz2
wmn@strudy:~/yasuo$ ls
etc  etc.tar.bz2  etc.tar.gz  etc.tar.xz

wmn@strudy:~/yasuo$ tar xf etc.tar.xz -C /tmp/
wmn@strudy:~/yasuo$ ls /tmp/
etc

wmn@strudy:~/yasuo$ tar xf etc.tar.xz -C /var/tmp/
wmn@strudy:~/yasuo$ ls /var/tmp/
etc
3.2.2.6 vim使用
vim是vi编辑器的升级版,主要用来对文件的修改等使用。vim分为三种模式,分别是:command(命令模式)、编辑模式(插入模式)、扩展命令模式。默认的是命令模式。
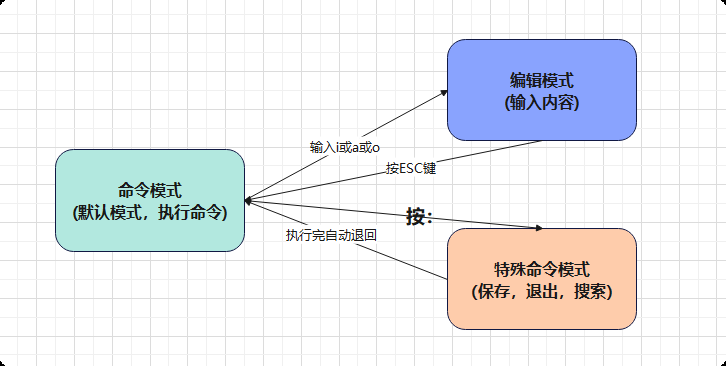
在命令模式常用操作
| 按键 | 作用 |
|---|---|
| i | 进入插入模式,在光标所在的位置进行编辑 |
| a | 进入插入模式,光标所在的位置后移一位进行编辑 |
| o | 进入插入模式,向下插入一行进行编辑 |
| : | 进入特殊插入模式 |
| G | 跳转到最后一行 |
| gg | 跳转到第一行 |
| dd | 删除(剪切)光标所在的行,3dd:删除光标所在的下两行,包括光标所在的行 |
| yy | 复制光标所在的行,3yy:复制光标所在下两行,包括光标所在的行 |
| p | 复制 |
| $ | 跳转到行尾 |
| 0 | 跳转到行首 |
| u | 撤到上一次操作 |
| / | 搜索关键字,按n搜索下一个,按回车,跳到搜索的位置 |
扩展命令模式操作
| 按键 | 说明 |
|---|---|
| : set nu | 设置行号 |
| :set nonu | 取消设置行号 |
| :w | 保存 |
| :q | 退出 |
| :wq | 保存并退出 |
| ! | 强制。wq! :强制保存并退出,q!: 强制退出,x!:强制保存并退出 |
| x | 保存并且退出 |
| :set cuc | 高亮光标所在的列,用于格式内容对齐 |
| :set cul | 高亮光标所在的行,不建议使用 |
| :%s#新内容#替换的内容#g | 全局替换。5,10s#新内容#替换内容#g:5到10行进行替换。5,10s#新内容#替换内容#:替换5到10行的首字符 |
3.2.2.7 若依实战项目:
创建标准化目录:
wmn@strudy:~/yasuo$ cd /opt/
wmn@strudy:/opt$ ls
wmn@strudy:/opt$ sudo mkdir -p ruoyi/{backend,frontend,logs,config,backup}
[sudo: authenticate] 密码:
wmn@strudy:/opt$ ls
ruoyi
wmn@strudy:/opt$ tree ruoyi
ruoyi
├── backend
├── backup
├── config
├── frontend
└── logs

6 directories, 0 files
创建配置文件模板:
wmn@strudy:/opt$ sudo vim ruoyi/config/application.yaml
wmn@strudy:/opt$ cat ruoyi/config/application.yaml
spring:
  application:
    name: ruoyi-admin
  profiles:
    active: druid

server:
  port: 8080
硬链接保护配置文件:
wmn@strudy:/opt$ sudo ln /opt/ruoyi/config/application.yaml /opt/ruoyi/config/application_backup.yaml
wmn@strudy:/opt$ ls -li /opt/ruoyi/config/application*
3282990 -rw-r--r-- 2 root root 97 Sep  7 21:03 /opt/ruoyi/config/application.yaml
3282990 -rw-r--r-- 2 root root 97 Sep  7 21:03 /opt/ruoyi/config/application_backup.yaml
软链接统一日志路径
wmn@strudy:/opt$ sudo ln -s /opt/ruoyi/logs /var/log/ruoyi
wmn@strudy:/opt$ ls -l /var/log/ruoyi
lrwxrwxrwx 1 root root 15 Sep  7 21:06 /var/log/ruoyi -> /opt/ruoyi/logs
压缩归档日志
wmn@strudy:/opt$ sudo tar zcf /opt/ruoyi/backup/ruoyi-logs-`date +%F`.tar.gz ruoyi/logs
wmn@strudy:/opt$ ls -l /opt/ruoyi/backup/
total 4
-rw-r--r-- 1 root root 117 Sep  7 21:08 ruoyi-logs-2026-09-07.tar.gz
wmn@strudy:/opt$ sudo tar tf /opt/ruoyi/backup/ruoyi-logs-2026-09-07.tar.gz
ruoyi/logs/
posted on 2026-09-12 15:10 wangmengnan 阅读(9) 评论(0) 收藏 举报


 浙公网安备 33010602011771号