
Reveal详细安装教程
Reveal的详细安装使用
标签: Reveal 工具 调试 iOS
一、终端的操作
- 首先最重要的一点,要先把Reveal软件放到Application中,否则路径是错的,后面的设置也就没有作用了
- 打开终端,输入
vim ~/.lldbinit - 接着输入
command alias reveal_load_sim expr (void*)dlopen("/Applications/Reveal.app/Contents/SharedSupport/iOS-Libraries/libReveal.dylib", 0x2);
command alias reveal_load_dev expr (void*)dlopen([(NSString*)[(NSBundle*)[NSBundle mainBundle]               pathForResource:@"libReveal" ofType:@"dylib"] cStringUsingEncoding:0x4], 0x2);
command alias reveal_start expr (void)[(NSNotificationCenter*)[NSNotificationCenter defaultCenter]           postNotificationName:@"IBARevealRequestStart" object:nil];
command alias reveal_stop expr (void)[(NSNotificationCenter*)[NSNotificationCenter defaultCenter]            postNotificationName:@"IBARevealRequestStop" object:nil];
- 此时终端属于 insert 状态 按
ESC退出插入状态 - 接下来 就要退出终端了
shift+q键入命令行状态 - 在终端输入
wq即保存退出
二、xcode内的设置
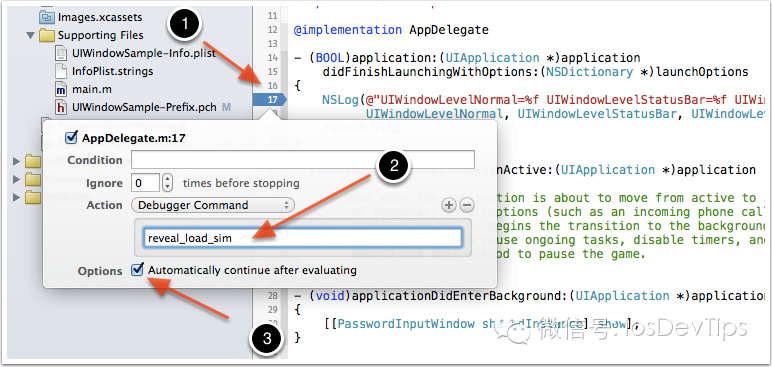
- 点击该方法左边的行号区域,增加一个断点,之后右击该断点,选择
Edit Breakpoint - 点击
Action项边右的Add Action,然后输入reveal_load_sim - 勾选上
Options上的Automatically continue after evaluating选项 如下图
![Reveal设置图片]()
三、见证神奇的时刻
现在我们可以运行模拟器,然后打开Reveal,就可以在Reveal界面的左上角,看到有模拟器可以连接调试,选择它,则可以在Reveal中查看和调试该iOS程序的界面了。

 浙公网安备 33010602011771号