Django + Uwsgi + Nginx 实现生产环境部署
Django + Uwsgi + Nginx 实现生产环境部署
uWSGI
是一个web服务器,也可以当做中间件
- 如果是Nginx+uWSGI+APP,那就是一个中间件
- 如果是uWSGI+APP,那它就是服务器
WSGI
是一个Python专有的web协议
web协议的发展历程是(Python):
CGI>>FCGI>>WSGI>>uwsgi
- CGI:Common Gateway
Interface,通用网关接口,是一个协议,是外部应用程序(CGI应用程序)与web服务器之间的标准接口,该协议定义了web服务器调用外部应用程序的时候需要输入的参数和给web服务器的返回结果 - FCGI:很明显,就是比CGI更快的CGI。CGI的特点是对于一个HTTP请求就新建一个进程,等到应用程序返回结果后就结束这个进程,这就导致了如果有多个请求就会频繁的创建进程而产生很大的开销,影响服务器的性能。而FCGI就像MYSQL连接池一样,在服务器启动的时候就新建多个空闲的进程,当有请求的时候就分配给一个空闲的进程,这样就避免了频繁的创建进程而导致的大开销。FCGI的另一个特点就是支持分布式,也就是服务器和应用程序可以在不同的机器上
- WSGI:WEB SERVER GATESAY
INTERFACE,web服务器网关接口,它是Python专有的处理web服务器和应用程序的协议,像我现在使用的Django就自带这个,其中我们新建程序的时候有个wsgi.py就是一个WSGI兼容的web服务器的入口,在Python的很多框架中都自带这个协议,但是性能不好(我也不懂这个性能是指什么),只做测试用途 - uwsgi:这个是uWSGI中自有的一个协议
Nginx
Nginx是一个Http和反向代理服务器
什么是反向代理服务器呢?
- 正向的就是由浏览器主动的想代理服务器发出请求,经代理服务器做出处理后再转给目标服务器
- 反向的就是不管浏览器同不同意,请求都会经过代理服务器处理再发给目标服务器
这其中的区别就是必须经过Nginx反向代理服务器,这就有了使用Nginx的几个好处:
- 安全:不管什么请求都要经过代理服务器,这样就避免了外部程序直接攻击web服务器
- 负载均衡:根据请求情况和服务器负载情况,将请求分配给不同的web服务器,保证服务器性能
- 提高web服务器的IO性能:这个我也没看懂,总结来说就是请求从客户端传到web服务器是需要时间的,传递多长时间就会让这个进程阻塞多长时间,而通过反向代理,就可以在反向代理这完整接受请求,然后再传给web服务器,从而保证服务器性能,而且有的一些简单的事情(比如静态文件)可以直接由反向代理处理,不经过web服务器
另外Nginx还是电子邮件(IMAP/POP3)代理服务器
下面就是有Nginx的架构 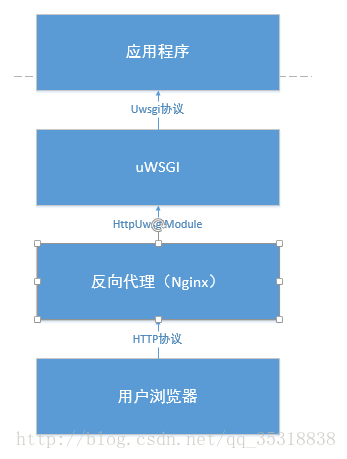
其中Nginx和uWSGI的可以通过uwsgi通信
总结
回到之前的问题
1.为什么不只用WSGI?
2.为什么用了uWSGI还要加个Nginx
第一,因为WSGI相对来说性能不照,测试还行,要是正是发布,百来个人一点就歇菜了;
第二,虽然有了uWSGi这个web服务器,但是加上Nginx就会让服务器更安全、性能更有保障,还能作为电子邮件代理服务器。
本节内容
uwsgi 介绍
uwsgi安装使用
nginx安装配置
django with nginx
如何在生产上部署Django?
Django的部署可以有很多方式,采用nginx+uwsgi的方式是其中比较常见的一种方式。
uwsgi介绍
uWSGI是一个Web服务器,它实现了WSGI协议、uwsgi、http等协议。Nginx中HttpUwsgiModule的作用是与uWSGI服务器进行交换。
要注意 WSGI / uwsgi / uWSGI 这三个概念的区分。
- WSGI是一种Web服务器网关接口。它是一个Web服务器(如nginx,uWSGI等服务器)与web应用(如用Flask框架写的程序)通信的一种规范。
- uwsgi是一种线路协议而不是通信协议,在此常用于在uWSGI服务器与其他网络服务器的数据通信。
- 而uWSGI是实现了uwsgi和WSGI两种协议的Web服务器。
- uwsgi协议是一个uWSGI服务器自有的协议,它用于定义传输信息的类型(type of information),每一个uwsgi packet前4byte为传输信息类型描述,它与WSGI相比是两样东西。
uwsgi性能非常高

uWSGI的主要特点如下
- 超快的性能
- 低内存占用(实测为apache2的mod_wsgi的一半左右)
- 多app管理(终于不用冥思苦想下个app用哪个端口比较好了-.-)
- 详尽的日志功能(可以用来分析app性能和瓶颈)
- 高度可定制(内存大小限制,服务一定次数后重启等)
总而言之uwgi是个部署用的好东东,正如uWSGI作者所吹嘘的:
If you are searching for a simple wsgi-only server, uWSGI is not for you, but if you are building a real (production-ready) app that need to be rock-solid, fast and easy to distribute/optimize for various load-average, you will pathetically and morbidly fall in love (we hope) with uWSGI.
Uwsgi 安装使用
|
1
2
3
4
|
# Install the latest stable release:pip install uwsgi# ... or if you want to install the latest LTS (long term support) release,pip install https://projects.unbit.it/downloads/uwsgi-lts.tar.gz |
基本测试
Create a file called test.py:
|
1
2
3
4
5
|
# test.pydef application(env, start_response): start_response('200 OK', [('Content-Type','text/html')]) return [b"Hello World"] # python3 #return ["Hello World"] # python2 |
运行
|
1
|
uwsgi --http :8000 --wsgi-file test.py |
用uwsgi 启动django
|
1
|
uwsgi --http :8000 --module mysite.wsgi |
可以把参数写到配置文件里
|
1
2
3
4
5
6
7
8
9
10
11
12
13
14
15
16
17
18
19
20
|
alex@alex-ubuntu:~/uwsgi-test$ more crazye-uwsgi.ini [uwsgi]http = :9000#the local unix socket file than commnuincate to Nginxsocket = 127.0.0.1:8001# the base directory (full path)chdir = /home/alex/CrazyEye # Django's wsgi filewsgi-file = CrazyEye/wsgi.py# maximum number of worker processesprocesses = 4#thread numbers startched in each worker processthreads = 2#monitor uwsgi status stats = 127.0.0.1:9191# clear environment on exitvacuum = true |
启动
|
1
|
/usr/local/bin/uwsgi crazye-uwsgi.ini |
Nginx安装使用
|
1
2
|
sudo apt-get install nginxsudo /etc/init.d/nginx start # start nginx |
为你的项目生成Nginx配置文件
You will need the uwsgi_params file, which is available in the nginx directory of the uWSGI distribution, or from https://github.com/nginx/nginx/blob/master/conf/uwsgi_params
Copy it into your project directory. In a moment we will tell nginx to refer to it.
Now create a file called mysite_nginx.conf, and put this in it:
|
1
2
3
4
5
6
7
8
9
10
11
12
13
14
15
16
17
18
19
20
21
22
23
24
25
26
27
28
29
30
31
32
33
34
|
# mysite_nginx.conf# the upstream component nginx needs to connect toupstream django { # server unix:///path/to/your/mysite/mysite.sock; # for a file socket server 127.0.0.1:8001; # for a web port socket (we'll use this first)}# configuration of the serverserver { # the port your site will be served on listen 8000; # the domain name it will serve for server_name .example.com; # substitute your machine's IP address or FQDN charset utf-8; # max upload size client_max_body_size 75M; # adjust to taste # Django media location /media { alias /path/to/your/mysite/media; # your Django project's media files - amend as required } location /static { alias /path/to/your/mysite/static; # your Django project's static files - amend as required } # Finally, send all non-media requests to the Django server. location / { uwsgi_pass django; include /path/to/your/mysite/uwsgi_params; # the uwsgi_params file you installed }} |
This conf file tells nginx to serve up media and static files from the filesystem, as well as handle requests that require Django’s intervention. For a large deployment it is considered good practice to let one server handle static/media files, and another handle Django applications, but for now, this will do just fine.
Symlink to this file from /etc/nginx/sites-enabled so nginx can see it:
|
1
|
sudo ln -s ~/path/to/your/mysite/mysite_nginx.conf /etc/nginx/sites-enabled/ |
Deploying static files
Before running nginx, you have to collect all Django static files in the static folder. First of all you have to edit mysite/settings.py adding:
|
1
|
STATIC_ROOT = os.path.join(BASE_DIR, "static/") |
and then run
|
1
|
python manage.py collectstatic |
此时启动Nginx 和Uwsgi,你的django项目就可以实现高并发啦!


 浙公网安备 33010602011771号