django项目定时任务celery
实际应用
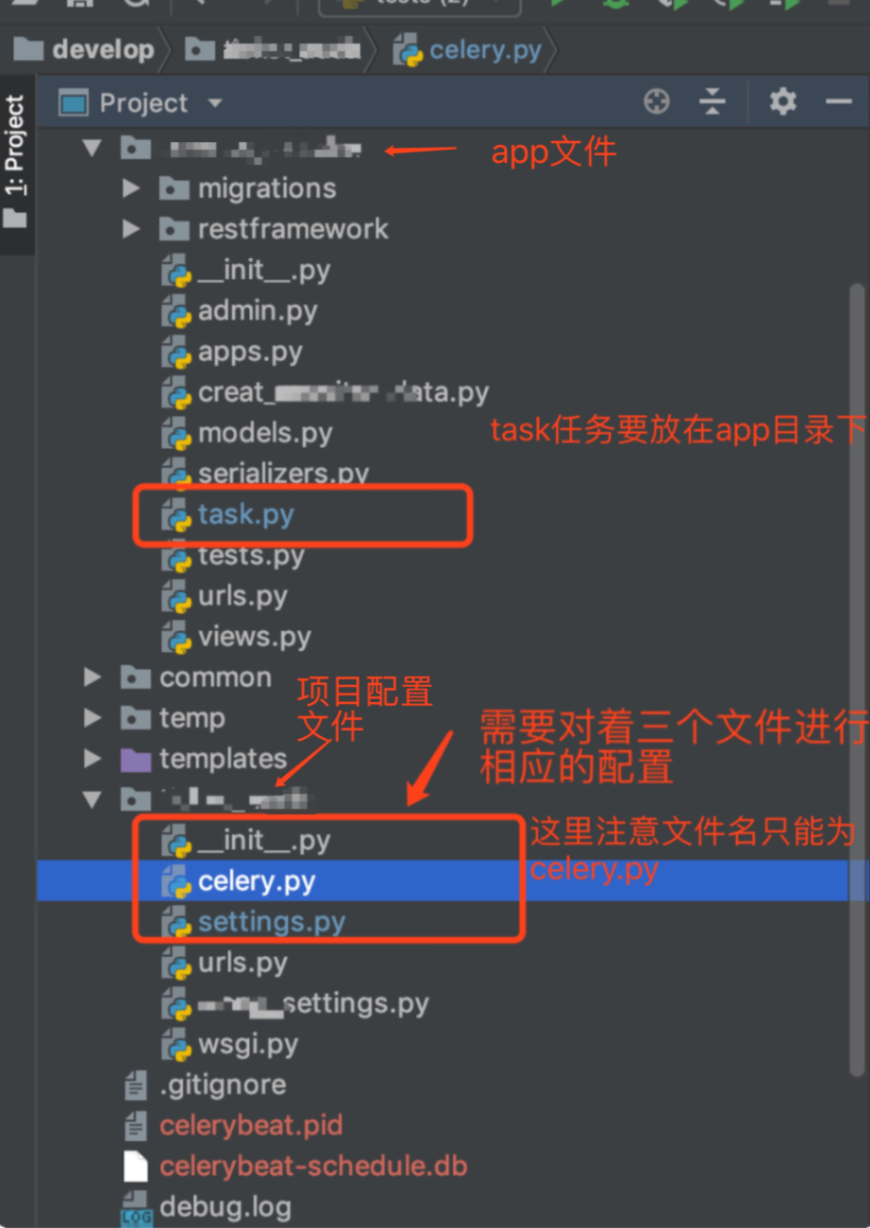
celery.py 初始创建时的样子
from __future__ import absolute_import, unicode_literals
import os
from celery import Celery, platforms
from django.conf import settings
from celery.schedules import crontab

# set the default Django settings module for the 'celery' program.
os.environ.setdefault('DJANGO_SETTINGS_MODULE', 'ticket_audit.settings')

app = Celery('ticket_audit')

# Using a string here means the worker don't have to serialize
# the configuration object to child processes.
# - namespace='CELERY' means all celery-related configuration keys
#   should have a `CELERY_` prefix.
app.config_from_object('django.conf:settings',)

# Load task modules from all registered Django app configs.
app.autodiscover_tasks(lambda: settings.INSTALLED_APPS)

# 允许root 用户运行celery
platforms.C_FORCE_ROOT = True

@app.task(bind=True)
def debug_task(self):
    print('Request: {0!r}'.format(self.request))
__init__.py
from __future__ import absolute_import
import pymysql
pymysql.install_as_MySQLdb()

# This will make sure the app is always imported when
# Django starts so that shared_task will use this app.
from .celery import app as celery_app
settings.py
BROKER_URL = 'redis://localhost:6379/1'
CELERY_RESULT_BACKEND = 'redis://localhost:6379/1'
CELERY_ACCEPT_CONTENT = ['application/json']
CELERY_TASK_SERIALIZER = 'json'
CELERY_RESULT_SERIALIZER = 'json'
CELERY_TIMEZONE = 'Asia/Shanghai'
task.py 用于创建任务
from __future__ import absolute_import, unicode_literals
import os,django
os.environ.setdefault("DJANGO_SETTINGS_MODULE", "ticket_audit.settings")
django.setup()
from ticket_audit.celery import app
from DBUtils.PooledDB import PooledDB
#注意上边的导入顺序和导入内容一定要有

import pymysql
# 使用import random
import datetime
# 使用

POOL = PooledDB(
    creator=pymysql,  # 使用链接数据库的模块
    maxconnections=6,  # 连接池允许的最大连接数,0和None表示不限制连接数
    mincached=2,  # 初始化时,链接池中至少创建的空闲的链接,0表示不创建
    maxcached=5,  # 链接池中最多闲置的链接,0和None不限制
    maxshared=3,
    # 链接池中最多共享的链接数量,0和None表示全部共享。PS: 无用,因为pymysql和MySQLdb等模块的 threadsafety都为1,所有值无论设置为多少,_maxcached永远为0,所以永远是所有链接都共享。
    blocking=True,  # 连接池中如果没有可用连接后,是否阻塞等待。True,等待;False,不等待然后报错
    maxusage=None,  # 一个链接最多被重复使用的次数,None表示无限制
    setsession=[],  # 开始会话前执行的命令列表。如:["set datestyle to ...", "set time zone ..."]
    ping=0,
    # ping MySQL服务端,检查是否服务可用。# 如:0 = None = never, 1 = default = whenever it is requested, 2 = when a cursor is created, 4 = when a query is executed, 7 = always
    host='127.0.0.1',
    port=3306,
    user='root',
    password='root1234',
    database='aqqa',
    charset='utf8'
)

@app.task
def do_create_mon():

    hall_objs = Hall.objects.all()
    hall_objs = Hallserializer(hall_objs,many=True)
    hall_objs = hall_objs.data
    for item in hall_objs:

        conn = POOL.connection()

        cursor = conn.cursor()
        today = datetime.datetime.date(datetime.datetime.now())
        num_people = random.randint(90,250)
        total_box_office = num_people*random.randint(25,55)
        insert_sql = """
                       insert into mondata(c_code,l_code,play_date,num_people,box_office)VALUES(%s,%s,%s,%s,%s)
                    """
        print('写入一跳数据成功========')
        cursor.execute(insert_sql, (item['cinema'],item['l_code'], today, num_people,box_office,))
        conn.commit()
        conn.close()
创建定时任务
在celery.py中的代码添加内容,写为
from __future__ import absolute_import, unicode_literals
import os
from celery import Celery, platforms
from django.conf import settings
from celery.schedules import crontab

# set the default Django settings module for the 'celery' program.
os.environ.setdefault('DJANGO_SETTINGS_MODULE', 'ticket_audit.settings')

app = Celery('ticket_audit')

# Using a string here means the worker don't have to serialize
# the configuration object to child processes.
# - namespace='CELERY' means all celery-related configuration keys
#   should have a `CELERY_` prefix.
app.config_from_object('django.conf:settings',)

# Load task modules from all registered Django app configs.
app.autodiscover_tasks(lambda: settings.INSTALLED_APPS)

# 允许root 用户运行celery
platforms.C_FORCE_ROOT = True

@app.task(bind=True)
def debug_task(self):
    print('Request: {0!r}'.format(self.request))

from mon.task import do_create_mon      注意引入task.py中的方法的   位置要在这里 不要在创建app对象的方法前 否则会报找不到app错
@app.on_after_configure.connect   #注意celery版本4以上才有此方法  当前用的是4.2.1
def setup_periodic_tasks(sender, **kwargs):

    # 每天上午10:30 执行 do_insert_maoyan('maoyan:items')
    sender.add_periodic_task(
        # crontab(hour=7, minute=30, day_of_week=1), # 可灵活修改
        crontab(hour=9, minute=42, ),  # 可灵活修改
        do_create_mon.s()
    )
然后
执行两条命令运行worker 和定时任务
celery -A ticket_audit worker -l debug
celery -A ticket_audit beat -l debug
Setup
Before diving into Celery, grab the starter project from the Github repo. Make sure to activate a virtualenv, install the requirements, and run the migrations. Then fire up the server and navigate to http://localhost:8000/ in your browser. You should see the familiar “Congratulations on your first Django-powered page” text. When done, kill the sever.
Next, let’s install Celery:
$ pip install celery==3.1.18
$ pip freeze > requirements.txt
Now we can integrate Celery into our Django Project in just three easy steps.
Step 1: Add celery.py
Inside the “picha” directory, create a new file called celery.py:
from __future__ import absolute_import
import os
from celery import Celery
from django.conf import settings

# set the default Django settings module for the 'celery' program.
os.environ.setdefault('DJANGO_SETTINGS_MODULE', 'picha.settings')
app = Celery('picha')

# Using a string here means the worker will not have to
# pickle the object when using Windows.
app.config_from_object('django.conf:settings')
app.autodiscover_tasks(lambda: settings.INSTALLED_APPS)


@app.task(bind=True)
def debug_task(self):
    print('Request: {0!r}'.format(self.request))
Take note of the comments in the code.
Step 2: Import your new Celery app
To ensure that the Celery app is loaded when Django starts, add the following code into the __init__.py file that sits next to your settings.py file:
from __future__ import absolute_import

# This will make sure the app is always imported when
# Django starts so that shared_task will use this app.
from .celery import app as celery_app
Having done that, your project layout should now look like:
├── manage.py
├── picha
│   ├── __init__.py
│   ├── celery.py
│   ├── settings.py
│   ├── urls.py
│   └── wsgi.py
└── requirements.txt
Step 3: Install Redis as a Celery “Broker”
Celery uses “brokers” to pass messages between a Django Project and the Celery workers. In this tutorial, we will use Redis as the message broker.
First, install Redis from the official download page or via brew (brew install redis) and then turn to your terminal, in a new terminal window, fire up the server:
$ redis-server
You can test that Redis is working properly by typing this into your terminal:
$ redis-cli ping
Redis should reply with PONG - try it!
Once Redis is up, add the following code to your settings.py file:
# CELERY STUFF
BROKER_URL = 'redis://localhost:6379'
CELERY_RESULT_BACKEND = 'redis://localhost:6379'
CELERY_ACCEPT_CONTENT = ['application/json']
CELERY_TASK_SERIALIZER = 'json'
CELERY_RESULT_SERIALIZER = 'json'
CELERY_TIMEZONE = 'Africa/Nairobi'
You also need to add Redis as a dependency in the Django Project:
$ pip install redis==2.10.3
$ pip freeze > requirements.txt
That’s it! You should now be able to use Celery with Django. For more information on setting up Celery with Django, please check out the official Celery documentation.
Before moving on, let’s run a few sanity checks to ensure all is well…
Test that the Celery worker is ready to receive tasks:
$ celery -A picha worker -l info
...
[2015-07-07 14:07:07,398: INFO/MainProcess] Connected to redis://localhost:6379//
[2015-07-07 14:07:07,410: INFO/MainProcess] mingle: searching for neighbors
[2015-07-07 14:07:08,419: INFO/MainProcess] mingle: all alone
Kill the process with CTRL-C. Now, test that the Celery task scheduler is ready for action:
$ celery -A picha beat -l info
...
[2015-07-07 14:08:23,054: INFO/MainProcess] beat: Starting...
Boom!
Again, kill the process when done.
Celery Tasks
Celery utilizes tasks, which can be thought of as regular Python functions that are called with Celery.
For example, let’s turn this basic function into a Celery task:
def add(x, y):
    return x + y
First, add a decorator:
from celery.decorators import task

@task(name="sum_two_numbers")
def add(x, y):
    return x + y
Then you can run this task asynchronously with Celery like so:
add.delay(7, 8)
Simple, right?
So, these types of tasks are perfect for when you want to load a web page without making the user wait for some background process to complete.
Let’s look at an example…
Going back to the Django Project, grab version three, which includes an app that accepts feedback from users, aptly called feedback:
├── feedback
│   ├── __init__.py
│   ├── admin.py
│   ├── emails.py
│   ├── forms.py
│   ├── models.py
│   ├── tests.py
│   └── views.py
├── manage.py
├── picha
│   ├── __init__.py
│   ├── celery.py
│   ├── settings.py
│   ├── urls.py
│   └── wsgi.py
├── requirements.txt
└── templates
    ├── base.html
    └── feedback
        ├── contact.html
        └── email
            ├── feedback_email_body.txt
            └── feedback_email_subject.txt
Install the new requirements, fire up the app, and navigate to http://localhost:8000/feedback/. You should see:


 浙公网安备 33010602011771号