直接上代码
1.#define 预处理
#include <iostream>
using namespace std;

#define PI 3.14159

int main ()
{

    cout << "Value of PI :" << PI << endl;

    return 0;
}
2.参数宏
#include <iostream>
using namespace std;

#define MIN(a,b) (a<b ? a : b)

int main ()
{
   int i, j;
   i = 100;
   j = 30;
   cout <<"较小的值为:" << MIN(i, j) << endl;

    return 0;
}
3.条件编译
有几个指令可以用来有选择地对部分程序源代码进行编译。这个过程被称为条件编译。
条件预处理器的结构与 if 选择结构很像。请看下面这段预处理器的代码:
#ifndef NULL
   #define NULL 0
#endif
您可以只在调试时进行编译,调试开关可以使用一个宏来实现,如下所示:
#ifdef DEBUG
   cerr <<"Variable x = " << x << endl;
#endif
如果在指令 #ifdef DEBUG 之前已经定义了符号常量 DEBUG,则会对程序中的 cerr 语句进行编译。您可以使用 #if 0 语句注释掉程序的一部分,如下所示:
#if 0
   不进行编译的代码
#endif
#include <iostream>
using namespace std;
#define DEBUG
#define MIN(a,b) (((a)<(b)) ? a : b)
int main ()
{
int i, j;
i = 100;
j = 30;
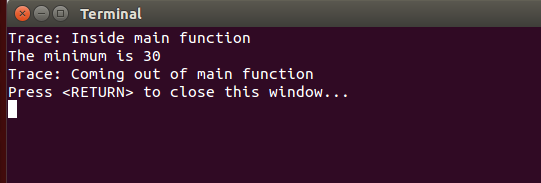
#ifdef DEBUG
cerr <<"Trace: Inside main function" << endl;
#endif
#if 0
/* 这是注释部分 */
cout << MKSTR(HELLO C++) << endl;
#endif
cout <<"The minimum is " << MIN(i, j) << endl;
#ifdef DEBUG
cerr <<"Trace: Coming out of main function" << endl;
#endif
return 0;
}
运行结果是
4.# 和 ## 运算符
# 和 ## 预处理运算符在 C++ 和 ANSI/ISO C 中都是可用的。# 运算符会把 replacement-text 令牌转换为用引号引起来的字符串。
请看下面的宏定义:
#include <iostream>
using namespace std;
#define MKSTR( x ) #x
int main ()
{
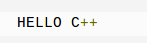
cout << MKSTR(HELLO C++) << endl;
return 0;
}
当上面的代码被编译和执行时,它会产生下列结果:
让我们来看看它是如何工作的。不难理解,C++ 预处理器把下面这行:
cout << MKSTR(HELLO C++) << endl;
转换成了:
cout << "HELLO C++" << endl;
## 运算符用于连接两个令牌。下面是一个实例:
#define CONCAT( x, y ) x ## y
当 CONCAT 出现在程序中时,它的参数会被连接起来,并用来取代宏。例如,程序中 CONCAT(HELLO, C++) 会被替换为 "HELLO C++",如下面实例所示。
#include <iostream>
using namespace std;

#define concat(a, b) a ## b
int main()
{
   int xy = 100;

   cout << concat(x, y);
   return 0;
}
当上面的代码被编译和执行时,它会产生下列结果:

让我们来看看它是如何工作的。不难理解,C++ 预处理器把下面这行:

转换成了:

5.C++ 中的预定义宏
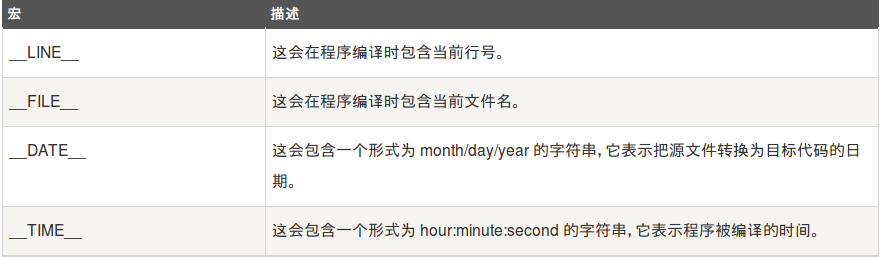
C++ 提供了下表所示的一些预定义宏:
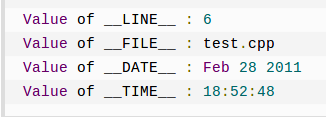
让我们看看上述这些宏的实例:


 浙公网安备 33010602011771号