
图像处理基础(5):双边滤波器
双边滤波(Bilateral filter)是一种非线性的滤波方法,是结合图像的空间邻近度和像素值相似度的一种折衷处理,同时考虑空域信息和灰度相似性,达到保边去噪的目的。
双边滤波器之所以能够做到在平滑去噪的同时还能够很好的保存边缘(Edge Preserve),是由于其滤波器的核由两个函数生成:
- 一个函数由像素欧式距离决定滤波器模板的系数
- 另一个函数由像素的灰度差值决定滤波器的系数
其综合了高斯滤波器(Gaussian Filter)和\(\alpha\)-截尾均值滤波器(Alpha-Trimmed mean Filter)的特点。高斯滤波器只考虑像素间的欧式距离,其使用的模板系数随着和窗口中心的距离增大而减小;Alpha截尾均值滤波器则只考虑了像素灰度值之间的差值,去掉\(\alpha\%\)的最小值和最大值后再计算均值。
双边滤波器使用二维高斯函数生成距离模板,使用一维高斯函数生成值域模板。
距离模板系数的生成公式如下:
其中,\((k,l)\)为模板窗口的中心坐标;\((i,j)\)为模板窗口的其他系数的坐标;\(\sigma_d\)为高斯函数的标准差。 使用该公式生成的滤波器模板和高斯滤波器使用的模板是没有区别的。
值域模板系数的生成公式如下:
其中,函数\(f(x,y)\)表示要处理的图像,\(f(x,y)\)表示图像在点\((x,y)\)处的像素值;\((k,l)\)为模板窗口的中心坐标;\((i,j)\)为模板窗口的其他系数的坐标;\(\sigma_r\)为高斯函数的标准差。
将上述两个模板相乘就得到了双边滤波器的模板
实现(参考OpenCV源代码)
这里的实现主要参考OpenCV中的bilateralFilter实现,其实现主要有两个优化:
- 使用查表的方式计算灰度值模板系数
- 将二维的模板转换为一维,降低算法复杂度。
在滤波之前,首先将灰度值模板系数计算出来。
double color_coeff = -0.5 / (color_sigma * color_sigma);
vector<double> _color_weight(channels * 256); // 存放差值的平方
double *color_weight = &_color_weight[0];
for (int i = 0; i < channels * 256; i++)
        color_weight[i] = exp(i * i * color_coeff);
灰度值的模板系数计算公式参见上面的公式,是两个灰度值的差值的平方。这里表的长度是channels * 256没有想通,应该255的长度就足够了。在使用的时候,首先取出模板中心的灰度值val0,然后依次取出模板其他位置的灰度值val,使用abs(val - val0)的差值从color_weight查表得到灰度值模板的系数。
距离的模板是二维的,这里使用的方法就i比较巧妙,将其化为了一维。
vector<double> _space_weight(ksize * ksize); // 空间模板系数
vector<int> _space_ofs(ksize * ksize); // 模板窗口的坐标

// 生成空间模板
    int maxk = 0;
    for (int i = -radius; i <= radius; i++)
    {
        for (int j = -radius; j <= radius; j++)
        {
            double r = sqrt(i*i + j * j);
            if (r > radius)
                continue;
            space_weight[maxk] = exp(r * r * space_coeff); // 存放模板系数
            space_ofs[maxk++] = i * temp.step + j * channels; // 存放模板的位置,和模板系数相对应
        }
    }
使用一维数组存放空间模板系数,同时使用另一个一维数组存放模板位置,和系数相对应。
整个代码的实现如下:
void myBilateralFilter(const Mat &src, Mat &dst, int ksize, double space_sigma, double color_sigma)
{
    int channels = src.channels();
    CV_Assert(channels == 1 || channels == 3);
    double space_coeff = -0.5 / (space_sigma * space_sigma);
    double color_coeff = -0.5 / (color_sigma * color_sigma);
    int radius = ksize / 2;
    Mat temp;
    copyMakeBorder(src, temp, radius, radius, radius, radius, BorderTypes::BORDER_REFLECT);
    vector<double> _color_weight(channels * 256); // 存放差值的平方
    vector<double> _space_weight(ksize * ksize); // 空间模板系数
    vector<int> _space_ofs(ksize * ksize); // 模板窗口的坐标
    double *color_weight = &_color_weight[0];
    double *space_weight = &_space_weight[0];
    int    *space_ofs = &_space_ofs[0];
    for (int i = 0; i < channels * 256; i++)
        color_weight[i] = exp(i * i * color_coeff);
    // 生成空间模板
    int maxk = 0;
    for (int i = -radius; i <= radius; i++)
    {
        for (int j = -radius; j <= radius; j++)
        {
            double r = sqrt(i*i + j * j);
            if (r > radius)
                continue;
            space_weight[maxk] = exp(r * r * space_coeff); // 存放模板系数
            space_ofs[maxk++] = i * temp.step + j * channels; // 存放模板的位置,和模板系数相对应
        }
    }
    // 滤波过程
    for (int i = 0; i < src.rows; i++)
    {
        const uchar *sptr = temp.data + (i + radius) * temp.step + radius * channels;
        uchar *dptr = dst.data + i * dst.step;
        if (channels == 1)
        {
            for (int j = 0; j < src.cols; j++)
            {
                double sum = 0, wsum = 0;
                int val0 = sptr[j]; // 模板中心位置的像素
                for (int k = 0; k < maxk; k++)
                {
                    int val = sptr[j + space_ofs[k]];
                    double w = space_weight[k] * color_weight[abs(val - val0)]; // 模板系数 = 空间系数 * 灰度值系数
                    sum += val * w;
                    wsum += w;
                }
                dptr[j] = (uchar)cvRound(sum / wsum);
            }
        }
        else if (channels == 3)
        {
            for (int j = 0; j < src.cols * 3; j+=3)
            {
                double sum_b = 0, sum_g = 0, sum_r = 0, wsum = 0;
                int b0 = sptr[j];
                int g0 = sptr[j + 1];
                int r0 = sptr[j + 2];
                for (int k = 0; k < maxk; k++)
                {
                    const uchar *sptr_k = sptr + j + space_ofs[k];
                    int b = sptr_k[0];
                    int g = sptr_k[1];
                    int r = sptr_k[2];
                    double w = space_weight[k] * color_weight[abs(b - b0) + abs(g - g0) + abs(r - r0)];
                    sum_b += b * w;
                    sum_g += g * w;
                    sum_r += r * w;
                    wsum += w;
                }
                wsum = 1.0f / wsum;
                b0 = cvRound(sum_b * wsum);
                g0 = cvRound(sum_g * wsum);
                r0 = cvRound(sum_r * wsum);
                dptr[j] = (uchar)b0;
                dptr[j + 1] = (uchar)g0;
                dptr[j + 2] = (uchar)r0;
            }
        }
    }
}
需要注意图像像素值的获取,首先获取到每行的坐标指针
const uchar *sptr = temp.data + (i + radius) * temp.step + radius * channels;
uchar *dptr = dst.data + i * dst.step;
在滤波循环中,从space_ofs中取出每个模板位置偏移地址
int val = sptr[j + space_ofs[k]];
这种实现方法,大大的降低滤波的时间复杂度。
结果对比:
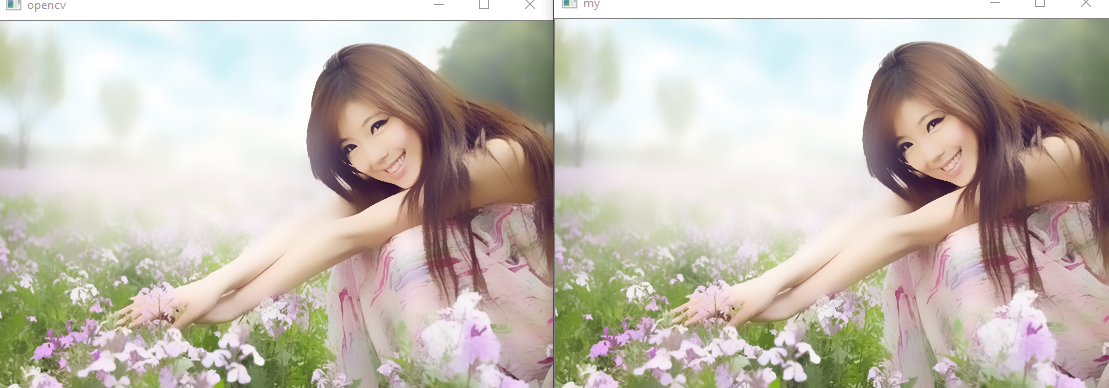
实现的结果和OpenCV的实现相差无几。sigma = 80,模板大小为20
总结
双边滤波器,在平滑图像的同时,还能够很好的保护图像的边缘信息,例如上图中,图像的平滑效果非常明显了,但是头发的发丝还是很明显的。
双边滤波器的最重要参数仍然是标准差sigma,其值小于10时,平滑效果不是很明显。

 浙公网安备 33010602011771号