多线程-ListenableFuture学习(转载)
转载:https://www.cnblogs.com/seedss/p/12762209.html
ListenableFuture是可以监听的Future,它是对Java原生的Future进行了拓展和增强。在java中Future表示一个多线程异步执行的任务,当任务执行完成之后可以得到一个计算结果。如果我们希望一旦计算完成之后就可以拿到结果返回或者将结果做另外的计算操作,就必须使用线程去不断查询计算状态。这样做会导致代码复杂,并且计算效率低下。使用ListenableFuture Guava帮我们检测Future是否完成了,如果完成就自动调用回调函数,这样可以减少并发程序的复杂度。
ListenableFuture回调函数有两种方式:
1.通过ListenableFuture的addListener方法
ListenableFuture是一个接口,它从jdk的Future接口继承,添加了void addListener(Runnable listener, Executor executor)方法。
2.通过Futures的静态方法addCallback给ListenableFuture添加回调函数
在调用回调函数之前,首先需要实例化ListenableFuture实例对象。
ListeningExecutorService listeningExecutorService = MoreExecutors.listeningDecorator(Executors.newFixedThreadPool(5));
        ListenableFutureTest test1 = new ListenableFutureTest();
        //获取一个ListenableFuture对象
        ListenableFuture<Integer> listenableFuture = listeningExecutorService.submit(test1);
首先通过MoreExecutors类的静态方法listeningDecorator方法初始化一个ListeningExecutorService的方法,然后使用此实例的submit方法即可初始化ListenableFuture对象。
方式1:通过ListenableFuture的addListener方法
代码实例:

  private static AtomicInteger count = new AtomicInteger(0);

    public static void main(String[] args) throws InterruptedException {
        ListeningExecutorService listeningExecutorService = MoreExecutors.listeningDecorator(Executors.newFixedThreadPool(5));

        ListenableFutureTest test1 = new ListenableFutureTest();

        //获取一个ListenableFuture对象
        ListenableFuture<Integer> listenableFuture = listeningExecutorService.submit(test1);

        listenableFuture.addListener(new Runnable() {
            @Override
            public void run() {
                try {
                    System.out.println("线程执行完成后执行该回调函数,线程返回值为:" + listenableFuture.get());
                }catch (InterruptedException | ExecutionException e) {
                    e.printStackTrace();
                }
            }
        }, listeningExecutorService);
    }

    @Override
    public Integer call() throws Exception {
        while (count.get() < 100) {
            count.getAndIncrement();
            System.out.println(Thread.currentThread().getName() + ":" + count.get());
            Thread.sleep(10);
        }
        return count.get();
    }
2.通过Futures的静态方法addCallback给ListenableFuture添加回调函数
 1 public static void main(String[] args) throws InterruptedException {
 2         ListeningExecutorService listeningExecutorService = MoreExecutors.listeningDecorator(Executors.newFixedThreadPool(5));
 3         ListenableFutureTest test1 = new ListenableFutureTest();
 4         //获取一个ListenableFuture对象
 5         ListenableFuture<Integer> listenableFuture = listeningExecutorService.submit(test1);
 6         //使用addCallback方法
 7         Futures.addCallback(listenableFuture, new FutureCallback<Integer>() {
 8
 9             @Override
10             public void onSuccess(Integer result) {
11                 System.out.println(Thread.currentThread().getName() + "线程执行结束,返回结果:" + result);
12             }
13
14             @Override
15             public void onFailure(Throwable t) {
16                 t.printStackTrace();
17             }
18         });
19     }
当发生异常时:
 1  public static void main(String[] args) throws InterruptedException {
 2         ListeningExecutorService listeningExecutorService = MoreExecutors.listeningDecorator(Executors.newFixedThreadPool(5));
 3         ListenableFutureTest test1 = new ListenableFutureTest();
 4         //获取一个ListenableFuture对象
 5         ListenableFuture<Integer> listenableFuture = listeningExecutorService.submit(test1);
 6         Futures.addCallback(listenableFuture, new FutureCallback<Integer>() {
 7
 8             @Override
 9             public void onSuccess(Integer result) {
10                 System.out.println(Thread.currentThread().getName() + "线程执行结束,返回结果:" + result);
11             }
12
13             @Override
14             public void onFailure(Throwable t) {
15                 System.out.println(Thread.currentThread().getName() + "线程执行发生异常");
16                 t.printStackTrace();
17             }
18         });
19     }
20
21     @Override
22     public Integer call() throws Exception {
23         while (count.get() < 100) {
24             count.getAndIncrement();
25             System.out.println(Thread.currentThread().getName() + ":" + count.get());
26             Thread.sleep(10);
27             if (count.get() == 20) {
28                 throw new InterruptedException("异常测试");
29             }
30         }
31         return count.get();
32     }
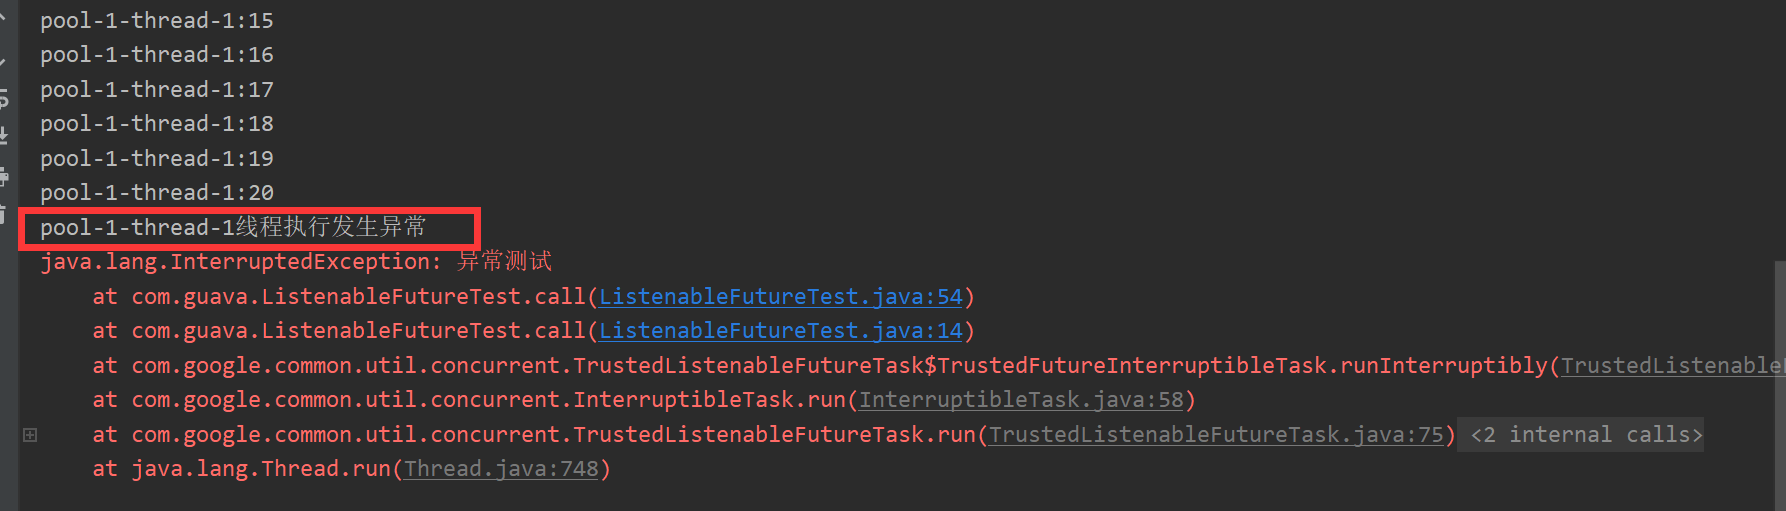
当发生异常时,回调函数输出结果为:
推荐使用第二种方法,因为第二种方法可以直接得到Future的返回值,或者处理错误情况。本质上第二种方法是通过调动第一种方法实现的,做了进一步的封装。
另外ListenableFuture还有其他几种内置实现:
- SettableFuture:不需要实现一个方法来计算返回值,而只需要返回一个固定值来做为返回值,可以通过程序设置此Future的返回值或者异常信息
- CheckedFuture: 这是一个继承自ListenableFuture接口,他提供了checkedGet()方法,此方法在Future执行发生异常时,可以抛出指定类型的异常。

 浙公网安备 33010602011771号