云环境自动化(Terraform+Ansible)
应用的自动化部署由来已久,也有很多知名的工具,比如puppet,ansible,saltstack,chef等等。
但是对于基础设施部分,一般都是以事先准备的方式来提供的。
虽然各大云服务器厂商也逐步提供了各类的API,用来控制自己的基础设施,
但是,由于各类厂商的差异性,API差异很大且没有统一分类标准,兼容各个云环境的难度非常大。
不过,随着Terraform的出现,基础设施的管理成为可能,更重要的是,各大云服务器厂商也都积极配合Terraform提供了各自的provider。
使得我们不用再一一对接各个云服务器厂商的API。
Terraform 简介
Terraform 是一种安全有效地构建、更改和版本控制基础设施的工具(基础架构自动化的编排工具)。
它的目标是 "Write, Plan, and create Infrastructure as Code", 基础架构即代码。
官方网站:
github 开源地址:terraform 项目地址
核心概念
Provider
Terraform 被设计成一个多云基础设施编排工具,可以同时编排各种云平台或是其他基础设施的资源,其实现多云编排的方法就是Provider插件机制。
用户在定义描述基础设施配置时可以指定使用的Provider名称和版本,Terraform在执行部署时将根据指定的Provider来判断将在哪个云平台上创建相应的基础设施。
比如:
terraform {
  required_version = ">= 1.2.0"
  required_providers {
    ansible = {
      source  = "nbering/ansible"
      version = "1.0.4"
    }
    alicloud = {
      source  = "aliyun/alicloud"
      version = "1.163.0"
    }
  }
}
Module
对于编写好的一组基础设施描述文件,如果想创建另一套相同的基础设施,一种方法是将写好的tf文件复制并粘贴到另一个文件夹,但我们也可以使用更方便的方法来避免复制粘贴,那就是Module。
Module是包含一组基础设施描述的代码文件集合,我们在编写tf文件时可以直接以module的方式进行引用,从而实现代码的复用,通常对于常用基础设施我们都可以抽象成Module,以便于在日常编写tf文件时直接进行引用。
比如:
module "instance" {
  source               = "https://xxxx.gitlab.com/iac-module/terraform-alicloud-modules.git//modules/instance?ref=v0.1.3"
  count                = var.instance_number
  zone_id              = var.zone_id
  instance_type        = var.instance_type
  hostname             = var.hostname
  image_id             = var.image_id
  internet_bandwidth   = var.internet_bandwidth
  internet_charge_type = "PayByTraffic"
  system_disk_category = "cloud_efficiency"
  system_disk_size     = 20
  # data_disks           = var.data_disks
  tags              = var.tags
  resource_group_id = var.resource_group_id
  vswitch_id        = module.networking.vswitch_id
  security_groups   = module.networking.sg_id
  key_name          = module.keypair.key_name
}
Variable
变量 variable 是用来在环境部署时传递可变参数的一组key/value。
Terraform变量一般定义在 variables.tf文件中。
比如:
variable "instance_number" {
  default = 1
}

variable "zone_id" {
  default = "cn-beijing-c"
}

variable "instance_type" {
  default = "ecs.t5-lc1m1.small"
}
Resource
资源 resource 是Terraform最重要的组成部分。
一个resource可以是一个或多个基础设施资源对象,例如虚拟机,网络,Consul的键值对数据,以及后面示例中的 ansible_host。
比如:
resource "ansible_host" "miniconda" {
  count = var.instance_number
  // 配置机器的 hostname,一般配置为计算资源的 public_ip (或 private_ip)
  #  inventory_hostname = module.vmware-tomcat.vm[count.index]
  inventory_hostname = module.instance.*.instance.public_ip[count.index]
  // 配置机器所属分组
  groups = ["python"]
  vars = {
    // 传给 ansible 的 vars,可在 playbook 文件中引用
    #    ansible_ssh_pass        = var.ansible_ssh_pass
    wait_connection_timeout = 600
    yum_mirror              = var.yum_mirror
    miniconda_dir           = var.miniconda_dir
    chinese_font_url        = var.chinese_font_url
    jupyter_ip              = var.jupyter_ip
    jupyter_port            = var.jupyter_port
    jupyter_root_dir        = var.jupyter_root_dir
    jupyter_config          = var.jupyter_config
  }
}
Output
Terraform代码可以有一个或者多个返回值,这就是输出值,一般定义在 outputs.tf文件中。
比如:
output "public_ip" {
  value = module.instance.*.instance.public_ip
}

output "instance" {
  value = module.instance
}
Ansible 简介
Ansible 是一款为类 Unix 系统开发的自由开源的配置和自动化工具。
它用 Python 写成,类似于 saltstack 和 Puppet,但是有一个不同和优点是我们不需要在节点中安装任何客户端。
它使用 SSH 来和节点进行通信。Ansible 基于 Python paramiko 开发,分布式,无需客户端,轻量级,配置语法使用 YMAL 及 Jinja2 模板语言,更强的远程命令执行操作。
官方网站:
github开源地址:
核心概念
Node
执行 Ansible 命令的机器称作控制节点(Control Node),这台机器上需要安装 ansible,其它机器称作受管节点(Managed Node),不需要安装 ansible。
Ansible 要求控制节点到受管节点之间要配置 ssh 免密登录。
Inventory
Inventory 可以翻译成“清单”,Ansible 要管理许多机器,那这些机器的 IP 在哪里存储、获取呢?
Ansible 定义了 inventory 格式,我们只需要把要管理的机器按格式保存成文件即可。
比如:
mail.example.com

[webservers]
foo.example.com
bar.example.com

[dbservers]
one.example.com
two.example.com
three.example.com
Task
Task可以看成是整个ansible脚本中的一个个步骤。
比如:
tasks:
  - name: 安装 miniconda
  shell:
  cmd: "bash /tmp/miniconda_install.sh -b -p {{minicondaDir}}"

  - name: 安装 numpy
  shell:
  cmd: "conda install -y numpy"
  executable: /bin/bash

  - name: 安装 pandas
  shell:
  cmd: "conda install -y pandas"
  executable: /bin/bash
Playbook
如果把上面的 Task 看出是一一步骤,那么 Playbook 则是把这些步骤串联起来,实现真正目的的“剧本”。
一个 Playbook 中至少要有一个 Task。
Role
Role 是 Ansible 后来加入的概念,目的是为了更好的复用“剧本”,Role可以理解为编程语言中的第三方库。
每个Role都有一个完整的功能,
Ansible 已经内置了很多的 Role:
实例演示
最后,通过一个实例来演示如何通过 Terraform 和 Ansible 部署一个基于 miniconda 的python环境,其中安装常用的数据分析相关的 package 和一个支持中文显示的字体。
Terraform 相关部分
versions.tf
terraform {
  required_version = ">= 1.2.0"
  required_providers {
    ansible = {
      source  = "nbering/ansible"
      version = "1.0.4"
    }
    alicloud = {
      source  = "aliyun/alicloud"
      version = "1.163.0"
    }
  }
}
main.tf
module "instance" {
  source               = "store.cloudiac.org/idcos/instance/alicloud"
  count                = var.instance_number
  zone_id              = var.zone_id
  instance_type        = var.instance_type
  hostname             = var.hostname
  image_id             = var.image_id
  internet_bandwidth   = var.internet_bandwidth
  internet_charge_type = "PayByTraffic"
  system_disk_category = "cloud_efficiency"
  system_disk_size     = 20
  # data_disks           = var.data_disks
  tags              = var.tags
  resource_group_id = var.resource_group_id
  vswitch_id        = module.networking.vswitch_id
  security_groups   = module.networking.sg_id
  key_name          = module.keypair.key_name
}

module "networking" {
  source            = "store.cloudiac.org/idcos/networking/alicloud"
  zone_id           = var.zone_id
  sg_rules          = var.sg_rules
  tags              = var.tags
  resource_group_id = var.resource_group_id
}

module "keypair" {
  source            = "store.cloudiac.org/idcos/keypair/alicloud"
  key_name_prefix   = var.key_name_prefix
  public_key        = var.public_key
  tags              = var.tags
  resource_group_id = var.resource_group_id
}

// 为每个计算资源创建一个对应的 ansible_host 资源,
// 执行 ansible playbook 前会基于 ansible_host 资源自动生成 inventory 文件。
resource "ansible_host" "miniconda" {
  count = var.instance_number
  // 配置机器的 hostname,一般配置为计算资源的 public_ip (或 private_ip)
  #  inventory_hostname = module.vmware-tomcat.vm[count.index]
  inventory_hostname = module.instance.*.instance.public_ip[count.index]
  // 配置机器所属分组
  groups = ["python"]
  vars = {
    // 传给 ansible 的 vars,可在 playbook 文件中引用
    #    ansible_ssh_pass        = var.ansible_ssh_pass
    wait_connection_timeout = 600
    yum_mirror              = var.yum_mirror
    miniconda_dir           = var.miniconda_dir
    chinese_font_url        = var.chinese_font_url
    jupyter_ip              = var.jupyter_ip
    jupyter_port            = var.jupyter_port
    jupyter_root_dir        = var.jupyter_root_dir
    jupyter_config          = var.jupyter_config
  }
}
variables.tf
variable "instance_number" {
  default = 1
}

variable "zone_id" {
  default = "cn-beijing-c"
}

variable "instance_type" {
  default = "ecs.t5-lc1m1.small"
}

variable "spot_strategy" {
  type        = string
  default     = "SpotWithPriceLimit"
}

variable "spot_price_limit" {
  type    = number
  default = 1.0
}

variable "public_key" {
  description = "ssh-rsa public key"
  default     = "ssh-rsa 这里要 替换自己的 public key"
}

variable "resource_group_id" {
  default = null
}

variable "hostname" {
  default = null
}

variable "image_id" {
  description = "镜像 id"
  default     = "centos_7_7_x64_20G_alibase_20200426.vhd"
  # default = "debian_11_5_x64_20G_alibase_20221130.vhd"
}

variable "key_name_prefix" {
  default = "cloudiac-aliyun-ecs-"
}

variable "internet_bandwidth" {
  default = 10
}

variable "sg_rules" {
  default = {
    "allow_tcp_22" : {
      cidr_ip    = "0.0.0.0/0"
      port_range = "22/22"
    }
    "allow_tcp_80" : {
      cidr_ip    = "0.0.0.0/0"
      port_range = "80/80"
    }
    "allow_tcp_443" : {
      cidr_ip    = "0.0.0.0/0"
      port_range = "443/443"
    }
  }
}

variable "tags" {
  type = map(string)
  default = {
    tagkey = "python-env"
  }
}


variable "yum_mirror" {
  description = "镜像地址"
  type        = string
  default     = "https://mirrors.aliyun.com/centos/7/os/x86_64/"
}

variable "miniconda_dir" {
  description = "miniconda install path"
  type        = string
  default     = "/home/miniconda3"
}

variable "chinese_font_url" {
  description = "matplotlib chinese font"
  type        = string
  default     = "http://databook.top:8888/Microsoft-Yahei-Mono.ttf"
}

variable "jupyter_ip" {
  description = "jupyter lab server ip"
  type        = string
  default     = "0.0.0.0"
}

variable "jupyter_port" {
  description = "jupyter lab server port"
  type        = string
  default     = "80"
}

variable "jupyter_root_dir" {
  description = "jupyter lab server root dir"
  type        = string
  default     = "/home/notebook"
}

variable "jupyter_config" {
  description = "jupyter lab server root dir"
  type        = string
  default     = "/home/miniconda3/jupyter_server_config.json"
}
output.tf
output "public_ip" {
  value = module.instance.*.instance.public_ip
}

output "instance" {
  value = module.instance
}
Ansible 相关部分
Terraform 完成服务器的部署和系统安装之后,Ansible 开始配置环境,主要是安装 miniconda,和安装常用 python packages。
最后配置 jupyter lab 服务,配置完成后,可以直接通过浏览器来使用 jupyter lab。
其中用到了一些 Ansible 内置的 Role。
---
- name: install miniconda env
  hosts: python
  remote_user: root
  vars:
    - yumMirror: "{{yum_mirror}}"
    - minicondaDir: "{{miniconda_dir}}"
    - jupyterIp: "{{jupyter_ip}}"
    - jupyterPort: "{{jupyter_port}}"
    - jupyterRootDir: "{{jupyter_root_dir}}"
    - jupyterConfig: "{{jupyter_config}}"
    - chineseFontUrl: "{{chinese_font_url}}"

  tasks:
    - name: 配置base yum仓库
      yum_repository:
        name: base
        description: BASE YUM repo
        baseurl: "{{yumMirror}}"
        enabled: yes
        gpgcheck: no

    - name: 清理yum缓存
      shell: yum clean all

    - name: 下载 miniconda
      get_url:
        url: "https://repo.anaconda.com/miniconda/Miniconda3-py310_22.11.1-1-Linux-x86_64.sh"
        dest: "/tmp/miniconda_install.sh"
        mode: 0755
        force: yes

    - name: 安装 miniconda
      shell:
        cmd: "[ ! -d {{minicondaDir}} ] && bash /tmp/miniconda_install.sh -b -p {{minicondaDir}} || exit 0"

    - name: 安装 numpy
      shell:
        cmd: "source {{minicondaDir}}/bin/activate && conda install -y numpy && conda deactivate"
        executable: /bin/bash

    - name: 安装 pandas
      shell:
        cmd: "source {{minicondaDir}}/bin/activate && conda install -y pandas && conda deactivate"
        executable: /bin/bash

    - name: 安装 scipy
      shell:
        cmd: "source {{minicondaDir}}/bin/activate && conda install -y scipy && conda deactivate"
        executable: /bin/bash

    - name: 安装 matplotlib
      shell:
        cmd: "source {{minicondaDir}}/bin/activate && conda install -y matplotlib && conda deactivate"
        executable: /bin/bash

    - name: 下载 中文字体 for matplotlib
      get_url:
        url: "{{chineseFontUrl}}"
        dest: "{{minicondaDir}}/lib/python3.10/site-packages/matplotlib/mpl-data/fonts/ttf/Microsoft-Yahei-Mono.ttf"
        mode: 0664
        force: yes

    - name: 安装 jupyter lab
      shell:
        cmd: "source {{minicondaDir}}/bin/activate && conda install -y jupyterlab && conda deactivate"
        executable: /bin/bash

    - name: 创建 notebook 文件夹
      file:
        path: "{{jupyterRootDir}}"
        state: directory
        recurse: yes
        mode: 0755

    # - name: 启动 jupyter lab 服务
    #   shell:
    #     cmd: "source {{minicondaDir}}/bin/activate && jupyter-lab --allow-root --no-browser --ip={{jupyterIp}} --port={{jupyterPort}} --config {{jupyterConfig}}"
    #     chdir: "{{jupyterRootDir}}"
    #     executable: /bin/bash

    - name: 设置配置文件
      template:
        src: templates/jupyter_server_config.json.j2
        dest: "{{ minicondaDir }}/jupyter_server_config.json"

    - name: 设置启动脚本
      template:
        src: templates/jupyter_server.sh.j2
        dest: "{{ minicondaDir }}/jupyter_server.sh"
        mode: 0755

    - name: 设置 jupyter 服务
      template:
        src: templates/jupyter-conda-env.service.j2
        dest: /usr/lib/systemd/system/jupyter-conda-env.service

    - name: 启动 jupyter-conda-env 服务
      systemd:
        name: jupyter-conda-env
        state: started
        enabled: true
        daemon_reload: yes
部署演示
整体代码的结构如下:
$ tree .
.
├── ansible
│   ├── main.yml
│   └── templates
│       ├── jupyter-conda-env.service.j2
│       ├── jupyter_server_config.json.j2
│       └── jupyter_server.sh.j2
├── main.tf
├── output.tf
├── variables.tf
└── versions.tf
ansible/templates 中是linux服务配置的模板。
部署准备
这个示例是部署到阿里云的,要先导入自己在阿里云配置的 access_key 和 secret_key。
同时要确保账户的余额在 20元之上。
export ALICLOUD_ACCESS_KEY="ALICLOUD_ACCESS_KEY"
export ALICLOUD_SECRET_KEY="ALICLOUD_SECRET_KEY"
开始部署
头一次使用下面的命令时,会安装相应的 provider,显示的信息可能会我的有区别。
$ terraform init
Initializing modules...

Initializing the backend...

Initializing provider plugins...
- Reusing previous version of aliyun/alicloud from the dependency lock file
- Reusing previous version of nbering/ansible from the dependency lock file
- Using previously-installed aliyun/alicloud v1.163.0
- Using previously-installed nbering/ansible v1.0.4

Terraform has been successfully initialized!

You may now begin working with Terraform. Try running "terraform plan" to see
any changes that are required for your infrastructure. All Terraform commands
should now work.

If you ever set or change modules or backend configuration for Terraform,
rerun this command to reinitialize your working directory. If you forget, other
commands will detect it and remind you to do so if necessary.
生成部署计划:(本例中设置计划的名称 miniconda)
$ terraform plan --out=miniconda
执行部署计划:
$ terraform apply "miniconda"
module.keypair.alicloud_ecs_key_pair.this: Creating...
module.networking.module.vpc.alicloud_vpc.this: Creating...
module.keypair.alicloud_ecs_key_pair.this: Creation complete after 1s [id=cloudiac-aliyun-ecs-20230313055948831100000002]
module.networking.module.vpc.alicloud_vpc.this: Creation complete after 6s [id=vpc-2zeiyaq50beoyhjh8zzd0]
module.networking.module.vswitch.alicloud_vswitch.this: Creating...
module.networking.module.sg.alicloud_security_group.this: Creating...
module.networking.module.sg.alicloud_security_group.this: Creation complete after 1s [id=sg-2ze9qy76kz5wtok9xpte]
module.networking.module.sg.alicloud_security_group_rule.tcp_allow["allow_tcp_443"]: Creating...
module.networking.module.sg.alicloud_security_group_rule.tcp_allow["allow_tcp_80"]: Creating...
module.networking.module.sg.alicloud_security_group_rule.tcp_allow["allow_tcp_22"]: Creating...
module.networking.module.sg.alicloud_security_group_rule.tcp_allow["allow_tcp_443"]: Creation complete after 1s [id=sg-2ze9qy76kz5wtok9xpte:ingress:tcp:443/443::0.0.0.0/0:accept:1]
module.networking.module.sg.alicloud_security_group_rule.tcp_allow["allow_tcp_80"]: Creation complete after 1s [id=sg-2ze9qy76kz5wtok9xpte:ingress:tcp:80/80::0.0.0.0/0:accept:1]
module.networking.module.sg.alicloud_security_group_rule.tcp_allow["allow_tcp_22"]: Creation complete after 1s [id=sg-2ze9qy76kz5wtok9xpte:ingress:tcp:22/22::0.0.0.0/0:accept:1]
module.networking.module.vswitch.alicloud_vswitch.this: Creation complete after 7s [id=vsw-2ze1jk0duvxld9n60pwp6]
module.instance[0].module.instance.alicloud_instance.this: Creating...
module.instance[0].module.instance.alicloud_instance.this: Still creating... [10s elapsed]
module.instance[0].module.instance.alicloud_instance.this: Creation complete after 12s [id=i-2zecdsjo798k2gy60p8b]
ansible_host.miniconda[0]: Creating...
ansible_host.miniconda[0]: Creation complete after 0s [id=101.200.124.9]

Apply complete! Resources: 9 added, 0 changed, 0 destroyed.

Outputs:

instance = [
  {
    "instance" = {
      "hostname" = "iZ2zecdsjo798k2gy60p8bZ"
      "instance_id" = "i-2zecdsjo798k2gy60p8b"
      "instance_name" = "ECS-Instance"
      "private_ip" = "172.16.1.185"
      "public_ip" = "101.200.124.9"
    }
  },
]
public_ip = [
  "101.200.124.9",
]
执行 ansible 脚本:
$ ANSIBLE_HOST_KEY_CHECKING=False ANSIBLE_TF_DIR="." ansible-playbook -i ~/tmp/terraform.py ansible/main.yml

PLAY [install miniconda env] *************************************************************************************

TASK [Gathering Facts] *******************************************************************************************
ok: [101.200.124.9]

TASK [配置base yum仓库] ******************************************************************************************
changed: [101.200.124.9]

TASK [清理yum缓存] ***********************************************************************************************
changed: [101.200.124.9]

TASK [下载 miniconda] ********************************************************************************************
changed: [101.200.124.9]

TASK [安装 miniconda] ********************************************************************************************
changed: [101.200.124.9]

TASK [安装 numpy] ************************************************************************************************
changed: [101.200.124.9]

TASK [安装 pandas] ***********************************************************************************************
changed: [101.200.124.9]

TASK [安装 scipy] ************************************************************************************************
changed: [101.200.124.9]

TASK [安装 matplotlib] *******************************************************************************************
changed: [101.200.124.9]

TASK [下载 中文字体 for matplotlib] ******************************************************************************
changed: [101.200.124.9]

TASK [安装 jupyter lab] ******************************************************************************************
changed: [101.200.124.9]

TASK [创建 notebook 文件夹] **************************************************************************************
changed: [101.200.124.9]

TASK [设置配置文件] **********************************************************************************************
changed: [101.200.124.9]

TASK [设置启动脚本] **********************************************************************************************
changed: [101.200.124.9]

TASK [设置 jupyter 服务] *****************************************************************************************
changed: [101.200.124.9]

TASK [启动 jupyter-conda-env 服务] *******************************************************************************
changed: [101.200.124.9]

PLAY RECAP *******************************************************************************************************
101.200.124.9              : ok=16   changed=15   unreachable=0    failed=0    skipped=0    rescued=0    ignored=0
上面的命令行中用到的 terraform.py从这里下载:
部署效果
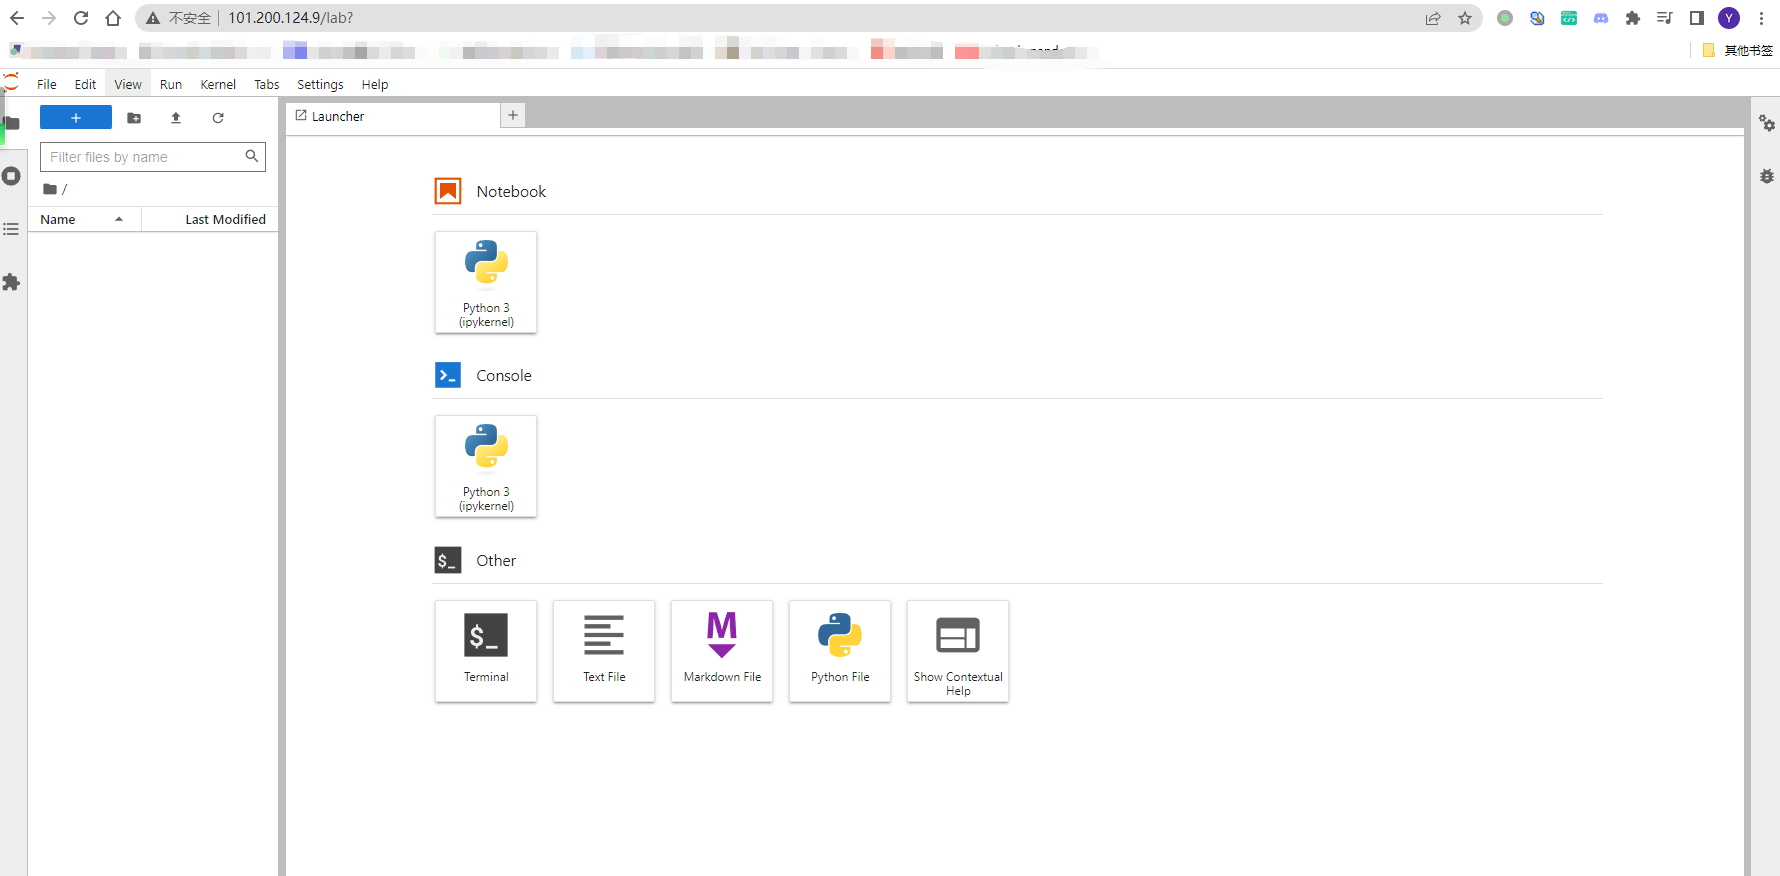
部署过程没有出错的话,等待几分钟之后,登录到自己的阿里云控制台,可以看到已经多了一台机器。

根据服务器分配的公网IP,尝试访问我们安装的jupyter lab 服务。
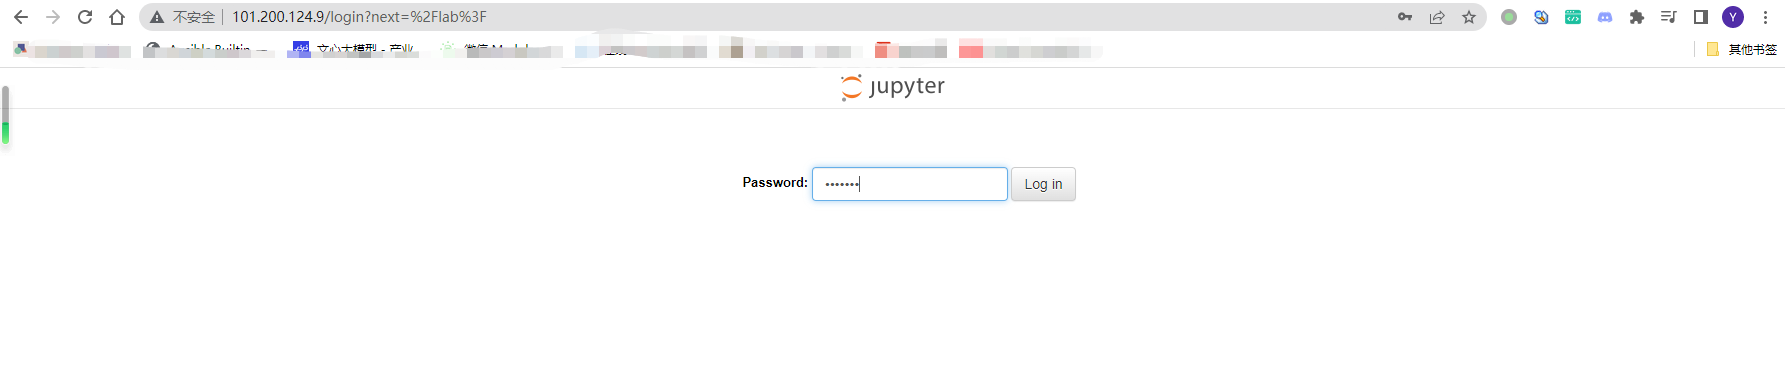
密码默认 root123。
最后我们销毁此服务器,免得持续扣费。
$ terraform destroy
总结回顾
本篇主要介绍了通过 Terraform 和 Ansible,将部署的自动化范围从应用扩展到基础设施。
- Terraform 创建基础设施,包括云服务器(CPU,内存,硬盘等),网络(IP,端口等),安全规则等等。
- Ansible 部署应用,安装软件环境,应用的packages,配置自启动服务等等。

 浙公网安备 33010602011771号