BeanPostProcessor、BeanFactoryPostProcessor、BeanDefinitionRegistryPostProcessor与ImportBeanDefinitionRegistrar接口的应用
一、BeanPostProcessor
主要负责bean的初始化前后进行前后置处理:
 1 public interface BeanPostProcessor {
 2
 3     @Nullable
 4     default Object postProcessBeforeInitialization(Object bean, String beanName) throws BeansException {
 5         return bean;
 6     }
 7
 8     @Nullable
 9     default Object postProcessAfterInitialization(Object bean, String beanName) throws BeansException {
10         return bean;
11     }
12
13 }
该接口在文章https://www.cnblogs.com/wangYB/p/14777035.html已经介绍过了,这里就不重复介绍了,需要注意的是,每个bean初始化前后都会调用这个接口的实现类方法。
二、BeanFactoryPostProcessor
1、接口
通过获取beanFactory可以修改beanFactory中的bean信息,如修改bean的属性值、实现bean的动态代理:
1 @FunctionalInterface
2 public interface BeanFactoryPostProcessor {
3
4     void postProcessBeanFactory(ConfigurableListableBeanFactory beanFactory) throws BeansException;
5
6 }
2、示例
(1)示例1:修改bean的属性值
通过获取beanFactory,获取spring注册的bean,进而修改bean的属性值。
public interface MessageService {

    String getMessage();
}

public class MessageServiceImpl implements MessageService {

    private String msg;


    public void setMsg(String msg) {
        this.msg = msg;
    }


    @Override
    public String getMessage() {
        return msg;
    }
}


public class TestBeanFactoryPostProcessor implements BeanFactoryPostProcessor {

    @Override
    public void postProcessBeanFactory(ConfigurableListableBeanFactory beanFactory) throws BeansException {
        BeanDefinition definition = beanFactory.getBeanDefinition("messageService");
        definition.getPropertyValues().addPropertyValue("msg", "456");//这里将该bean的msg属性值修改为"456"
    }

}
bean配置:
 1 <?xml version="1.0" encoding="UTF-8" ?>
 2 <beans xmlns:xsi="http://www.w3.org/2001/XMLSchema-instance"
 3        xmlns="http://www.springframework.org/schema/beans" xmlns:context="http://www.springframework.org/schema/context"
 4        xsi:schemaLocation="http://www.springframework.org/schema/beans http://www.springframework.org/schema/beans/spring-beans.xsd http://www.springframework.org/schema/context https://www.springframework.org/schema/context/spring-context.xsd"
 5 >
 6
 7     <bean id="messageService" class="com.spring.service.MessageServiceImpl" >
 8         <property name="msg" value="111"/>
 9     </bean>
10
11     <bean id="testBeanFactoryPostProcessor" class="com.spring.processor.TestBeanFactoryPostProcessor"/>
12
14 </beans>
启动并获取msg值:
 1 public class Test {
 2
 3     public static void main(String[] args) {
 4          // 用我们的配置文件来启动一个 ApplicationContext
 5         ApplicationContext context = new ClassPathXmlApplicationContext("classpath:application.xml");
 6  8         MessageService messageService = (MessageService)context.getBean("messageService");
 9
10         System.out.println(messageService.getMessage());
11
12         ((ClassPathXmlApplicationContext) context).close();
13     }
14
15 }
运行结果:

可见,原xml中配置的属性值已经被修改.。
(2)示例二:bean的动态代理
通过FactoryBean<T>接口,创建对应bean的代理对象,注册到beanFactory中,以给Car装Wheel为例:
 1 public interface Wheel {
 2     void run();
 3 }
 4
 5 public class Car {
 6
 7     private Wheel wheel;
 8
 9     public Wheel getWheel() {
10         return wheel;
11     }
12
13     public void setWheel(Wheel wheel) {
14         this.wheel = wheel;
15     }
16
17     public void start(){
18         wheel.run();
19     }
20
21 }
22
23
24 public class WheelFactory implements FactoryBean<Wheel>,InvocationHandler {
25
26     @Override
27     public Object invoke(Object proxy, Method method, Object[] args) throws Throwable {
28         System.out.println("代理类方法被调用|method="+method.getName());
29
30         return null;
31     }
32
33     @Override
34     public Wheel getObject() throws Exception {
35         System.out.println("获取Engine动态代理");
36         return (Wheel) Proxy.newProxyInstance(this.getClass().getClassLoader(),new Class[]{Wheel.class},this);
37     }
38
39     @Override
40     public Class<?> getObjectType() {
41         return Wheel.class;
42     }
43 }
44
45 public class DynamicProxyBeanFactoryPostProcessor implements BeanFactoryPostProcessor {
46
47     @Override
48     public void postProcessBeanFactory(ConfigurableListableBeanFactory beanFactory) throws BeansException {
49         BeanDefinitionRegistry registry=(BeanDefinitionRegistry) beanFactory;
50         GenericBeanDefinition beanDefinition=new GenericBeanDefinition();
51         beanDefinition.setBeanClass(WheelFactory.class);
52         beanDefinition.setScope(BeanDefinition.SCOPE_SINGLETON);
53         beanDefinition.setAutowireCandidate(true);
54         registry.registerBeanDefinition("wheel",beanDefinition);
55     }
56
57 }
58
59
60 @Configuration
61 public class BeanConfiguration {
62
63     @Bean
64     public Car car(Wheel wheel){
65         Car car=new Car();
66         car.setWheel(wheel);
67         return car;
68     }
69 }
xml配置:
<?xml version="1.0" encoding="UTF-8" ?>
<beans xmlns:xsi="http://www.w3.org/2001/XMLSchema-instance"
       xmlns="http://www.springframework.org/schema/beans" xmlns:context="http://www.springframework.org/schema/context"
       xsi:schemaLocation="http://www.springframework.org/schema/beans http://www.springframework.org/schema/beans/spring-beans.xsd http://www.springframework.org/schema/context https://www.springframework.org/schema/context/spring-context.xsd"
>

    <bean id="dynamicProxyBeanFactoryPostProcessor" class="com.spring.processor.dynamicproxy.DynamicProxyBeanFactoryPostProcessor"/>

    <context:component-scan base-package="com.spring"/>
</beans>
调用:
public class Test {

    public static void main(String[] args) {
        ApplicationContext context = new ClassPathXmlApplicationContext("classpath:application.xml");

        Car car=(Car)context.getBean("car");
        car.start();
        ((ClassPathXmlApplicationContext) context).close();
    }

}
执行结果:
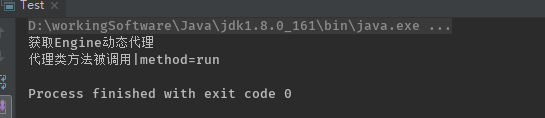
可见,调用到了代理类的invoke方法,即代理类通过factoryBean注册成功。
三、BeanDefinitionRegistryPostProcessor
1、接口
实现了bean的动态注入,且继承了BeanFactoryPostProcessor接口
1 public interface BeanDefinitionRegistryPostProcessor extends BeanFactoryPostProcessor {
2
3   postProcessBeanDefinitionRegistry(BeanDefinitionRegistry registry) throws BeansException;
4
5 }
我们查看一下传入的BeanDefinitionRegistey类:
public interface BeanDefinitionRegistry extends AliasRegistry {

    /**
     * Register a new bean definition with this registry.
     * Must support RootBeanDefinition and ChildBeanDefinition.
     * @param beanName the name of the bean instance to register
     * @param beanDefinition definition of the bean instance to register
     * @throws BeanDefinitionStoreException if the BeanDefinition is invalid
     * @throws BeanDefinitionOverrideException if there is already a BeanDefinition
     * for the specified bean name and we are not allowed to override it
     * @see GenericBeanDefinition
     * @see RootBeanDefinition
     * @see ChildBeanDefinition
     */
    void registerBeanDefinition(String beanName, BeanDefinition beanDefinition)
            throws BeanDefinitionStoreException;

    /**
     * Remove the BeanDefinition for the given name.
     * @param beanName the name of the bean instance to register
     * @throws NoSuchBeanDefinitionException if there is no such bean definition
     */
    void removeBeanDefinition(String beanName) throws NoSuchBeanDefinitionException;

    /**
     * Return the BeanDefinition for the given bean name.
     * @param beanName name of the bean to find a definition for
     * @return the BeanDefinition for the given name (never {@code null})
     * @throws NoSuchBeanDefinitionException if there is no such bean definition
     */
    BeanDefinition getBeanDefinition(String beanName) throws NoSuchBeanDefinitionException;

    /**
     * Check if this registry contains a bean definition with the given name.
     * @param beanName the name of the bean to look for
     * @return if this registry contains a bean definition with the given name
     */
    boolean containsBeanDefinition(String beanName);

    /**
     * Return the names of all beans defined in this registry.
     * @return the names of all beans defined in this registry,
     * or an empty array if none defined
     */
    String[] getBeanDefinitionNames();

    /**
     * Return the number of beans defined in the registry.
     * @return the number of beans defined in the registry
     */
    int getBeanDefinitionCount();

    /**
     * Determine whether the given bean name is already in use within this registry,
     * i.e. whether there is a local bean or alias registered under this name.
     * @param beanName the name to check
     * @return whether the given bean name is already in use
     */
    boolean isBeanNameInUse(String beanName);

}
可见,该类提供了bean的注册、修改、删除操作,可以动态修改spring中的bean。
2、示例
创建一个BeanDefinitionRegistryPostProcessor 接口的实现类,在实现方法中创建beanDefinition,并注册到BeanDefinitionRegistry中:
public class User {

    private String name;

    private int age;

    User(String name,int age){
        this.name=name;
        this.age=age;
    }

    public String getName() {
        return name;
    }

    public void setName(String name) {
        this.name = name;
    }

    public int getAge() {
        return age;
    }

    public void setAge(int age) {
        this.age = age;
    }
}


public class TestBeanDefinitionRegistryPostProcessor implements BeanDefinitionRegistryPostProcessor {

    @Override
    public void postProcessBeanDefinitionRegistry(BeanDefinitionRegistry registry) throws BeansException {

        AbstractBeanDefinition definition = BeanDefinitionBuilder.rootBeanDefinition(User.class)
                .addConstructorArgValue("张三")
                .addConstructorArgValue(26)
                .getBeanDefinition();
        registry.registerBeanDefinition("testUserBean", definition);
    }

    @Override
    public void postProcessBeanFactory(ConfigurableListableBeanFactory beanFactory) throws BeansException {

    }

}
xml配置:
<?xml version="1.0" encoding="UTF-8" ?>
<beans xmlns:xsi="http://www.w3.org/2001/XMLSchema-instance"
       xmlns="http://www.springframework.org/schema/beans" xmlns:context="http://www.springframework.org/schema/context"
       xsi:schemaLocation="http://www.springframework.org/schema/beans http://www.springframework.org/schema/beans/spring-beans.xsd http://www.springframework.org/schema/context https://www.springframework.org/schema/context/spring-context.xsd"
>
    <bean id="testBeanDefinitionRegistryPostProcessor" class="com.spring.processor.TestBeanDefinitionRegistryPostProcessor"/>

</beans>
访问:
public class Test {

    public static void main(String[] args) {
        ApplicationContext context = new ClassPathXmlApplicationContext("classpath:application.xml");

        User user=(User)context.getBean("testUserBean");
        System.out.println("name="+user.getName()+",age="+user.getAge());
        ((ClassPathXmlApplicationContext) context).close();
    }

}
结果:
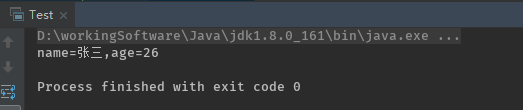
可见在实现类的postProcessBeanDefinitionRegistry()方法中的testUserBean创建成功,在实际的使用中,该方法经常与ClassPathBeanDefinitionScanner结合使用,通过指定扫描包来扫描要创建的bean,并注册到BeanDefinitionRegistry中。
四、 ImportBeanDefinitionRegistrar
1、接口
相比较BeanDefinitionRegistryPostProcessor接口而言,ImportBeanDefinitionRegistrar的方法多传了一个AnnotationMetadata,用于从注解配置中读取出待创建bean的元数据,读取成功后将对应的bean注册到BeanDefinitionRegistry中:
1 public interface ImportBeanDefinitionRegistrar {
2
3     public void registerBeanDefinitions(
4             AnnotationMetadata importingClassMetadata, BeanDefinitionRegistry registry);
5
6 }
2、示例
以下演示通过注解配置指定bean的属性并写入到bean中:
public class TestImportBeanDefinitionRegistrar implements ImportBeanDefinitionRegistrar {

    @Override
    public void registerBeanDefinitions(AnnotationMetadata importingClassMetadata, BeanDefinitionRegistry registry) {
        AnnotationAttributes annotationAttributes=AnnotationAttributes.fromMap(importingClassMetadata.getAnnotationAttributes(TestRegisterAnnotation.class.getName()));
        String userName=annotationAttributes.getString("userName");

        AbstractBeanDefinition definition = BeanDefinitionBuilder.rootBeanDefinition(User.class)
                .addConstructorArgValue(userName)
                .addConstructorArgValue(26)
                .getBeanDefinition();
        registry.registerBeanDefinition("testUserBean", definition);
    }

}


@Retention(RetentionPolicy.RUNTIME)
@Target(ElementType.TYPE)
@Documented
@Import(TestImportBeanDefinitionRegistrar.class)
public @interface TestRegisterAnnotation {
    String userName() default "";
}

//注解里指定属性参数
@Configuration
@TestRegisterAnnotation(userName = "赵云")
public class TestBeanConfiguration {

}
xml配置扫描包:
<?xml version="1.0" encoding="UTF-8" ?>
<beans xmlns:xsi="http://www.w3.org/2001/XMLSchema-instance"
       xmlns="http://www.springframework.org/schema/beans" xmlns:context="http://www.springframework.org/schema/context"
       xsi:schemaLocation="http://www.springframework.org/schema/beans http://www.springframework.org/schema/beans/spring-beans.xsd http://www.springframework.org/schema/context https://www.springframework.org/schema/context/spring-context.xsd"
>
    <context:component-scan base-package="com.spring"/>
</beans>
打印输出bean信息:
public class Test {

   public static void main(String[] args) {
        ApplicationContext context = new ClassPathXmlApplicationContext("classpath:application.xml");
        User user=(User)context.getBean("testUserBean");
        System.out.println("name="+user.getName()+",age="+user.getAge());
      ((ClassPathXmlApplicationContext) context).close();
   }

}
结果:
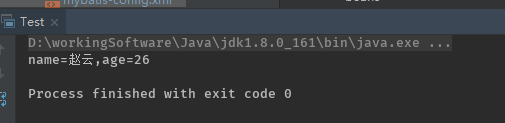
可见,注解中配置的bean属性已经生效。

 浙公网安备 33010602011771号