Linux--编译安装LNMP架构
编译安装LNMP
http://nginx.org/en/download.html/nginx-1.20.2.tar.gz
https://github.com/thkukuk/rpcsvc-proto/releases/rpcsvc-proto-1.4.tar.gz
http://mirrors.sohu.com/mysql/MySQL-5.7/mysql-boost-5.7.34.tar.gz
https://www.php.net/downloads.php/php-7.4.27.tar.gz
https://gitee.com/3dming/DiscuzL/attach_files/Discuz_X3.4_SC_UTF8_20211124.zip
http://mirror.centos.org/centos-7/7/cloud/x86_64/openstack-queens/Packages/o/oniguruma-6.7.0-1.el7.x86_64.rpm
http://mirror.centos.org/centos-7/7/cloud/x86_64/openstack-queens/Packages/o/oniguruma-devel-6.7.0-1.el7.x86_64.rpm
先刷个初始化脚本
[root@localhost ~]# sh initalize.sh

一、LNMP架构的编译安装
1. 安装nginx服务
(1)关闭防火墙
[root@localhost ~]# systemctl stop firewalld
[root@localhost ~]# systemctl disable firewalld
Removed symlink /etc/systemd/system/multi-user.target.wants/firewalld.service.
Removed symlink /etc/systemd/system/dbus-org.fedoraproject.FirewallD1.service.
[root@localhost ~]# setenforce 0
setenforce: SELinux is disabled

(2)安装依赖包
[root@localhost ~]# yum -y install pcre-devel zlib-devel gcc gcc-c++ make

(3)创建运行用户
[root@localhost ~]# useradd -M -s /sbin/nologin nginx

(4)编译安装
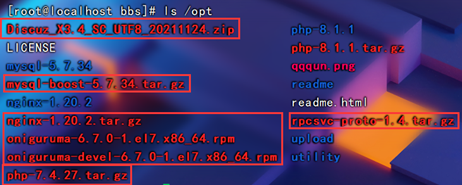
[root@localhost ~]# cd /opt
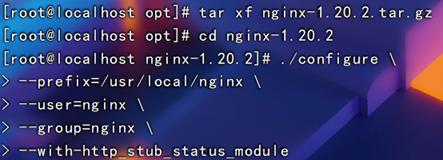
[root@localhost opt]# tar zxvf nginx-1.20.2.tar.gz -C /opt
[root@localhost opt]# cd nginx-1.20.2/
[root@localhost nginx-1.20.2]# ./configure \
> --prefix=/usr/local/nginx \
> --user=nginx \
> --group=nginx \
> --with-http_stub_status_module
[root@localhost nginx-1.20.2]# make -j 2 && make install
要先把红色的包下好,网站已给

(5)优化路径
[root@localhost nginx-1.20.2]# ln -s /usr/local/nginx/sbin/nginx /usr/local/sbin

(6)添加nginx系统服务
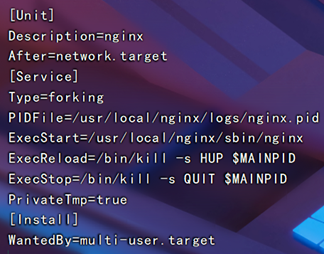
[root@localhost nginx-1.20.2]# vim /lib/systemd/system/nginx.service
[Unit]
Description=nginx
After=network.target
[Service]
Type=forking
PIDFile=/usr/local/nginx/logs/nginx.pid
ExecStart=/usr/local/nginx/sbin/nginx
ExecReload=/bin/kill -s HUP $MAINPID
ExecStop=/bin/kill -s QUIT $MAINPID
PrivateTmp=true
[Install]
WantedBy=multi-user.target
[root@localhost nginx-1.20.2]# chmod 754 /lib/systemd/system/nginx.service
[root@localhost nginx-1.20.2]# systemctl start nginx.service
[root@localhost nginx-1.20.2]# systemctl enable nginx.service
Created symlink from /etc/systemd/system/multi-user.target.wants/nginx.service to /usr/lib/systemd/system/nginx.service.


2. 安装mysql服务
(1)安装mysql环境依赖包
[root@localhost nginx-1.20.2]# yum install -y \
ncurses-devel \
perl-Data-Dumper \
git \
bison \
openssl-devel \
libtirpc-devel \
cmake

(2)创建运行用户
[root@localhost nginx-1.20.2]# useradd -M -s /sbin/nologin mysql

(3)编译安装
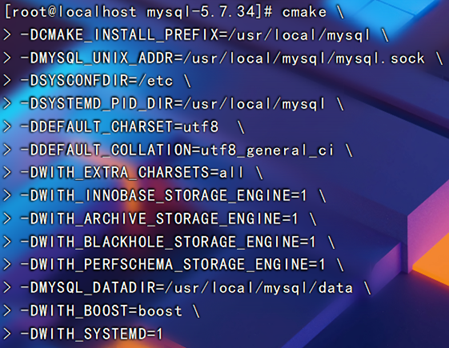
[root@localhost nginx-1.20.2]# cd /opt
[root@localhost opt]# tar zxvf mysql-boost-5.7.34.tar.gz
[root@localhost opt]# cd /opt/mysql-5.7.34/
[root@localhost mysql-5.7.34]# cmake \
-DCMAKE_INSTALL_PREFIX=/usr/local/mysql \
-DMYSQL_UNIX_ADDR=/usr/local/mysql/mysql.sock \
-DSYSCONFDIR=/etc \
-DSYSTEMD_PID_DIR=/usr/local/mysql \
-DDEFAULT_CHARSET=utf8 \
-DDEFAULT_COLLATION=utf8_general_ci \
-DWITH_EXTRA_CHARSETS=all \
-DWITH_INNOBASE_STORAGE_ENGINE=1 \
-DWITH_ARCHIVE_STORAGE_ENGINE=1 \
-DWITH_BLACKHOLE_STORAGE_ENGINE=1 \
-DWITH_PERFSCHEMA_STORAGE_ENGINE=1 \
-DMYSQL_DATADIR=/usr/local/mysql/data \
-DWITH_BOOST=boost \
-DWITH_SYSTEMD=1
[root@localhost mysql-5.7.34]# make -j 2 && make install


(4)修改mysql配置文件
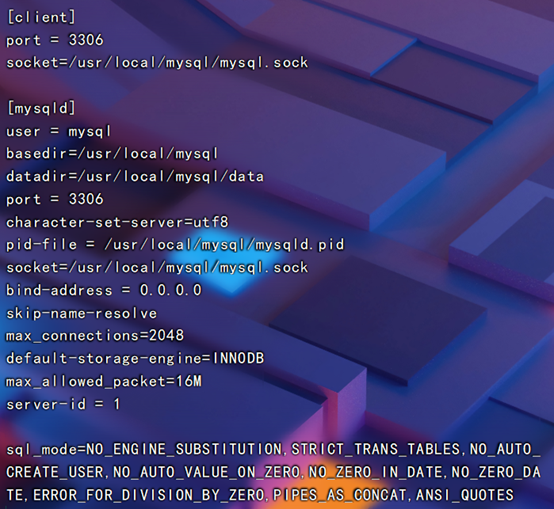
[root@localhost mysql-5.7.34]# vim /etc/my.cnf
#删除全部内容后编辑
[client]
port = 3306
socket=/usr/local/mysql/mysql.sock
[mysqld]
user = mysql
basedir=/usr/local/mysql
datadir=/usr/local/mysql/data
port = 3306
character-set-server=utf8
pid-file = /usr/local/mysql/mysqld.pid
socket=/usr/local/mysql/mysql.sock
bind-address = 0.0.0.0
skip-name-resolve
max_connections=2048
default-storage-engine=INNODB
max_allowed_packet=16M
server-id = 1
sql_mode=NO_ENGINE_SUBSTITUTION,STRICT_TRANS_TABLES,NO_AUTO_CREATE_USER,NO_AUTO_VALUE_ON_ZERO,NO_ZERO_IN_DATE,NO_ZERO_DATE,ERROR_FOR_DIVISION_BY_ZERO,PIPES_AS_CONCAT,ANSI_QUOTES

(5)更改mysql安装目录和配置文件的属主数组
[root@localhost mysql-5.7.34]# chown -R mysql:mysql /usr/local/mysql/
[root@localhost mysql-5.7.34]# chown mysql:mysql /etc/my.cnf

(6)设置路径环境变量
[root@localhost mysql-5.7.34]#
echo 'export PATH=/usr/local/mysql/bin:/usr/local/mysql/lib:$PATH' >> /etc/profile
[root@localhost mysql-5.7.34]# source /etc/profile


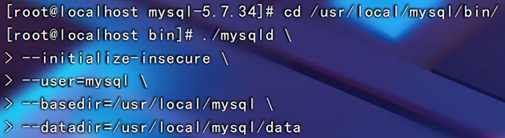
(7)初始化数据库
[root@localhost mysql-5.7.34]# cd /usr/local/mysql/bin/
[root@localhost bin]# ./mysqld \
> --initialize-insecure \
> --user=mysql \
> --basedir=/usr/local/mysql \
> --datadir=/usr/local/mysql/data
(8)添加mysqld系统服务
[root@localhost bin]#
cp /usr/local/mysql/usr/lib/systemd/system/mysqld.service /usr/lib/systemd/system/
[root@localhost bin]# systemctl daemon-reload
[root@localhost bin]# systemctl start mysqld.service
[root@localhost bin]# systemctl enable mysqld
Created symlink from /etc/systemd/system/multi-user.target.wants/mysqld.service to /usr/lib/systemd/system/mysqld.service.

(9)修改mysql的登录密码
[root@localhost bin]# mysqladmin -u root -p password "abc123"
Enter password:
mysqladmin: [Warning] Using a password on the command line interface can be insecure.
Warning: Since password will be sent to server in plain text, use ssl connection to ensure password safety.

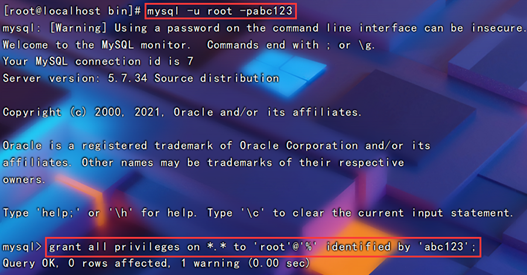
(10)授权远程登录
[root@localhost bin]# mysql -u root -p
Enter password:
Welcome to the MySQL monitor. Commands end with ; or \g.
Your MySQL connection id is 5
Server version: 5.7.34 Source distribution
Copyright (c) 2000, 2017, Oracle and/or its affiliates. All rights reserved.
Oracle is a registered trademark of Oracle Corporation and/or its
affiliates. Other names may be trademarks of their respective
owners.
Type 'help;' or '\h' for help. Type '\c' to clear the current input statement.
mysql> grant all privileges on *.* to 'root'@'%' identified by 'abc123';
Query OK, 0 rows affected, 1 warning (0.00 sec)
3. 安装配置php解析环境
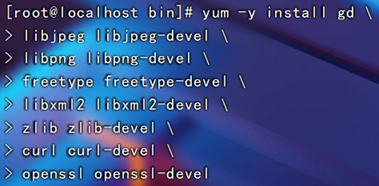
(1)安装环境依赖包
[root@localhost bin]# yum -y install gd \
> libjpeg libjpeg-devel \
> libpng libpng-devel \
> freetype freetype-devel \
> libxml2 libxml2-devel \
> zlib zlib-devel \
> curl curl-devel \
> openssl openssl-devel
> sqlite-devel
https://blog.csdn.net/Kangshuo2471781030/article/details/107241779
rpm -ivh oniguruma-*


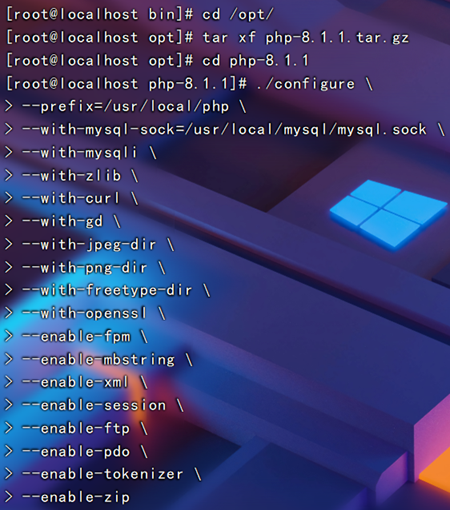
(2)编译安装,以下的截图是8.0
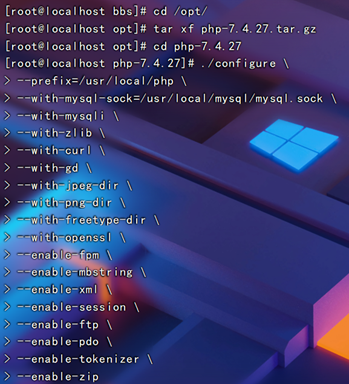
[root@localhost bin]# cd /opt
[root@localhost opt]# tar jxvf php-7.4.27.tar.bz2
[root@localhost opt]# cd php-7.4.27
[root@localhost php-7.4.27]# ./configure \
> --prefix=/usr/local/php \
> --with-mysql-sock=/usr/local/mysql/mysql.sock \
> --with-mysqli \
> --with-zlib \
> --with-curl \
> --with-gd \
> --with-jpeg-dir \
> --with-png-dir \
> --with-freetype-dir \
> --with-openssl \
> --enable-fpm \
> --enable-mbstring \
> --enable-xml \
> --enable-session \
> --enable-ftp \
> --enable-pdo \
> --enable-tokenizer \
> --enable-zip
[root@localhost php-7.4.27]# make -j 2 && make install

(3)路径优化
[root@localhost php-7.4.27]# ln -s /usr/local/php/bin/* /usr/local/bin/
[root@localhost php-7.4.27]# ln -s /usr/local/php/sbin/* /usr/local/sbin/

(4)调整php配置文件
php有三个配置文件,分别是:
主配置文件php.ini
进程服务配置文件php-fpm.conf
扩展配置文件www.conf
1.调整主配置文件
[root@localhost php-7.4.27]# cp /opt/php-7.4.27/
php.ini-development /usr/local/php/php.ini
#在测试环境时使用php.ini-development文件,而在生产环境时使用php.ini-production文件
[root@localhost php-7.4.27]# vim /usr/local/php/lib/php.ini
#1170行,修改
mysqli.default_socket = /usr/local/mysql/mysql.sock
#939行,取消注释,修改
date.timezone = Asia/Shanghai
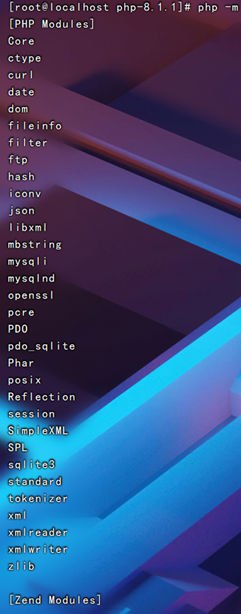
[root@localhost php-7.4.27]# php -m #验证安装的模块
[PHP Modules]
Core
ctype
curl
date
dom
fileinfo
filter
ftp
gd
hash
iconv
json
libxml
mbstring
mysqli
mysqlnd
openssl
pcre
PDO
pdo_sqlite
Phar
posix
Reflection
session
SimpleXML
SPL
sqlite3
standard
tokenizer
xml
xmlreader
xmlwriter
zip
zlib
[Zend Modules]


1171行

966行

2.调整进程服务配置文件
[root@localhost php-7.4.27]# cd /usr/local/php/etc/
[root@localhost etc]# cp php-fpm.conf.default php-fpm.conf
[root@localhost etc]# vim php-fpm.conf
#17行,删除注释符号";"
pid = run/php-fpm.pid

17行

3.调整扩展配置文件
[root@localhost etc]# cd /usr/local/php/etc/php-fpm.d/
[root@localhost php-fpm.d]# cp www.conf.default www.conf

(5)启动php-fpm
PHP-FPM(FastCGI Process Manager:FastCGI 进程管理器)是一个 PHPFastCGI 管理器, 由于Nginx服务器不能处理动态页面,需要由 Nginx 把动态请求交给 php-fpm 进程进行解析。
[root@localhost php-fpm.d]#
/usr/local/php/sbin/php-fpm -c /usr/local/php/lib/php.ini
[root@localhost php-fpm.d]# netstat -anpt | grep 9000
tcp 0 0 127.0.0.1:9000 0.0.0.0:* LISTEN 33883/php-fpm: mast
[root@localhost php-fpm.d]# cd /opt/php-7.4.27/sapi/fpm
[root@localhost fpm]# cp php-fpm.service /usr/lib/systemd/system/php-fpm.service
[root@localhost fpm]# systemctl restart php-fpm.service


(6)配置nginx支持php解析
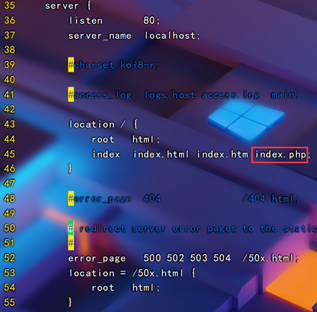
[root@localhost fpm]# vim /usr/local/nginx/conf/nginx.conf
#65行-71行,取消注释,修改第69行,将/scripts 修改为nginx的工作目录
location ~ \.php$ {
root html;
fastcgi_pass 127.0.0.1:9000;
fastcgi_index index.php;
fastcgi_param SCRIPT_FILENAME /usr/local/nginx/html$fastcgi_script_name;
include fastcgi_params;
}
[root@localhost fpm]# systemctl restart nginx.service


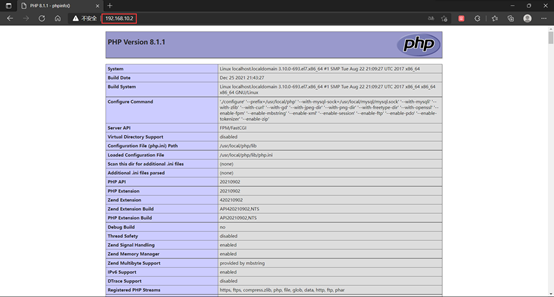
(7)验证php测试页
[root@localhost fpm]# vim /usr/local/nginx/html/index.php
<?php
phpinfo();
?>


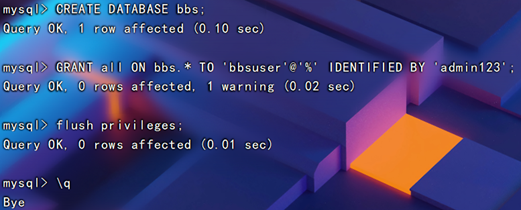
(8)验证数据库工作是否正常
[root@localhost fpm]# mysql -u root -p
Enter password:
Welcome to the MySQL monitor. Commands end with ; or \g.
Your MySQL connection id is 6
Server version: 5.7.34 Source distribution
Copyright (c) 2000, 2017, Oracle and/or its affiliates. All rights reserved.
Oracle is a registered trademark of Oracle Corporation and/or its
affiliates. Other names may be trademarks of their respective
owners.
Type 'help;' or '\h' for help. Type '\c' to clear the current input statement.
mysql> CREATE DATABASE bbs;
Query OK, 1 row affected (0.00 sec)
mysql> GRANT all ON bbs.* TO 'bbsuser'@'%' IDENTIFIED BY 'admin123';
Query OK, 0 rows affected, 1 warning (0.00 sec)
mysql> flush privileges;
Query OK, 0 rows affected (0.03 sec)
mysql> quit
Bye
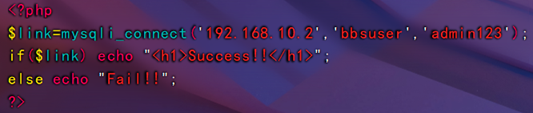
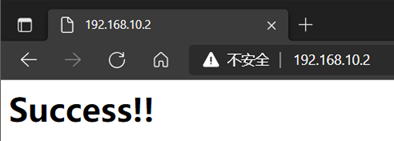
[root@localhost fpm]# vim /usr/local/nginx/html/index.php
<?php
$link=mysqli_connect('192.168.122.10','bbsuser','admin123');
if($link) echo "<h1>Success!!</h1>";
else echo "Fail!!";
?>


因为论坛3.4暂不支持php.8.0,所以降级7.0


OK了,其余操作不需要再做了,只需重启服务即可

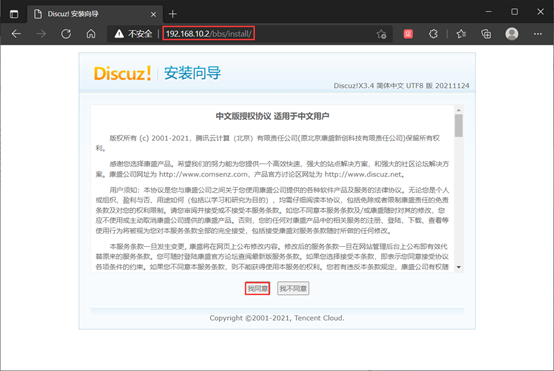
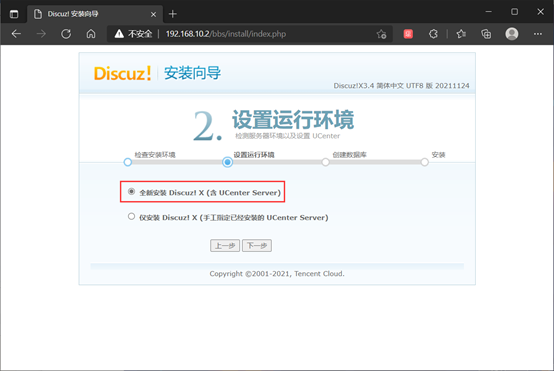
4.部署Discuz!社区论坛web应用
(1)解压论坛软件
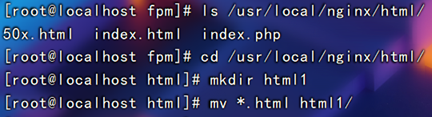
[root@localhost fpm]# cd /opt
[root@localhost opt]# unzip Discuz_X3.4_SC_UTF8.zip -d /opt/dis


(2)新建web目录
[root@localhost opt]# cd /opt/dis/dir_SC_UTF8/
[root@localhost dir_SC_UTF8]# cp -r upload/ /usr/local/nginx/html/bbs/

(3)调整论坛目录的权限
[root@localhost dir_SC_UTF8]# cd /usr/local/nginx/html/bbs/
[root@localhost bbs]# chmod -R 777 ./{config,data,uc_server,uc_client}

(4)安装bbs
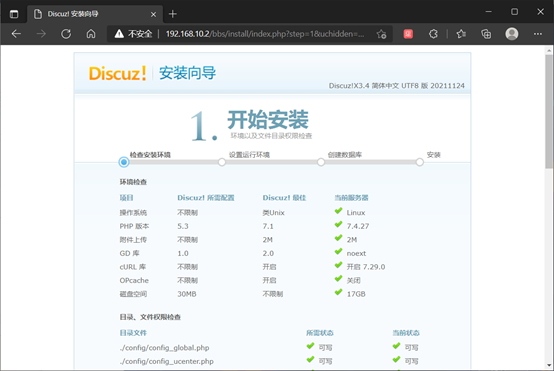

如果服务器地址为127.0.0.1或其他地址,需要授权
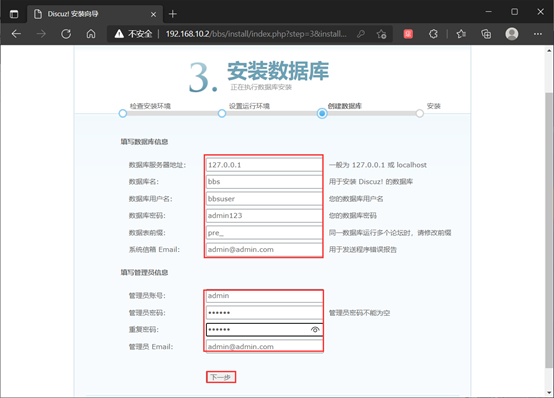

如果想重新安装论坛,请执行
rm -rf /usr/local/nginx/html/bbs/data/install.lock
(5)访问
用户访问页面:http://IP地址/bbs/index.php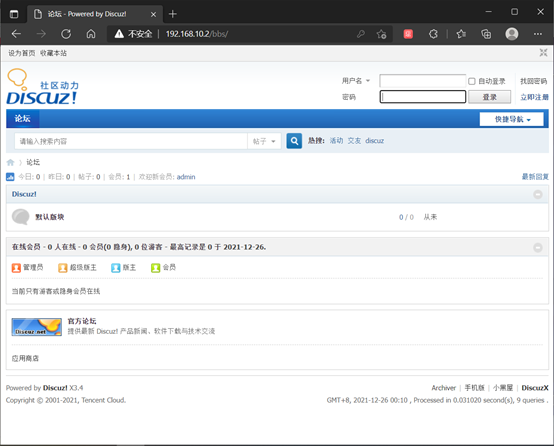
管理访问页面:http://IP地址/bbs/admin.php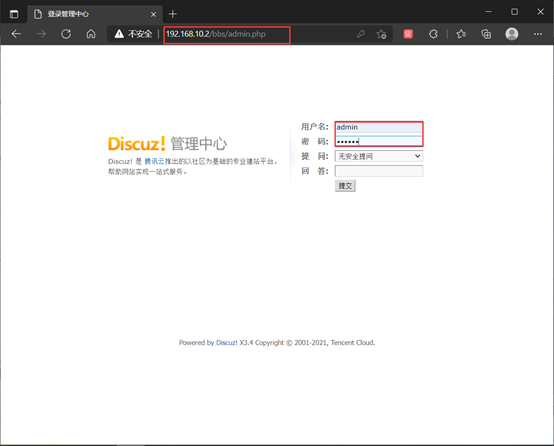
配置并安装phpMydmin
mysql -u root -p
CREATE DATABASE myadm;
GRANT all ON myadm.* TO 'myadm'@'%' IDENTIFIED BY 'admin123';
GRANT all ON myadm.* TO 'myadm'@'localhost' IDENTIFIED BY 'admin123';
flush privileges;
unzip phpMyAdmin-4.9.7-all-languages.zip -d /opt/
mv phpMyAdmin-4.9.7-all-languages /usr/local/httpd/htdocs/myadm
cd /usr/local/httpd/htdocs/myadm
cp config.sample.inc.php config.inc.php
vi config.inc.php
$cfg['Servers'][$i]['host'] = '127.0.0.1'; //把localhost 改成IP 32行
http://192.168.10.2/myadm

 浙公网安备 33010602011771号