
深入了解JUC(并发编程)
并发大纲

java.util.concurrent包涵盖三块内容
- atomic
- locks
- 其他

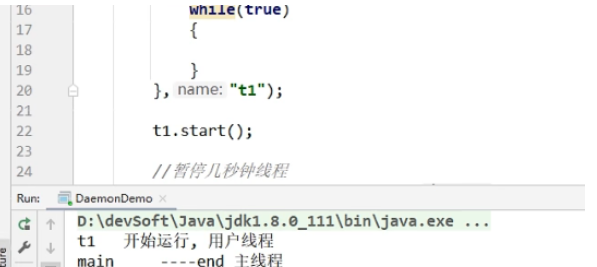
start线程解读
- 初始程序
public static void main(String[] args) {
        Thread t1 = new Thread(() ->{
        },"t1");
        t1.start();
    }
//start
    public synchronized void start() {
        /**
         * This method is not invoked for the main method thread or "system"
         * group threads created/set up by the VM. Any new functionality added
         * to this method in the future may have to also be added to the VM.
         *
         * A zero status value corresponds to state "NEW".
         */
        if (threadStatus != 0)
            throw new IllegalThreadStateException();

        /* Notify the group that this thread is about to be started
         * so that it can be added to the group's list of threads
         * and the group's unstarted count can be decremented. */
        group.add(this);

        boolean started = false;
        try {
            start0();
            started = true;
        } finally {
            try {
                if (!started) {
                    group.threadStartFailed(this);
                }
            } catch (Throwable ignore) {
                /* do nothing. If start0 threw a Throwable then
                  it will be passed up the call stack */
            }
        }
    }
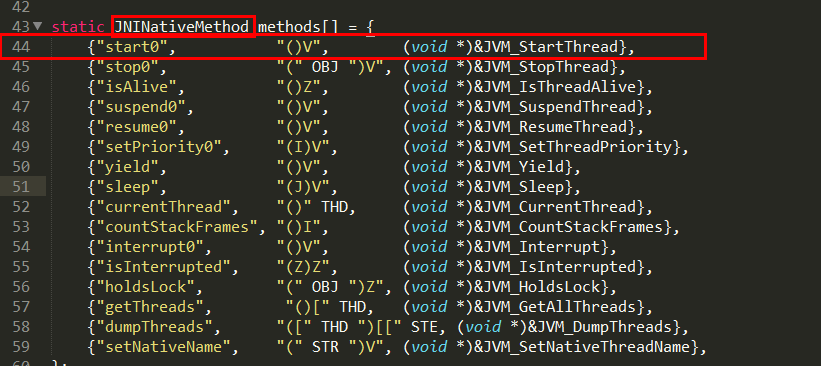
private native void start0();//start0是一个native方法
-
native调用了本地方法,我们可以通过下载官网OpenJDK查看其源码
-
thread.c
java线程是通过start的方法启动执行的,主要内容在native方法start0中
Openjdk的写JNI一般是一一对应的,Thread.java对应的就是Thread.c
start0其实就是JVM_StartThread。此时查看源代码可以看到在jvm.h中找到了声明,jvm.cpp中有实现
-
vm.cpp
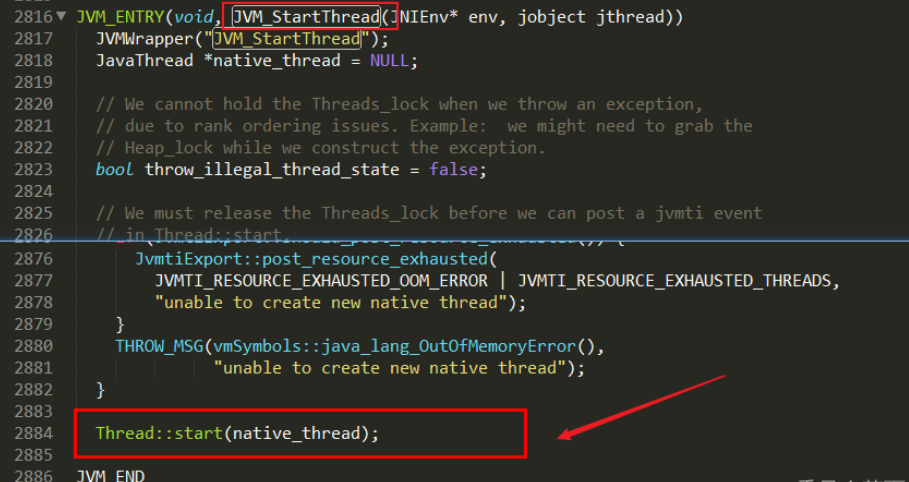
- thread.cpp
- 终于在这里调用了操作系统的线程启动,os::start_thread(thread);
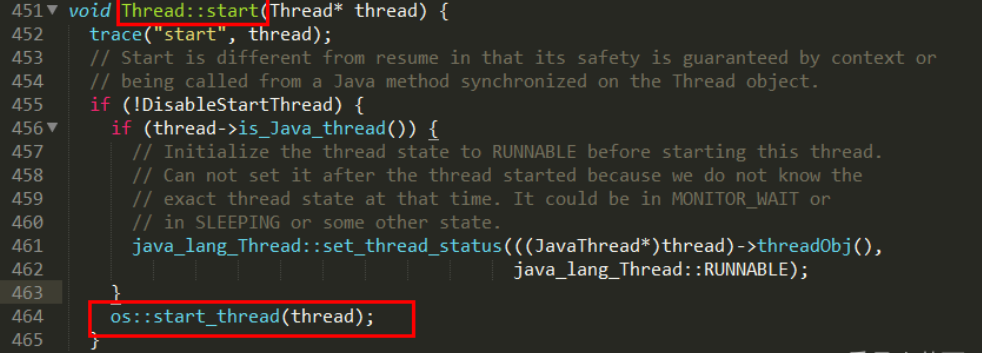
- 终于在这里调用了操作系统的线程启动,os::start_thread(thread);
-
Java多线程相关概念(1把锁 2个并(并发和并行))
- 并发:是在同一实体上的多个事件,是在同一台处理器上“同时”处理多个任务,同一时刻,其实是只有一个事件在发生。
- 并行:是在不同实体上的多个事件,是在多台处理器上同时处理多个任务,同一时刻,大家都真的在做事情,你做你的,我做我的
并发VS并行

3个程(进程 线程 管程)
- 通过上面start线程的案例,其实进程线程都来源于操作系统。
- 进程:系统中运行的一个应用程序就是一个进程,每一个进程都有它自己的内存空间和系统资源。
- 线程:也被称为轻量级进程,在同一个进程内基本会有1一个或多个线程,是大多数操作系统进行调度的基本单元。
- 管程: Monitor(监视器),也就是我们平时说的锁,Monitor其实是一种同步机制,他的义务是保证(同一时间)只有一个线程可以访问被保护的数据和代码。JVM中同步是基于进入和退出监视器对象(Monitor,管程对象)来实现的,每个对象实例都会有一个Monitor对象,Monitor对象会和Java对象一同创建并销毁,它底层是由C++语言来实现的.
进程VS线程
进程是…,线程是…,进程和线程的最大不同在于进程基本上是独立的,而线程不一定,线程共享方法区和堆,线程私有栈、本地方法栈和程序计数器
用户线程和守护线程
Java线程分为用户线程和守护线程
- 线程的daemon属性为
- true表示是守护线程
- false表示是用户线程。
用户线程
是系统的工作线程,它会完成这个程序需要完成的业务操作
守护线程
是一种特殊的线程,为其他线程服务的,在后台默默地完成一些系统性的服务,比如垃圾回收线程。
总结
点击查看代码
public class DaemonDemo
{
public static void main(String[] args)
{
    Thread t1 = new Thread(() -> {
        System.out.println(Thread.currentThread().getName()+"\t 开始运行,"+(Thread.currentThread().isDaemon() ? "守护线程":"用户线程"));
        while (true) {

        }
    }, "t1");
    //线程的daemon属性为true表示是守护线程,false表示是用户线程
    //---------------------------------------------
    t1.setDaemon(true);
    //-----------------------------------------------
    t1.start();
    //3秒钟后主线程再运行
    try { TimeUnit.SECONDS.sleep(3); } catch (InterruptedException e) { e.printStackTrace(); }

    System.out.println("----------main线程运行完毕");
}

}
- 两种情况
- 未加t1.setDaemon(true);,默认是用户线程,他会继续运行,所以灯亮着
- 加了t1.setDaemon(true);是守护线程,当用户线程main方法结束后自动退出了
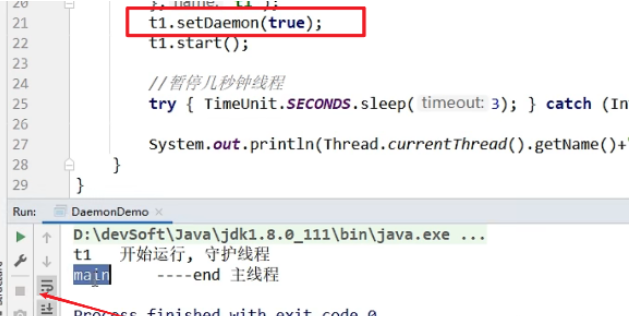
- 守护线程作为一个服务线程,没有服务对象就没有必要继续运行了,如果用户线程全部结束了,意味着程序需要完成的业务操作已经结束了,系统可退出了。假如当系统只剩下守护线程的时候,java虚拟机会自动退出。
- setDaemon(true)方法必须在start()之前设置,否则报IIIegalThreadStateException异常
CompletableFuture(异步实现)
Future和Callable接口
* Future接口(FutureTask实现类)定义了操作异步任务执行一些方法,如获取异步任务的执行结果、取消任务的执行、判断任务是否被取消、判断任务执行是否完毕等。(异步:可以被叫停,可以被取消)
* 一句话:Future接口可以为主线程开一个分支任务,专门为主线程处理耗时和费力的复杂业务。
* eg.比如主线程让一个子线程去执行任务,子线程可能比较耗时,启动子线程开始执行任务后,主线程就去做其他事情了,过了一会才去获取子任务的执行结果。老师在上课,但是口渴,于是让班长这个线程去买水,自己可以继续上课,实现了异步任务。
* 有个目的:异步多线程任务执行且有返回结果,三个特点:多线程/有返回/异步任务(班长作为老师去买水作为新启动的异步多线程任务且买到水有结果返回)
FutureTask三功能合一:
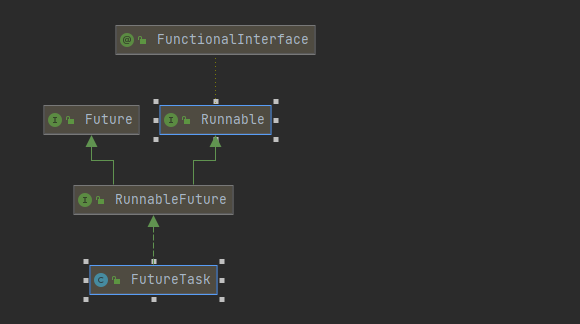
- 作为线程:实现了runnable接口
- 异步处理:实现了future接口
- 有返回值:构造注入了Callable
,提供了Callable功能
点击查看代码
    /**
     * Creates a {@code FutureTask} that will, upon running, execute the
     * given {@code Callable}.
     *
     * @param  callable the callable task
     * @throws NullPointerException if the callable is null
     */
    public FutureTask(Callable<V> callable) {
        if (callable == null)
            throw new NullPointerException();
        this.callable = callable;
        this.state = NEW;       // ensure visibility of callable
    }
ForkJoinTask
在 JDK 1.7 , ForkJoin,并行执行任务!提高效率。大数据量!
大数据:Map Reduce (把大任务拆分为小任务)
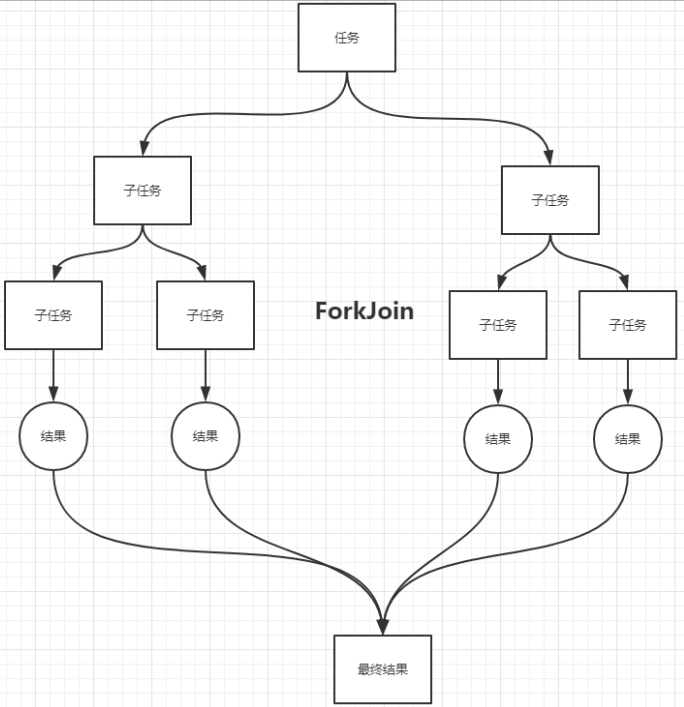
就是在必要的情况下,将一个大任务,进行拆分(fork) 成若干个小任务(拆到给出的临界值为止),再将一个个的小任务运算的结果进行join汇总
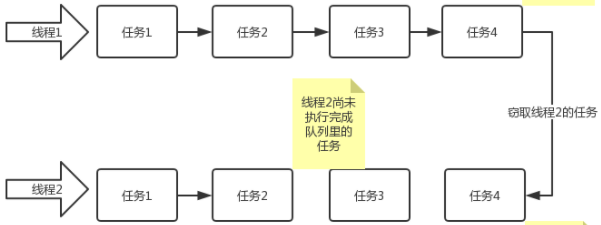
工作窃取
工作窃取模式 (work-stealing):当执行新的任务时它可以将其拆分成 更小的任务执行,并将小任务加到线程队列中,当没有任务执行时,再从一个随机线程的队列中偷一个并把它放在自己的队列中
相对于一般的线程池实现 ,fork/join 框架的优势体现在对其中包含的任务的处理方式上,在一般的线程池中,如果一个线程正在执行的任务由于某些原因无法继续运行那么该线程会处于等待状态。而在fork/join 框架实现中,如果某个子问题由于等待另外一个子问题的完成而无法继续运行。那么处理该子问题的线程会主动寻找其他尚未运行的子问题(窃取过来)来执行,这种方式减少了线程的等待时间,提高了性能
ForkJoinTask实现类
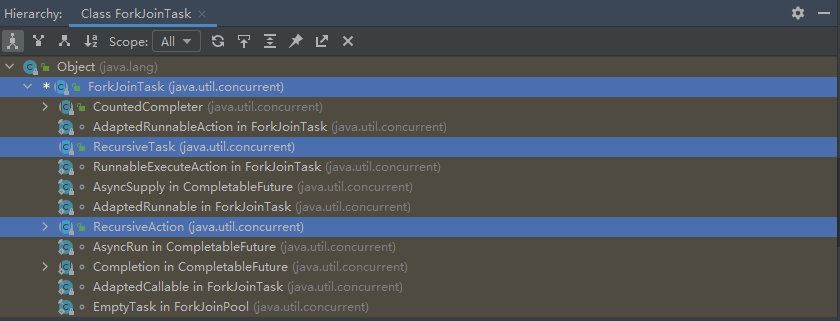
- RecursiveTask
>:有返回值的递归任务 - RecursiveAction:无返回值得递归事件
实现类Demo
点击查看代码
package com.kuang.forkjoin;

import java.util.concurrent.RecursiveTask;

/**
 * 求和计算的任务!
 * 3000   6000(ForkJoin)  9000(Stream并行流)
 * // 如何使用 forkjoin
 * // 1、forkjoinPool 通过它来执行
 * // 2、计算任务 forkjoinPool.execute(ForkJoinTask task)
 * // 3. 计算类要继承 ForkJoinTask
 */
public class ForkJoinDemo extends RecursiveTask<Long> {

    private Long start;  // 1
    private Long end;    // 1990900000

    // 临界值
    private Long temp = 10000L;

    public ForkJoinDemo(Long start, Long end) {
        this.start = start;
        this.end = end;
    }

    // 计算方法
    @Override
    protected Long compute() {
        if ((end-start)<temp){
            Long sum = 0L;
            for (Long i = start; i <= end; i++) {
                sum += i;
            }
            return sum;
        }else { // forkjoin 递归
            long middle = (start + end) / 2; // 中间值
            ForkJoinDemo task1 = new ForkJoinDemo(start, middle);
            task1.fork(); // 拆分任务,把任务压入线程队列
            ForkJoinDemo task2 = new ForkJoinDemo(middle+1, end);
            task2.fork(); // 拆分任务,把任务压入线程队列

            return task1.join() + task2.join();
        }
    }
}
点击查看代码
package com.kuang.forkjoin;

import java.util.concurrent.ExecutionException;
import java.util.concurrent.ForkJoinPool;
import java.util.concurrent.ForkJoinTask;
import java.util.stream.DoubleStream;
import java.util.stream.IntStream;
import java.util.stream.LongStream;

/**
 * 同一个任务,别人效率高你几十倍!
 */
public class Test {
    public static void main(String[] args) throws ExecutionException, InterruptedException {
        // test1(); // 12224
        // test2(); // 10038
        // test3(); // 153
    }

    // 普通程序员
    public static void test1(){
        Long sum = 0L;
        long start = System.currentTimeMillis();
        for (Long i = 1L; i <= 10_0000_0000; i++) {
            sum += i;
        }
        long end = System.currentTimeMillis();
        System.out.println("sum="+sum+" 时间:"+(end-start));
    }

    // 会使用ForkJoin
    public static void test2() throws ExecutionException, InterruptedException {
        long start = System.currentTimeMillis();

        ForkJoinPool forkJoinPool = new ForkJoinPool();
        ForkJoinTask<Long> task = new ForkJoinDemo(0L, 10_0000_0000L);
        ForkJoinTask<Long> submit = forkJoinPool.submit(task);// 提交任务
        Long sum = submit.get();

        long end = System.currentTimeMillis();

        System.out.println("sum="+sum+" 时间:"+(end-start));
    }

    public static void test3(){
        long start = System.currentTimeMillis();
        // Stream并行流 ()  (]
        long sum = LongStream.rangeClosed(0L, 10_0000_0000L).parallel().reduce(0, Long::sum);
        long end = System.currentTimeMillis();
        System.out.println("sum="+"时间:"+(end-start));
    }

}
CountDownLatch
用过 CountDownLatch 么?什么场景下用的?
CountDownLatch的作用就是 允许 count 个线程阻塞在一个地方,直至这count个线程的任务都执行完毕。之前在项目中,有一个使用多线程读取多个文件处理的场景,我用到了 。具体场景是下面这样的:
我们要读取处理 6 个文件,这 6 个任务都是没有执行顺序依赖的任务,但是我们需要返回给用户的时候将这几个文件的处理的结果进行统计整理。
为此我们定义了一个线程池和 count 为 6 的CountDownLatch对象 。使用线程池处理读取任务,每一个线程处理完之后就将 count-1,调用方法,直到所有文件读取完之后,才会接着执行后面的逻辑。
伪代码是下面这样的:
点击查看代码
public class CountDownLatchExample1 {
    // 处理文件的数量
    private static final int threadCount = 6;

    public static void main(String[] args) throws InterruptedException {
        // 创建一个具有固定线程数量的线程池对象(推荐使用构造方法创建)
        ExecutorService threadPool = Executors.newFixedThreadPool(10);
        final CountDownLatch countDownLatch = new CountDownLatch(threadCount);
        for (int i = 0; i < threadCount; i++) {
            final int threadnum = i;
            threadPool.execute(() -> {
                try {
                    //处理文件的业务操作
                    //......
                } catch (InterruptedException e) {
                    e.printStackTrace();
                } finally {
                    //表示一个文件已经被完成
                    countDownLatch.countDown();
                }

            });
        }
        countDownLatch.await();
        threadPool.shutdown();
        System.out.println("finish");
    }
}
点击查看代码
CompletableFuture<Void> task1 =
    CompletableFuture.supplyAsync(()->{
        //自定义业务操作
    });
......
CompletableFuture<Void> task6 =
    CompletableFuture.supplyAsync(()->{
    //自定义业务操作
    });
......
CompletableFuture<Void> headerFuture=CompletableFuture.allOf(task1,.....,task6);

try {
    headerFuture.join();
} catch (Exception ex) {
    //......
}
System.out.println("all done. ");
点击查看代码
//文件夹位置
List<String> filePaths = Arrays.asList(...)
// 异步处理所有文件
List<CompletableFuture<String>> fileFutures = filePaths.stream()
    .map(filePath -> doSomeThing(filePath))
    .collect(Collectors.toList());
// 将他们合并起来
CompletableFuture<Void> allFutures = CompletableFuture.allOf(
    fileFutures.toArray(new CompletableFuture[fileFutures.size()])
);
CompletableFuture
Bi函数式接口
BiConsumer
函数式接口 BiConsumer
点击查看代码
@FunctionalInterface
public interface BiConsumer<T, U> {

    /**
     * Performs this operation on the given arguments.
     *
     * @param t the first input argument
     * @param u the second input argument
     */
    void accept(T t, U u);

    /**
     * Returns a composed {@code BiConsumer} that performs, in sequence, this
     * operation followed by the {@code after} operation. If performing either
     * operation throws an exception, it is relayed to the caller of the
     * composed operation.  If performing this operation throws an exception,
     * the {@code after} operation will not be performed.
     *
     * @param after the operation to perform after this operation
     * @return a composed {@code BiConsumer} that performs in sequence this
     * operation followed by the {@code after} operation
     * @throws NullPointerException if {@code after} is null
     */
    default BiConsumer<T, U> andThen(BiConsumer<? super T, ? super U> after) {
        Objects.requireNonNull(after);

        return (l, r) -> {
            accept(l, r);
            after.accept(l, r);
        };
    }
}    public CompletableFuture<T> whenComplete(BiConsumer<? super T, ? super Throwable> action) {
        return uniWhenCompleteStage(null, action);
}
BiFunction
点击查看代码
@FunctionalInterface
public interface BiFunction<T, U, R> {

    /**
     * Applies this function to the given arguments.
     *
     * @param t the first function argument
     * @param u the second function argument
     * @return the function result
     */
    R apply(T t, U u);

    /**
     * Returns a composed function that first applies this function to
     * its input, and then applies the {@code after} function to the result.
     * If evaluation of either function throws an exception, it is relayed to
     * the caller of the composed function.
     *
     * @param <V> the type of output of the {@code after} function, and of the
     *           composed function
     * @param after the function to apply after this function is applied
     * @return a composed function that first applies this function and then
     * applies the {@code after} function
     * @throws NullPointerException if after is null
     */
    default <V> BiFunction<T, U, V> andThen(Function<? super R, ? extends V> after) {
        Objects.requireNonNull(after);
        return (T t, U u) -> after.apply(apply(t, u));
    }
}
BiPredicate
点击查看代码
@FunctionalInterface
public interface BiPredicate<T, U> {

    /**
     * Evaluates this predicate on the given arguments.
     *
     * @param t the first input argument
     * @param u the second input argument
     * @return {@code true} if the input arguments match the predicate,
     * otherwise {@code false}
     */
    boolean test(T t, U u);

    /**
     * Returns a composed predicate that represents a short-circuiting logical
     * AND of this predicate and another.  When evaluating the composed
     * predicate, if this predicate is {@code false}, then the {@code other}
     * predicate is not evaluated.
     *
     * <p>Any exceptions thrown during evaluation of either predicate are relayed
     * to the caller; if evaluation of this predicate throws an exception, the
     * {@code other} predicate will not be evaluated.
     *
     * @param other a predicate that will be logically-ANDed with this
     *              predicate
     * @return a composed predicate that represents the short-circuiting logical
     * AND of this predicate and the {@code other} predicate
     * @throws NullPointerException if other is null
     */
    default BiPredicate<T, U> and(BiPredicate<? super T, ? super U> other) {
        Objects.requireNonNull(other);
        return (T t, U u) -> test(t, u) && other.test(t, u);
    }

    /**
     * Returns a predicate that represents the logical negation of this
     * predicate.
     *
     * @return a predicate that represents the logical negation of this
     * predicate
     */
    default BiPredicate<T, U> negate() {
        return (T t, U u) -> !test(t, u);
    }

    /**
     * Returns a composed predicate that represents a short-circuiting logical
     * OR of this predicate and another.  When evaluating the composed
     * predicate, if this predicate is {@code true}, then the {@code other}
     * predicate is not evaluated.
     *
     * <p>Any exceptions thrown during evaluation of either predicate are relayed
     * to the caller; if evaluation of this predicate throws an exception, the
     * {@code other} predicate will not be evaluated.
     *
     * @param other a predicate that will be logically-ORed with this
     *              predicate
     * @return a composed predicate that represents the short-circuiting logical
     * OR of this predicate and the {@code other} predicate
     * @throws NullPointerException if other is null
     */
    default BiPredicate<T, U> or(BiPredicate<? super T, ? super U> other) {
        Objects.requireNonNull(other);
        return (T t, U u) -> test(t, u) || other.test(t, u);
    }
}
与普通的断言接口不同的是,BiPredicate可以传入两个参数。
CompletableFuture启动异步任务
CompletableFuture创建方式:
点击查看代码
    /**
     * Returns a new CompletableFuture that is asynchronously completed
     * by a task running in the {@link ForkJoinPool#commonPool()} after
     * it runs the given action.
     *
     * @param runnable the action to run before completing the
     * returned CompletableFuture
     * @return the new CompletableFuture
     */
    public static CompletableFuture<Void> runAsync(Runnable runnable) {
        return asyncRunStage(asyncPool, runnable);
    }

    /**
     * Returns a new CompletableFuture that is asynchronously completed
     * by a task running in the given executor after it runs the given
     * action.
     *
     * @param runnable the action to run before completing the
     * returned CompletableFuture
     * @param executor the executor to use for asynchronous execution
     * @return the new CompletableFuture
     */
    public static CompletableFuture<Void> runAsync(Runnable runnable,
                                                   Executor executor) {
        return asyncRunStage(screenExecutor(executor), runnable);
    }

    /**
     * Returns a new CompletableFuture that is asynchronously completed
     * by a task running in the {@link ForkJoinPool#commonPool()} with
     * the value obtained by calling the given Supplier.
     *
     * @param supplier a function returning the value to be used
     * to complete the returned CompletableFuture
     * @param <U> the function's return type
     * @return the new CompletableFuture
     */
    public static <U> CompletableFuture<U> supplyAsync(Supplier<U> supplier) {
        return asyncSupplyStage(asyncPool, supplier);
    }

    /**
     * Returns a new CompletableFuture that is asynchronously completed
     * by a task running in the given executor with the value obtained
     * by calling the given Supplier.
     *
     * @param supplier a function returning the value to be used
     * to complete the returned CompletableFuture
     * @param executor the executor to use for asynchronous execution
     * @param <U> the function's return type
     * @return the new CompletableFuture
     */
    public static <U> CompletableFuture<U> supplyAsync(Supplier<U> supplier,
                                                       Executor executor) {
        return asyncSupplyStage(screenExecutor(executor), supplier);
    }
- runAsync方法不支持返回值。其中Executor指的是可以传入我们的线程池对象
- supplyAsync可以支持返回值。其中Executor指的是可以传入我们的线程池对象
CompletableFuture回调方法:
whenComplete
点击查看代码
    public CompletableFuture<T> whenComplete(
        BiConsumer<? super T, ? super Throwable> action) {
        return uniWhenCompleteStage(null, action);
    }

    public CompletableFuture<T> whenCompleteAsync(
        BiConsumer<? super T, ? super Throwable> action) {
        return uniWhenCompleteStage(asyncPool, action);
    }

    public CompletableFuture<T> whenCompleteAsync(
        BiConsumer<? super T, ? super Throwable> action, Executor executor) {
        return uniWhenCompleteStage(screenExecutor(executor), action);
    }
whenComplete可以处理正常的计算结果
whenComplete和whenCompleteAsync的区别:
whenComplete:是当前线程执行当前任务,等待任务执行之后继续执行当前的whenComplete
whenCompleteAsync:是执行把whenCompleteAsync这个任务提交给线程池中的其他线程来进行执行。
方法不以Async结尾,意味着Action使用相同的线程执行
方法以Async结尾可能会使用其他线程执行(如果是使用相同的线程池,也可能会被同一个线程选中执行)
点击查看代码
package com.bilibili.juc.cf;

import java.util.concurrent.*;

/**
 * @auther zzyy
 * @create 2022-01-16 16:53
 */
public class CompletableFutureUseDemo
{
    public static void main(String[] args) throws ExecutionException, InterruptedException
    {

        ExecutorService threadPool = Executors.newFixedThreadPool(3);

        try
        {
            CompletableFuture.supplyAsync(() -> {
                System.out.println(Thread.currentThread().getName() + "----come in");
                int result = ThreadLocalRandom.current().nextInt(10);
                try { TimeUnit.SECONDS.sleep(1); } catch (InterruptedException e) { e.printStackTrace(); }
                System.out.println("-----1秒钟后出结果:" + result);
                if(result > 2)
                {
                    int i=10/0;
                }
                return result;
            },threadPool).whenComplete((v,e) -> {
                if (e == null) {
                    System.out.println("-----计算完成,更新系统UpdateValue:"+v);
                }
            }).exceptionally(e -> {
                e.printStackTrace();
                System.out.println("异常情况:"+e.getCause()+"\t"+e.getMessage());
                return null;
            });

            System.out.println(Thread.currentThread().getName()+"线程先去忙其它任务");
        }catch (Exception e){
            e.printStackTrace();
        }finally {
            threadPool.shutdown();
        }


        //主线程不要立刻结束,否则CompletableFuture默认使用的线程池会立刻关闭:暂停3秒钟线程
        //try { TimeUnit.SECONDS.sleep(3); } catch (InterruptedException e) { e.printStackTrace(); }

    }

    private static void future1() throws InterruptedException, ExecutionException
    {
        CompletableFuture<Integer> completableFuture = CompletableFuture.supplyAsync(() -> {
            System.out.println(Thread.currentThread().getName() + "----come in");
            int result = ThreadLocalRandom.current().nextInt(10);
            try {
                TimeUnit.SECONDS.sleep(1);
            } catch (InterruptedException e) {
                e.printStackTrace();
            }
            System.out.println("-----1秒钟后出结果:" + result);
            return result;
        });

        System.out.println(Thread.currentThread().getName()+"线程先去忙其它任务");

        System.out.println(completableFuture.get());
    }
}
exceptionally
点击查看代码
    /**
     * Returns a new CompletableFuture that is completed when this
     * CompletableFuture completes, with the result of the given
     * function of the exception triggering this CompletableFuture's
     * completion when it completes exceptionally; otherwise, if this
     * CompletableFuture completes normally, then the returned
     * CompletableFuture also completes normally with the same value.
     * Note: More flexible versions of this functionality are
     * available using methods {@code whenComplete} and {@code handle}.
     *
     * @param fn the function to use to compute the value of the
     * returned CompletableFuture if this CompletableFuture completed
     * exceptionally
     * @return the new CompletableFuture
     */
    public CompletableFuture<T> exceptionally(
        Function<Throwable, ? extends T> fn) {
        return uniExceptionallyStage(fn);
    }
exceptionally处理异常情况。
handle
handle:whenComplete和exceptionally的结合版。方法执行后的处理,无论成功与失败都可处理
代码示例:
点击查看代码
		/**
		 * 方法执行完成后的处理
		 */
        CompletableFuture<Integer> completableFuture2 = CompletableFuture.supplyAsync(() -> {
            System.out.println("当前线程:" + Thread.currentThread().getId());
            System.out.println("CompletableFuture...");
            return 10/1;
        }, service).handle((t,u)->{ // R apply(T t, U u);
            System.out.println("handle:");
            if (t != null){
                System.out.println("存在返回结果:" + t);
                return 8;
            }
            if (u != null){
                System.out.println("存在日常:" + u);
                return 9;
            }
            return 5;

        });
        Integer integer = completableFuture2.get();
        System.out.println(integer);
CompletableFuture异步任务场景
线程串行化
- thenRun:不能获取到上一步的执行结果,无返回值
- thenAcceptAsyne 能接受上—步结果,但是无返回值
- thenApplyAsyne 能接受上—步结果,有返回值
我们即要能感知到上一步的执行结果,也要能有自己线程执行成功的自己的返回值
点击查看代码
我是B
//        CompletableFuture<Integer> completableFuture2 = CompletableFuture.supplyAsync(() -> {
//            System.out.println("当前线程:" + Thread.currentThread().getId());
//            System.out.println("CompletableFuture...");
//            return 10;//拿到A的返回值
//        }, service).thenApplyAsync((u)->{
//            System.out.println("返回值" + u);
//            System.out.println("任务2启动");
//            return 5;//自己的返回值再返回出去
//        });
//        System.out.println(completableFuture2.get());
        /*
        * main....start....
        当前线程:11
        CompletableFuture...
        返回值10
        任务2启动
        5
        main....end....
                * */
双线程均完成才能后续
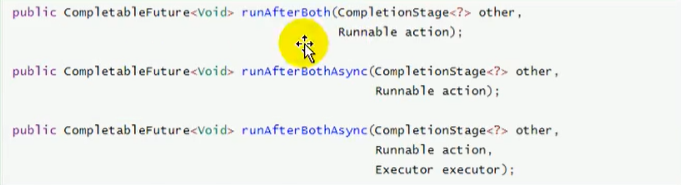
- runAfterBothAsync 两人任务组合,不能得到前任务的结果和无返回值
- thenAcceptBothAsync 两人任务组合,能得到前任务的结果和无返回值
- thenCombineAsync 两人任务组合,能得到前任务的结果和有返回值
传入的参数:CompletionStage是什么?其实还是我们的CompletableFuture

两个任务必须都完成,触发该Runnable参数指定的任务即当前lambda表达式的内容

点击查看代码
    public <U,V> CompletableFuture<V> thenCombineAsync(
        CompletionStage<? extends U> other,
        BiFunction<? super T,? super U,? extends V> fn, Executor executor) {
        return biApplyStage(screenExecutor(executor), other, fn);
    }
示例代码
点击查看代码
//        CompletableFuture<Integer> completableFuture3 = CompletableFuture.supplyAsync(() -> {
//                    System.out.println("当前线程:" + Thread.currentThread().getId());
//                    System.out.println("任务1...");
//                    return 111;
//                }, service);
//        CompletableFuture<Integer> completableFuture4 = CompletableFuture.supplyAsync(() -> {
//            System.out.println("当前线程:" + Thread.currentThread().getId());
//            System.out.println("任务2...");
//            return 222;
//        }, service);


//        completableFuture3.runAfterBothAsync(completableFuture4,()->{
//                System.out.println("任务3...");
//        },service);
        /*
        * main....start....
        main....end....
        当前线程:11
        任务1...
        当前线程:12
        任务2...
        任务3...
        * */

//        completableFuture3.thenAcceptBothAsync(completableFuture4, (f1,f2) -> {
//            System.out.println("任务3...");
//            System.out.println("f1:" + f1 + ".f2:" + f2);
//        }, service);
        /*
        * main....start....
        main....end....
        当前线程:11
        任务1...
        当前线程:12
        任务2...
        任务3...
        f1:111.f2:222
        * */

//        CompletableFuture<Integer> integerCompletableFuture = completableFuture3.thenCombineAsync(completableFuture4, (f1, f2) -> {
//            System.out.println("任务3...");
//            System.out.println("f1:" + f1 + ".f2:" + f2);
//            return 3;
//        }, service);
//        System.out.println(integerCompletableFuture.get());
        /*
        * main....start....
        当前线程:11
        任务1...
        当前线程:12
        任务2...
        任务3...
        f1:111.f2:222
        3
        main....end....
        * */
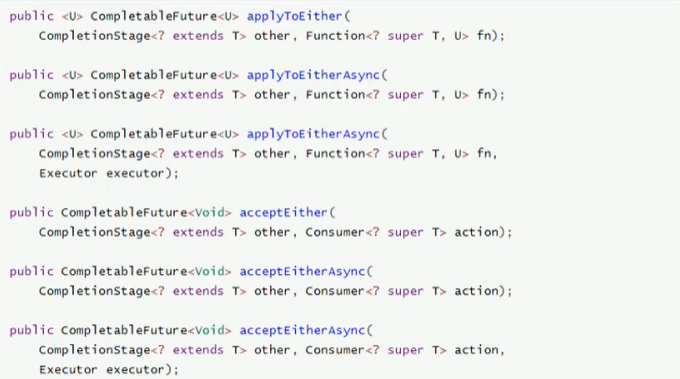
双线程完成其一就能后续

点击查看代码
//        CompletableFuture<Integer> completableFuture5 = CompletableFuture.supplyAsync(() -> {
//            System.out.println("当前线程:" + Thread.currentThread().getId());
//            System.out.println("任务1...");
//            return 111;
//        }, service);
//
//        CompletableFuture<Integer> completableFuture6 = CompletableFuture.supplyAsync(() -> {
//            System.out.println("当前线程:" + Thread.currentThread().getId());
//            try {
//                Thread.sleep(2000);
//            } catch (InterruptedException e) {
//                e.printStackTrace();
//            }
//            System.out.println("任务2结束...");
//            return 222;
//        }, service);


//        completableFuture5.runAfterEitherAsync(completableFuture6, () -> {
//            System.out.println("任务3...");
//        }, service);
        /*
        * main....start....
        main....end....
        当前线程:11
        任务1...
        当前线程:12
        任务3...
        任务2结束...
        * */

//        completableFuture5.acceptEitherAsync(completableFuture6, (f1) -> {
//            System.out.println("f1:" + f1);
//            System.out.println("任务3...");
//        }, service);
        /*
        * main....start....
        当前线程:11
        任务1...
        当前线程:12
        main....end....
        f1:111
        任务3...
        任务2...
        * */

//        CompletableFuture<Integer> integerCompletableFuture = completableFuture5.applyToEitherAsync(completableFuture6, (f1) -> {
//            System.out.println("f1:" + f1);
//            System.out.println("任务3...");
//            return 6;
//        }, service);
//        System.out.println(integerCompletableFuture.get());
        /*
        * main....start....
        当前线程:11
        任务1...
        当前线程:12
        f1:111
        任务3...
        6
        main....end....
        任务2结束...
        * */
多任务组合
点击查看代码
    /* ------------- Arbitrary-arity constructions -------------- */

    /**
     * Returns a new CompletableFuture that is completed when all of
     * the given CompletableFutures complete.  If any of the given
     * CompletableFutures complete exceptionally, then the returned
     * CompletableFuture also does so, with a CompletionException
     * holding this exception as its cause.  Otherwise, the results,
     * if any, of the given CompletableFutures are not reflected in
     * the returned CompletableFuture, but may be obtained by
     * inspecting them individually. If no CompletableFutures are
     * provided, returns a CompletableFuture completed with the value
     * {@code null}.
     *
     * <p>Among the applications of this method is to await completion
     * of a set of independent CompletableFutures before continuing a
     * program, as in: {@code CompletableFuture.allOf(c1, c2,
     * c3).join();}.
     *
     * @param cfs the CompletableFutures
     * @return a new CompletableFuture that is completed when all of the
     * given CompletableFutures complete
     * @throws NullPointerException if the array or any of its elements are
     * {@code null}
     */
    public static CompletableFuture<Void> allOf(CompletableFuture<?>... cfs) {
        return andTree(cfs, 0, cfs.length - 1);
    }

    /**
     * Returns a new CompletableFuture that is completed when any of
     * the given CompletableFutures complete, with the same result.
     * Otherwise, if it completed exceptionally, the returned
     * CompletableFuture also does so, with a CompletionException
     * holding this exception as its cause.  If no CompletableFutures
     * are provided, returns an incomplete CompletableFuture.
     *
     * @param cfs the CompletableFutures
     * @return a new CompletableFuture that is completed with the
     * result or exception of any of the given CompletableFutures when
     * one completes
     * @throws NullPointerException if the array or any of its elements are
     * {@code null}
     */
    public static CompletableFuture<Object> anyOf(CompletableFuture<?>... cfs) {
        return orTree(cfs, 0, cfs.length - 1);
    }
- allOf:等待所有任务完成
- anyOf:只要一个任务完成
点击查看代码
		CompletableFuture<String> img = CompletableFuture.supplyAsync(() -> {
			System.out.println("查询商品图片信息");
			return "1.jpg";
		},service);

		CompletableFuture<String> attr = CompletableFuture.supplyAsync(() -> {
			try {
				Thread.sleep(2000);
			} catch (InterruptedException e) {
				e.printStackTrace();
			}
			System.out.println("查询商品属性");
			return "麒麟990 5G  钛空银";
		},service);


		CompletableFuture<String> desc = CompletableFuture.supplyAsync(() -> {
			System.out.println("查询商品介绍");
			return "华为";
		},service);

		/**
		 * 等这三个都做完
		 */

		CompletableFuture<Void> allOf = CompletableFuture.allOf(img, attr, desc);
		allOf.join();

//		System.out.println("main....end"  + desc.get() + attr.get() + img.get());
//		CompletableFuture<Object> anyOf = CompletableFuture.anyOf(img, attr, desc);
//		anyOf.get();

		System.out.println("main....end" + img.get()+attr.get()+desc.get());

main....start
查询商品图片信息
查询商品介绍
#这里卡2s
查询商品属性
main....end1.jpg麒麟990 5G  钛空银华为
CompletableFuture+自定义线程池
MyThreadConfig
线程池配置
点击查看代码
/**
 * @Description:  本源码分享自 www.cx1314.cn   欢迎访问获取更多资源 线程池配置类
 * @Created: 程序源码论坛
 * @author: cx
 * @createTime: 2020-06-23 20:24
 **/

@EnableConfigurationProperties(ThreadPoolConfigProperties.class)
@Configuration
public class MyThreadConfig {


    @Bean
    public ThreadPoolExecutor threadPoolExecutor(ThreadPoolConfigProperties pool) {
        return new ThreadPoolExecutor(
                pool.getCoreSize(),
                pool.getMaxSize(),
                pool.getKeepAliveTime(),
                TimeUnit.SECONDS,
                new LinkedBlockingDeque<>(100000),
                Executors.defaultThreadFactory(),
                new ThreadPoolExecutor.AbortPolicy()
        );
    }

}
ThreadPoolConfigProperties
将配置参数抽取出来到application.properties
加上@Component,或者MyThreadConfig导入ThreadPoolConfigProperties.class的时候加上@EnableConfigurationProperties注解即可
点击查看代码
@ConfigurationProperties(prefix = "gulimall.thread")
// @Component
@Data
public class ThreadPoolConfigProperties {

    private Integer coreSize;

    private Integer maxSize;

    private Integer keepAliveTime;


}
业务实现
点击查看代码
    @Override
    public SkuItemVo item(Long skuId) throws ExecutionException, InterruptedException {

        SkuItemVo skuItemVo = new SkuItemVo();

        CompletableFuture<SkuInfoEntity> infoFuture = CompletableFuture.supplyAsync(() -> {
            //1、sku基本信息的获取  pms_sku_info
            SkuInfoEntity info = this.getById(skuId);
            skuItemVo.setInfo(info);
            return info;
        }, executor);


        CompletableFuture<Void> saleAttrFuture = infoFuture.thenAcceptAsync((res) -> {
            //3、获取spu的销售属性组合
            List<SkuItemSaleAttrVo> saleAttrVos = skuSaleAttrValueService.getSaleAttrBySpuId(res.getSpuId());
            skuItemVo.setSaleAttr(saleAttrVos);
        }, executor);


        CompletableFuture<Void> descFuture = infoFuture.thenAcceptAsync((res) -> {
            //4、获取spu的介绍    pms_spu_info_desc
            SpuInfoDescEntity spuInfoDescEntity = spuInfoDescService.getById(res.getSpuId());
            skuItemVo.setDesc(spuInfoDescEntity);
        }, executor);


        CompletableFuture<Void> baseAttrFuture = infoFuture.thenAcceptAsync((res) -> {
            //5、获取spu的规格参数信息
            List<SpuItemAttrGroupVo> attrGroupVos = attrGroupService.getAttrGroupWithAttrsBySpuId(
                res.getSpuId(), res.getCatalogId());
            skuItemVo.setGroupAttrs(attrGroupVos);
        }, executor);


        // Long spuId = info.getSpuId();
        // Long catalogId = info.getCatalogId();

        //2、sku的图片信息    pms_sku_images
        CompletableFuture<Void> imageFuture = CompletableFuture.runAsync(() -> {
            List<SkuImagesEntity> imagesEntities = skuImagesService.getImagesBySkuId(skuId);
            skuItemVo.setImages(imagesEntities);
        }, executor);

        CompletableFuture<Void> seckillFuture = CompletableFuture.runAsync(() -> {
            //3、远程调用查询当前sku是否参与秒杀优惠活动
            R skuSeckilInfo = seckillFeignService.getSkuSeckilInfo(skuId);
            if (skuSeckilInfo.getCode() == 0) {
                //查询成功
                SeckillSkuVo seckilInfoData = skuSeckilInfo.getData("data", new TypeReference<SeckillSkuVo>() {
                });
                skuItemVo.setSeckillSkuVo(seckilInfoData);

                if (seckilInfoData != null) {
                    long currentTime = System.currentTimeMillis();
                    if (currentTime > seckilInfoData.getEndTime()) {
                        skuItemVo.setSeckillSkuVo(null);
                    }
                }
            }
        }, executor);


        //等到所有任务都完成
        CompletableFuture.allOf(saleAttrFuture,descFuture,baseAttrFuture,imageFuture,seckillFuture).get();

        return skuItemVo;
    }
application.properties如下
点击查看代码
spring.cache.type=redis

#spring.cache.cache-names=qq,毫秒为单位
spring.cache.redis.time-to-live=3600000

#如果指定了前缀就用我们指定的前缀,如果没有就默认使用缓存的名字作为前缀
#spring.cache.redis.key-prefix=CACHE_
spring.cache.redis.use-key-prefix=true

#是否缓存空值,防止缓存穿透
spring.cache.redis.cache-null-values=true

#配置线程池
gulimall.thread.coreSize=20
gulimall.thread.maxSize=200
gulimall.thread.keepAliveTime=10

#开启debug日志
logging.level.org.springframework.cloud.openfeign=debug
logging.level.org.springframework.cloud.sleuth=debug

#服务追踪
spring.zipkin.base-url=http://192.168.18.80:9411/
#关闭服务发现
spring.zipkin.discovery-client-enabled=false
spring.zipkin.sender.type=web
#配置采样器
spring.sleuth.sampler.probability=1
Java锁
大厂面试题
一、Synchronized相关问题
1.Synchronized用过吗, 其原理是什么?
2.你刚才提到获取对象的锁,这个锁到底是什么?如何确定对象的锁?
3.什么是可重入性,为什么说Synchronized是可重入锁?
4.JVM对Java的原生锁做了哪些优化?
5.为什么说Synchronized是非公平
锁?
6.什么是锁消除和锁粗化?
7.为什么说Synchronized是个悲观锁?乐观锁的实现原理又是什么?什么是CAS, 它有
8.乐观锁一定就是好的吗?
二、可重入锁Reentrant Lock及其他显式锁相关问题
1.跟Synchronized相比,可重入锁Reentrant Lock其实现原理有什么不同?
2.那么请谈谈AQS框架是怎么回事儿?
3.请尽可能详尽地对比下Synchronized和Reentrant Lock的异同。
4.Reentrant Lock是如何实现可重入性的?
1, 你怎么理解iava多线程的?怎么处理并发?线程池有那几个核心参数?
2, Java加锁有哪几种锁?我先说了synchronized, 刚讲到偏向锁, 他就不让我讲了,
3, 简单说说lock?
4, hashmap的实现原理?hash冲突怎么解决?为什么使用红黑树?
5, spring里面都使用了那些设计模式?循环依赖怎么解决?
6,项目中那个地方用了countdown lan ch, 怎么使用的?
乐观锁和悲观锁
悲观锁
* 悲观锁认为自己在使用数据的时候一定有别的线程来修改数据,因此在获取数据的时候会先加锁,确保数据不会被别的线程修改。
* 悲观锁的实现方式
* synchronized关键字
* Lock的实现类都是悲观锁
* 适合写操作多的场景,先加锁可以保证写操作时数据正确。显示的锁定之后再操作同步资源。
点击查看代码
//=============悲观锁的调用方式
public synchronized void m1()
{
    //加锁后的业务逻辑......
}

// 保证多个线程使用的是同一个lock对象的前提下
ReentrantLock lock = new ReentrantLock();
public void m2() {
    lock.lock();
    try {
        // 操作同步资源
    }finally {
        lock.unlock();
    }
}
乐观锁
* 乐观锁认为自己在使用数据时不会有别的线程修改数据,所以不会添加锁,只是在更新数据的时候去判断之前有没有别的线程更新了这个数据。如果这个数据没有被更新,当前线程将自己修改的数据成功写入。如果数据已经被其他线程更新,则根据不同的实现方式执行不同的操作
* 乐观锁的实现方式
1. 版本号机制Version。(只要有人提交了就会修改版本号,可以解决ABA问题)
1. ABA问题:再CAS中想读取一个值A,想把值A变为C,不能保证读取时的A就是赋值时的A,中间可能有个线程将A变为B再变为A。
1. 解决方法:Juc包提供了一个AtomicStampedReference,原子更新带有版本号的引用类型,通过控制版本值的变化来解决ABA问题。
2. 最常采用的是CAS算法,Java原子类中的递增操作就通过CAS自旋实现的。
* 适合读操作多的场景,不加锁的性能特点能够使其操作的性能大幅提升。
点击查看代码
//=============乐观锁的调用方式
// 保证多个线程使用的是同一个AtomicInteger
private AtomicInteger atomicInteger = new AtomicInteger();
atomicInteger.incrementAndGet();
从8种情况演示锁的案例,看看我们到底锁的是什么
8锁案例
* 阿里巴巴代码规范
* 【强制】高并发时,同步调用应该去考量锁的性能损耗。能用无锁数据结构,就不要用锁;能锁区块,就不要锁整个方法体;能用对象锁,就不要用类锁。
* 说明:尽可能使加锁的代码块工作量尽可能的小,避免在锁代码块中调用 RPC 方法。
8锁演示
* 8锁案例
点击查看代码
class Phone{
    public static synchronized void sendEmail(){
        try {TimeUnit.SECONDS.sleep(3);} catch (InterruptedException e) {e.printStackTrace();}
        System.out.println("-------------sendEmail");

    }
    public  synchronized void sendSMS(){//static
        System.out.println("-------------sendSMS");
    }
    public void hello(){
        System.out.println("-------------hello");
    }
}

/**
 * - 题目:谈谈你对多线程锁的理解,8锁案例说明
 * - 口诀:线程 操作 资源类
 * 1. 标准访问有ab两个线程,请问先打印邮件还是短信?邮件
 * 2. a里面故意停3秒?邮件
 * 3. 添加一个普通的hello方法,请问先打印邮件还是hello?hello
 * 4. 有两部手机,请问先打印邮件(这里有个3秒延迟)还是短信?短信
 * 5.有两个静态同步方法(synchroized前加static,3秒延迟也在),有1部手机,先打印邮件还是短信?邮件
 * 6.两个手机,有两个静态同步方法(synchroized前加static,3秒延迟也在),有1部手机,先打印邮件还是短信?邮件
 * 7.一个静态同步方法,一个普通同步方法,请问先打印邮件还是手机?短信
 * 8.两个手机,一个静态同步方法,一个普通同步方法,请问先打印邮件还是手机?短信
 */
public class lock8 {
    public static void main(String[] args) {
        Phone phone = new Phone();
        Phone phone2 = new Phone();
        new Thread(()->{
            phone.sendEmail();
        },"a").start();

        //暂停毫秒,保证a线程先启动
        try {TimeUnit.MILLISECONDS.sleep(200);} catch (InterruptedException e) {e.printStackTrace();}

        new Thread(()->{
            phone.sendSMS();
        },"b").start();
    }
}
8锁原理
* 1.2中
* 一个对象里面如果有多个synchronized方法,某一时刻内,只要一个线程去调用其中的一个synchronized方法了,其他的线程都只能是等待,换句话说,某一个时刻内,只能有唯一的一个线程去访问这些synchronized方法,锁的是当前对象this,被锁定后,其它的线程都不能 进入到当前对象的其他synchronized方法
* 3中
* hello并未和其他synchronized修饰的方法产生争抢
* 4 中
* 锁在两个不同的对象/两个不同的资源上,不产生竞争条件
* 5.6中static+synchronized - 类锁 **** phone = new Phone();中 加到了左边的Phone上
* 对于普通同步方法,锁的是当前实例对象,通常指this,具体的一部部手机,所有的普通同步方法用的都是同一把锁→实例对象本身。
* 对于静态同步方法,锁的是当前类的Class对象,如Phone,class唯一的一个模板。
* 对于同步方法块,锁的是synchronized括号内的对象。synchronized(o)
* 7.8中一个加了对象锁,一个加了类锁,不产生竞争条件
8锁-3个体现
* 8种锁的案例实际体现在3个地方-相当于总结
* 作用域实例方法,当前实例加锁,进入同步代码块前要获得当前实例的锁。
* 作用于代码块,对括号里配置的对象加锁。
* 作用于静态方法,当前类加锁,进去同步代码前要获得当前类对象的锁
字节码角度分析synchronized实现
文件反编译技巧
* 文件反编译javap -c ***.class文件反编译,-c表示对代码进行反汇编
* 假如需要更多信息 javap -v ***.class ,-v即-verbose输出附加信息(包括行号、本地变量表、反汇编等详细信息)
synchronized同步代码块
点击查看代码
/**
 * 锁同步代码块
 */
public class LockSyncDemo {
    Object object = new Object();

    public void m1(){
        synchronized (object){
            System.out.println("-----hello synchronized code block");
        }
    }

    public static void main(String[] args) {

    }
}
- 从target中找到LockSyncDemo.class文件,右键,open in terminal,然后javap -c LockSyncDemo.class
public class com.zhang.admin.controller.LockSyncDemo {
  java.lang.Object object;

  public com.zhang.admin.controller.LockSyncDemo();
    Code:
       0: aload_0
       1: invokespecial #1                  // Method java/lang/Object."<init>":()V
       4: aload_0
       5: new           #2                  // class java/lang/Object
       8: dup
       9: invokespecial #1                  // Method java/lang/Object."<init>":()V
      12: putfield      #3                  // Field object:Ljava/lang/Object;
      15: return

  public void m1();
    Code:
       0: aload_0
       1: getfield      #3                  // Field object:Ljava/lang/Object;
       4: dup
       5: astore_1
       6: monitorenter        //**注****------进入锁
       7: getstatic     #4                  // Field java/lang/System.out:Ljava/io/PrintStream;
      10: ldc           #5                  // String -----hello synchronized code block
      12: invokevirtual #6                  // Method java/io/PrintStream.println:(Ljava/lang/String;)V
      15: aload_1
      16: monitorexit        // **注**------退出锁
      17: goto          25
      20: astore_2
      21: aload_1
      22: monitorexit        //**注**-----这里又有一个exit???????以防出现异常,保证能够释放锁
      23: aload_2
      24: athrow
      25: return
    Exception table:
       from    to  target type
           7    17    20   any
          20    23    20   any

  public static void main(java.lang.String[]);
    Code:
       0: return
}
- 总结
- synchronized同步代码块,实现使用的是moniterenter和moniterexit指令(moniterexit可能有两个)
- 那一定是一个enter两个exit吗?(不一样,如果主动throw一个RuntimeException,发现一个enter,一个exit,还有两个athrow)
synchronized普通同步方法
点击查看代码
/**
 * 锁普通的同步方法
 */
public class LockSyncDemo {

    public synchronized void m2(){
        System.out.println("------hello synchronized m2");
    }

    public static void main(String[] args) {

    }
}
- 类似于上述操作,最后调用javap -v LockSyncDemo.class
点击查看代码
.....
public synchronized void m2();
    descriptor: ()V
    flags: ACC_PUBLIC, ACC_SYNCHRONIZED //请注意该标志
    Code:
      stack=2, locals=1, args_size=1
         0: getstatic     #2                  // Field java/lang/System.out:Ljava/io/PrintStream;
         3: ldc           #3                  // String ------hello synchronized m2
         5: invokevirtual #4                  // Method java/io/PrintStream.println:(Ljava/lang/String;)V
         8: return
      LineNumberTable:
        line 11: 0
        line 12: 8
      LocalVariableTable:
        Start  Length  Slot  Name   Signature
            0       9     0  this   Lcom/zhang/admin/controller/LockSyncDemo;
......
- 总结
- 调用指令将会检查方法的****访问标志是否被设置。如果设置了,执行线程会将先持有monitore然后再执行方法,最后在方法完成(无论是正常完成还是非正常完成)时释放monitor
synchronized静态同步方法
点击查看代码
/**
 * 锁静态同步方法
 */
public class LockSyncDemo {

    public synchronized void m2(){
        System.out.println("------hello synchronized m2");
    }

    public static synchronized void m3(){
        System.out.println("------hello synchronized m3---static");
    }


    public static void main(String[] args) {

    }
}
- 和上面一样的操作
点击查看代码
 ......
 public static synchronized void m3();
    descriptor: ()V
    flags: ACC_PUBLIC, ACC_STATIC, ACC_SYNCHRONIZED //访问标志 区分该方法是否是静态同步方法
    Code:
      stack=2, locals=0, args_size=0
         0: getstatic     #2                  // Field java/lang/System.out:Ljava/io/PrintStream;
         3: ldc           #5                  // String ------hello synchronized m3---static
         5: invokevirtual #4                  // Method java/io/PrintStream.println:(Ljava/lang/String;)V
         8: return
      LineNumberTable:
        line 15: 0
        line 16: 8
......
- 总结
- ******, ******访问标志区分该方法是否是静态同步方法。
反编译synchronized锁的是什么
概念-管程
* 管程概念
* 管程:Monitor(监视器),也就是我们平时说的锁。监视器锁
* 信号量及其操作原语“封装”在一个对象内部)管程实现了在一个时间点,最多只有一个线程在执行管程的某个子程序。 管程提供了一种机制,管程可以看做一个软件模块,它是将共享的变量和对于这些共享变量的操作封装起来,形成一个具有一定接口的功能模块,进程可以调用管程来实现进程级别的并发控制。
* 执行线程就要求先成功持有管程,然后才能执行方法,最后当方法完成(无论是正常完成还是非正常完成)时释放管理。在方法执行期间,执行线程持有了管程,其他任何线程都无法再获取到同一个管程。
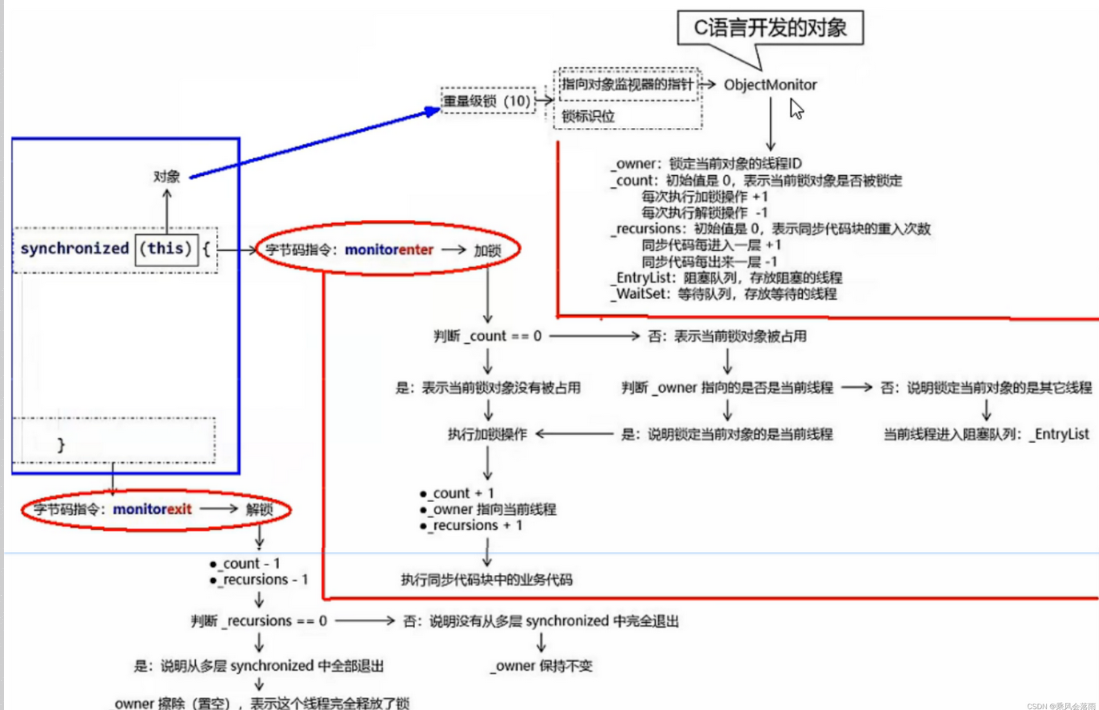
大厂:为什么任何一个对象都可以成为一个锁?
* 溯源
* Java Object 类是所有类的父类,也就是说 Java 的所有类都继承了 Object,子类可以使用 Object 的所有方法。
* ObjectMonitor.java→ObjectMonitor.cpp→objectMonitor.hpp
ObjectMonitor.cpp中引入了头文件(include)objectMonitor.hpp
点击查看代码
140行
  ObjectMonitor() {
    _header       = NULL;
    _count        = 0; //用来记录该线程获取锁的次数
    _waiters      = 0,
    _recursions   = 0;//锁的重入次数
    _object       = NULL;
    _owner        = NULL; //------最重要的----指向持有ObjectMonitor对象的线程,记录哪个线程持有了我
    _WaitSet      = NULL; //存放处于wait状态的线程队列
    _WaitSetLock  = 0 ;
    _Responsible  = NULL ;
    _succ         = NULL ;
    _cxq          = NULL ;
    FreeNext      = NULL ;
    _EntryList    = NULL ;//存放处于等待锁block状态的线程队列
    _SpinFreq     = 0 ;
    _SpinClock    = 0 ;
    OwnerIsThread = 0 ;
    _previous_owner_tid = 0;
  }
- 追溯底层可以发现每个对象天生都带着一个对象监视器。
提前熟悉锁升级
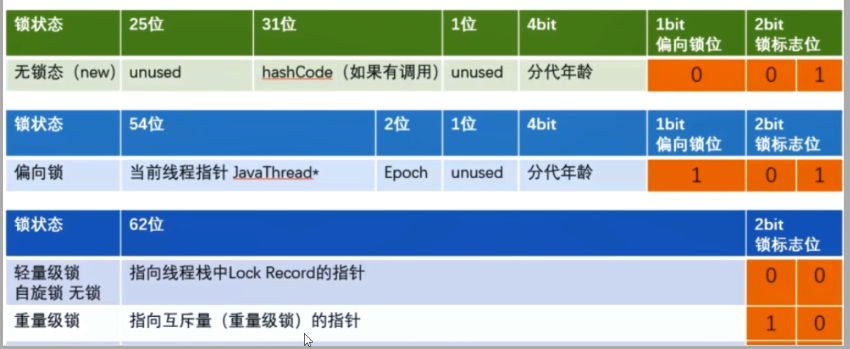
synchronized必须作用于某个对象中,所以Java在对象的头文件存储了锁的相关信息。锁升级功能主要依赖于 MarkWord 中的锁标志位和释放偏向锁标志位
公平锁和非公平锁
ReentrantLock抢票案例
点击查看代码
class Ticket
{
    private int number = 30;
    ReentrantLock lock = new ReentrantLock();
    //ReentrantLock lock = new ReentrantLock(true);

    public void sale()
    {
        lock.lock();
        try
        {
            if(number > 0)
            {
                System.out.println(Thread.currentThread().getName()+"卖出第:\t"+(number--)+"\t 还剩下:"+number);
            }
        }catch (Exception e){
            e.printStackTrace();
        }finally {
            lock.unlock();
        }
    }
}


/**
 * @auther zzyy
 * @create 2020-05-14 17:26
 */
public class SaleTicketDemo
{
    public static void main(String[] args)
    {
        Ticket ticket = new Ticket();

        new Thread(() -> { for (int i = 0; i <35; i++)  ticket.sale(); },"a").start();
        new Thread(() -> { for (int i = 0; i <35; i++)  ticket.sale(); },"b").start();
        new Thread(() -> { for (int i = 0; i <35; i++)  ticket.sale(); },"c").start();
    }
}
非公平锁
* 默认是非公平锁
* 非公平锁可以插队,买卖票不均匀。
* 是指多个线程获取锁的顺序并不是按照申请锁的顺序,有可能后申请的线程比先申请的线程优先获取锁,在高并发环境下,有可能造成优先级翻转或饥饿的状态(某个线程一直得不到锁)
公平锁
* ReentrantLock lock = new ReentrantLock(true);
* 买卖票一开始a占优,后面a b c a b c a b c均匀分布
* 是指多个线程按照申请锁的顺序来获取锁,这里类似排队买票,先来的人先买后来的人在队尾排着,这是公平的。
为什么会有公平锁/非公平锁的设计?为什么默认是非公平?
1. 恢复挂起的线程到真正锁的获取还是有时间差的,从开发人员来看这个时间微乎其微,但是从CPU的角度来看,这个时间差存在的还是很明显的。所以非公平锁能更充分的利用CPU 的时间片,尽量减少 CPU 空闲状态时间。
2. 使用多线程很重要的考量点是线程切换的开销,当采用非公平锁时,当1个线程请求锁获取同步状态,然后释放同步状态,因为不需要考虑是否还有前驱节点,所以刚释放锁的线程在此刻再次获取同步状态的概率就变得非常大,所以就减少了线程的开销。
什么时候用公平?什么时候用非公平?
如果为了更高的吞吐量,很显然非公平锁是比较合适的,因为节省很多线程切换时间,吞吐量自然就上去了;
否则那就用公平锁,大家公平使用。
AQS提前了解
可重入锁(又名递归锁)
可重入锁说明
可重入锁又名递归锁,是指在同一个线程在外层方法获取锁的时候,再进入该线程的内层方法会自动获取****锁(前提,锁对象得是同一个对象),不会因为之前已经获取过还没释放而阻塞。如果是1个有 synchronized 修饰的递归调用方法,程序第2次进入被自己阻塞了岂不是天大的笑话,出现了作茧自缚。所以Java中ReentrantLock和synchronized都是可重入锁,可重入锁的一个优点是可一定程度避免死锁。
“可重入锁”详细解释
* 可:可以
* 重:再次
* 入:进入
* 锁:同步锁
* 进入什么:进入同步域(即同步代码块/方法或显示锁锁定的代码)
* 一句话:一个线程中的多个流程可以获取同一把锁,持有这把锁可以再次进入。自己可以获取自己的内部锁。
可重入锁种类
隐式锁Synchronized
- synchronized是java中的关键字,默认是可重入锁,即隐式锁
* 在同步块中
点击查看代码
public class ReEntryLockDemo {
    public static void main(String[] args)
    {
        final Object objectLockA = new Object();

        new Thread(() -> {
            synchronized (objectLockA)
            {
                System.out.println("-----外层调用");
                synchronized (objectLockA)
                {
                    System.out.println("-----中层调用");
                    synchronized (objectLockA)
                    {
                        System.out.println("-----内层调用");
                    }
                }
            }
        },"a").start();
    }
}
//-----外层调用
//-----中层调用
//-----内层调用
- 在同步方法中
点击查看代码
public class ReEntryLockDemo
{
    public synchronized void m1()
    {
        //指的是可重复可递归调用的锁,在外层使用之后,在内层仍然可以使用,并且不发生死锁,这样的锁就叫做可重入锁
        System.out.println(Thread.currentThread().getName()+"\t"+"-----come in m1");
        m2();
        System.out.println(Thread.currentThread().getName()+"\t-----end m1");
    }
    public synchronized void m2()
    {
        System.out.println("-----m2");
        m3();
    }
    public synchronized void m3()
    {
        System.out.println("-----m3");
    }

    public static void main(String[] args)
    {
        ReEntryLockDemo reEntryLockDemo = new ReEntryLockDemo();

        reEntryLockDemo.m1();
    }
}
/**
 * main  -----come in m1
 * -----m2
 * -----m3
 * main  -----end m1
 */
Synchronized的重入实现机理
- 回看上方的ObjectMoitor.hpp
点击查看代码
140行
  ObjectMonitor() {
    _header       = NULL;
    _count        = 0; //用来记录该线程获取锁的次数
    _waiters      = 0,
    _recursions   = 0;//锁的重入次数
    _object       = NULL;
    _owner        = NULL; //------最重要的----指向持有ObjectMonitor对象的线程,记录哪个线程持有了我
    _WaitSet      = NULL; //存放处于wait状态的线程队列
    _WaitSetLock  = 0 ;
    _Responsible  = NULL ;
    _succ         = NULL ;
    _cxq          = NULL ;
    FreeNext      = NULL ;
    _EntryList    = NULL ;//存放处于等待锁block状态的线程队列
    _SpinFreq     = 0 ;
    _SpinClock    = 0 ;
    OwnerIsThread = 0 ;
    _previous_owner_tid = 0;
  }
- ObjectMoitor.hpp底层:每个锁对象拥有一个锁计数器和一个指向持有该锁的线程的指针。_count _owner
- 首次加锁:当执行monitorenter时,如果目标锁对象的计数器为零,那么说明它没有被其他线程所持有,Java虚拟机会将该锁对象的持有线程设置为当前线程,并且将其计数器加1。
- 重入:在目标锁对象的计数器不为零的情况下,如果锁对象的持有线程是当前线程,那么 Java 虚拟机可以将其计数器加1,否则需要等待,直至持有线程释放该锁。
- 释放锁:当执行monitorexit时,Java虚拟机则需将锁对象的计数器减1。计数器为零代表锁已被释放。
显式锁Lock
- 显式锁(即Lock)也有ReentrantLock这样的可重入锁
感觉所谓的显式隐式即是指显示/隐式的调用锁 - 注意:lock unlock要成对
点击查看代码
public class ReEntryLockDemo {
    static Lock lock = new ReentrantLock();
    public static void main(String[] args) {

        {
            new Thread(() -> {
                lock.lock();
                try {
                    System.out.println(Thread.currentThread().getName() + "\t----come in 外层调用");
                    lock.lock();
                    try {
                        System.out.println(Thread.currentThread().getName() + "\t------come in 内层调用");
                    } finally {
                        lock.unlock();
                    }
                } finally {
                    lock.unlock();
                }
            }, "t1").start();
        }
    }
}
//t1  ----come in 外层调用
//t1  ------come in 内层调用
- 假如lock unlock不成对,单线程情况下问题不大,但多线程下出问题
点击查看代码
public class ReEntryLockDemo {
    static Lock lock = new ReentrantLock();
    public static void main(String[] args) {

            new Thread(() -> {
                lock.lock();
                try {
                    System.out.println(Thread.currentThread().getName() + "\t----come in 外层调用");
                    lock.lock();
                    try {
                        System.out.println(Thread.currentThread().getName() + "\t------come in 内层调用");
                    } finally {
                        lock.unlock();
                    }
                } finally {
                    //lock.unlock();//-------------------------不成对|多线程情况
                }
            }, "t1").start();

        new Thread(() -> {
            lock.lock();
            try
            {
                System.out.println("t2 ----外层调用lock");
            }finally {
                lock.unlock();
            }
        },"t2").start();

    }
}
//t1  ----come in 外层调用
//t1  ------come in 内层调用
//(t2 ----外层调用lock 假如不成对,这句话就不显示了)
死锁及排查
死锁是什么
* 死锁
* 是指两个或两个以上的线程在执行过程中,因争夺资源而造成的一种互相等待的现象,若无外力干涉那它们都将无法推进下去,如果系统资源充足,进程的资源请求都能够得到满足,死锁出现的可能性就很低,否则就会因争夺有限的资源而陷入死锁。
* a跟b两个资源互相请求对方的资源
* 死锁产生的原因
* 系统资源不足
* 进程运行推进的顺序不合适
* 资源分配不当
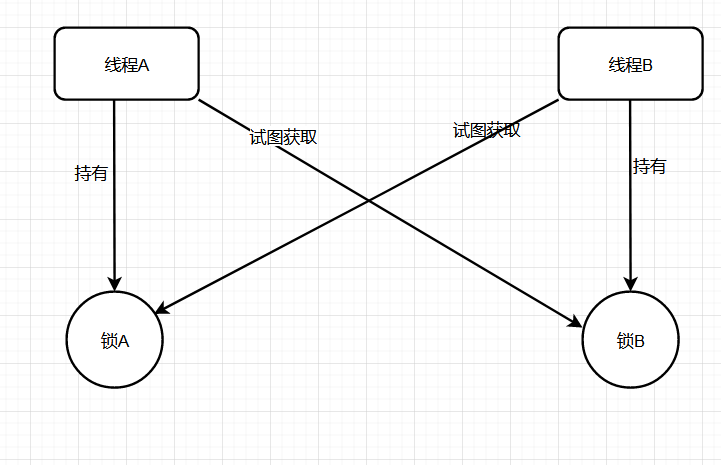
请写一个死锁代码case
点击查看代码
public class DeadLockDemo {
    public static void main(String[] args) {
        Object object1 = new Object();
        Object object2 = new Object();

        new Thread(()->{
            synchronized (object1){
                System.out.println(Thread.currentThread().getName()+"\t 持有a锁,想获得b锁");
                try {TimeUnit.SECONDS.sleep(1);} catch (InterruptedException e) {e.printStackTrace();}//使得线程b也启动
                synchronized (object2){
                    System.out.println(Thread.currentThread().getName()+"\t 成功获得b锁");
                }
            }
        },"A").start();

        new Thread(()->{
            synchronized (object2){
                System.out.println(Thread.currentThread().getName()+"\t 持有b锁,想获得a锁");
                synchronized (object1){
                    System.out.println(Thread.currentThread().getName()+"\t 成功获得a锁");
                }
            }
        },"B").start();
    }

}
如何排查死锁
纯命令
* jps -l 查看当前进程运行状况
* jstack 进程编号 查看该进程信息
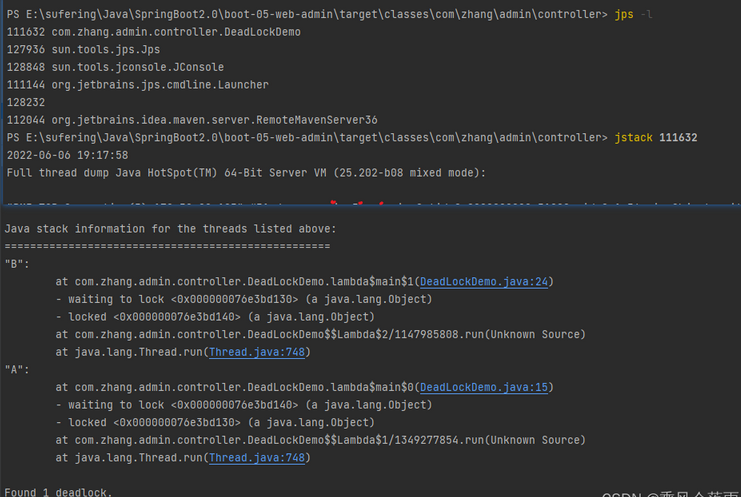
小总结-重要
* 指针指向monitor对象(也称为管程或监视器锁)的起始地址。每个对象都存在着一个monitor与之关联,当一个monitor被某个线程持有后,它便处于锁定状态。在Java虚拟机(HotSpot)中,monitor是由ObjectMonitor实现的,其主要数据结构如下(位于HotSpot虚拟机源码ObjectMonitor.hpp,C++实现的)
LockSupport与线程中断
线程中断机制

阿里蚂蚁金服面试题
* 三个方法了解过吗?用在哪?
* 如何停止一个运行中的线程?
* 如何中断一个运行中的线程??
什么是中断机制?
* 首先
一个线程不应该由其他线程来强制中断或停止,而是应该由线程自己自行停止。
所以,Thread.stop, Thread.suspend, Thread.resume 都已经被废弃了。
* 其次
在Java中没有办法立即停止一条线程,然而停止线程却显得尤为重要,如取消一个耗时操作。
因此,Java提供了一种用于停止线程的协商机制——中断。
中断只是一种协作协商机制,Java没有给中断增加任何语法,中断的过程完全需要程序员自己实现。
若要中断一个线程,你需要手动调用该线程的interrupt方法,该方法也仅仅是将线程对象的中断标识设成true;
接着你需要自己写代码不断地检测当前线程的标识位,如果为true,表示别的线程要求这条线程中断,
此时究竟该做什么需要你自己写代码实现。
每个线程对象中都有一个标识,用于表示线程是否被中断;该标识位为true表示中断,为false表示未中断;
通过调用线程对象的interrupt方法将该线程的标识位设为true;可以在别的线程中调用,也可以在自己的线程中调用。
* eg.顾客在无烟餐厅中吸烟,服务员希望他别吸烟了,不是强行停止他吸烟,而是给他的标志位打为true,具体的停止吸烟还是要顾客自己停止。(体现了协商机制)
中断的相关API方法之三大方法说明
大厂面试题:如何使用中断标识停止线程?
1如何停止中断运行中的线程?
① 通过一个volatile变量实现
* volatile保证了可见性,t2修改了标志位后能马上被t1看到
点击查看代码
public class interruptDemo {
    static volatile boolean isStop = false;

    public static void main(String[] args) {
        new Thread(()->{
            while(true){
                if(isStop){//如果这个标志位被其他线程改为true了
                    System.out.println(Thread.currentThread().getName()+"\t isStop被修改为true,程序终止");
                    break;
                }
                System.out.println("t1 ------hello volatile");//----------------------如果没停止,那就一直打印
            }
        },"t1").start();

        try {TimeUnit.MILLISECONDS.sleep(20);} catch (InterruptedException e) {e.printStackTrace();}

        new Thread(()->{
            isStop = true;
        },"t2").start();
    }
}
//--
//t1 ------hello volatile
//t1 ------hello volatile
//t1 ------hello volatile
//t1 ------hello volatile
//t1 ------hello volatile
//t1 ------hello volatile
//t1 ------hello volatile
//t1   isStop被修改为true,程序终止
② 通过AtomicBoolean(原子布尔型)
点击查看代码
public class interruptDemo {

    static AtomicBoolean atomicBoolean = new AtomicBoolean(false);

    public static void main(String[] args) {
        m1_volatile();
    }

    public static void m1_volatile() {
        new Thread(()->{
            while(true){
                if(atomicBoolean.get()){//如果这个标志位被其他线程改为true了
                    System.out.println(Thread.currentThread().getName()+"\t isStop被修改为true,程序终止");
                    break;
                }
                System.out.println("t1 ------hello volatile");//----------------------如果没停止,那就一直打印
            }
        },"t1").start();

        try {TimeUnit.MILLISECONDS.sleep(20);} catch (InterruptedException e) {e.printStackTrace();}

        new Thread(()->{
            atomicBoolean.set(true);
        },"t2").start();
    }
}
//t1 ------hello volatile
//t1 ------hello volatile
//t1 ------hello volatile
//t1 ------hello volatile
//t1 ------hello volatile
//t1 ------hello volatile
//t1   isStop被修改为true,程序终止
③ 通过Thread类自带的中断api方法实现
点击查看代码
    //默认的中断标志位是false,然后被改为了true
    public static void main(String[] args) {
        m1_volatile();
    }

    public static void m1_volatile() {
        Thread t1 = new Thread(() -> {
            while (true) {
                if (Thread.currentThread().isInterrupted()) {//一旦发现中断标志位被修改
                    System.out.println(Thread.currentThread().getName() + "\t isInterrupted()被修改为true,程序终止");
                    break;
                }
                System.out.println("t1 ------hello interrupt ");//----------------------如果没停止,那就一直打印
            }
        }, "t1");
        t1.start();

        try {TimeUnit.MILLISECONDS.sleep(20);} catch (InterruptedException e) {e.printStackTrace();}

        new Thread(()->{
            t1.interrupt();//把t1中断
        },"t2").start();
    }
}

//t1 ------hello interrupt
//t1 ------hello interrupt
//t1 ------hello interrupt
//t1 ------hello interrupt
//t1 ------hello interrupt
//t1 ------hello interrupt
//t1 ------hello interrupt
//t1 ------hello interrupt
//t1 ------hello interrupt
//t1   isInterrupted()被修改为true,程序终止
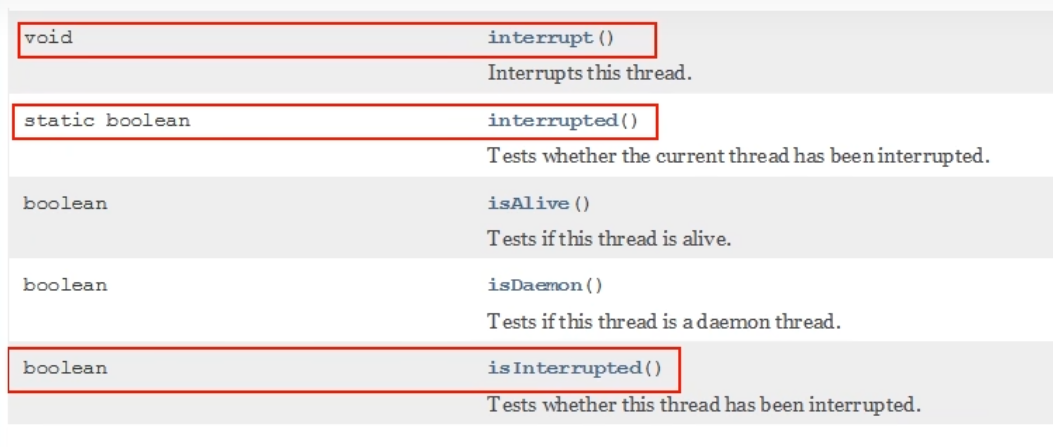
—API源码分析
实例方法interrupt(),没有返回值
点击查看代码
//Thread.java
public void interrupt() {
        if (this != Thread.currentThread())
            checkAccess();

        synchronized (blockerLock) {
            Interruptible b = blocker;
            if (b != null) {
                interrupt0();           // Just to set the interrupt flag----调用了interrupt0()方法
                b.interrupt(this);
                return;
            }
        }
        interrupt0();
    }
点击查看代码
//Thread.java
    /* Some private helper methods */
    private native void setPriority0(int newPriority);
    private native void stop0(Object o);
    private native void suspend0();
    private native void resume0();
    private native void interrupt0();  //---------------------------调用了c底层
    private native void setNativeName(String name);
点击查看代码
    //Thread.java
    public boolean isInterrupted() {
        return isInterrupted(false);
    }
//Thread.java private native boolean isInterrupted(boolean ClearInterrupted);//也调用了c底层
说明
* 具体来说,当对一个线程,调用 interrupt() 时:
1. 如果线程处于正常活动状态,那么会将该线程的中断标志设置为 true,仅此而已。被设置中断标志的线程将继续正常运行,不受影响。所以, interrupt() 并不能真正的中断线程,需要被调用的线程自己进行配合才行。
2. ② 如果线程处于被阻塞状态(例如处于sleep, wait, join 等状态),在别的线程中调用当前线程对象的interrupt方法,那么线程将立即退出被阻塞状态(中断状态将被清除),并抛出一个InterruptedException异常。
3.(中断不活动的线程不会产生任何影响,看下面案例)
2. 当前线程的中断标识为true,是不是线程就立刻停止?
* 否
* 仅仅设置了一个中断状态
* 看看中断是否会立即停止这个300的线程
* 否,虽然中断标志位变了。但是i一直在循环
点击查看代码
public class InterruptDemo02 {
    public static void main(String[] args) {
        Thread t1 = new Thread(()->{
            for(int i = 0;i < 300;i ++){
                System.out.println("---------" + i);
            }
            System.out.println("after t1.interrupt()---第2次----"+Thread.currentThread().isInterrupted());
        },"t1");
        t1.start();
        System.out.println("before t1.interrupt()----"+t1.isInterrupted());
        t1.interrupt();
        try {TimeUnit.MILLISECONDS.sleep(3);} catch (InterruptedException e) {e.printStackTrace();}
        System.out.println("after t1.interrupt()---第1次---"+t1.isInterrupted());
        try {TimeUnit.MILLISECONDS.sleep(3000);} catch (InterruptedException e) {e.printStackTrace();}
        System.out.println("after t1.interrupt()---第3次---"+t1.isInterrupted());
    }
}
//before t1.interrupt()----false
//---------0
//---------1
//---------2
//---------3
//....
//---------136
//after t1.interrupt()---第1次---true    ------此处中断标志位设置为了true,但是t1仍然在运行
//---------137
//---------298
//---------299
//after t1.interrupt()---第2次----true
//after t1.interrupt()---第3次---false//中断不活动的线程不会产生任何影响,线程结束后应该是自动变为了false
后手案例-深入
* 在我们基本中断程序的骨架上 + 一个sleep阻塞
* 中断异常 且 会导致程序无限循环.
点击查看代码
public class InterruptDemo03 {
    public static void main(String[] args) {
        Thread t1 =  new Thread(()->{
            while(true){
                if(Thread.currentThread().isInterrupted()){
                    System.out.println(Thread.currentThread().getName()+"\t"+
                            "中断标志位:"+Thread.currentThread().isInterrupted()+"程序终止");
                    break;
                }
                try {
                    Thread.sleep(200);
                } catch (InterruptedException e) {
                    e.printStackTrace();
                    // Thread.currentThread().interrupt();  假如加了这个,程序可以终止,只会爆异常
                }
                System.out.println("-----hello InterruptDemo03");
            }
        },"t1");
        t1.start();
        try {TimeUnit.MILLISECONDS.sleep(1);} catch (InterruptedException e) {e.printStackTrace();}
        new Thread(() -> t1.interrupt()).start();
    }
}
//爆异常了,并且程序一直在跑
//java.lang.InterruptedException: sleep interrupted
//  at java.lang.Thread.sleep(Native Method)
//-----hello InterruptDemo03
//-----hello InterruptDemo03
//-----hello InterruptDemo03
//......
//----------------------------
//---------加了Thread.currentThread().interrupt();
//java.lang.InterruptedException: sleep interrupted
// at java.lang.Thread.sleep(Native Method)
//  at com.zhang.admin.controller.InterruptDemo03.lambda$main$0(InterruptDemo03.java:15)
//  at java.lang.Thread.run(Thread.java:748)
//-----hello InterruptDemo03
//t1  中断标志位:true程序终止
* 前文
② 如果线程处于被阻塞状态(例如处于sleep, wait, join 等状态),在别的线程中调用当前线程对象的interrupt方法,那么线程将立即退出被阻塞状态(中断状态将被清除),并抛出一个InterruptedException异常。
`
/**
- 1 中断标志位 默认是false
- 2 t2 ----->t1发出了中断协商,t2调用t1.interrupt(),中断标志位true
- 3 中断标志位true,正常情况下,程序停止,-
- 4 中断标志位true,异常情况下,InterruptedException,将会把中断状态清除,并且将收到InterruptedException。中断标志位false导致无限循环。
- 5 在catch块中,需要再次给中断标志位设置为true,2次调用停止
*/
sleep方法抛出InterruptedException后,中断标识也被清空置为false,我们在catch没有通过th.interrupt()方法再次将中断标志设置为true,这就导致无限循环了
`
小总结
中断只是一种协同机制,修改中断标识位仅此而已,而不是立刻stop打断
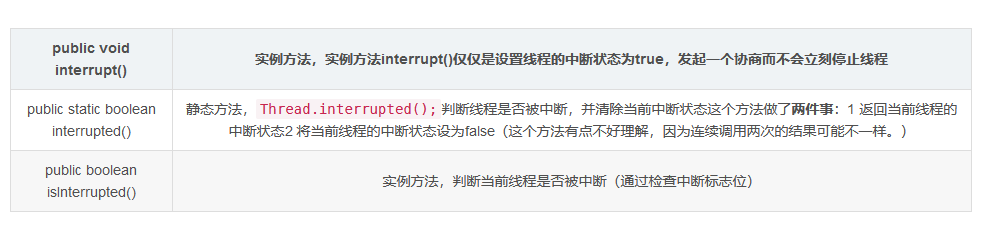
3. 静态方法Thread.interrupted(),谈谈你的理解
* api里的第二个
* public static boolean interrupted()
* 静态方法,Thread.interrupted();判断线程是否被中断,并清除当前中断状态这个方法做了两件事:1 返回当前线程的中断状态2 将当前线程的中断状态设为false(这个方法有点不好理解,因为连续调用两次的结果可能不一样。) |
public class InterruptDemo04 { public static void main(String[] args) { System.out.println(Thread.currentThread().getName()+"\t"+Thread.interrupted()); System.out.println(Thread.currentThread().getName()+"\t"+Thread.interrupted()); System.out.println("-----1"); Thread.currentThread().interrupt();//中断标志位设置为true System.out.println("-----2"); System.out.println(Thread.currentThread().getName()+"\t"+Thread.interrupted()); System.out.println(Thread.currentThread().getName()+"\t"+Thread.interrupted()); } } //main false //main false //-----1 //-----2 //main true //main false
* 看下源码,interrupted()对比isInterrupted()
`
public static boolean interrupted() {
return currentThread().isInterrupted(true);
}
private native boolean isInterrupted(boolean ClearInterrupted);
public boolean isInterrupted() {
return isInterrupted(false);
}
private native boolean isInterrupted(boolean ClearInterrupted);
`
* 他们在底层都调用了native方法isInterrupted。
* 只不过传入参数ClearInterrupted一个传参传了true,一个传了false。
* 静态方法interrupted() 中true表示清空当前中断状态。
* 实例方法isInterrupted 则不会。
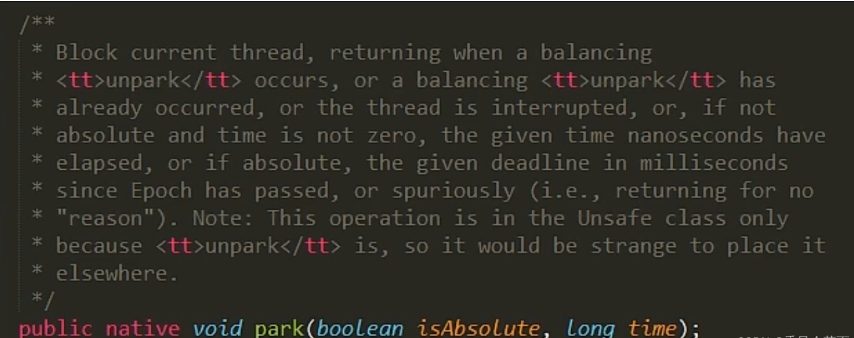
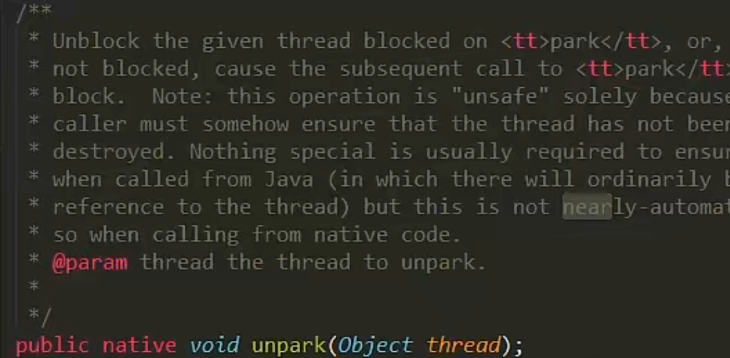
LockSupport是什么
* 官方解释:用于创建锁和其他同步类的基本线程阻塞原语。
* 核心就是park()和unpark()方法
* park()方法是阻塞线程
* unpark()方法是解除阻塞线程
线程等待唤醒机制
3种让线程等待和唤醒的方法
1. 使用Object中的wait()方法让线程等待,使用Object中的notify()方法唤醒线程
2. 使用JUC包中Condition的await()方法让线程等待,使用signal()方法唤醒线程
3. LockSupport类可以阻塞当前线程以及唤醒指定被阻塞的线程
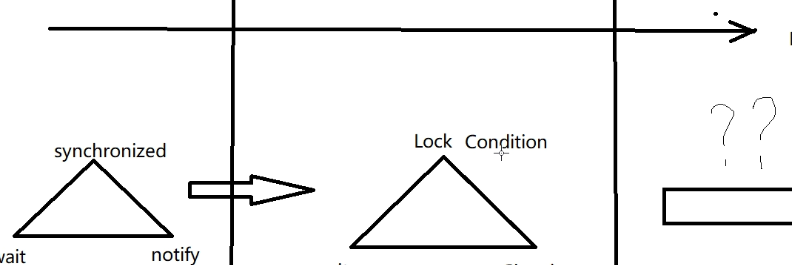
①Object类中的wait和notify方法实现线程等待和唤醒
- 正常
点击查看代码
public class LockSupportDemo
{
    public static void main(String[] args)
    {
        Object objectLock = new Object();

        new Thread(() -> {
            synchronized (objectLock) {
                System.out.println(Thread.currentThread().getName()+"\t ---- come in");
                try {
                    objectLock.wait();//----------------------这里先让他等待
                } catch (InterruptedException e) {
                    e.printStackTrace();
                }
            }
            System.out.println(Thread.currentThread().getName()+"\t"+"---被唤醒了");
        },"t1").start();

        //暂停几秒钟线程
        try { TimeUnit.SECONDS.sleep(3L); } catch (InterruptedException e) { e.printStackTrace(); }

        new Thread(() -> {
            synchronized (objectLock) {
                objectLock.notify();//-------------------------再唤醒它
                System.out.println(Thread.currentThread().getName()+"\t ---发出通知");
            }
        },"t2").start();
    }
}
//t1   ---- come in
//t2   ---发出通知
//t1  ---被唤醒了
-
异常1—去掉synchronized
- 说明要使用wait和notify必须加synchronized
点击查看代码
public class LockSupportDemo
{
    public static void main(String[] args)
    {
        Object objectLock = new Object();

        new Thread(() -> {
        //    synchronized (objectLock) {
                System.out.println(Thread.currentThread().getName()+"\t ---- come in");
                try {
                    objectLock.wait();
                } catch (InterruptedException e) {
                    e.printStackTrace();
                }
      //      }
            System.out.println(Thread.currentThread().getName()+"\t"+"---被唤醒了");
        },"t1").start();

        //暂停几秒钟线程
        try { TimeUnit.SECONDS.sleep(3L); } catch (InterruptedException e) { e.printStackTrace(); }

        new Thread(() -> {
       //     synchronized (objectLock) {
                objectLock.notify();
                System.out.println(Thread.currentThread().getName()+"\t ---发出通知");
       //     }
        },"t2").start();
    }
}
//t1   ---- come in
//Exception in thread "t1" java.lang.IllegalMonitorStateException
//  at java.lang.Object.wait(Native Method)
//  at java.lang.Object.wait(Object.java:502)
//  at com.zhang.admin.controller.LockSupportDemo.lambda$main$0(LockSupportDemo.java:15)
//  at java.lang.Thread.run(Thread.java:748)
-
异常2—把notify和wait的执行顺序对换
- 说明顺序不能对换
点击查看代码
public class LockSupportDemo
{
    public static void main(String[] args)
    {
        Object objectLock = new Object();

        new Thread(() -> {
            try { TimeUnit.SECONDS.sleep(1); } catch (InterruptedException e) { e.printStackTrace(); }
            synchronized (objectLock) {
                System.out.println(Thread.currentThread().getName()+"\t ---- come in");
                try {
                    objectLock.wait();
                } catch (InterruptedException e) {
                    e.printStackTrace();
                }
            }
            System.out.println(Thread.currentThread().getName()+"\t"+"---被唤醒了");
        },"t1").start();


        new Thread(() -> {
            synchronized (objectLock) {
                objectLock.notify();//这个先执行了
                System.out.println(Thread.currentThread().getName()+"\t ---发出通知");
            }
        },"t2").start();
    }
}
//一直处于循环中
小总结
* wait和notify方法必须要在同步块或者方法里面,且成对出现使用
* 先wait后notify才OK,顺序
②Condition接口中的await后signal方法实现线程的等待和唤醒
* 正常
点击查看代码
public class LockSupportDemo
{
    public static void main(String[] args)
    {
        Lock lock = new ReentrantLock();
        Condition condition = lock.newCondition();

        new Thread(() -> {
            lock.lock();
            try
            {
                System.out.println(Thread.currentThread().getName()+"\t-----come in");
                condition.await();
                System.out.println(Thread.currentThread().getName()+"\t -----被唤醒");
            } catch (InterruptedException e) {
                e.printStackTrace();
            } finally {
                lock.unlock();
            }
        },"t1").start();

        //暂停几秒钟线程
        try { TimeUnit.SECONDS.sleep(1); } catch (InterruptedException e) { e.printStackTrace(); }

        new Thread(() -> {
            lock.lock();
            try
            {
                condition.signal();
            } catch (Exception e) {
                e.printStackTrace();
            } finally {
                lock.unlock();
            }
            System.out.println(Thread.currentThread().getName()+"\t"+"我要进行唤醒");
        },"t2").start();

    }
}
//t1  -----come in
//t2  我要进行唤醒
//t1   -----被唤醒
* 异常1原理同上
仍然返回IllegalMonitorStateException
* 异常2 原理同上
仍然在不停的循环
小总结
* await和notify类似于上面wait和notify
* Condition中的线程等待和唤醒方法,需要先获取锁
* 一定要先await后signal,不能反了
Object和Condition使用的限制条件
* 总结
* 线程先要获得并持有锁,必须在锁块(synchronized或lock)中
* 必须要先等待后唤醒,线程才能够被唤醒
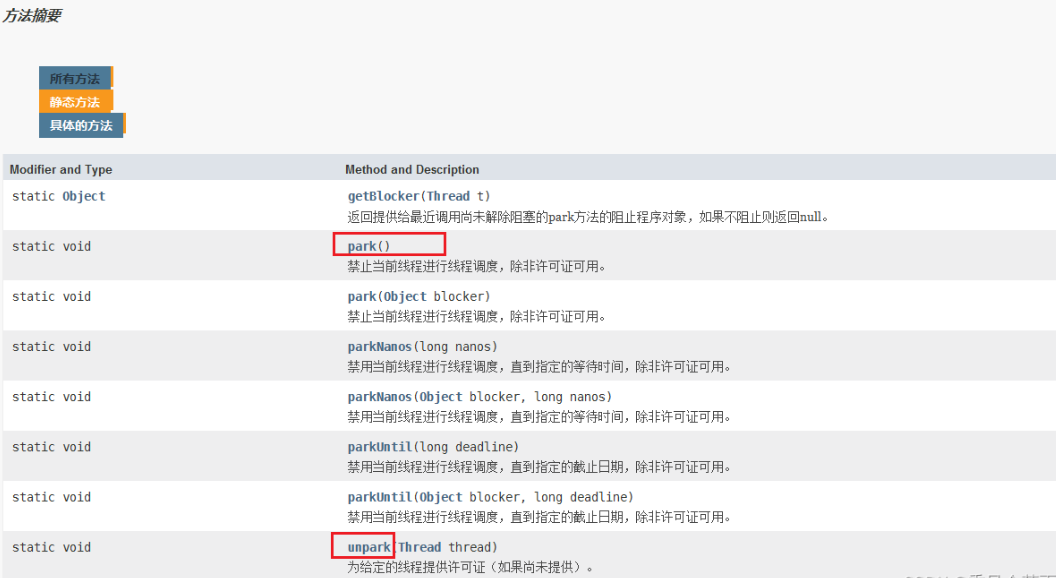
③LockSupport类中的park等待和unpark唤醒
是什么
* 通过park()和unpark(thread)方法来实现阻塞和唤醒线程的操作
* 官网解释
[外链图片转存失败,源站可能有防盗链机制,建议将图片保存下来直接上传(img-za4dJOuv-1654754693269)(image/image_E5vM4GxxSB.png)]
* LockSupport是用来创建锁和其他同步类的基本线程阻塞原语。
* LockSupport类使用了一种名为Permit(许可) 的概念来做到阻塞和唤醒线程的功能, 每个线程都有一个许可(permit),
* permit(许可)只有两个值1和0,默认是0。0 是阻塞,1是唤醒
* 可以把许可看成是一种(0,1)信号量(Semaphore),但与 Semaphore 不同的是,许可的累加上限是1。
许可(Permit)
主要方法
API
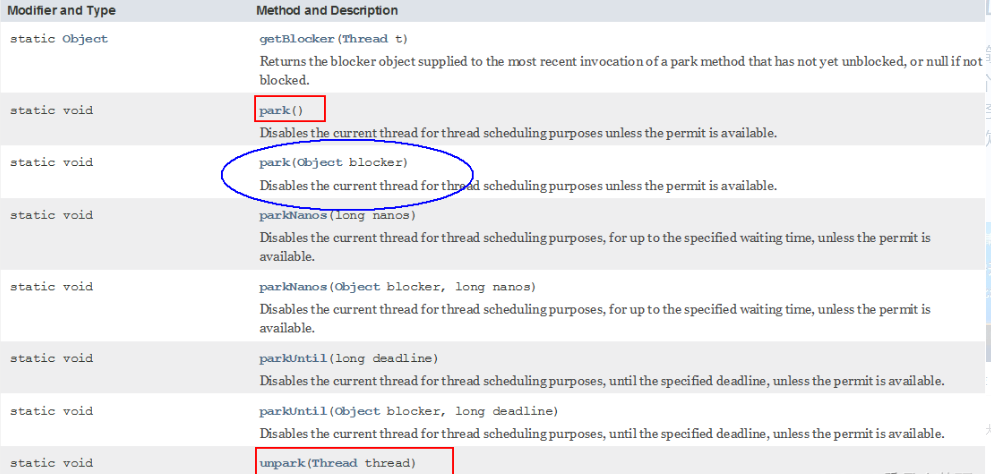
阻塞
* park()/park(Object blocker)
* 调用LockSupport.park()时,发现它调用了unsafe类,并且默认传了一个0
点击查看代码
public static void park() {
        UNSAFE.park(false, 0L);
    }
* permit默认是零,所以一开始调用park()方法,当前线程就会阻塞,直到别的线程将当前线程的permit设置为1时,park方法会被唤醒,
然后会将permit再次设置为零并返回。
唤醒
* 调用LockSupport.unpark();时,也调用了unsafe类
点击查看代码
public static void unpark(Thread thread) {
        if (thread != null)
            UNSAFE.unpark(thread);
    }
* 调用unpark(thread)方法后,就会将thread线程的许可permit设置成1(注意多次调用unpark方法,不会累加,permit值还是1)会自动唤醒thread线程,即之前阻塞中的LockSupport.park()方法会立即返回。
代码
- 正常+无锁块要求
点击查看代码
public class LockSupportDemo
{
    public static void main(String[] args) {
        Thread t1 = new Thread(()->{
            System.out.println(Thread.currentThread().getName()+"\t----------come in");
            LockSupport.park();
            System.out.println(Thread.currentThread().getName()+"\t----------被唤醒了");
        },"t1");
        t1.start();

        new Thread(()->{
            LockSupport.unpark(t1);
            System.out.println(Thread.currentThread().getName()+"\t-----发出通知,去唤醒t1");
        },"t2").start();
    }
}
//t1  ----------come in
//t2  -----发出通知,去唤醒t1
//t1  ----------被唤醒了
- 之前错误的先唤醒后等待,LockSupport照样支持
点击查看代码
public class LockSupportDemo
{
    public static void main(String[] args) {
        Thread t1 = new Thread(()->{
            try {TimeUnit.SECONDS.sleep(3);} catch (InterruptedException e) {e.printStackTrace();}
            System.out.println(Thread.currentThread().getName()+"\t----------come in"+"\t"+System.currentTimeMillis());
            LockSupport.park();
            System.out.println(Thread.currentThread().getName()+"\t----------被唤醒了"+"\t"+System.currentTimeMillis());
        },"t1");
        t1.start();

        new Thread(()->{
            LockSupport.unpark(t1);
            System.out.println(Thread.currentThread().getName()+"\t-----发出通知,去唤醒t1");
        },"t2").start();
    }
}
//t2  -----发出通知,去唤醒t1
//t1  ----------come in  1654750785663
//t1  ----------被唤醒了  1654750785663
`
sleep方法3秒后醒来,执行park无效,没有阻塞效果,解释如下。先执行了unpark(t1)导致上面的park方法形同虚设无效,时间是一样的
- 类似于高速公路的ETC,提前买好了通行证unpark,到闸机处直接抬起栏杆放行了,没有park拦截了。
`
- 成双成对要牢记
最后
- 许可证是只要一个的
点击查看代码
public class LockSupportDemo
{
    public static void main(String[] args) {
        Thread t1 = new Thread(()->{
            try {TimeUnit.SECONDS.sleep(3);} catch (InterruptedException e) {e.printStackTrace();}
            System.out.println(Thread.currentThread().getName()+"\t----------come in"+"\t"+System.currentTimeMillis());
            LockSupport.park();
            LockSupport.park();
            System.out.println(Thread.currentThread().getName()+"\t----------被唤醒了"+"\t"+System.currentTimeMillis());
        },"t1");
        t1.start();

        new Thread(()->{
            LockSupport.unpark(t1);
            LockSupport.unpark(t1);
            System.out.println(Thread.currentThread().getName()+"\t-----发出通知,去唤醒t1");
        },"t2").start();
    }
}
//t2  -----发出通知,去唤醒t1
//t1  ----------come in  1654750970677--------------------卡在这里了
-
小总结
Lock Support是用来创建锁和其他同步类的基本线程阻塞原语。
Lock Support是一个线程阻塞工具类, 所有的方法都是静态方法, 可以让线程在任意位置阻塞, 阻塞之后也有对应的唤醒方法。归根结
底, Lock Support调用的Unsafe中的native代码。Lock Support提供park() 和unpark() 方法实现阻塞线程和解除线程阻塞的过程
Lock Support和每个使用它的线程都有一个许可(permit) 关联。
每个线程都有一个相关的permit, permit最多只有一个, 重复调用un park也不会积累凭证。形象的理解
线程阻塞需要消耗凭证(permit) , 这个凭证最多只有1个。
当调用方法时
如果有凭证,则会直接消耗掉这个凭证然后正常退出;
如果无凭证,就必须阻塞等待凭证可用;
而**则相反, 它会增加一个凭证, 但凭证最多只能有1个, 累加无效。
面试题
* 为什么可以突破wait/notify的原有调用顺序?
因为un park获得了一个凭证, 之后再调用park方法, 就可以名正言顺的凭证消费, 故不会阻塞。
先发放了凭证后续可以畅通无阻。
* 为什么唤醒两次后阻塞两次,但最终结果还会阻塞线程?
因为凭证的数量最多为1, 连续调用两次un park和调用一次un park效果一样, 只会增加一个凭证;
而调用两次park却需要消费两个凭证, 证不够, 不能放行。
Java内存模型之JMM
先从大厂面试题开始
* 你知道什么是Java内存模型JMM吗?
* JMM与volatile它们两个之间的关系?(下一章详细讲解)
* JMM有哪些特性or它的三大特性是什么?
* 为什么要有JMM,它为什么出现?作用和功能是什么?
* happens-before先行发生原则你有了解过吗?
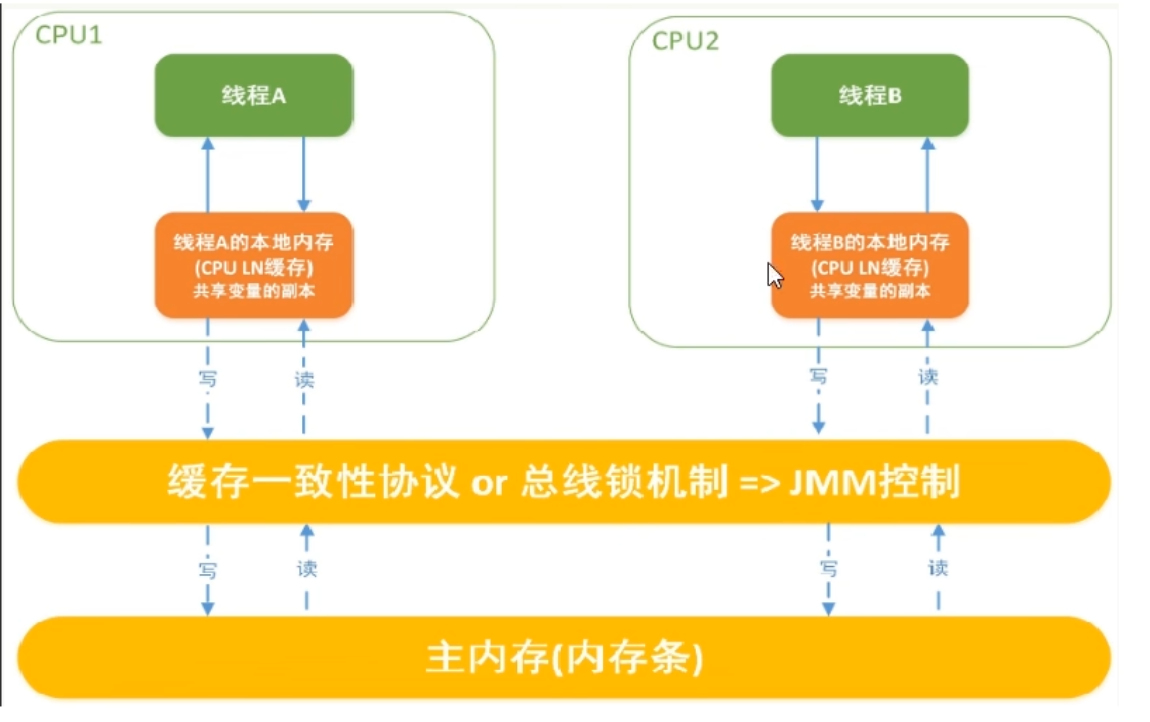
计算机硬件存储体系
计算机存储结构,从本地磁盘到主存到CPU缓存,也就是从硬盘到内存,到CPU。
一般对应的程序的操作就是从数据库查数据到内存然后到CPU进行计算
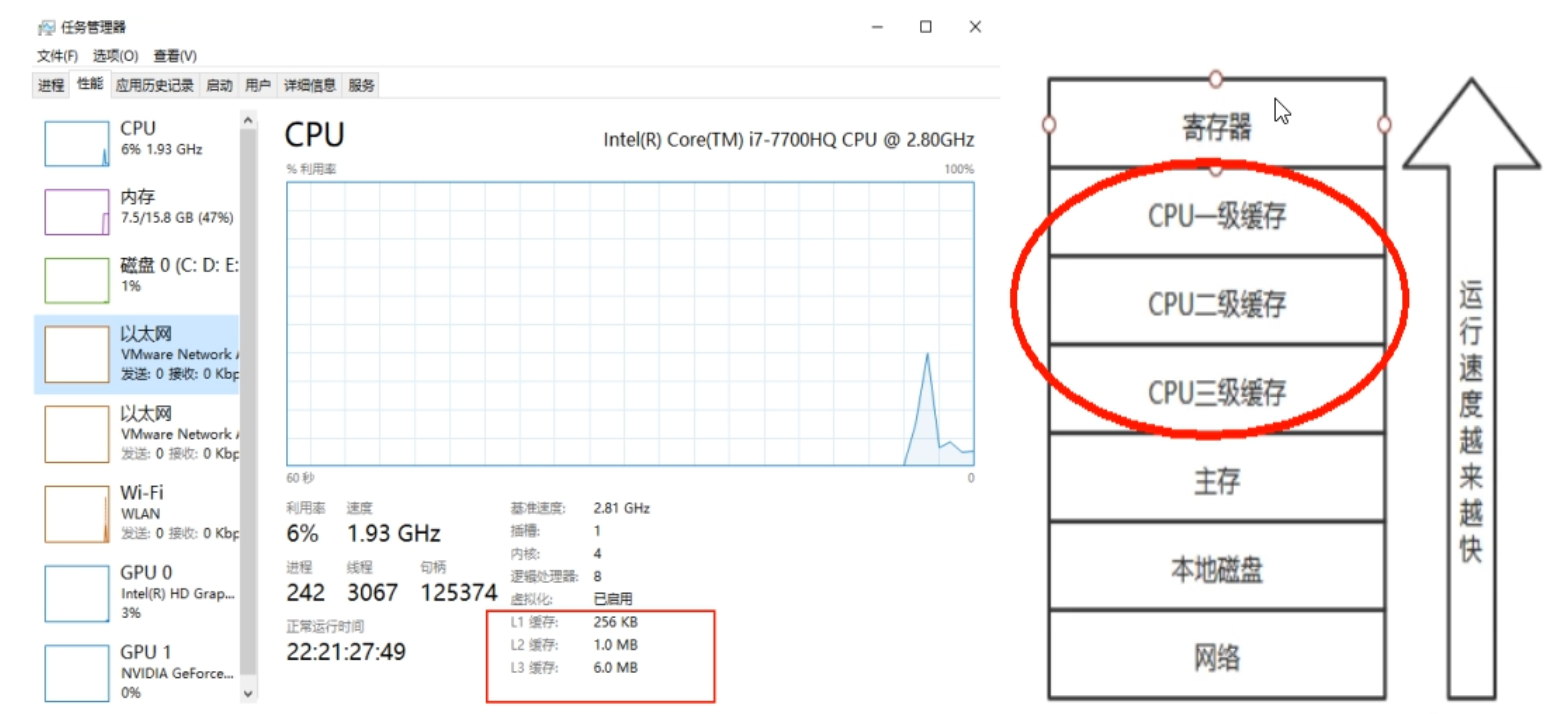
因为有这么多级的缓存(cpu和物理主内存的速度不一致的),
CPU的运行并不是直接操作内存而是先把内存里边的数据读到缓存,而内存的读和写操作的时候就会造成不一致的问题
Java虚拟机规范中试图定义一种Java内存模型(java Memory Model,简称JMM) 来屏蔽掉各种硬件和操作系统的内存访问差异,
以实现让Java程序在各种平台下都能达到一致的内存访问效果。推导出我们需要知道JMM
Java内存模型Java Memory Model
* JMM
JMM(Java内存模型Java Memory Model,简称JMM)本身是一种抽象的概念并不真实存在它仅仅描述的是一组约定或规范,通过这组规范定义了程序中(尤其是多线程)各个变量的读写访问方式并决定一个线程对共享变量的写入何时以及如何变成对另一个线程可见,关键技术点都是围绕多线程的原子性、可见性和有序性展开的。
* 原则:
JMM的关键技术点都是围绕多线程的原子性、可见性和有序性展开的
* 能干嘛?
1通过JMM来实现线程和主内存之间的抽象关系。
2屏蔽各个硬件平台和操作系统的内存访问差异以实现让Java程序在各种平台下都能达到一致的内存访问效果。
JMM规范下,三大特性
原子性
* 指一个操作是不可中断的,即多线程环境下,操作不能被其他线程干扰
可见性
* 可见性
* 是指当一个线程修改了某一个共享变量的值,其他线程是否能够立即知道该变更 ,JMM规定了所有的变量都存储在主内存中。
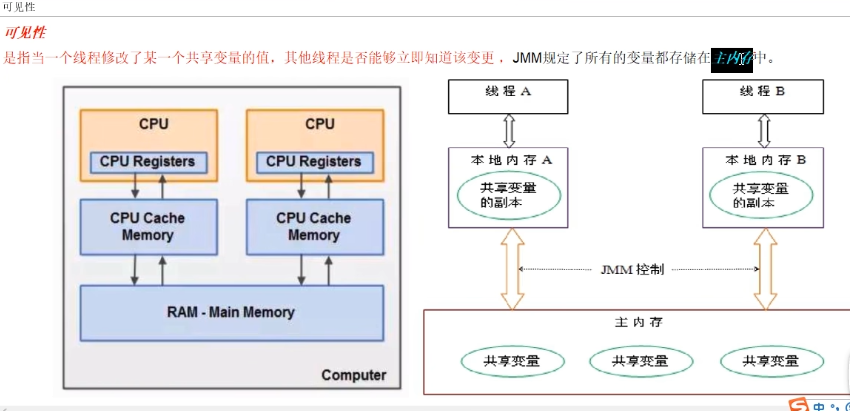
* Java中普通的共享变量不保证可见性,因为数据修改被写入内存的时机是不确定的,多线程并发下很可能出现"脏读",所以每个线程都有自己的工作内存,线程自己的工作内存中保存了该线程使用到的变量的主内存副本拷贝,线程对变量的所有操作(读取,赋值等 )都必需在线程自己的工作内存中进行,而不能够直接读写主内存中的变量。不同线程之间也无法直接访问对方工作内存中的变量,线程间变量值的传递均需要通过主内存来完成
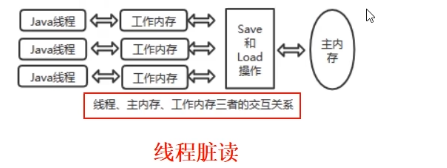
- 如果没有保证可见性
* 导致-线程脏读
* 例子
* 主内存中有变量 x,初始值为 0
* 线程 A 要将 x 加 1,先将 x=0 拷贝到自己的私有内存中,然后更新 x 的值
* 线程 A 将更新后的 x 值回刷到主内存的时间是不固定的
* 刚好在线程 A 没有回刷 x 到主内存时,线程 B 同样从主内存中读取 x,此时为 0,和线程 A 一样的操作,最后期盼的 x=2 就会变成 x=1
有序性
* 有序性牵扯到指令
* 这里给一个案例
点击查看代码
public void mySort()
{
    int x = 11; //语句1
    int y = 12; //语句2
    x = x + 5;  //语句3
    y = x * x;  //语句4
}

  1234
  2134
  1324

问题:请问语句4可以重排后变成第一个条吗?
* 有序性是什么?
对于一个线程的执行代码而言,我们总是习惯性认为代码的执行总是从上到下,有序执行。但为了提供性能,编译器和处理器通常会对指令序列进行重新排序。Java规范规定JVM线程内部维持顺序化语义,即只要程序的最终结果与它顺序化执行的结果相等,那么指令的执行顺序可以与代码顺序不一致,此过程叫指令的重排序。
* 优缺点
JVM能根据处理器特性(CPU多级缓存系统、多核处理器等)适当的机器对指令进行重排序,使得机器指令能更符合CPU的执行特性,最大限度的发挥机器性能。但是,
指令重排可以保证串行语义一致,但没有义务保证多线程间的语义也一致(即可能产生“脏读”),简单说,两行以上不相干的代码在执行的时候有可能先执行的不是第一条,不见得是从上到下顺序执行,执行顺序会被优化。
* 指令重排的三种表现(层面)
* 编译器优化的重排
* 指令并行的重排
* 内存系统的重排

* 小总结
单线程环境里面确保程序最终执行结果和代码顺序执行的结果一致。
处理器在进行重排序时必须要考虑指令之间的数据依赖性
多线程环境中线程交替执行,由于编译器优化重排的存在,两个线程中使用的变量能否保证一致性是无法确定的,结果无法预测
JMM规范下,多线程对变量的读写过程
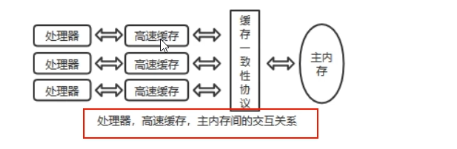
* 读取过程
由于JVM运行程序的实体是线程,而每个线程创建时JVM都会为其创建一个工作内存(有些地方称为栈空间),工作内存是每个线程的私有数据区域,而Java内存模型中规定所有变量都存储在主内存,主内存是共享内存区域,所有线程都可以访问,但线程对变量的操作(读取赋值等)必须在工作内存中进行,首先要将变量从主内存拷贝到的线程自己的工作内存空间,然后对变量进行操作,操作完成后再将变量写回主内存,不能直接操作主内存中的变量,各个线程中的工作内存中存储着主内存中的变量副本拷贝,因此不同的线程间无法访问对方的工作内存,线程间的通信(传值)必须通过主内存来完成,其简要访问过程如下图
* JMM定义了线程和主内存之间的抽象关系
线程之间的共享变量存储在主内存中(从硬件角度来说就是内存条)
每个线程都有一个私有的本地工作内存,本地工作内存中存储了该线程用来读/写共享变量的副本(从硬件角度来说就是CPU的缓存,比如寄存器、L1、L2、L3缓存等)
* 小总结
* 我们定义的所有共享变量都存储在物理主内存中
* 每个线程都有自己独立的工作内存,里面保存该线程使用到的变量的副本(主内存中该变量的一份拷贝)
* 线程对共享变量所有的操作都必须先在线程自己的工作内存中进行后写回主内存,不能直接从主内存中读写(不能越级)
* 不同线程之间也无法直接访问其他线程的工作内存中的变量,线程间变量值的传递需要通过主内存来进行(同级不能相互访问)
JMM规范下,多线程先行发生原则之happens-before
引入happens-before
* 本章最晦涩难懂的知识
* happens-before先行发生原则
* 在JMM中,如果一个操作执行的结果需要对另一个操作可见性或者代码重新排序,那么这两个操作之间必须存在happens-before(先行发生)原则。逻辑上的先后关系。
* x,y案例说明
* x=5;线程A执行
* y=x;线程B执行
* 问:y一定等于5吗?
* 答:不一定
如果线程A的操作(x= 5)happens-before(先行发生)线程B的操作(y = x),那么可以确定线程B执行后y = 5 一定成立;
如果他们不存在happens-before原则,那么y = 5 不一定成立。
是happens-before原则的威力。-------------------》包含可见性和有序性的约束
* 先行发生原则(happens-before)被定义在了JMM之中
如果Java内存模型中所有的有序性都仅靠volatile和synchronized来完成,那么有很多操作都将会变得非常啰嗦,
但是我们在编写Java并发代码的时候并没有察觉到这一点。
我没有时时、处处、次次,添加volatile和synchronized来完成程序,这是因为Java语言中JMM原则下
有一个“先行发生”(Happens-Before)的原则限制和规矩
这个原则非常重要:
它是判断数据是否存在竞争,线程是否安全的非常有用的手段。依赖这个原则,我们可以通过几条简单规则一揽子解决并发环境下两个操作之间是否可能存在冲突的所有问题,而不需要陷入Java内存模型苦涩难懂的底层编译原理之中。
happens-before总原则
happens-before总原则
如果一个操作happens-before另一个操作,那么第一个操作的执行结果将对第二个操作可见,而且第一个操作的执行顺序排在第二个操作之前。
两个操作之间存在happens-before关系,并不一定要按照happens-before原则制定的顺序来执行。如果重排序之后的执行结果与按照happens-before关系来执行的结果一致,那么这种重排序并不非法。
happens-before8条
JMM存在的天然存在的happens-before 关系,8条
* happens-before8条
* 次序规则:一个线程内,按照代码顺序,写在前面的操作先行发生于写在后面的操作。
* 锁定规则:锁的获取的先后顺序
* 一个unLock操作先行发生于后面(这里的后面是指时间上的先后)对同一个锁的lock操作(一个线程想要lock,肯定要等前面的锁unLock释放这个资源)
点击查看代码
public class HappenBeforeDemo
{
    static Object objectLock = new Object();

    public static void main(String[] args) throws InterruptedException
    {
        //对于同一把锁objectLock,threadA一定先unlock同一把锁后B才能获得该锁,   A 先行发生于B
        synchronized (objectLock)
        {

        }
    }
}
- volatile变量规则
对一个volatile变量的读写操作先行发生于后面对这个变量的读操作,前面的写对后面的读是可见的,这里的后面同样是指时间上的先后。 - 传递规则
如果操作A先行发生于操作B,而操作B又先行发生于操作C,则可以得出操作A先行发生于操作C - 线程启动规则(Thread Start Rule)
Thread对象的start()方法先行发生于此线程的每一个动作
点击查看代码
Thread t1 = new Thread(()->{
 System.out.println("----hello thread")//后执行
},"t1");
t1.start();//-------------------先执行
- 线程中断规则(Thread Interruption Rule)
对线程interrupt()方法的调用先行发生于被中断线程的代码检测到中断事件的发生;可以通过Thread.interrupted()检测到是否发生中断。- 也就是说你要先调用了interrupt()方法设置过中断标志位,我才能检测到中断发送。
- 线程终止规则(Thread Termination Rule)
线程中的所有操作都先行发生于对此线程的终止检测,我们可以通过isAlive()等手段检测线程是否已经终止执行。 - 对象终结规则(Finalizer Rule)
一个对象的初始化完成(构造函数执行结束)先行发生于它的finalize()方法的开始- finalize的通常目的是在对象被不可撤销的丢弃之前执行清理操作。
happens-before案例说明
* 案例
点击查看代码
public class TestDemo
{
  private int value = 0;
  public int getValue(){
      return value;
  }
  public  int setValue(){
      return ++value;
  }
}
-
问:假设存在线程A和B,线程A先(时间上的先后)调用了setValue(),然后线程B调用了同一个对象的getValue(),那么线程B收到的返回值是什么?是0还是1?
-
答:真不一定
我们就这段简单的代码一次分析happens-before的规则(规则5、6、7、8 可以忽略,因为他们和这段代码毫无关系):
1 由于两个方法是由不同的线程调用,不在同一个线程中,所以肯定不满足程序次序规则;
2 两个方法都没有使用锁,所以不满足锁定规则;
3 变量不是用volatile修饰的,所以volatile变量规则不满足;
4 传递规则肯定不满足;
所以我们无法通过happens-before原则推导出线程A happens-before线程B,虽然可以确认在时间上线程A优先于线程B指定,
但就是无法确认线程B获得的结果是什么,所以这段代码不是线程安全的。那么怎么修复这段代码呢?
- 修复
点击查看代码
//1
public class TestDemo
{
  private int value = 0;
  public synchronized int getValue(){
      return value;
  }
  public synchronized int setValue(){
      return ++value;
  }
}
//synchronized太猛了,降低太多的效率
点击查看代码
//2
public class TestDemo
{
  private int value = 0;
  public synchronized int getValue(){
      return value;
  }
  public synchronized int setValue(){
      return ++value;
  }
}
//把value定义为volatile变量,由于setter方法对value的修改不依赖value的值,满足volatile关键字使用场景
//理由:利用volatile保证读取操作的可见性;利用synchronized保证复合操作的原子性结合使用锁和volatile变量来减少同步的开销。

 浙公网安备 33010602011771号