
作业2
# 使用 kickstart 半自动化安装CentOS7系统
## 1、创建kickstart文件
**创建kickstart文件的方式**
- 可使用创建工具:system-config-kickstart ,注意:此方法 CentOS 8 不再支持
- 依据某模板修改并生成新配置,CentOS安装完后,会自动参考当前系统的安装过程,生成一个kickstart文件 /root/anaconda-ks.cfg
**使用system-config-kickstart生成kickstart配置文件**
---(centos8保护支持,可在centos7生成,经过修改给centos8使用)
- 创建yum仓库
```bash
[root@centos7.8 ~]#yum -y install httpd
[root@centos7.8 ~]#systemctl enable --now httpd
Created symlink from /etc/systemd/system/multi-user.target.wants/httpd.service to /usr/lib/systemd/system/httpd.service.
[root@centos7.8 ~]#cd /var/www/html
[root@centos7.8 html]#mkdir -p centos/7/os/x86_64
[root@centos7.7 html]#tree
.
└── centos
└── 7
└── os
└── x86_64
4 directories, 0 files
[root@centos7 html]#mount /dev/sr0 centos/7/os/x86_64/
mount: /dev/sr0 is write-protected, mounting read-only
[root@centos7 html]#lsblk
NAME MAJ:MIN RM SIZE RO TYPE MOUNTPOINT
sda 8:0 0 200G 0 disk
├─sda1 8:1 0 1G 0 part /boot
├─sda2 8:2 0 100G 0 part /
├─sda3 8:3 0 50G 0 part /data
├─sda4 8:4 0 1K 0 part
└─sda5 8:5 0 2G 0 part [SWAP]
sr0 11:0 1 4.5G 0 rom /var/www/html/centos/7/os/x86_64
[root@centos7 html]#systemctl disable --now firewalld
[root@centos7 html]#setenforce 0
```
- 安装system-config-kickstart工具
```bash
[root@centos7 ~]#yum -y install system-config-kickstart
```
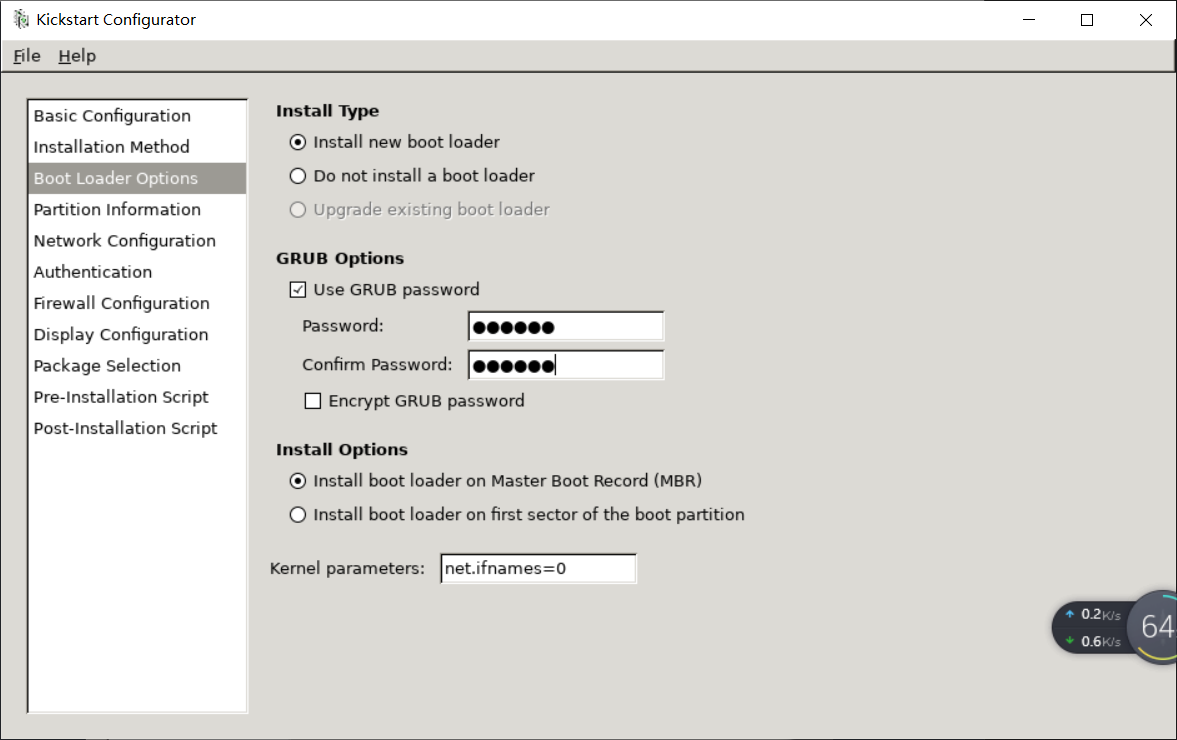
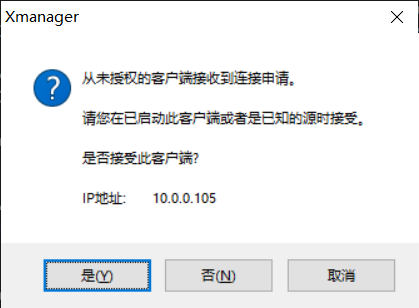
- 此工具是一个图形化工具,在Windows运行一个Xmanager程序

```bash
[root@centos7 ~]#export DISPLAY=10.0.0.1:0.0
#10.0.0.1为本机电脑IP,可以在网卡属性中查看,0.0为上图中Xmanager后的窗口
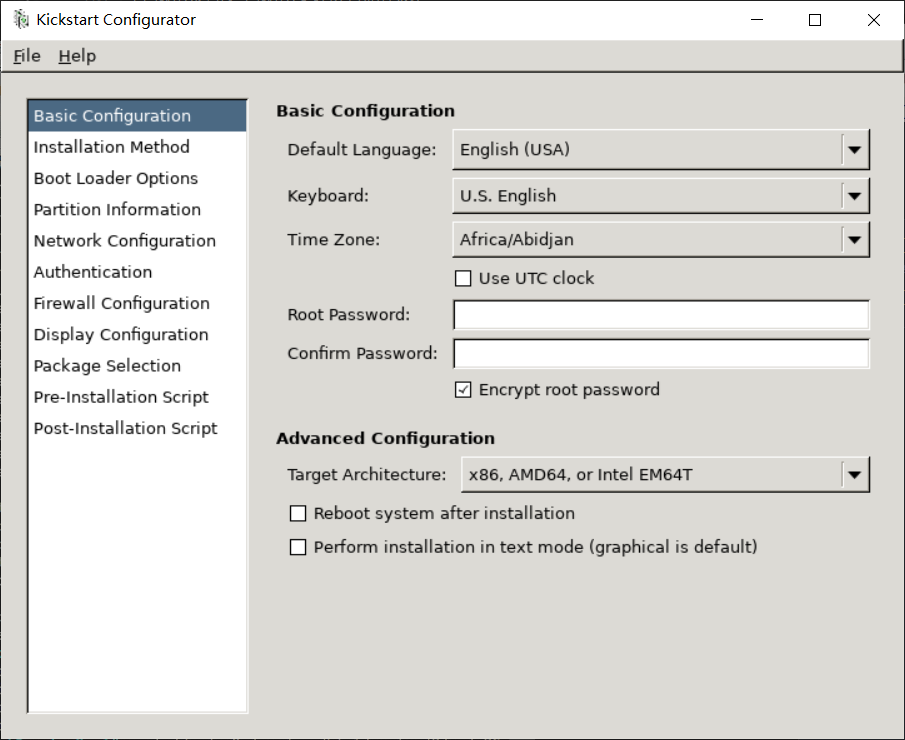
[root@centos7 ~]#system-config-kickstart
```


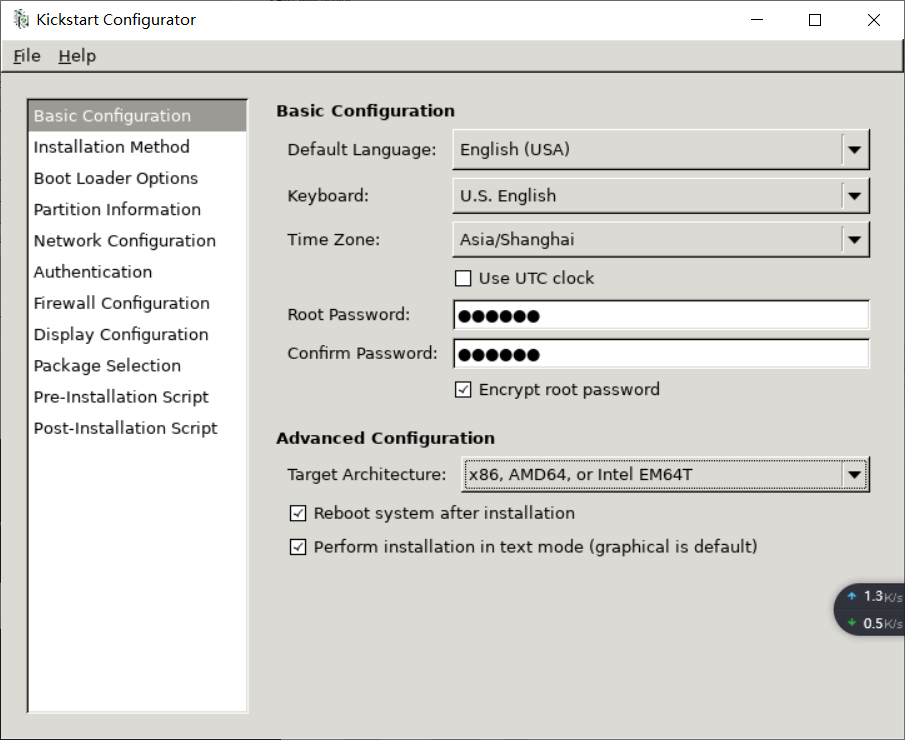
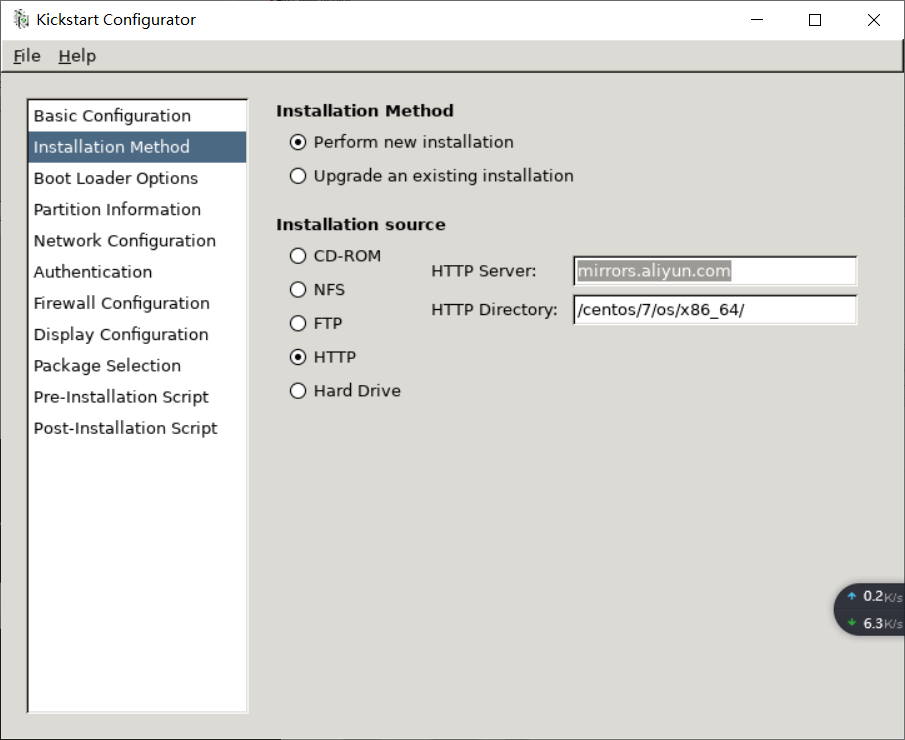
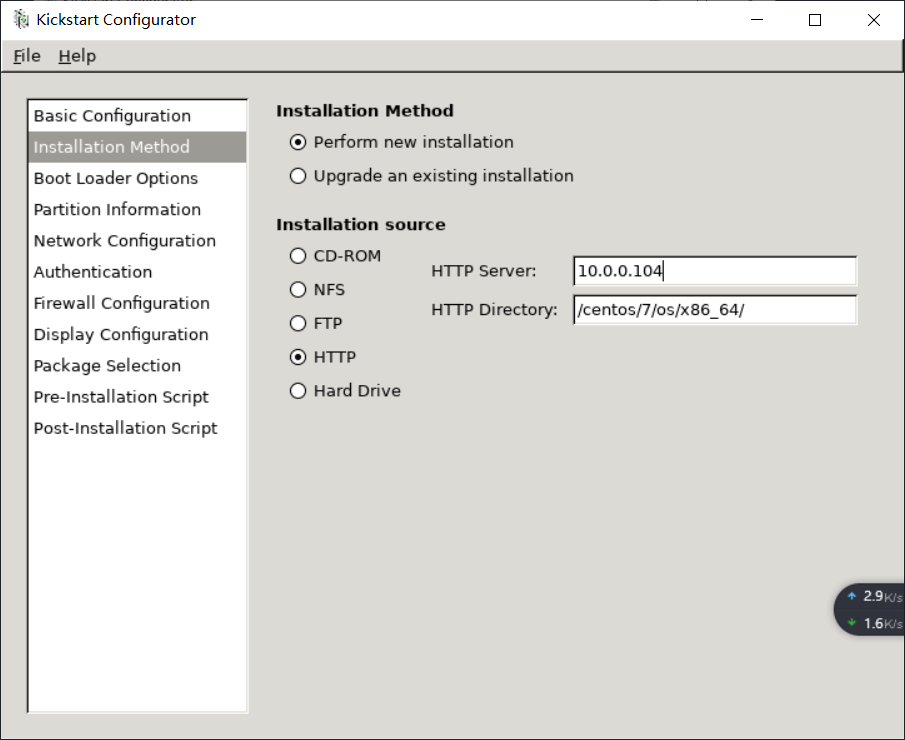
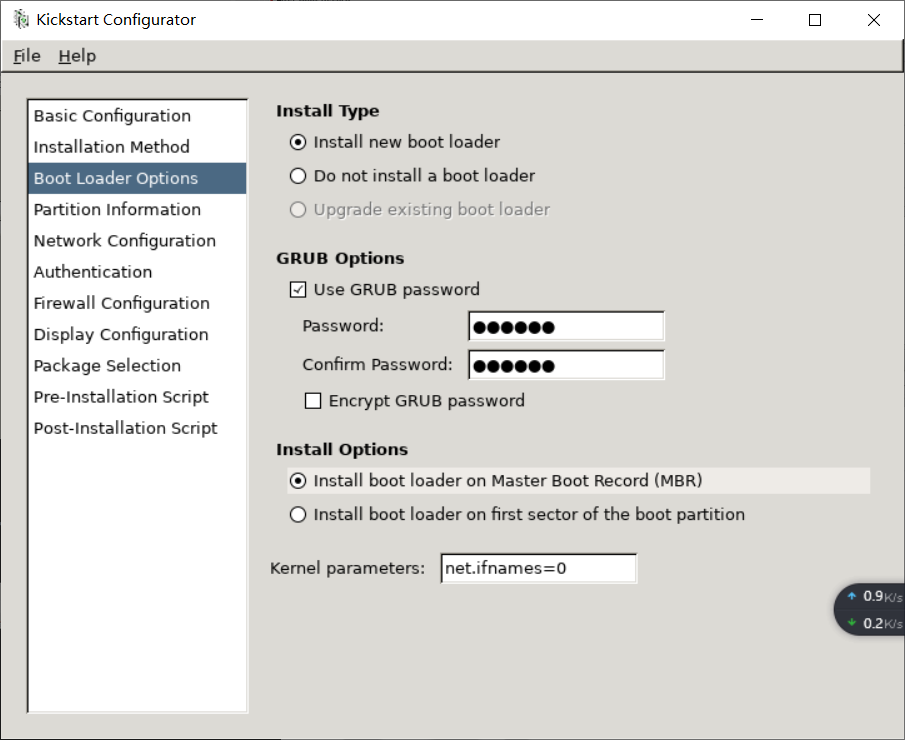
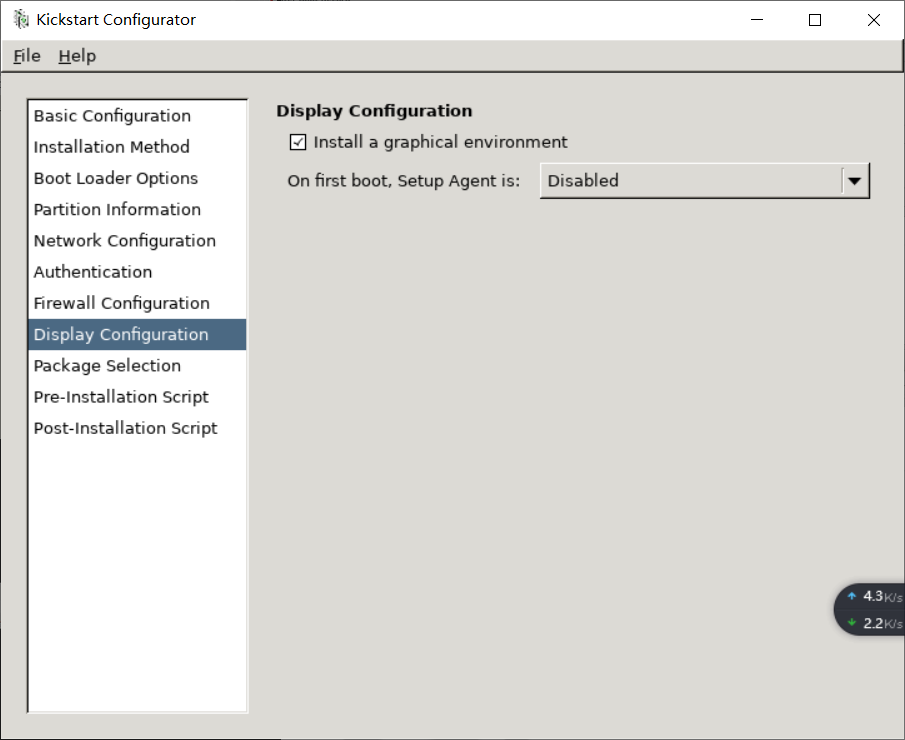
- **依次配置上图中左侧菜单:**


上图中http://10.0.0.104/centos/7/os/x86_64为自建的yum仓库


不出现可选的包信息,需要修改yum仓库配置文件:
```bash
[root@centos7 ~]#vim /etc/yum.repos.d/***.repo
[development]
#把原来"[]"内的内容改成development,其它不变
```

安装前脚本,可不写

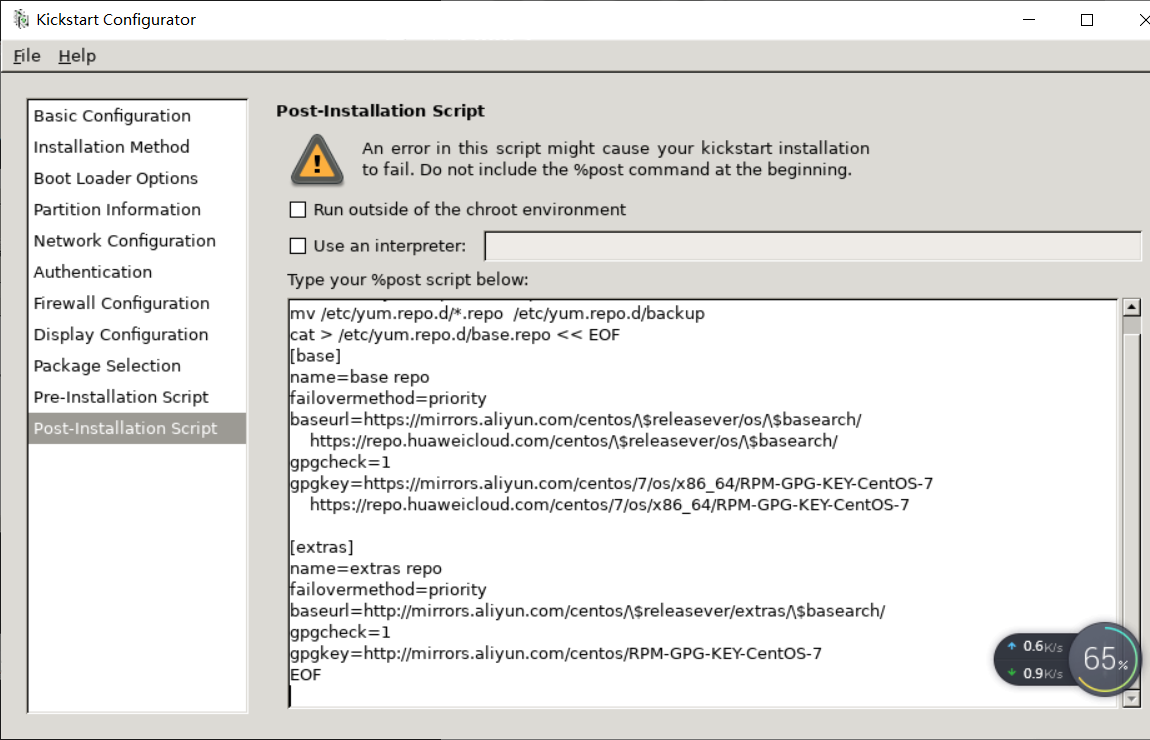
安装后脚本,可以写入希望执行操作,例如配置yum源
- 保存并命名为ks7.cfg
- 查看生成的kickstart文件ks7.cfg
```bash
[root@centos7 kickstart]#vim ks7.cfg
#platform=x86, AMD64, or Intel EM64T
#version=DEVEL
# Install OS instead of upgrade
install
# Keyboard layouts
keyboard 'us'
# Root password
rootpw --iscrypted $1$4EavzQm1$mSdkpMa2MRVRt4Gd0bVM7.
# System language
lang en_US
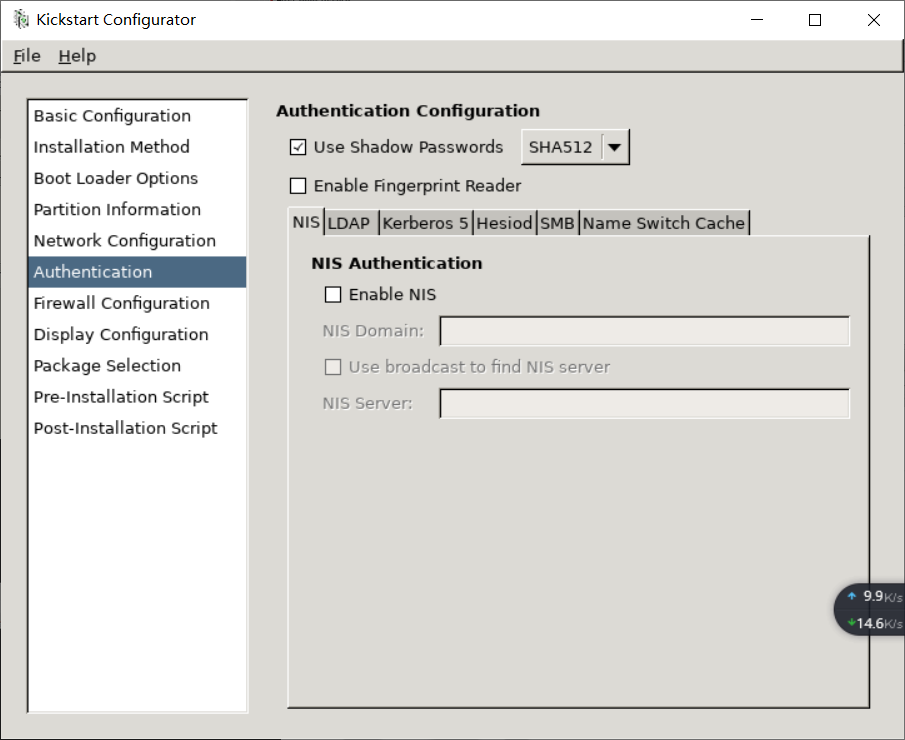
# System authorization information
auth --useshadow --passalgo=sha512
# Use text mode install
text
firstboot --disable
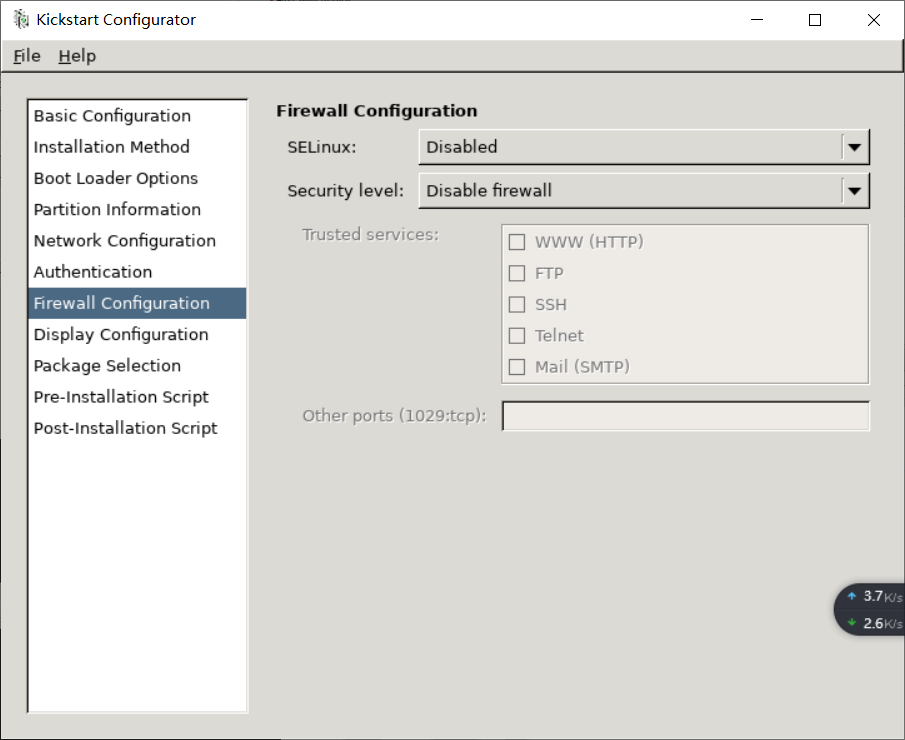
# SELinux configuration
selinux --disabled
ignoredisk --only-use=sda
# Firewall configuration
firewall --disabled
# Network information
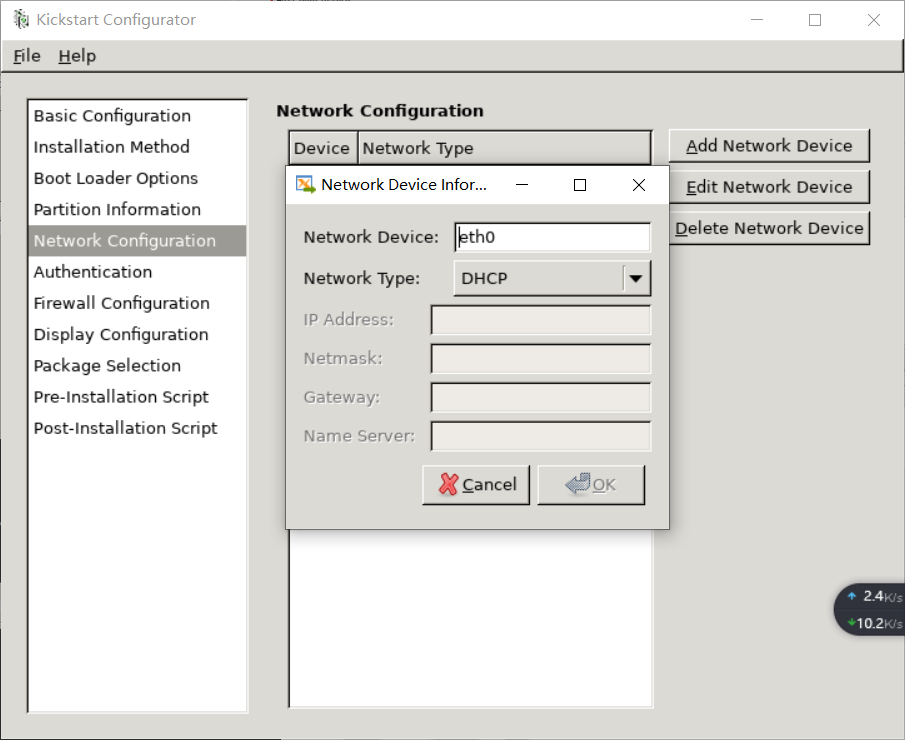
network --bootproto=dhcp --device=eth0
# Reboot after installation
reboot
# System timezone
timezone Asia/Shanghai
# Use network installation
url --url="http://10.0.0.104/centos/7/os/x86_64/"
# System bootloader configuration
bootloader --append="net.ifnames=0" --location=mbr --password="123456"
# Clear the Master Boot Record
zerombr
# Partition clearing information
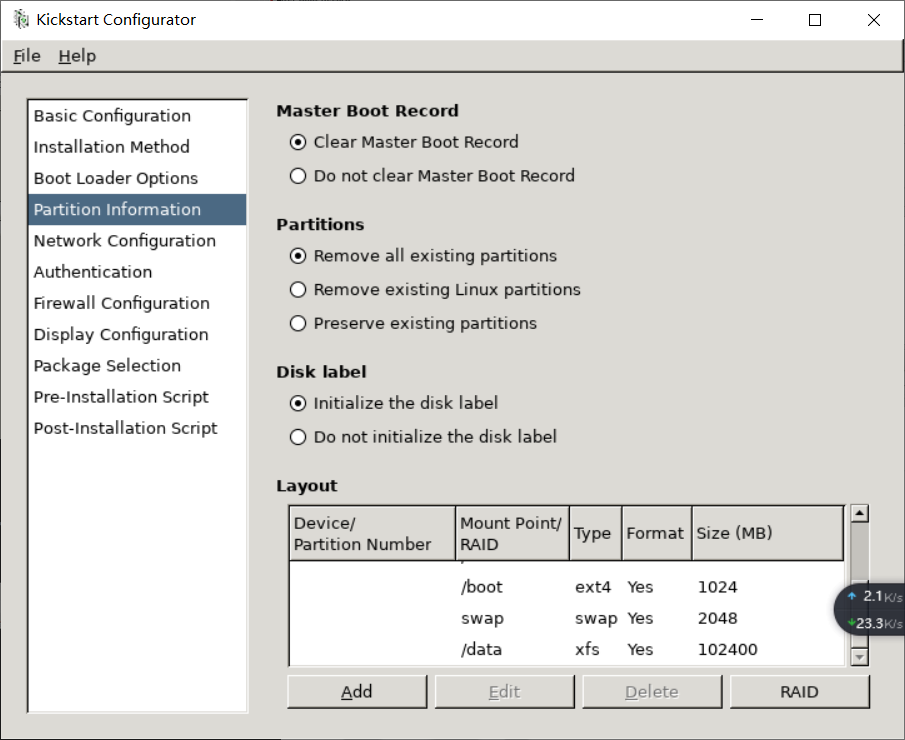
clearpart --all --initlabel
# Disk partitioning information
part / --fstype="xfs" --size=51200
part /boot --fstype="ext4" --size=1024
part swap --fstype="swap" --size=2048
part /data --fstype="xfs" --size=102400
%post --nochroot
mkdir /etc/yum.repo.d/backup
mv /etc/yum.repo.d/*.repo /etc/yum.repo.d/backup
cat > /etc/yum.repo.d/base.repo << EOF
[base]
name=base repo
failovermethod=priority
baseurl=https://mirrors.aliyun.com/centos/\$releasever/os/\$basearch/
https://repo.huaweicloud.com/centos/\$releasever/os/\$basearch/
gpgcheck=1
gpgkey=https://mirrors.aliyun.com/centos/7/os/x86_64/RPM-GPG-KEY-CentOS-7
https://repo.huaweicloud.com/centos/7/os/x86_64/RPM-GPG-KEY-CentOS-7
[extras]
name=extras repo
failovermethod=priority
baseurl=http://mirrors.aliyun.com/centos/\$releasever/extras/\$basearch/
gpgcheck=1
gpgkey=http://mirrors.aliyun.com/centos/RPM-GPG-KEY-CentOS-7
EOF
%end
%packages
@web-server
%end
```
将kickstart文件拷贝到10.0.0.104 http服务器
```bash
[root@centos7 ~]#scp ks7.cfg 10.0.0.104:/var/www/html/kickstart/
root@10.0.0.104's password:
ks7.cfg 100% 1722 784.2KB/s 00:00
```
- 找一个新机器,利用光盘和自定义kick start文件启动
1. 下载光盘https://mirrors.aliyun.com/centos/7/isos/x86_64/CentOS-7-x86_64-NetInstall-2003.iso
2. 使用下载的光盘启动,Esc键进入下面界面

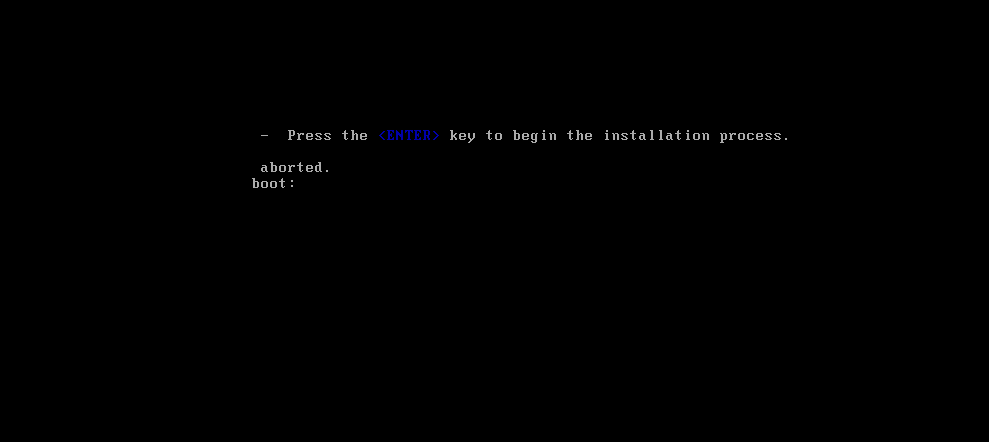
输入linux ks=http://10.0.0.104/kickstart/ks7.cfg ip=dhcp
Enter之后即可开始安装(ks后的地址为存放kick start文件的地址)
# 制作光盘并结合kickstart实现基于光盘启动的半自动化安装引导
- 创建一个文件夹,将光盘里的相关启动文件拷贝到此文件夹中
```bash
[root@centos7 data]#mkdir /data/iso
[root@centos7 data]#cd iso/
[root@centos7 iso]#mount /dev/sr0 /mnt
mount: /dev/sr0 is write-protected, mounting read-only
[root@centos7 iso]#cp -a /mnt/isolinux/ /data/iso/
[root@centos7 iso]#tree
.
└── isolinux
├── boot.cat
├── boot.msg
├── grub.conf
├── initrd.img
├── isolinux.bin
├── isolinux.cfg
├── memtest
├── splash.png
├── TRANS.TBL
├── vesamenu.c32
└── vmlinuz
1 directory, 11 files
```
- 修改isolinux.cfg文件,设置启动菜单
```bash
[root@centos7 iso]#vim isolinux/isolinux.cfg
label linux
menu label Auto Install CentOS ^7
label linux
menu label ^Auto Install CentOS 7
kernel vmlinuz
append initrd=initrd.img ks=http://10.0.0.104/kickstart/ks7.cfg #应答文件存放位置
label rescue
menu indent count 5
menu label ^Rescue a CentOS system
text help
If the system will not boot, this lets you access files
and edit config files to try to get it booting again.
endtext
kernel vmlinuz
append initrd=initrd.img inst.repo=http://10.0.0.104/7/os/x86_64 rescue quiet #指定救援模式时依赖的yum源路径
label local
menu default #指定默认菜单为本地启动,避免因没有选定菜单而重装系统
menu label Boot from ^local drive
localboot 0xffff
```
- 利用mkisofs创建光盘文件
```baash
[root@centos7 isolinux]#mkisofs -R -J -T -v --no-emul-boot --boot-load-size 4 --boot-info-table -V "CentOS 7.8 x86_64 boot" -b isolinux/isolinux.bin -c isolinux/boot.cat -o /root/boot.iso /data/iso/
会生成一个/root/boot.iso光盘文件, 就可以利用这个关盘文件启动系统,或是刻录光盘
```
# centos7上实现pxe安装系统centos6、centos7、centos8
### 1、安装前准备
- 关闭防火墙和SELINUX,DHCP服务器静态IP
- 网络要求:关闭Vmware软件中的DHCP服务,基于NAT模式或者仅主机模式
### 2、安装相关软件包并启动
```bash
[root@centos7 ~]#yum -y install httpd tftp-server dhcp syslinux system-config-kickstart
[root@centos7 ~]#systemctl enable --now httpd tftp dhcpd
由于dhcp还没有配置,此时还无法立即启动
```
### 3、配置DHCP服务并启动DHCP服务
```bash
一般在/usr/share/doc/dhcp* 目录下会有一个dhcpd.conf.example的文件范例,可根据此文件编辑/etc/dhcp/dhcd.conf
[root@centos7 ~]#cp /usr/share/doc/dhcp-4.2.5/dhcpd.conf.example /etc/dhcp/dhcpd.conf
[root@centos7 ~]#vim /etc/dhcp/dhcpd.conf
# option definitions common to all supported networks...
option domain-name "magedu.org";
option domain-name-servers 180.76.76.76, 223.5.5.5 ;
default-lease-time 86400;
max-lease-time 172800;
log-facility local7;
# No service will be given on this subnet, but declaring it helps the
# DHCP server to understand the network topology.
subnet 10.0.0.0 netmask 255.255.255.0 {
range 10.0.0.1 10.0.0.100;
range 10.0.0.150 10.0.0.254;
option routers 10.0.0.2;
next-server 10.0.0.104;
filename "pxelinux.0";
}
[root@centos7 ~]#systemctl enable --now dhcpd
```
### 4、创建yum源
```bash
[root@centos7 ~]#mkdir -p /var/www/html/centos/{6,7,8}/os/x86_64/
[root@centos7 ~]#cd /var/www/html
[root@centos7 html]#tree -L 4
.
├── centos
│ ├── 6
│ │ └── os
│ │ └── x86_64
│ ├── 7
│ │ └── os
│ │ └── x86_64
│ └── 8
│ └── os
│ └── x86_64
└── kickstart
└── ks7.cfg
11 directories, 1 file
[root@centos8 ~]#mount /dev/sr0 /var/www/html/centos/7/os/x86_64/
[root@centos8 ~]#mount /dev/sr1 /var/www/html/centos/6/os/x86_64/
[root@centos8 ~]#mount /dev/sr2 /var/www/html/centos/8/os/x86_64/
yum源配置好了之后最好能够在浏览器中测试一下,是否能够访问
```
### 5、准备kickstart文件
```bash
[root@centos7 ~]#cd /var/www/html
[root@centos7 html]#mkdir kickstart
```
- **centos6 的kickstart文件**
```bash
[root@centos6 data]#cp /root/anaconda-ks.cfg cnetos6.cfg
[root@centos6 data]#vim centos6.cfg
[root@centos6 data]#cat centos6.cfg |grep -e "^[^#]"
install
text
reboot
url --url=http://10.0.0.104/centos/6/os/x86_64/
lang en_US.UTF-8
keyboard us
network --onboot yes --device eth0 --bootproto dhcp --noipv6
rootpw --iscrypted $6$bT4/8b5iSoS.h7tp$fDpDihnZO8PcO3wiiPoa0Hv64vKCpb98HGiXFtWTCickNhjyq/ql7r3q1uWJ5NncIl4SiM1GD3eecdmHSS0U.1
firewall --disabled
authconfig --enableshadow --passalgo=sha512
selinux --disabled
timezone Asia/Shanghai
bootloader --location=mbr --driveorder=sda --append="crashkernel=auto rhgb quiet"
zerombr
clearpart --all --initlabel
part / --fstype=ext4 --size=51200
part /boot --fstype=ext4 --size=1024
part /data --fstype=ext4 --size=102400
part swap --size=2048
%packages
vim
tree
lrzsz
wget
%end
%post
useradd boy
echo boy:123456 | chpasswd boy &> /dev/null
mkdir /etc/yum.repos.d/backup
mv /etc/yum.repos.d/*.repo /etc/yum.repos.d/backup
cat > /etc/yum.repos.d/base.repo <<EOF
[base]
name=base repo
baseurl=file:///misc/cd
https://mirrors.aliyun.com/centos/\$releasever/os/\$basearch/
https://repo.huaweicloud.com/centos/\$releasever/os/\$basearch/
gpgchech=1
gpgkey=https://mirrors.aliyun.com/centos/6/os/x86_64/RPM-GPG-KEY-CentOS-6
https://repo.huaweicloud.com/centos/6/os/x86_64/RPM-GPG-KEY-CentOS-6
EOF
%end
[root@centos6 data]#scp centos6.cfg 10.0.0.104:/var/www/html/kickstart/
```
- **cnetos7 的kickstart 文件**
```bash
[root@centos7 html]#cp /root/anaconda-ks.cfg kickstart/centos7.cfg
[root@centos7 kickstart]#vim centos7.cfg
[root@centos7 kickstart]#cat centos7.cfg | grep -e "^[^#]"
install
text
xconfig --startxonboot
url --url="http://10.0.0.104/centos/7/os/x86_64/"
auth --enableshadow --passalgo=sha512
firstboot --enable
ignoredisk --only-use=sda
keyboard --vckeymap=us --xlayouts='us'
lang en_US.UTF-8
network --bootproto=dhcp --device=eth0 --ipv6=auto --activate
network --hostname=centos7.8-boy-min
reboot
rootpw --iscrypted $6$4AwYgykG62A9cNW/$dSCU/6mHzSUlshkMbaFxiQYhtHN09J1lO.9/IwP1uEZOuNkp53uerls3gp8lgLCIxMSWi9KpML5cslAuy913Z0
services --disabled="chronyd"
selinux --disabled
skipx
firewall --disabled
timezone Asia/Shanghai --nontp
user --name=boy --password=$6$ic2DfXieFhUxRQE1$lX9WFco1r8aYTuJR1134HSFYTDvLWKJsOL6qDZ58UnNyF7hNb3Y5UGRYibD5IzVhY4c.18TOIbpBG54CTN89B. --iscrypted --gecos="boy"
bootloader --append=" net.ifnames=0" --location=mbr --boot-drive=sda
zerombr
clearpart --all --initlabel
part /data --fstype="xfs" --ondisk=sda --size=51200
part / --fstype="xfs" --ondisk=sda --size=102400
part /boot --fstype="xfs" --ondisk=sda --size=1024
part swap --fstype="swap" --ondisk=sda --size=2048
%packages
vim
tree
lrzsz
wget
@^minimal
@core
kexec-tools
%end
%post --nochroot
mkdir /etc/yum.repos.d/backup
mv /etc/yum.repos.d/*.repo /etc/yum.repos.d/backup
cat > /etc/yum.repos.d/base.repo <<EOF
[base]
name=base repo
failovermethod=priority
baseurl=https://mirrors.aliyun.com/centos/\$releasever/os/\$basearch/
https://repo.huaweicloud.com/centos/\$releasever/os/\$basearch/
gpgcheck=1
gpgkey=https://mirrors.aliyun.com/centos/7/os/x86_64/RPM-GPG-KEY-CentOS-7
https://repo.huaweicloud.com/centos/7/os/x86_64/RPM-GPG-KEY-CentOS-7
[extras]
name=extras repo
failovermethod=priority
baseurl=http://mirrors.aliyun.com/centos/\$releasever/extras/\$basearch/
gpgcheck=1
gpgkey=http://mirrors.aliyun.com/centos/RPM-GPG-KEY-CentOS-7
EOF
%end
```
- **centos8的kickstart文件**
```bash
[root@centos7 kickstart]#scp 10.0.0.8:/root/anaconda-ks.cfg ./centos8.cfg
[root@centos7 kickstart]#vim centos8.cfg
[root@centos7 kickstart]#cat centos8.cfg | grep -e "^[^#]"
ignoredisk --only-use=sda
selinux --disabled
firewall --disabled
zerombr
reboot
clearpart --all --initlabel
text
keyboard --vckeymap=us --xlayouts='us'
lang en_US.UTF-8
network --bootproto=dhcp --device=eth0 --ipv6=auto --activate
bootloader --append="net.ifnames=0" --location=mbr --boot-drive=sda
network --hostname=centos8.2-boy-min
url --url=http://10.0.0.104/centos/8/os/x86_64
rootpw --iscrypted $6$LexrB4d/C9NAKA9W$XUJqMLfLuktlFx3oLqHPxcVSg7k10wiUC7inl9V4Ja.sjhkIa5WYq0wuBCgzru96QrcnyAn8YD0kxiMZ8Imfk0
firstboot --enable
skipx
services --enabled="chronyd"
timezone Asia/Shanghai --isUtc --nontp
user --name=boy --password=$6$iS9WMZq1GEYu9FAW$T5LxhyCjX6s0WERlkZvQFgYx7PgTXj6dzhokFr3Da6WAwTU.3ppPdjVwo.3i5hS8i5N0I1D.gJWnrxtSJoc4y/ --iscrypted --gecos="boy"
part swap --fstype="swap" --ondisk=sda --size=2048
part / --fstype="xfs" --ondisk=sda --size=102400
part /data --fstype="xfs" --ondisk=sda --size=51200
part /boot --fstype="ext4" --ondisk=sda --size=1024
%packages
@^minimal-environment
kexec-tools
vim
tree
lrzsz
wget
%end
%addon com_redhat_kdump --enable --reserve-mb='auto'
%end
%anaconda
pwpolicy root --minlen=6 --minquality=1 --notstrict --nochanges --notempty
pwpolicy user --minlen=6 --minquality=1 --notstrict --nochanges --emptyok
pwpolicy luks --minlen=6 --minquality=1 --notstrict --nochanges --notempty
%end
```
### 6、准备pxe启动相关文件
```bash
[root@centos7 ~]#cd /var/lib/tftpboot/
[root@centos7 tftpboot]#mkdir centos{6..8}
[root@centos7 tftpboot]#tree
.
├── centos6
├── centos7
└── centos8
3 directories, 0 files
准备CentOS6,7,8各自的内核相关文件
[root@centos7 tftpboot]#cp /var/www/html/centos/6/os/x86_64/isolinux/{vmlinuz,initrd.img} centos6
[root@centos7 tftpboot]#cp /var/www/html/centos/7/os/x86_64/isolinux/{vmlinuz,initrd.img} centos7
[root@centos7 tftpboot]#cp /var/www/html/centos/8/os/x86_64/isolinux/{vmlinuz,initrd.img} centos8
[root@centos7 tftpboot]#cp /usr/share/syslinux/{pxelinux.0,menu.c32} .
以下三个文件是CentOS8安装所必须文件,CentOS6,7则不需要
[root@centos7 tftpboot]#cp /var/www/html/centos/8/os/x86_64/isolinux/{ldlinux.c32,libcom32.c32,libutil.c32} /var/lib/tftpboot/
[root@centos7 tftpboot]#tree
.
├── centos6
│ ├── initrd.img
│ └── vmlinuz
├── centos7
│ ├── initrd.img
│ └── vmlinuz
├── centos8
│ ├── initrd.img
│ └── vmlinuz
├── ldlinux.c32
├── libcom32.c32
└── libutil.c32
3 directories, 9 files
生成菜单文件default
[root@centos7 tftpboot]#mkdir pxelinux.cfg
[root@centos7 tftpboot]#cp /var/www/html/centos/8/os/x86_64/isolinux/isolinux.cfg /var/lib/tftpboot/pxelinux.cfg/default
[root@centos7 tftpboot]#tree
.
├── centos6
│ ├── initrd.img
│ └── vmlinuz
├── centos7
│ ├── initrd.img
│ └── vmlinuz
├── centos8
│ ├── initrd.img
│ └── vmlinuz
├── ldlinux.c32
├── libcom32.c32
├── libutil.c32
├── menu.c32
├── pxelinux.0
└── pxelinux.cfg
└── default
4 directories, 12 files
```
### 7、准备启动菜单
```bash
[root@centos7 tftpboot]#vim pxelinux.cfg/default
[root@centos7 tftpboot]#cat pxelinux.cfg/default
default menu.c32
timeout 60
label linux
menu label Auto Install CentOS Linux ^8
kernel centos8/vmlinuz
append initrd=centos8/initrd.img ks=http://10.0.0.104/kickstart/centos8.cf gquiet
label linux
menu label Auto Install CentOS Linux ^7
kernel centos7/vmlinuz
append initrd=centos7/initrd.img ks=http://10.0.0.104/kickstart/centos7.cfg quiet
label linux
menu label Auto Install CentOS Linux ^6
kernel centos6/vmlinuz
append initrd=centos6/initrd.img ks=http://10.0.0.104/kickstart/centos6.cfg quiet
label rescue
menu label ^Rescue a CentOS Linux system 8
kernel centos8/vmlinuz
append initrd=centos8/initrd.img inst.repo=http://10.0.0.104/centos/8/os/x86_64 rescue quiet
label rescue
menu label ^Rescue a CentOS Linux system 7
kernel centos7/vmlinuz
append initrd=centos7/initrd.img inst.repo=http://10.0.0.104/centos/7/os/x86_64 rescue quiet
label rescue
menu label ^Rescue a CentOS Linux system 6
kernel centos6/vmlinuz
append initrd=centos6/initrd.img inst.repo=http://10.0.0.104/centos/6/os/x86_64 rescue quiet
label local
menu default
menu label Boot from ^local drive
localboot 0xffff
```
### 8、测试客户端基于PXE实现自动安装
新准备一台主机,设置网卡引导,可看到看启动菜单,并实现自动安装
**注意**:VMware workstation 对于不同的CentOS 版本,生成的虚拟机的硬件并不兼容

 浙公网安备 33010602011771号