vue3.x 首次搭建 - 遇到的问题
vite2.x 初始化项目
配置说明: https://cn.vitejs.dev/guide/#%E6%90%AD%E5%BB%BA%E7%AC%AC%E4%B8%80%E4%B8%AA-vite-%E9%A1%B9%E7%9B%AE
兼容性注意
Vite 需要 Node.js 版本 >= 12.0.0。
下面项目使用 ts, 初始化项目:
cnpm create @vitejs/app my-vue-app --template vue-ts

引入 vant , 实现按需加载+修改主题
需要安装的一依赖包:cnpm install less sass vite-plugin-imp -D

关键代码上图圈住的,具体vite.config.ts配置文件如下:
import { defineConfig } from 'vite'
import vue from '@vitejs/plugin-vue'
import vitePluginImp from 'vite-plugin-imp'
const { resolve } = require('path')

// https://vitejs.dev/config/
export default defineConfig({
  plugins: [
    vue(),

    // 按需引入
    vitePluginImp({
      libList: [
        {
          libName: 'vant',
          style(name) {
            if (/CompWithoutStyleFile/i.test(name)) return false
            return `vant/es/${name}/index.less`
          }
      },
      ]
    })
  ],

  css: {
    preprocessorOptions: {
      // 重置vant的样式变量:https://github.com/youzan/vant/blob/dev/src/style/var.less
      less: {
        modifyVars: {
          'button-primary-color': 'red',
          'button-primary-border-color': 'red'
        },
      },

      scss: {
        additionalData: `
          @import "./src/styles/_var.scss";
          @import "./src/styles/_mix.scss";
        `
      }
    }
  },

  base: '/ybs',

  alias: [
    { find: '/@', replacement: resolve(__dirname, 'src') },
    { find: '/@ser', replacement: resolve(__dirname, 'src/services') },
    { find: '/@comp', replacement: resolve(__dirname, 'src/components') }
  ],

  server: {
    port: 8080,
    proxy: {
      '/api': {
        target: 'http://10.9.129.13',
        changeOrigin: true,
        secure: false,
      }
    }
  }
})
附加上vant的样式变量:https://github.com/youzan/vant/blob/dev/src/style/var.less
其他配置基本和1.x版本一样,可以参考下面说明
vite1.x 初始化项目
git地址: https://github.com/vitejs/vite
npm init vite-app <project-name> cd <project-name> npm install npm run dev
安装常用插件:
{
  "name": "xxx",
  "version": "0.0.0",
  "scripts": {
    "dev": "vite",
    "build": "vite build"
  },
  "dependencies": {
    "@types/axios": "^0.14.0",
    "axios": "^0.21.0",
    "dayjs": "^1.9.7",
    "element-plus": "^v1.0.1-beta.14",
    "vue": "^3.0.4",
    "vue-router": "^4.0.1",
    "vuex": "^4.0.0-rc.2"
  },
  "devDependencies": {
    "@vue/compiler-sfc": "^3.0.4",
    "sass": "^1.30.0",
    "typescript": "^4.1.3",
    "vite": "^1.0.0-rc.13"
  }
}
添加配置文件:shims.d.ts(2.x版本会自动添加在src/shims-vue.d.ts)
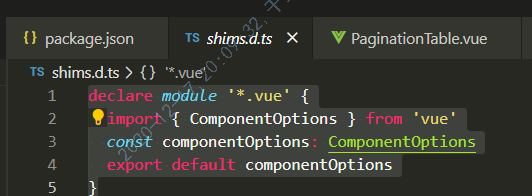
declare module '*.vue' {
  import { ComponentOptions } from 'vue'
  const componentOptions: ComponentOptions
  export default componentOptions
}
添加tsconfig.json
{
  "compilerOptions": {
    "target": "esnext",
    "module": "esnext",
    "strict": true,
    "jsx": "preserve",
    "moduleResolution": "node",
    "allowSyntheticDefaultImports": true,
    /* 用来指定编译时是否生成.map文件 */
    "declarationMap": false,
    "sourceMap": false,
    "paths": {
      "/@/*": ["./src/*"],
      "/@ser/*": ["./src/services/*"],
      "/@comp/*": ["./src/components/*"]
    }
  },
  "exclude": ["node_modules", "dist"]
}
引入Vue Router4
安装: cnpm i vue-router@next -S
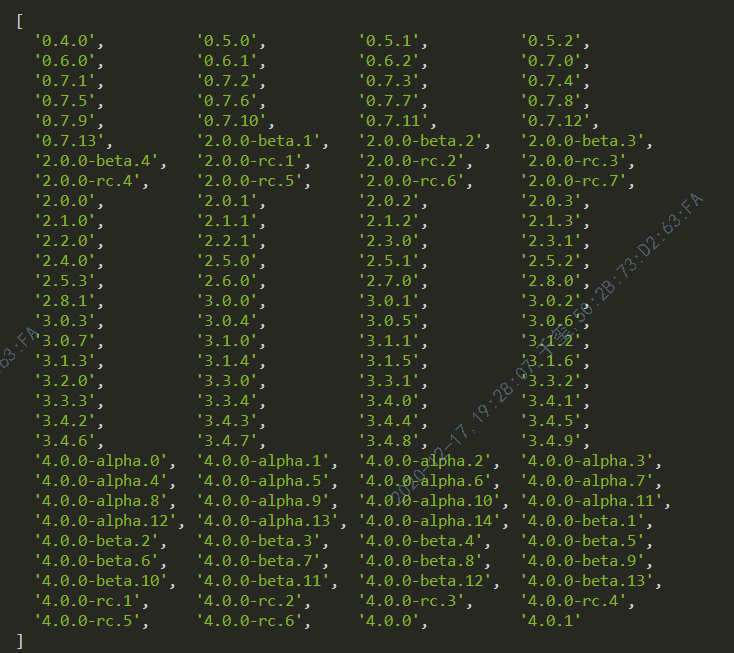
使用命令行查看vue-router 所有版本号: npm info vue-router versions
route/index.ts:
import { RouteRecordRaw, createRouter, createWebHashHistory } from 'vue-router';

const routes: RouteRecordRaw[] = [
  {
    path: '/home/:id',
    name: 'Home',
    component: () => import('../test/Home.vue'),
  },
  {
    path: '/user',
    name: 'User',
    component: () => import('../views/User.vue'),
  },
];

const router = createRouter({
  history: createWebHashHistory(),
  routes,
});

export default router;
添加UI插件 element-plus,main.ts 文件如下:
文档: https://element-plus.gitee.io/#/zh-CN/component/i18n
element-ui 目前不支持vue3; 使用 element-plus,用法UI基本一样
import { createApp } from 'vue'
import App from './App.vue'
import store from './store/index'
import router from './router/index'
import ElementPlus from 'element-plus'
import zhLocale from 'element-plus/lib/locale/lang/zh-cn'  // 国际化
import 'element-plus/lib/theme-chalk/index.css'
import './styles/index.scss'

createApp(App)
.use(router)
.use(store)
.use(ElementPlus, { locale :zhLocale })
.mount('#app')
配置文件:vite.config.ts(vue2的vue.config.js,2.x 版本参考上面说明)
//git地址 https://github.com/vitejs/vite/blob/master/src/node/config.ts
const path = require('path');

module.exports = {
  // 配置别名
  alias: {
    '/@/': path.resolve(__dirname, './src'),
    '/@comp/': path.resolve(__dirname, './src/components'),
  },

  // 端口,默认3000
  port: '8080',

  // 是否自动在浏览器打开
  open: true,

  // 配置部署基础路径
  base: 'admin',

  // 引用全局 scss
  cssPreprocessOptions: {
    scss: {
      additionalData: `
        @import "./src/styles/_var.scss";
        @import "./src/styles/_mix.scss";
      `
    }
  },


  // 为开发服务器配置自定义代理规则
  proxy: {
    '/api': {
      target: 'http://10.110.52.28:8081',
      changeOrigin: true,
      secure: false,
    }
  }
}
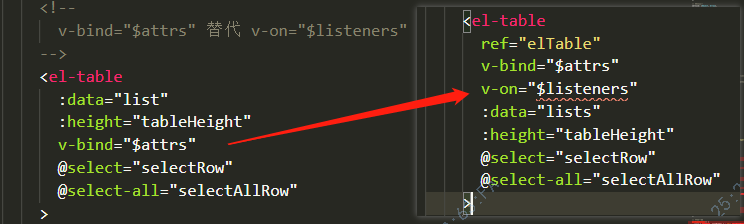
问题1: v-on="$listeners" 不能使用,v-bind="$attrs" 代替;
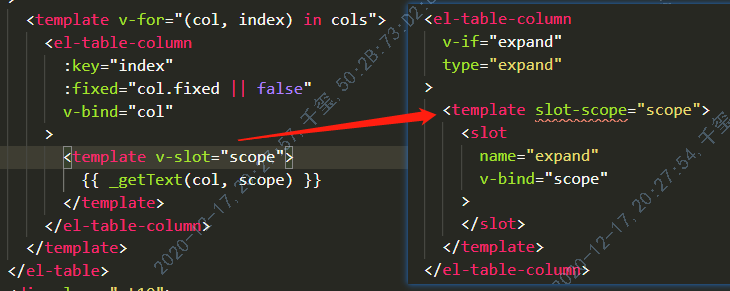
问题2:slot-scope="scope" 被废弃, 使用 v-slot="scope"
问题3: scss 的 /deep/ 不能使用(至少在我写这个博客时)
解决:使用 ::v-deep或者:deep(控制台会报警告,但总比不能使用好)


deep报错:

问题4:修改全局的样式,例如重置element样式,保存可以立即生效,不过刷新还是原来一样,需要重启才生效;(2.x 版本已经解决)
问题5:import dayjs from 'dayjs' 报错;
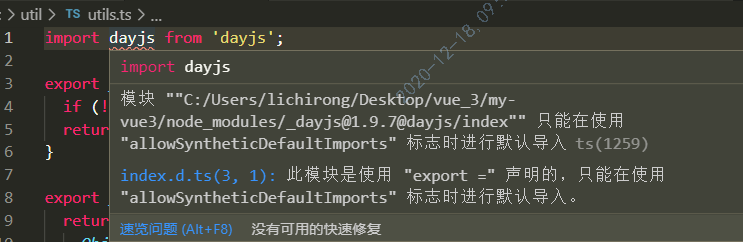
解决方法1:import * as dayjs from 'dayjs';
解决方法2:tsconfig.json,添加配置文件:

问题6: element-plus 默认英文,需要使用中文如下配置:
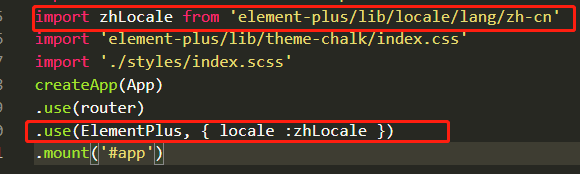
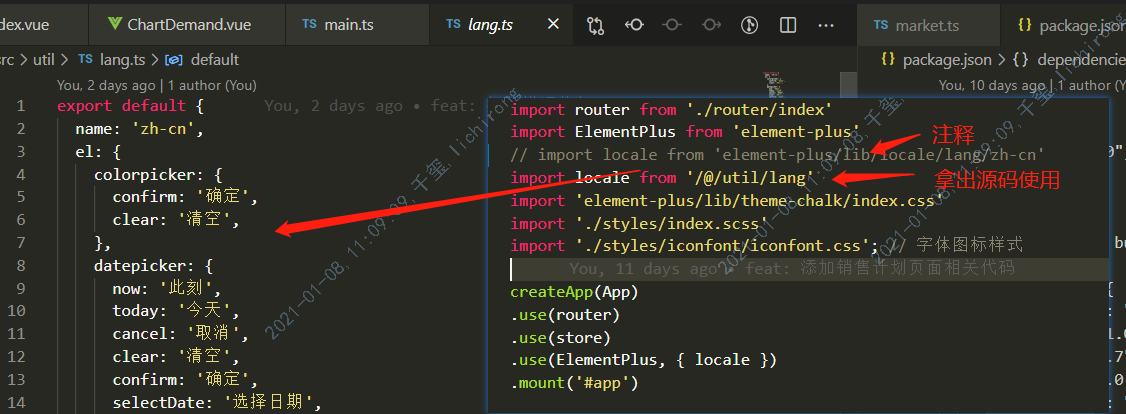
element-plus 版本在 v1.0.1-beta.14 时,还可以使用上面方法,后面不知道什么版本开始,就不能使用了 会报错:

作者的解决方法:先在 node_nodules/element-plus/lib/locale/lang/zh-cn.js 找到配置,然后直接拿出来使用;
问题7:使用别名后,vetur报错 Cannot find module
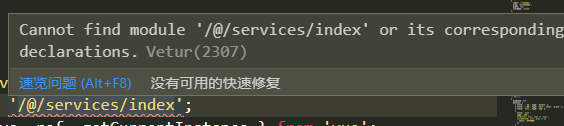
解决:tsconfig.json 文件添加路径配置
{
  "compilerOptions": {
    "target": "esnext",
    "module": "esnext",
    "sourceMap": true,
    "strict": true,
    "jsx": "preserve",
    "moduleResolution": "node",
    "paths": {
      "/@/*": ["./src/*"]
    }
  }
}
问题8:import echarts from 'echarts' 报错
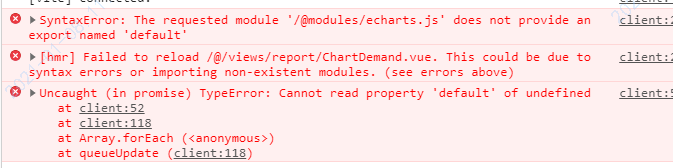
解决:import * as echarts from 'echarts';
路由相关:

获取当前路由:const route = useRoute(); 或者:

路由跳转(之前一致):

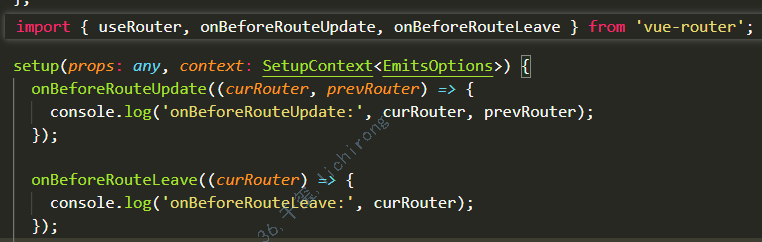
监听路由变化:

路由钩子:
home页面的钩子:
404路由配置:
  {
    path: '/404',
    name: '404',
    component: () => import('/@/views/404.vue')
  },
  {
    path: '/:pathMatch(.*)*',
    redirect: '/404'
  }
别名:
表示访问url时自由命名,不受约束,router会自动进行别名匹配,就像我们设置/的别名为/home,相当于访问/
const routes = [{ path: '/', component: Homepage, alias: '/home' }] // alias是别名的key
重定向:
// 路径写法
const routes = [{ path: '/home', redirect: '/' }]

// 命名写法
const routes = [{ path: '/home', redirect: { name: 'homepage' } }]

// 函数写法
const routes = [
{
    path: '/search/:searchText',
    redirect: to => {
        return { path: '/search', query: { q: to.params.searchText } }
    }
}
路由插槽:
append、event、tag、exact上面列举的4个属性已经不再使用,改为作用域插槽:
<router-link to="/" v-slot="{ href, navigate, isActive }">
  <li :class="{ 'active': isActive }">
    <a :href="href" @click="navigate">
      <span>Home</span>
    </a>
  </li>
</router-link>
<router-view> <keep-alive> <transition>现在必须通过v-slot API在router-view内部使用transition和keep-alive
<router-view v-slot="{ Component }">
  <transition>
    <keep-alive>
      <component :is="Component" />
    </keep-alive>
  </transition>
</router-view>
动态路由:router.addRoute()和router.removeRoute()
// addRoute 添加路由
router.addRoute({ name: 'about', path: '/about', component: About })

// removeRoute是删除路由,删除后对应的子路由和别名都会删掉
router.removeRoute('about')

// 路由嵌套
router.addRoute('about', { path: 'profile', component: Profile})

//等价于
router.addRoute({
  name: 'about',
  path: '/about',
  component: About,
  children: [{ path: 'profile', component: Profile}],
})
vuex 相关:

const store = useStore();
// state
const list = computed(() => store.state.foodList);
// getters
const userInfo = store.getters.userInfo;

// 触发mutations,改变值:
store.commit('setFoodList', resList);

// 触发actions异步操作,改变值:
store.dispatch(`login`)
对于复杂的业务可以封装一个hook,例子:
function useContentData(store: Store<IGlobalState>) {
  let cityList = computed(() => store.state.home.cityList)
  let accessControlList = computed(() => store.state.home.accessControlList)
  onMounted(() => {
    if (cityList.value.length === 0) store.dispatch(`xxx`)
    if (accessControlList.value.length === 0) store.dispatch(`xxxx`, { communityId: 13 })
  })
  return {
    cityList,
    accessControlList
  }
}
vue3使用说明:
抛弃data, 使用 setup
数组,字符串,数字,布尔使用 ref
const name = ref<string>('0');
计算属性:
const nameComputed = computed(() => name.value + ' computed');
复杂对象使用reactive
const msg = reactive<any>({ obj: 123 });
Teleport 传送门
组件可以任意地丢到html中的任一个DOM下。在react中也有相同功能的组件——Portal;
子组件:
 <teleport to="#endofbody">
    <div v-if="modalOpen">
      teleport content
    </div>
 </teleport>
上层组件:
<div id="endofbody"></div>
使用后,子组件的内容,会填充到上层组件中;
Suspense异步组件
方便地控制异步组件的一个挂起和完成状态,简单来说:
1. Suspense将异步组件包起来;
2. template #default中展示加载完成的异步组件;
3. template #fallback中则展示异步组件挂起状态时需要显示的内容;
例子:
// AsyncComponent.vue
<template>
  <h2>AsyncComponent</h2>
</template>
<script lang="ts">
import {defineComponent} from "vue"
export default defineComponent({
  async setup(props) {
    const sleep = (timeout: number) => {
      return new Promise(resolve => {
        setTimeout(resolve, timeout)
      })
    }
    await sleep(5000)
  }
})
</script>

// Suspense.vue
<template>
  <h1>Suspense</h1>
  <Suspense>
    <template #default>
      <AsyncComponent />
    </template>
    <template #fallback>
      <p class="loading">loading</p>
    </template>
  </Suspense>
</template>
<script lang="ts">
import {defineComponent} from "vue"
import AsyncComponent from "./AsyncComponent.vue"
export default defineComponent({
  components: {
    AsyncComponent
  }
})
</script>
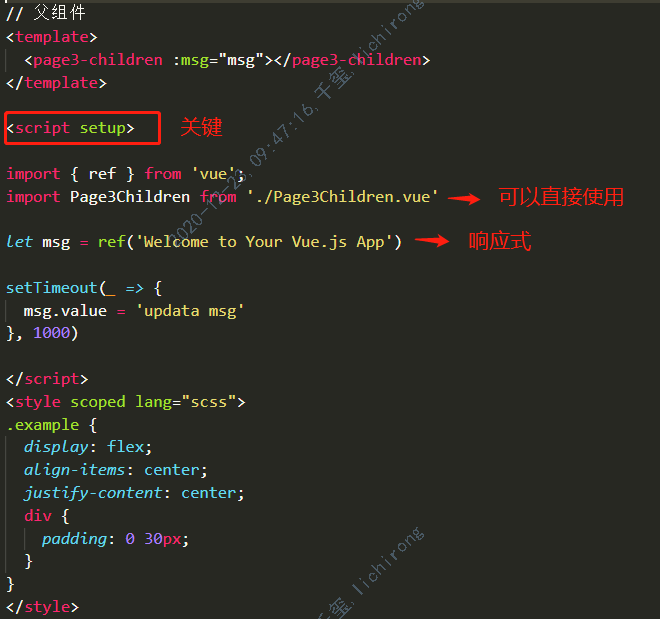
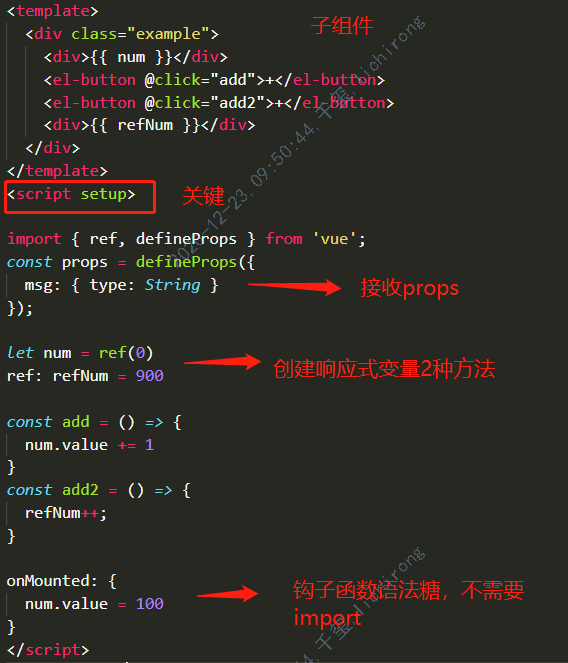
script setup 语法糖
vue3.0.3 推出了setup 语法糖,下面是例子
样式使用变量v-bind语法糖

其他
目前第三方库都是测试版本,附带各个版本的说明:
参考:
vue: https://vue3js.cn/docs/zh/guide/introduction.html
vuex: https://next.vuex.vuejs.org/
vue-router: https://next.router.vuejs.org/api/
element-plus: https://github.com/element-plus https://element-plus.org/#/zh-CN/component/installation

 浙公网安备 33010602011771号