Python学习之路16——线程、进程和协程
一、线程
线程是操作系统能够进行运算调度的最小单位,是一串指令的集合。
它被包含在进程之中,是进程中的实际运作单位。
一条线程指的是进程中一个单一顺序的控制流,一个进程中可以并发多个线程,每条线程并行执行不同的任务。
所有在同一进程里的线程是共享同一块内存空间的。
运行多线程需要频繁的cpu上下文切换。
注:cpu内一个核数只能同时运行一个线程,所以多核cpu同时可以运行多个线程。
在Python中,即使是多核cpu,同时运行的线程也只有一个,Python语言设计之初就不支持多核。
所以在Python程序中,启用越多的线程,程序不一定运行的就很快,因为cpu要进行大量的上下文切换,反而消耗时间;
GIL全局解释锁保障线程的上下文关系,保障当前只有一个线程在运行,与lock数据加锁无关。
1、建立线程(threading模块)
线程创建有2种方式:
直接调用
 1 #!/user/bin/env ptyhon
 2 # -*- coding:utf-8 -*-
 3 # Author: VisonWong
 4
 5 import threading, time
 6
 7 def run(n):
 8     print('Task',n)
 9     time.sleep(2)
10
11
12 if __name__ == "__main__":
13
14     t1= threading.Thread(target=run,args=('t1',))
15     t2= threading.Thread(target=run,args=('t2',))
16
17     #两个同时执行,然后等待两秒程序结束
18     t1.start()
19     t2.start()
20
21
22 #程序输出
23 # Task t1
24 # Task t2
继承式调用
 1 #!/user/bin/env ptyhon
 2 # -*- coding:utf-8 -*-
 3 # Author: VisonWong
 4
 5 import threading,time
 6
 7 class MyThread(threading.Thread):
 8
 9     def __init__(self,num):
10         # threading.Thread.__init__(self)
11         super(MyThread, self).__init__()
12         self.num = num
13
14     def run(self): #定义每个线程要运行的函数
15         print('running task',self.num)
16         time.sleep(2)
17
18 if __name__ == '__main__':
19     #两个同时执行,然后等待两秒程序结束
20     t1 = MyThread('t1')
21     t2 = MyThread('t2')
22
23     t1.start()
24     t2.start()
25
26
27 # 程序输出
28 # running task t1
29 # running task t2
2、多线程的默认情况
当一个进程启动之后,会默认产生一个主线程,因为线程是程序执行流的最小单元,当设置多线程时,主线程会创建多个子线程。
在python中,默认情况下(其实就是setDaemon(False)),主线程执行完自己的任务以后,就退出了,此时子线程会继续执行自己的任务,直到自己的任务结束。
 1 #!/user/bin/env ptyhon
 2 # -*- coding:utf-8 -*-
 3 # Author: VisonWong
 4
 5
 6 import threading
 7 import time
 8
 9 def run():
10     time.sleep(2)
11     print('当前线程的名字是: ', threading.current_thread())
12     # time.sleep(2)
13
14
15 if __name__ == '__main__':
16
17     start_time = time.time()
18
19     print('这是主线程:', threading.current_thread())
20     thread_list = []
21     for i in range(5):
22         t = threading.Thread(target=run)
23         thread_list.append(t)
24
25     for t in thread_list:
26         t.start()
27
28
29     print('主线程结束!' , threading.current_thread().name,'done')
30     print('一共用时:', time.time()-start_time)
31
32
33 # 这是主线程: <_MainThread(MainThread, started 7124)>
34 # 主线程结束! MainThread done
35 # 一共用时: 0.002000093460083008
36 # 当前线程的名字是:  <Thread(Thread-3, started 3560)>
37 # 当前线程的名字是:  <Thread(Thread-4, started 7256)>
38 # 当前线程的名字是:  <Thread(Thread-2, started 2164)>
39 # 当前线程的名字是:  <Thread(Thread-1, started 5452)>
40 # 当前线程的名字是:  <Thread(Thread-5, started 6780)>
1、我们的计时是对主线程计时,主线程结束,计时随之结束,打印出主线程的用时。
2、主线程的任务完成之后,主线程随之结束,子线程继续执行自己的任务,直到全部的子线程的任务全部结束,程序结束。
3、started 后跟的是当前线程的识别号,可通过 threading.get_ident() 获得。
3、守护线程Daemon
当我们使用setDaemon(True)方法,设置子线程为守护线程时,主线程一旦执行结束,则全部线程全部被终止执行。
可能出现的情况就是,子线程的任务还没有完全执行结束,就被迫停止。
 1 #!/user/bin/env ptyhon
 2 # -*- coding:utf-8 -*-
 3 # Author: VisonWong
 4
 5
 6 import threading
 7 import time
 8
 9 def run():
10
11     time.sleep(2)
12     print('当前线程的名字是: ', threading.current_thread().name)
13     time.sleep(2)
14
15
16 if __name__ == '__main__':
17
18     start_time = time.time()
19
20     print('这是主线程:', threading.current_thread().name)
21
22     thread_list = []
23     for i in range(5):
24         t = threading.Thread(target=run)
25         thread_list.append(t)
26
27     for t in thread_list:
28         t.setDaemon(True)
29         t.start()
30
31     print('主线程结束了!' , threading.current_thread().name)
32     print('一共用时:', time.time()-start_time)
33
34
35 # 这是主线程: MainThread
36 # 主线程结束了! MainThread
37 # 一共用时: 0.002000093460083008
非常明显的看到,主线程结束以后,子线程还没有来得及执行,整个程序就退出了。
4、join方法
join所完成的工作就是线程同步, 等待被join的线程执行完后,其他线程再继续执行。
 1 #!/user/bin/env ptyhon
 2 # -*- coding:utf-8 -*-
 3 # Author: VisonWong
 4
 5 import threading
 6 import time
 7
 8 def run():
 9
10     time.sleep(2)
11     print('当前线程的名字是: ', threading.current_thread().name)
12     time.sleep(2)
13
14
15 if __name__ == '__main__':
16
17     start_time = time.time()
18
19     print('这是主线程:', threading.current_thread().name)
20     thread_list = []
21     for i in range(5):
22         t = threading.Thread(target=run)
23         thread_list.append(t)
24
25     for t in thread_list:
26         t.setDaemon(True)
27         t.start()
28
29     for t in thread_list:
30         t.join()
31
32     print('主线程结束了!' , threading.current_thread().name)
33     print('一共用时:', time.time()-start_time)
34
35
36 # 这是主线程: MainThread
37 # 当前线程的名字是:  Thread-2
38 # 当前线程的名字是:  Thread-1
39 # 当前线程的名字是:  Thread-4
40 # 当前线程的名字是:  Thread-3
41 # 当前线程的名字是:  Thread-5
42 # 主线程结束了! MainThread
43 # 一共用时: 4.0142295360565186
注:计算所有线程运行的时间,待所有线程运行完后,运行主程序,计算运行时间。
join有一个timeout参数:
1、当设置守护线程时,含义是主线程对于子线程等待timeout的时间将会杀死该子线程,最后退出程序。
简单的来说,就是给每个子线程一个timeout的时间,让他去执行,时间一到,不管任务有没有完成,直接杀死。
2、没有设置守护线程时,主线程将会等待timeout这样的一段时间,时间一到,主线程结束,但是并没有杀死子线程,子线程依然可以继续执行,直到子线程全部结束,程序退出。
5、Mutex 线程锁
一个进程下可以启动多个线程,多个线程共享父进程的内存空间,也就意味着每个线程可以访问同一份数据,此时,如果2个线程同时要修改同一份数据,会出现什么状况?
 1 #!/user/bin/env ptyhon
 2 # -*- coding:utf-8 -*-
 3 # Author: VisonWong
 4
 5 import time
 6 import threading
 7
 8
 9 def addNum():
10     global num  # 在每个线程中都获取这个全局变量
11     print('--get num:', num)
12     time.sleep(1)
13     num -= 1  # 对此公共变量进行-1操作
14     print('--after num:',num)
15
16
17 num = 10  # 设定一个共享变量
18 thread_list = []
19 for i in range(10):
20     t = threading.Thread(target=addNum)
21     t.start()
22     thread_list.append(t)
23
24 for t in thread_list:  # 等待所有线程执行完毕
25     t.join()
26
27 print('final num:', num)
28
29
30 # --get num: 10
31 # --get num: 10
32 # --get num: 10
33 # --get num: 10
34 # --get num: 10
35 # --get num: 10
36 # --get num: 10
37 # --get num: 10
38 # --get num: 10
39 # --get num: 10
40 # --after num: 9
41 # --after num: 8
42 # --after num: 7
43 # --after num: 6
44 # --after num: 5
45 # --after num: 4
46 # --after num: 3
47 # --after num: 2
48 # --after num: 1
49 # --after num: 0
50 # final num: 0
正常来讲,这个num结果应该是0, 但在python 2.7上多运行几次,会发现,最后打印出来的num结果不总是0,为什么每次运行的结果不一样呢?
假设你有A,B两个线程,此时都 要对num 进行减1操作, 由于2个线程是并发同时运行的,所以2个线程很有可能同时拿走了num=100这个初始变量交给cpu去运算。
当A线程去处完的结果是99,但此时B线程运算完的结果也是99,两个线程同时CPU运算的结果再赋值给num变量后,结果就都是99。
因此每个线程在要修改公共数据时,为了避免自己在还没改完的时候别人也来修改此数据,可以给这个数据加一把锁, 这样其它线程想修改此数据时就必须等待你修改完毕并把锁释放掉后才能再访问此数据。
对程序加锁:
 1 #!/user/bin/env ptyhon
 2 # -*- coding:utf-8 -*-
 3 # Author: VisonWong
 4
 5 import time
 6 import threading
 7
 8
 9 def addNum():
10     global num  # 在每个线程中都获取这个全局变量
11     print('--get num:', num)
12     time.sleep(1)
13     lock.acquire()  # 修改数据前加锁
14     num -= 1  # 对此公共变量进行-1操作
15     lock.release()  # 修改后释放
16     print('--after num:',num)
17
18
19 num = 10  # 设定一个共享变量
20 thread_list = []
21 lock = threading.Lock()  # 生成全局锁
22 for i in range(10):
23     t = threading.Thread(target=addNum)
24     t.start()
25     thread_list.append(t)
26
27 for t in thread_list:  # 等待所有线程执行完毕
28     t.join()
29
30 print('final num:', num)
31
32
33 # --get num: 10
34 # --get num: 10
35 # --get num: 10
36 # --get num: 10
37 # --get num: 10
38 # --get num: 10
39 # --get num: 10
40 # --get num: 10
41 # --get num: 10
42 # --get num: 10
43 # --after num: 9
44 # --after num: 8
45 # --after num: 7
46 # --after num: 6
47 # --after num: 5
48 # --after num: 4
49 # --after num: 3
50 # --after num: 2
51 # --after num: 1
52 # --after num: 0
53 # final num: 0
Python已经有一个GIL来保证同一时间只能有一个线程来执行了,为什么这里还需要lock?
注意啦,这里的lock是用户级的lock,跟那个GIL没关系 ,具体我们通过下图来看一下。
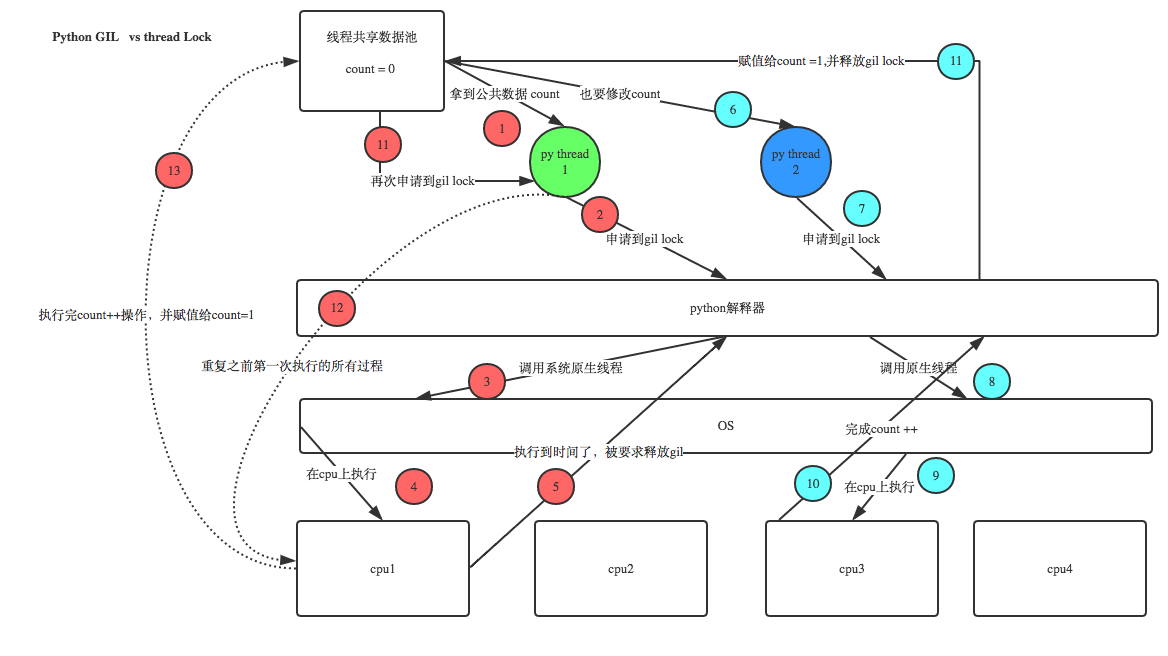
虽然python有全局锁保证通过一时间只有一个线程进行,但有可能当前线程修改全局变量未完成而被挂起,换作另一个线程同时修改同一全局变量,就有可能出现修改不准确的现象。
6、递归锁Rlock
当一个大锁中还要再包含子锁的时候,如果再用threading.Lock的话,程序锁和钥匙会出现对不上的情况,这时候就需要用到递归锁。
 1 #!/user/bin/env ptyhon
 2 # -*- coding:utf-8 -*-
 3 # Author: VisonWong
 4
 5
 6 import threading
 7
 8
 9 def run1():
10     print("grab the first part data")
11     lock.acquire()
12     global num
13     num += 1
14     lock.release()
15     return num
16
17
18 def run2():
19     print("grab the second part data")
20     lock.acquire()
21     global num2
22     num2 += 1
23     lock.release()
24     return num2
25
26
27 def run3():
28     lock.acquire()
29     res = run1()
30     print('--------between run1 and run2-----')
31     res2 = run2()
32     lock.release()
33     print(res, res2)
34
35
36 if __name__ == '__main__':
37
38     num, num2 = 0, 0
39     thread_list = []
40     lock = threading.RLock()
41     for i in range(10):
42         t = threading.Thread(target=run3)
43         t.start()
44         thread_list.append(t)
45
46     for t in thread_list:
47         t.join()
48
49
50     print('----all threads done---')
51     print(num, num2)
52
53
54 # grab the first part data
55 # --------between run1 and run2-----
56 # grab the second part data
57 # 1 1
58 # grab the first part data
59 # --------between run1 and run2-----
60 # grab the second part data
61 # 2 2
62 # grab the first part data
63 # --------between run1 and run2-----
64 # grab the second part data
65 # 3 3
66 # grab the first part data
67 # --------between run1 and run2-----
68 # grab the second part data
69 # 4 4
70 # grab the first part data
71 # --------between run1 and run2-----
72 # grab the second part data
73 # 5 5
74 # grab the first part data
75 # --------between run1 and run2-----
76 # grab the second part data
77 # 6 6
78 # grab the first part data
79 # --------between run1 and run2-----
80 # grab the second part data
81 # 7 7
82 # grab the first part data
83 # --------between run1 and run2-----
84 # grab the second part data
85 # 8 8
86 # grab the first part data
87 # --------between run1 and run2-----
88 # grab the second part data
89 # 9 9
90 # grab the first part data
91 # --------between run1 and run2-----
92 # grab the second part data
93 # 10 10
94 # ----all threads done---
95 # 10 10
7、Semaphore信号量
Mutex 同时只允许一个线程更改数据。
而Semaphore是同时允许一定数量的线程更改数据 ,比如饭店有3个位置,那最多只允许3个人吃饭,后面的人只能等里面有人出来了才能再进去。
 1 #!/user/bin/env ptyhon
 2 # -*- coding:utf-8 -*-
 3 # Author: VisonWong
 4
 5 import threading, time
 6
 7
 8 def run(n):
 9     semaphore.acquire()
10     time.sleep(1)
11     print("run the thread: %s\n" % n)
12     semaphore.release()
13
14
15
16 if __name__ == '__main__':
17
18     thread_list=[]
19     semaphore = threading.BoundedSemaphore(5)  # 最多允许5个线程同时运行
20     for i in range(10):
21         t = threading.Thread(target=run, args=(i,))
22         t.start()
23         thread_list.append(t)
24     for t in thread_list:
25         t.join()
26
27     print('----all threads done---')
28
29
30 # run the thread: 3
31 # run the thread: 2
32 # run the thread: 4
33 # run the thread: 1
34 # run the thread: 0
35 # run the thread: 5
36 # run the thread: 9
37 # run the thread: 6
38 # run the thread: 8
39 # run the thread: 7
40 # ----all threads done---
8、Event
通过Event来实现两个或多个线程间的交互,下面是一个红绿灯的例子,即起动一个线程做交通指挥灯,生成几个线程做车辆,车辆行驶按红灯停,绿灯行的规则。
 1 #!/user/bin/env ptyhon
 2 # -*- coding:utf-8 -*-
 3 # Author: VisonWong
 4
 5 import threading, time
 6
 7 def light():
 8     count = 0
 9     while True:
10         if count < 10:  # 红灯
11             print("\033[41;1m红灯\033[0m", 10 - count)
12         elif count >= 10 and count < 30:  # 绿灯
13             event.set()  # 设置标志位
14             print("\033[42;1m绿灯\033[0m", 30 - count)
15         else:
16             event.clear()  # 把标志位清空
17             count = 0
18         time.sleep(1)
19         count += 1
20
21
22 def car(n):
23     while True:
24         if event.is_set():
25             print("\033[32;0m[%s]在路上飞奔.....\033[0m" % n)
26         else:
27             print("\033[31;0m[%s]等红灯等的花都谢了.....\033[0m" % n)
28         time.sleep(1)
29
30
31 if __name__ == "__main__":
32     event = threading.Event()
33     light = threading.Thread(target=light)
34     light.start()
35     car = threading.Thread(target=car, args=("tesla",))
36     car.start()
37
38
39
40 # 红灯 10
41 # [tesla]等红灯等的花都谢了.....
42 # 红灯 9
43 # [tesla]等红灯等的花都谢了.....
44 # 红灯 8
45 # [tesla]等红灯等的花都谢了.....
46 # 红灯 7
47 # [tesla]等红灯等的花都谢了.....
48 # 红灯 6
49 # [tesla]等红灯等的花都谢了.....
50 # 红灯 5
51 # [tesla]等红灯等的花都谢了.....
52 # 红灯 4
53 # [tesla]等红灯等的花都谢了.....
54 # 红灯 3
55 # [tesla]等红灯等的花都谢了.....
56 # 红灯 2
57 # [tesla]等红灯等的花都谢了.....
58 # 红灯 1
59 # [tesla]等红灯等的花都谢了.....
60 # 绿灯 20
61 # [tesla]在路上飞奔.....
62 # 绿灯 19
63 # [tesla]在路上飞奔.....
64 # 绿灯 18
65 # [tesla]在路上飞奔.....
66 # 绿灯 17
67 # [tesla]在路上飞奔.....
68 # 绿灯 16
69 # [tesla]在路上飞奔.....
70 # 绿灯 15
71 # [tesla]在路上飞奔.....
9、queue
 1 #!/user/bin/env ptyhon
 2 # -*- coding:utf-8 -*-
 3 # Author: VisonWong
 4
 5
 6 import queue
 7
 8 q = queue.Queue()
 9
10 for i in range(10):
11     q.put(i)
12
13 for t in range(10):
14     print(q.get())
15
16 # 0
17 # 1
18 # 2
19 # 3
20 # 4
21 # 5
22 # 6
23 # 7
24 # 8
25 # 9


class queue.Queue(maxsize=0) #先入先出
class queue.LifoQueue(maxsize=0) #last in fisrt out
class queue.PriorityQueue(maxsize=0) #存储数据时可设置优先级的队列
python多线程,不适合cpu密集操作型的任务,适合io操作密集型的任务。
二、进程
要以一个整体的形式暴露给操作系统管理,里面包含了对各种资源的调用,内存的管理,网络接口的调用等;对各种资源的管理集合,就可以称为进程。
1、multiprocessing模块(多进程)
 1 #!/user/bin/env ptyhon
 2 # -*- coding:utf-8 -*-
 3 # Author: VisonWong
 4
 5 # 多进程
 6
 7 import multiprocessing, time
 8 import threading,os
 9
10
11 def thread_run():
12     print("thread id ", threading.get_ident())
13
14
15 def run(name):
16     time.sleep(1)
17     print("process----", name)
18     print('parent process id:', os.getppid())
19     t = threading.Thread(target=thread_run )
20     t.start()
21
22
23 if __name__ == "__main__":
24
25     print('process id:', os.getpid())
26     for i in range(3):
27         p = multiprocessing.Process(target=run, args=(i,))
28         p.start()
29
30
31 # process id: 3732
32 # process---- 1
33 # parent process id: 3732
34 # thread id  1168
35 # process---- 0
36 # parent process id: 3732
37 # thread id  4928
38 # process---- 2
39 # parent process id: 3732
40 # thread id  3524
对比下主进程和子进程的id号以及关系:
 1 #!/user/bin/env ptyhon
 2 # -*- coding:utf-8 -*-
 3 # Author: VisonWong
 4
 5 # 多进程id
 6
 7 import multiprocessing
 8 import os
 9
10
11 def info(title):
12     print(title)
13     print('module name:', __name__)
14     print('parent process:', os.getppid())  # 父进程id
15     print('process id:', os.getpid())  # 子进程id
16
17
18 def run(name):
19     info('\033[31;1mfunction f\033[0m')
20     print("process----", name)
21
22
23 if __name__ == '__main__':
24     info('\033[32;1mmain process line\033[0m')
25     p = multiprocessing.Process(target=run, args=("暴风雨",))
26     p.start()
27     p.join()
28
29
30 # main process line
31 # module name: __main__
32 # parent process: 5832
33 # process id: 5256
34 # function f
35 # module name: __mp_main__
36 # parent process: 5256
37 # process id: 2996
38 # process---- 暴风雨
2、进程间通信
不同进程间内存是不共享的,要想实现两个进程间的数据交换,可以用以下方法:
(1)queue
 1 #!/user/bin/env ptyhon
 2 # -*- coding:utf-8 -*-
 3 # Author: VisonWong
 4
 5 from multiprocessing import Process, Queue
 6 import os, time, random
 7
 8
 9 # 写数据进程执行的代码:
10 def write(q):
11     print('Process to write: %s' % os.getpid())
12     for value in ['A', 'B', 'C']:
13         print('Put %s to queue...' % value)
14         q.put(value)
15         time.sleep(random.random())
16
17
18 # 读数据进程执行的代码:
19 def read(q):
20     print('Process to read: %s' % os.getpid())
21     while True:
22         value = q.get(True)
23         print('Get %s from queue.' % value)
24
25
26 if __name__ == '__main__':
27     # 父进程创建Queue,并传给各个子进程:
28     q = Queue()
29     pw = Process(target=write, args=(q,))
30     pr = Process(target=read, args=(q,))
31     # 启动子进程pw,写入:
32     pw.start()
33     # 启动子进程pr,读取:
34     pr.start()
35     # 等待pw结束:
36     pw.join()
37     # pr进程里是死循环,无法等待其结束,只能强行终止:
38     pr.terminate()  # 强制关闭子进程
39
40
41 # Process to read: 2152
42 # Process to write: 3372
43 # Put A to queue...
44 # Get A from queue.
45 # Put B to queue...
46 # Get B from queue.
47 # Put C to queue...
48 # Get C from queue.
(2)Pipe
 1 #!/user/bin/env ptyhon
 2 # -*- coding:utf-8 -*-
 3 # Author: VisonWong
 4
 5
 6 # Pipe 进程间通信
 7
 8 import multiprocessing
 9
10
11 def f(conn):
12     conn.send("hello from child")
13     conn.close()
14
15
16 if __name__ == "__main__":
17     parent_conn, child_conn = multiprocessing.Pipe()
18     p = multiprocessing.Process(target=f, args=(child_conn,))
19     p.start()
20     print(parent_conn.recv())
21     p.join()
22
23
24 # hello from child
(3)Manager
 1 #!/user/bin/env ptyhon
 2 # -*- coding:utf-8 -*-
 3 # Author: VisonWong
 4
 5 # Manager 进程间共享数据
 6
 7 import multiprocessing
 8 import os
 9
10
11 def f(d, l, i):
12     d[i] = os.getpid()
13     l.append(os.getpid())
14
15
16 if __name__ == "__main__":
17     manager = multiprocessing.Manager()
18     d = manager.dict()  # 创建一个字典,进程间可以共享数据
19     l = manager.list()
20     p_list = []
21     for i in range(5):
22         p = multiprocessing.Process(target=f, args=(d,l,i))
23         p.start()
24         p_list.append(p)
25     for t in p_list:
26         t.join()
27
28     print(d)
29     print(l)
30
31
32 # {1: 4064, 3: 3048, 2: 3660, 0: 5876, 4: 5892}
33 # [4064, 3048, 3660, 5876, 5892]
(4)进程锁
 1 #!/user/bin/env ptyhon
 2 # -*- coding:utf-8 -*-
 3 # Author: VisonWong
 4
 5 from multiprocessing import Process, Lock
 6
 7
 8 def f(l, i):
 9     l.acquire()
10     print('process__', i)
11     l.release()
12
13
14 if __name__ == '__main__':
15     lock = Lock()               #生成锁的实例
16     for num in range(5):
17         Process(target=f, args=(lock, num)).start()
18
19
20 # process__ 1
21 # process__ 3
22 # process__ 2
23 # process__ 0
24 # process__ 4
虽然进程及进程所含的数据都是相互独立的,但是多进程运行期间会共享同一块屏幕,使用进程锁是为了防止出现打印异常的情况。
3、进程池
进程创建子进程的过程,子进程克隆了一遍父进程里的数据,如果父进程占用空间特别大,子进程启动过多就会导致系统空间不够用,所以引出了进程池的概念;
进程池内部维护一个进程序列,当使用时,则去进程池中获取一个进程,如果进程池序列中没有可供使用的进进程,那么程序就会等待,直到进程池中有可用进程为止。
进程池中有两个方法:
-
- apply 同步执行(串行)
- apply_async 异步执行(并行)
 1 #!/user/bin/env ptyhon
 2 # -*- coding:utf-8 -*-
 3 # Author: VisonWong
 4
 5
 6 # 进程池
 7
 8 from multiprocessing import Process, Pool
 9 import time, os
10
11
12 def Foo(i):
13     time.sleep(1)
14     print("in process", os.getpid())
15
16
17
18 def Bar(arg):
19     print('-->exec done:', arg, os.getpid())
20
21
22 if __name__ == "__main__":
23     pool = Pool(2)  # 允许进程池同时放入5个进程
24     print("主进程:", os.getpid())
25     for i in range(5):
26         pool.apply_async(func=Foo, args=(i,), callback=Bar) #callback回调 执行完func后再执行callback 用主程序执行
27         #pool.apply(func=Foo, args=(i,))  #串行
28
29     pool.close()
30     pool.join()  # 进程池中进程执行完毕后再关闭,如果注释,那么程序直接关闭。
31
32
33 # 主进程: 5612
34 # in process 4220
35 # -->exec done: None 5612
36 # in process 4248
37 # -->exec done: None 5612
38 # in process 4220
39 # -->exec done: None 5612
40 # in process 4248
41 # -->exec done: None 5612
42 # in process 4220
43 # -->exec done: None 5612
三、协程
协程,又称微线程,纤程。英文名Coroutine。一句话说明什么是线程:协程是一种用户态的轻量级线程。
协程拥有自己的寄存器上下文和栈。协程调度切换时,将寄存器上下文和栈保存到其他地方,在切回来的时候,恢复先前保存的寄存器上下文和栈。因此:协程能保留上一次调用时的状态(即所有局部状态的一个特定组合),每次过程重入时,就相当于进入上一次调用的状态,换种说法:进入上一次离开时所处逻辑流的位置。
好处:
-
- 无需线程上下文切换的开销
- 无需原子操作锁定及同步的开销
- 方便切换控制流,简化编程模型
- 高并发+高扩展性+低成本:一个CPU支持上万的协程都不是问题。所以很适合用于高并发处理。
缺点:
-
- 无法利用多核资源:协程的本质是个单线程,它不能同时将 单个CPU 的多个核用上,协程需要和进程配合才能运行在多CPU上.当然我们日常所编写的绝大部分应用都没有这个必要,除非是cpu密集型应用。
- 进行阻塞(Blocking)操作(如IO时)会阻塞掉整个程序。
1、yeild实现协程
 1 # yield实现协程
 2
 3 def consumer(name):
 4     print("------>starting eating baozi..")
 5     while True:
 6         new_baozi = yield
 7         print("[%s] is eating baozi %s"%(name,new_baozi))
 8
 9 def producer():
10     n = 0
11     while n < 5 :
12         n +=1
13         con.send(n)         #唤醒yield并且传值
14         con2.send(n)
15         print("\033[32;1m[producer]\033[0m is making baozi %s" % n)
16
17 if __name__ == "__main__":
18     con = consumer("c1")        #生成生成器
19     con2 = consumer("c2")
20     con.__next__()         #唤醒yield
21     con2.__next__()
22     producer()
23
24 # 输出
25 # ------>starting eating baozi..
26 # ------>starting eating baozi..
27 # [c1] is eating baozi 1
28 # [c2] is eating baozi 1
29 # [producer] is making baozi 1
30 # [c1] is eating baozi 2
31 # [c2] is eating baozi 2
32 # [producer] is making baozi 2
33 # [c1] is eating baozi 3
34 # [c2] is eating baozi 3
35 # [producer] is making baozi 3
36 # [c1] is eating baozi 4
37 # [c2] is eating baozi 4
38 # [producer] is making baozi 4
39 # [c1] is eating baozi 5
40 # [c2] is eating baozi 5
41 # [producer] is making baozi 5
2、greenlet
greenlet封装好的协程,利用.swith对协程操作进行手动切换。
 1 #!/user/bin/env ptyhon
 2 # -*- coding:utf-8 -*-
 3 # Author: VisonWong
 4
 5
 6 from greenlet import greenlet
 7
 8
 9 def test1():
10     print("in test1 12")
11     gr2.switch()
12     print("in test1 34")
13     gr2.switch()
14
15
16 def test2():
17     print("in test2 56")
18     gr1.switch()
19     print("in test2 78")
20
21
22 gr1 = greenlet(test1)  # 启动一个协程
23 gr2 = greenlet(test2)
24 gr1.switch()  # 切换操作 类似于yeild里的next()
25               # 手动切换 相当于启动gr1
26
27
28 # in test1 12
29 # in test2 56
30 # in test1 34
31 # in test2 78
3、gevent
Gevent 是一个第三方库,可以轻松通过gevent实现并发同步或异步编程,在gevent中用到的主要模式是Greenlet, 它是以C扩展模块形式接入Python的轻量级协程。
Greenlet全部运行在主程序操作系统进程的内部,但它们被协作式地调度。
 1 #!/user/bin/env ptyhon
 2 # -*- coding:utf-8 -*-
 3 # Author: VisonWong
 4
 5 import gevent
 6
 7 def foo():
 8     print("runing in foo")
 9     gevent.sleep(2)
10     print("context switch to foo again")
11
12
13 def bar():
14     print("context to bar")
15     gevent.sleep(1)
16     print("context to switch bar to bar")
17
18
19 gevent.joinall([  # 启动协程
20     gevent.spawn(foo),          #自动切换
21     gevent.spawn(bar),
22 ])
23
24
25 # runing in foo
26 # context to bar
27 # context to swith bar to bar
28 # context swith to foo again
还原生成环境下,利用gevent做同步与异步的性能对比
 1 # 同步异步性能对比
 2
 3 import urllib.request
 4 import gevent,time
 5 from gevent import monkey
 6 monkey.patch_all()  #monkey.patch_all()执行后可以识别urllib里面的I/0操作
 7
 8 def f(url):
 9     print("GET: %s"%url)
10     resp = urllib.request.urlopen(url)
11     data = resp.read()
12     print("%d bytes received from %s"%(len(data),url))
13
14 # 同步开销
15 urls = [
16      'https://www.python.org/',
17     'https://www.yahoo.com/',
18     'https://github.com/',
19 ]
20 time_start = time.time()
21 for url in urls:
22     f(url)
23 print("同步cost time",time.time()-time_start)
24
25 # 异步开销
26 async_time_start = time.time()
27 gevent.joinall([
28     gevent.spawn(f,'https://www.python.org/'),
29     gevent.spawn(f,'https://www.yahoo.com/'),
30     gevent.spawn(f,'https://github.com/')
31 ])
32 print("异步cost time",time.time()-async_time_start)
33
34 # 输出
35 # GET: https://www.python.org/
36 # 47446 bytes received from https://www.python.org/
37 # GET: https://www.yahoo.com/
38 # 431619 bytes received from https://www.yahoo.com/
39 # GET: https://github.com/
40 # 25478 bytes received from https://github.com/
41 # 同步cost time 4.225241661071777
42 # GET: https://www.python.org/
43 # GET: https://www.yahoo.com/
44 # GET: https://github.com/
45 # 25478 bytes received from https://github.com/
46 # 461925 bytes received from https://www.yahoo.com/
47 # 47446 bytes received from https://www.python.org/
48 # 异步cost time 2.5521459579467773
由上面程序可知,同步开销时间为4秒,异步开销为2.5秒,大大节省了开销,这就是协程的魅力;monkey.patch_all()使gevent能识别到urllib中的I/O操作。

 浙公网安备 33010602011771号