
OpenThread CLI Code Exploring
OpenThread 的协议栈是用 C++ 编写的。本文通过分析 nRF connect SDK 中的例程代码 OpenThread Command Line Interface,来分享一些 C++ 的基础知识。目的在帮助大家更好的理解 OpenThread 的源代码。
OpenThread Architectures
下面是 OpenThread 网络的描述,它有几个关特性:IPv6,低功耗,IEEE 802.15.4,mesh network
-
- Thread® is an IPv6-based networking protocol designed for low-power Internet of Things devices
- IEEE 802.15.4-2006 wireless mesh network, commonly called a Wireless Personal Area Network (WPAN)
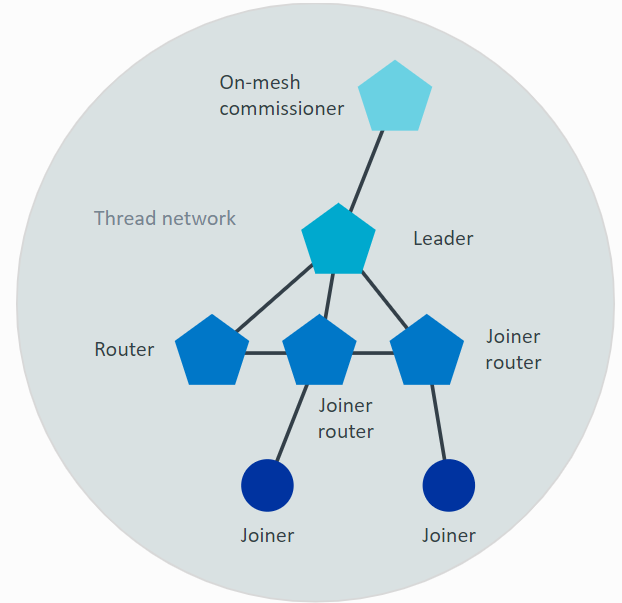
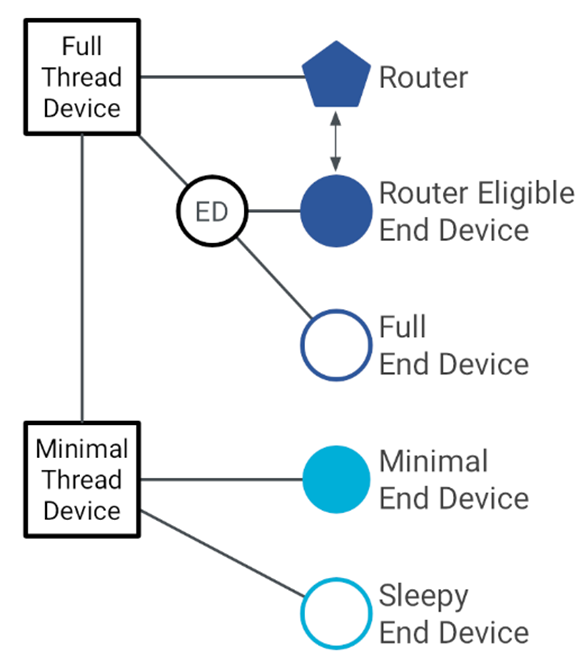
OpenThread网络中的设备类型分为以下几种。CLI 例程中默认的设备类型是 FTD。
-
- Full Thread Device (FTD) Router 是一种 FTD 设备。 Leader 是一个特殊的 Router, 它是整个 Thread 网络的中心,同一个网络中只能有一个 Leader。
- Minimal Thread Device (MTD)
- Minimal End Device (MED)
- Sleepy End Device (SED)
- Synchronized Sleepy End Device (SSED)
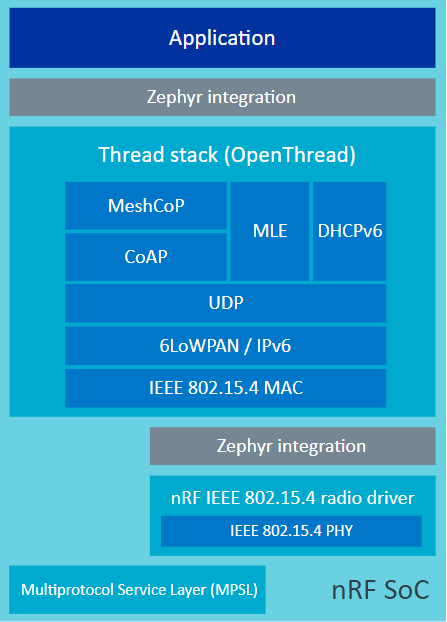
OpenThread stack architecture
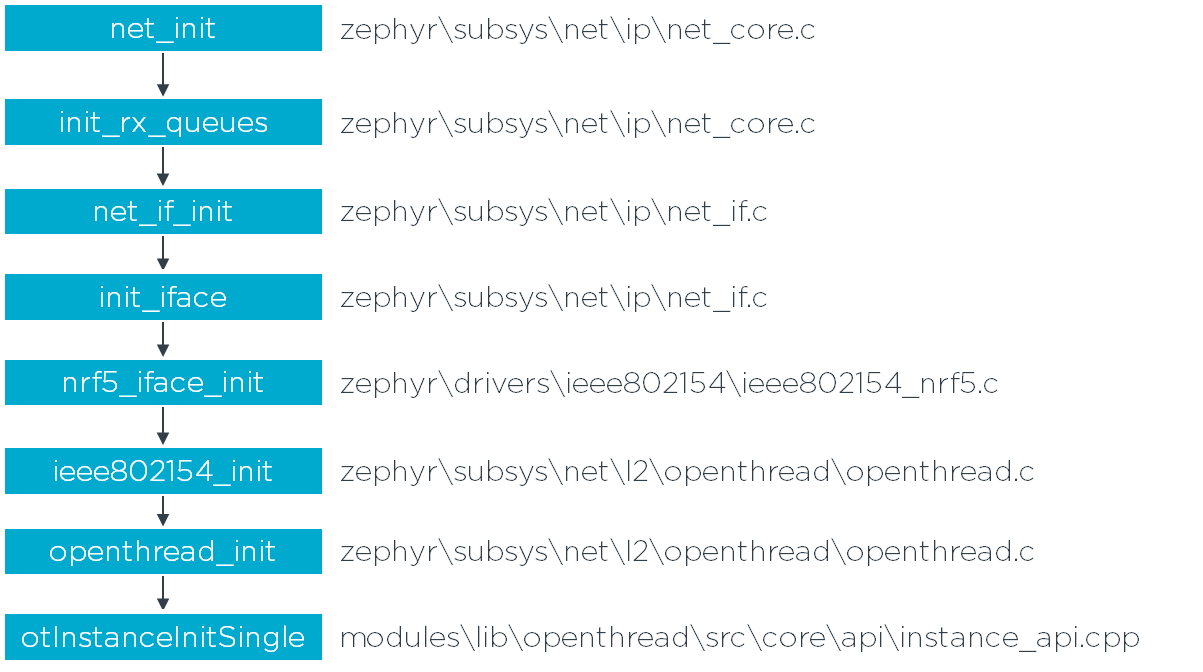
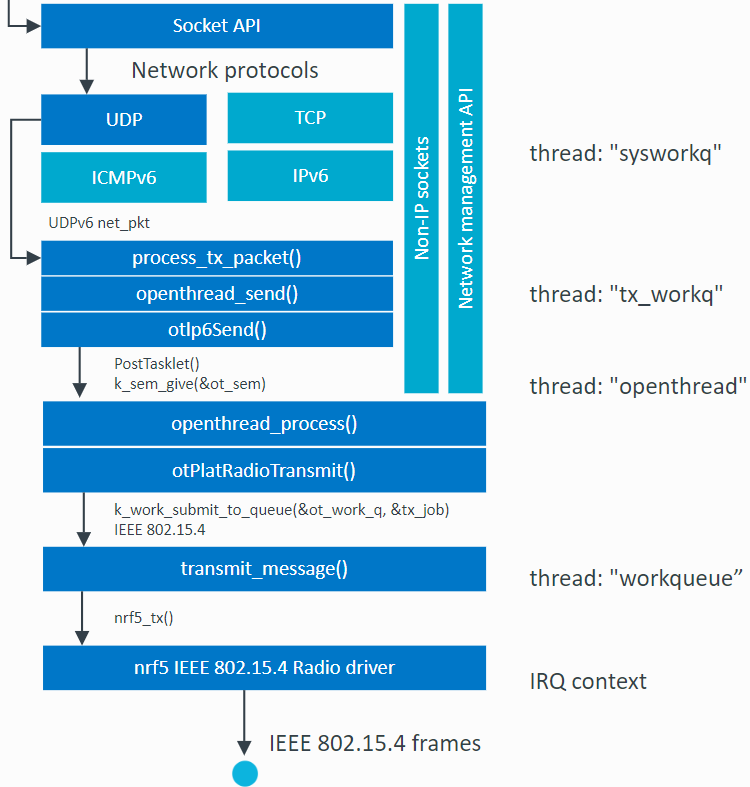
nRF connect SDK 中 OpenThread 的代码框架如下图。PHY 层是 Nordic 提供的 IEEE 802.15.4 的驱动。中间层是 google 提供的 OpenThread 的 MAC 层和 网络层。上层有 Zephyr 提供的 BSD socket 接口和各种应用层网络协议。
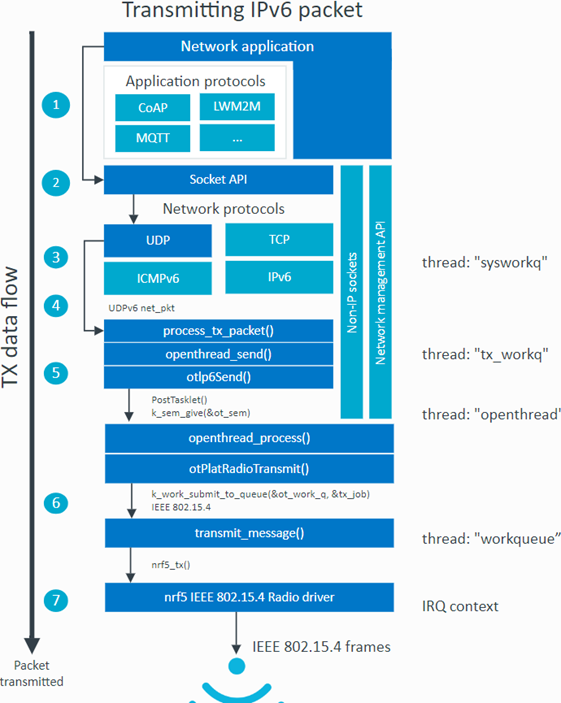
下面是 OpenThread 的数据发送的流程图。后面我们会在 UDP 数据通讯演示部分具体分析。
OpneThread CLI Example
我们分析的代码位于 nRF connect SDK 2.6.0 的目录 nrf\samples\openthread\cli 下。它支持的开发板如下:
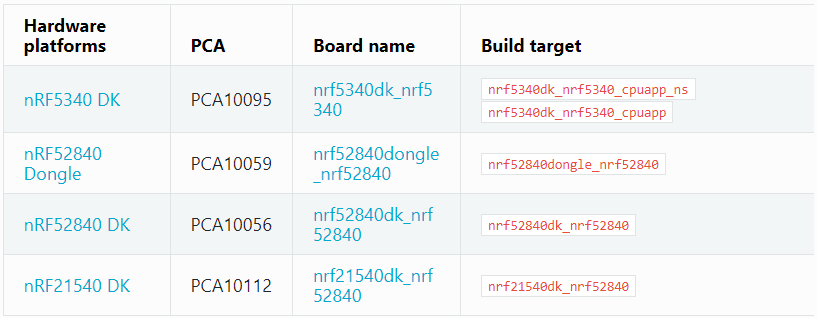
这里我们选用 nRF52840 DK。我们可以通过下面的命令编译
west build -p -b nrf52840dk_nrf52840
编译结束后我们可以看到整个代码占用的 flash 和 RAM 的大小,如下图。

下面的命令用来烧写代码
west flash
烧写完成后,连接串口终端。然后输入下面的指令启动 OpenThread 网络。
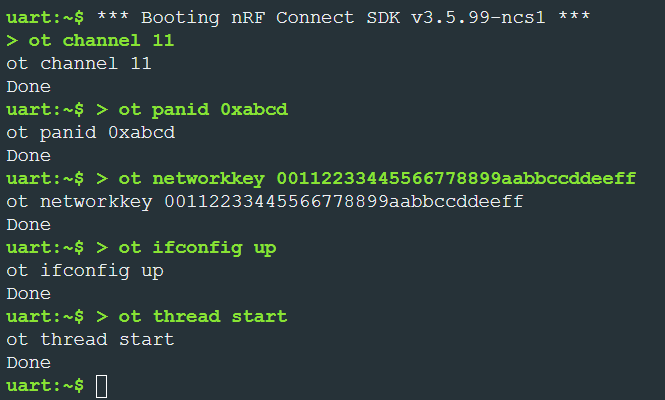
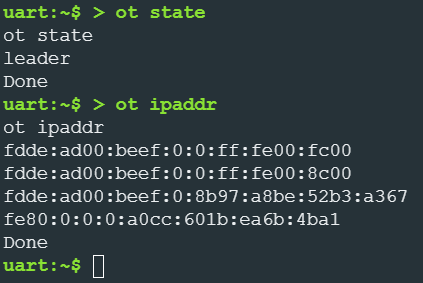
当启动网络后,可以使用下面的命令来查看网络状态和IP地址。我们可以看到这台设备的角色是 leader。任何一台 FTD 都可以成为 leader. 当一台设备使能了 thread 网络后,它会首先试图加入一个已有的 Thread 网络。当搜索了一段时间,发现没有可加入的网络后,FTD 设备会构建一个 Thread 网络,自己成为 leader。一个设备可以有多个IP地址。
CLI命令 ot channel 11 分析
下面我们来分析命令 ot channel 11 在代码中是如何实现的。在文件 modules\lib\openthread\src\cli\cli.cpp 中我们可以找到这条命令的代码,如下图。它调用了函数 otLinkSetChannel 。
template <> otError Interpreter::Process<Cmd("channel")>(Arg aArgs[])
{
    otError error = OT_ERROR_NONE;

        ExitNow(error = ProcessGetSet(aArgs, otLinkGetChannel, otLinkSetChannel));

exit:
    return error;
}
我们找到函数 otLinkSetChannel 继续分析。下图并不是函数的全部代码,而是其中的部分关键代码。有兴趣地朋友可以去 modules\lib\openthread\src\core\api\link_api.cpp 中查看完整代码。otLinkSetChannel 里面最关键的一句是 SuccessOrExit(error = instance.Get<Mac::Mac>().SetPanChannel(aChannel))。 这句代码对不太了解C++的人很不友好。接下来我们会仔细地分析一下这句。
otError otLinkSetChannel(otInstance *aInstance, uint8_t aChannel)
{
    Error     error;
    Instance &instance = AsCoreType(aInstance);

#if OPENTHREAD_CONFIG_LINK_RAW_ENABLE
    if (instance.Get<Mac::LinkRaw>().IsEnabled())
    {
        error = instance.Get<Mac::LinkRaw>().SetChannel(aChannel);
        ExitNow();
    }
#endif

    VerifyOrExit(instance.Get<Mle::MleRouter>().IsDisabled(), error = kErrorInvalidState);

    SuccessOrExit(error = instance.Get<Mac::Mac>().SetPanChannel(aChannel));
    instance.Get<MeshCoP::ActiveDatasetManager>().Clear();
    instance.Get<MeshCoP::PendingDatasetManager>().Clear();

exit:
    return error;
}
先来分析 Instance &instance 这个定义。这里 instance 的数据类型是类 Instance。我们进一步分析类 Instance. 从下面这张图中我们介绍两个 C++ 的知识
-
- Namespace 命名空间。命名空间是一种用来避免命名冲突的机制,它可以将一段代码的名称隔离开,使其与其他代码的名称不冲突。下面这段代码中 Instance 是包含在 namespace ot 中的。
- Inheritance 继承。继承机制是面向对象程序设计使代码可以复用的最重要的手段,它允许程序员在保持原有类特性的基础上进行扩展,增加功能,这样产生新的类,称派生类。下图中,类 Instance 是由基类 otInstance 和 基类 NonCopyable 派生而来。
- 继承 otInstance 的方式是 public。基类中的 public 成员继承后仍为public,protected 成员在派生类中为 protected,private 成员在派生类中不能使用。
- 继承 NonCopyable 的方式是 private。基类中的 public 成员继承后为 private ,protected 成员在派生类中为 private ,private 成员在派生类中不能使用。
namespace ot {

/**
 * Represents an OpenThread instance.
 *
 * Contains all the components used by OpenThread.
 *
 */
class Instance : public otInstance, private NonCopyable
{
public:
    /**
     * Represents the message buffer information (number of messages/buffers in all OT stack message queues).
     *
     */
    class BufferInfo : public otBufferInfo, public Clearable<BufferInfo>
    {
    };
继续分析 instance.Get<Mac::Mac>().SetPanChannel(aChannel) 这一句中的 Get<Mac::Mac>()。我们在类 Instance 中可以找到这个函数的定义如下图。这里又有两个关于 C++ 的基础知识。
-
- Function Template 函数模板。建立一个通用的函数,其返回值类型,形参的类型都不确定指定而是采用虚拟类型来代替。通过将类型作为参数传递给模板,可以使编译器为该特定类型生成一个函数。因为模板允许您根据泛型类型而不是特定类型编程,所以这个过程有时被称为泛型编程。Get<Mac::Mac> 中< >里的类 Mac::Mac 就是告诉函数模板需要的返回值得类型。
- Reference 引用。引用不是新定义一个变量,而是给已存在变量取了一个别名。C++中用 & 来表示引用。因为 Get<Mac::Mac> 返回的是引用,所以后面是可以直接用点号来调用类成员。如果返回的指针,则需要用“->”来调用成员。所以 SetPanChannel(aChannel) 应该是类 Mac::Mac 的成员。
    /**
     * Returns a reference to a given `Type` object belonging to the OpenThread instance.
     *
     * For example, `Get<MeshForwarder>()` returns a reference to the `MeshForwarder` object of the instance.
     *
     * Note that any `Type` for which the `Get<Type>` is defined MUST be uniquely accessible from the OpenThread
     * `Instance` through the member variable property hierarchy.
     *
     * Specializations of the `Get<Type>()` method are defined in this file after the `Instance` class definition.
     *
     * @returns A reference to the `Type` object of the instance.
     *
     */
    template <typename Type> inline Type &Get(void);
template <> inline Mac::Mac &Instance::Get(void) { return mMac; }

template <> inline Mac::SubMac &Instance::Get(void) { return mMac.mLinks.mSubMac; }
下面我们来看一下类 Mac::Mac。第一句我们就看到其中一个成员就是刚才我们分析过的类 Instance。但是这个类的名字是 ot::Instance,这是因为在 namespace 之外类 Instance 的全名就是ot::Instance。另外class ot::Instance 之前还有一个关键字 friend。
-
- friend 友元。友元(Friend)是C++中一种特殊的访问控制机制,它允许一个类或函数访问另一个类的私有成员。友元是一种权限授予机制,当一个类或函数被声明为另一个类的友元时,它就能够绕过访问权限进行访问,即使这些成员在普通情况下对外是不可见的。通过这种机制类 Mac 可以访问 类 Instance 的私有成员。
/**
 * Implements the IEEE 802.15.4 MAC.
 *
 */
class Mac : public InstanceLocator, private NonCopyable
{
    friend class ot::Instance;

public:
    /**
     * Initializes the MAC object.
     *
     * @param[in]  aInstance  A reference to the OpenThread instance.
     *
     */
    explicit Mac(Instance &aInstance);
继续在类 Mac 中寻找,我们可以找到成员方法 SetPanChannel。
    /**
     * Sets the IEEE 802.15.4 PAN Channel.
     *
     * @param[in]  aChannel  The IEEE 802.15.4 PAN Channel.
     *
     * @retval kErrorNone          Successfully set the IEEE 802.15.4 PAN Channel.
     * @retval kErrorInvalidArgs   The @p aChannel is not in the supported channel mask.
     *
     */
    Error SetPanChannel(uint8_t aChannel);
找到 SetPanChannel 的定义。里面调用了 Get<Notifier>().Update(mPanChannel, aChannel, kEventThreadChannelChanged) 我们去类 Notifier 找到成员 Update。最终 aChannel 的值传递给了变量 mRadioChannel 完成了对信道的设定。
Error Mac::SetPanChannel(uint8_t aChannel)
{
    Error error = kErrorNone;

    VerifyOrExit(mSupportedChannelMask.ContainsChannel(aChannel), error = kErrorInvalidArgs);

    SuccessOrExit(Get<Notifier>().Update(mPanChannel, aChannel, kEventThreadChannelChanged));

    mCcaSuccessRateTracker.Clear();

    VerifyOrExit(!mUsingTemporaryChannel);

    mRadioChannel = mPanChannel;

#if OPENTHREAD_CONFIG_MAC_CSL_RECEIVER_ENABLE
    UpdateCsl();
#endif

    UpdateIdleMode();

exit:
    return error;
}
Instantiated Object of Class
OpenThread 的代码中,各个功能模块都是以类的形式存在的。比如我们之前分析过的 class Instance,class Mac 等。这里我们和结构体做个类比。结构体的定义只是规定了结构体的形式,它并没有形成一个结构体的实体,也就是并没有实际分配内存。只有声明了结构体变量之后,才产生了真正的结构体实体。类的实例化类似于声明结构体变量,是产生类实体的动作。OpenThread 中这些类都是在哪里实例化的呢?下面我们将进一步分析。
在下图的 class Instance 定义中,我们可以看到它的 private 成员定义了很多模块类的实体。比如类 Mac::Mac 的实例就是 mMac。实例化 class Instance ,就可以实例化了各个类。那么下一个问题 class Instance 自己是在哪里实例化的呢?
#if OPENTHREAD_CONFIG_DNS_DSO_ENABLE
    Dns::Dso mDnsDso;
#endif

#if OPENTHREAD_CONFIG_SNTP_CLIENT_ENABLE
    Sntp::Client mSntpClient;
#endif

#if OPENTHREAD_FTD && OPENTHREAD_CONFIG_BACKBONE_ROUTER_ENABLE
    BackboneRouter::Local mBackboneRouterLocal;
#endif

    MeshCoP::ActiveDatasetManager  mActiveDataset;
    MeshCoP::PendingDatasetManager mPendingDataset;
    MeshCoP::ExtendedPanIdManager  mExtendedPanIdManager;
    MeshCoP::NetworkNameManager    mNetworkNameManager;
    Ip6::Filter                    mIp6Filter;
    KeyManager                     mKeyManager;
    Lowpan::Lowpan                 mLowpan;
    Mac::Mac                       mMac;
    MeshForwarder                  mMeshForwarder;
    Mle::MleRouter                 mMleRouter;
    Mle::DiscoverScanner           mDiscoverScanner;
    AddressResolver                mAddressResolver;
在寻找 class Instance 在哪里实例化之前,我们首先要搞清楚一个问题:如何将 class Instance 实例化?class Instance 的实例化是通过静态函数 InitSingle 来实现的。这里面涉及到下面几个 C++ 的基础知识:
-
- static function 静态函数。 类中的静态成员。静态成员函数不属于任何对象,可以直接通过类名调用。静态成员函数通常用于执行全局性质的操作,比如单例模式 Singleton 等。class Instance 中的函数 InitSingle 在加了 static 后可以在 class Instance 实例化前直接调用。
- Singleton 单例模式是一种常用的软件设计模式。在它的核心结构中只包含一个被称为单例类的特殊类。通过单例模式可以保证系统中一个类只有一个实例而且该实例易于外界访问。class Instance 显然需要这个特性。在 class Instance 实现单例模式需要以下三步:
-
单例模式的类只提供私有的构造函数。class Instance 中的构造函数 Instance(void) 是 private 属性。
-
类定义中含有一个该类的静态私有对象。modules\lib\openthread\src\core\instance\instance.cpp 中定义的数组 gInstanceRaw 实现了这个功能。
- 类提供了一个静态的共有的函数用于创建或获取它本身的静态私有对象。class Instance 中的函数 InitSingle 实现了这个功能。并且 InitSingle 中通过 VerifyOrExit(!instance->mIsInitialized) 和 instance->AfterInit() 确保这个函数在重复调用时,只能生效一次。
-
- placement new 在用户指定的内存位置上(这个内存是已经预先分配好的)构建新的对象,因此这个构建过程不需要额外分配内存,只需要调用对象的构造函数在该内存位置上构造对象即可。具体的实现方式是 Object * p = new (address) ClassConstruct(...)。从下图中我们看到 gInstanceRaw 是预先定义的数组。new(&gInstanceRaw) Instance() 就是在 gInstanceRaw 的地址上实例化类 Instance。在实例化的过程中会自动调用私有的构造函数初始化成员变量。
    /**
     * Initializes the single OpenThread instance.
     *
     * Initializes OpenThread and prepares it for subsequent OpenThread API calls. This function must be
     * called before any other calls to OpenThread.
     *
     * @returns A reference to the single OpenThread instance.
     *
     */
    static Instance &InitSingle(void);
Instance &Instance::InitSingle(void)
{
    Instance *instance = &Get();

    VerifyOrExit(!instance->mIsInitialized);

    instance = new (&gInstanceRaw) Instance();

    instance->AfterInit();

exit:
    return *instance;
}
// Define the raw storage used for OpenThread instance (in single-instance case).
OT_DEFINE_ALIGNED_VAR(gInstanceRaw, sizeof(Instance), uint64_t);
知道了如何实例化单例模式的 class Instance 后,下面我们来分析 CLI 程序是在哪里调用静态成员函数 InitSingle 来实例化 class Instance 的。如下,文件 instance_api.cpp 中的接口函数 otInstanceInitSingle 对 InitSingle 做了一个封装。CLI 这个例程代码中是 调用 otInstanceInitSingle 来完成实例化的。
otInstance *otInstanceInitSingle(void) { return &Instance::InitSingle(); }
下面是函数 otInstanceInitSingle 的调用顺序。net_init 在整个 zephyr 系统初始化的时候调用。
SYS_INIT(net_init, POST_KERNEL, CONFIG_NET_INIT_PRIO);
CLI Command ot ifconfig up
我们再分析一条 CLI 指令。我们可以从下图中很容易的看出这条指令是通过 otIp6SetEnabled(GetInstancePtr(), true) 执行的。
template <> otError Interpreter::Process<Cmd("ifconfig")>(Arg aArgs[])
{
    otError error = OT_ERROR_NONE;

    /**
     * @cli ifconfig
     * @code
     * ifconfig
     * down
     * Done
     * @endcode
     * @code
     * ifconfig
     * up
     * Done
     * @endcode
     * @par api_copy
     * #otIp6IsEnabled
     */
    if (aArgs[0].IsEmpty())
    {
        if (otIp6IsEnabled(GetInstancePtr()))
        {
            OutputLine("up");
        }
        else
        {
            OutputLine("down");
        }
    }
    /**
     * @cli ifconfig (up,down)
     * @code
     * ifconfig up
     * Done
     * @endcode
     * @code
     * ifconfig down
     * Done
     * @endcode
     * @cparam ifconfig @ca{up|down}
     * @par api_copy
     * #otIp6SetEnabled
     */
    else if (aArgs[0] == "up")
    {
        SuccessOrExit(error = otIp6SetEnabled(GetInstancePtr(), true));
    }
    else if (aArgs[0] == "down")
    {
        SuccessOrExit(error = otIp6SetEnabled(GetInstancePtr(), false));
    }
    else
    {
        ExitNow(error = OT_ERROR_INVALID_ARGS);
    }

exit:
    return error;
}
找到如下图函数 otIp6SetEnabled 的定义。我们可以看到里面主要是执行了 instance.Get<ThreadNetif>().Up() 。经过上面对 C++ 基础知识的学习,我们可以很快速的看出来这句调用了类 ThreadNetif 中的 up 函数。
otError otIp6SetEnabled(otInstance *aInstance, bool aEnabled)
{
    Error     error    = kErrorNone;
    Instance &instance = AsCoreType(aInstance);

#if OPENTHREAD_CONFIG_LINK_RAW_ENABLE
    VerifyOrExit(!instance.Get<Mac::LinkRaw>().IsEnabled(), error = kErrorInvalidState);
#endif

    if (aEnabled)
    {
        instance.Get<ThreadNetif>().Up();
    }
    else
    {
        instance.Get<ThreadNetif>().Down();
    }

#if OPENTHREAD_CONFIG_LINK_RAW_ENABLE
exit:
#endif
    return error;
}
找到如下图的函数 ThreadNetif::Up 的定义,里面调用了 Get<Mac::Mac>().SetEnabled(true) 这样一层一层的分析下去,"ot ifconfig up" 最终调用了 otPlatRadioEnable。
void ThreadNetif::Up(void)
{
    VerifyOrExit(!mIsUp);

    // Enable the MAC just in case it was disabled while the Interface was down.
    Get<Mac::Mac>().SetEnabled(true);
#if OPENTHREAD_CONFIG_CHANNEL_MONITOR_ENABLE
    IgnoreError(Get<Utils::ChannelMonitor>().Start());
#endif
    Get<MeshForwarder>().Start();

    mIsUp = true;

    SubscribeAllNodesMulticast();
    IgnoreError(Get<Mle::MleRouter>().Enable());
    IgnoreError(Get<Tmf::Agent>().Start());
#if OPENTHREAD_CONFIG_DNSSD_SERVER_ENABLE
    IgnoreError(Get<Dns::ServiceDiscovery::Server>().Start());
#endif
#if OPENTHREAD_CONFIG_DNS_CLIENT_ENABLE
    IgnoreError(Get<Dns::Client>().Start());
#endif
#if OPENTHREAD_CONFIG_SNTP_CLIENT_ENABLE
    IgnoreError(Get<Sntp::Client>().Start());
#endif
    Get<Notifier>().Signal(kEventThreadNetifStateChanged);

exit:
    return;
}
UDP data transfer
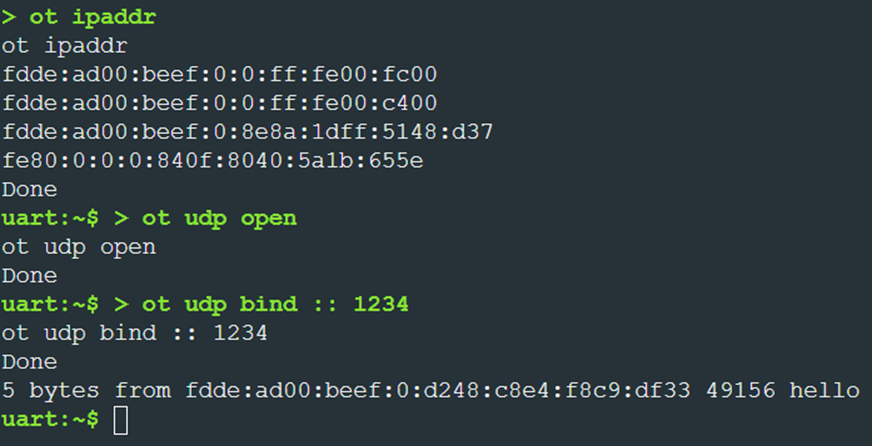
我们用两块 nRF52840DK 来进行 UDP 通讯的演示。先用之前所述的命令启动网络。先启动的网络的一块DK会成为 OpenThread 网络中的 leader 角色。先在 leader 上输入如下左图的的命令。 然后在另一块 DK 上输入如右图的指令。右图的指令首先加入已有的 Thread 网络,然后发送一个 UDP 数据包到 leader。
-
-
ot ipaddr 用来获取 IP address
-
ot udp bind :: 1234 用来监听端口 1234
-
ot udp send 用来发送 UDP 数据 hello。 这里所用的地址和端口号需要和 leader 一侧的对应。
- 从 leader 上打印出来的信息,我们可以看到 另一块 DK 发过来的 UDP 数据。
-

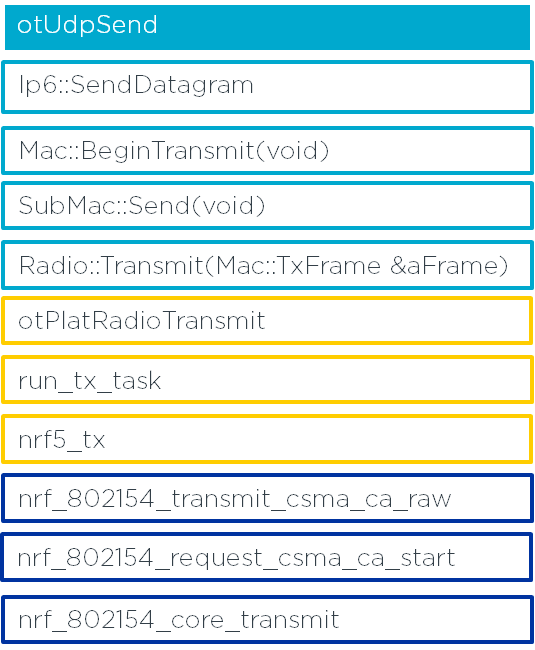
接下来,我们可以运用之前学到的 C++ 知识,通过分析命令 ot udp send 来探索 OpenThread 数据发送流程。左边是通过分析 ot udp send 所得到的关键函数。这些函数可以对应右侧的 TX data flow 图。
总结
本文通过分析 nRF connect SDK 中的例程代码 OpenThread Command Line Interfac,分享一些了 C++ 的基础知识。所涉及到的概念有 Namespace , Inheritance,Function Template,friend,static function,Singleton, placement new 等。并运用这些知识分析了OpenThread 协议栈中各种类的实列化过程,分析了 CLI 命令 ot ifconfig up 和 ot channel 11 的实现。 最后演示了 UDP 的发送和接收,并分析了数据发送流程。希望能对大家阅读 OpenThread 代码有所助益。

 浙公网安备 33010602011771号