Android自定义控件:动画类(六)----ValueAnimator高级进阶(一)

上一篇给大家介绍了ValueAnimator的大部分函数的用法,不过还都是些简单的用法,这篇我们带大家来看看有关加速器、animator和keyFrame的知识。

一、插值器

插值器,也叫加速器;有关插值器的知识,我在《Animation动画详解(二)——Interpolator插值器》中专门讲过,大家可以先看看这篇文章中各个加速器的效果。
这里再讲一下什么是插值器。我们知道,我们通过ofInt(0,400)定义了动画的区间值是0到400;然后通过添加AnimatorUpdateListener来监听动画的实时变化。那么问题来了,0-400的值是怎么变化的呢?像我们骑自行车,还有的快有的慢呢;这个值是匀速变化的吗?如果是,那我如果想让它先加速再减速的变化该怎么办? 
这就是插值器的作用!插值器就是用来控制动画区间的值被如何计算出来的。比如LinearInterpolator插值器就是匀速返回区间点的值;而DecelerateInterpolator则表示开始变化快,后期变化慢;其它都类似,下面我们就看看ValueAnimator中插值器的应用方法,然后通过自定义一个插值器来看看插值器到底是什么。

1、使用插值器

我们就以BounceInterpolator(弹跳插值器)为例做一个实验,BounceInterpolator的解释是动画结束的时候弹起;我们来看一下效果: 


下面我们就来看一下利用ValueAnimator是如何实现的。布局和上一篇的都一样,这里就不再细讲了,我们着重来看一下,当点击start anim按钮以后是怎么做的,代码如下:

[java] view plain copy
  1. ValueAnimator animator = ValueAnimator.ofInt(0,600);  
  2.   
  3. animator.addUpdateListener(new ValueAnimator.AnimatorUpdateListener() {  
  4.     @Override  
  5.     public void onAnimationUpdate(ValueAnimator animation) {  
  6.         int curValue = (int)animation.getAnimatedValue();  
  7.         tv.layout(tv.getLeft(),curValue,tv.getRight(),curValue+tv.getHeight());  
  8.     }  
  9. });  
  10. animator.setDuration(1000);  
  11. animator.setInterpolator(new BounceInterpolator());  
  12. animator.start();  
如果大家已经看懂了上篇,这段代码就非常容易理解了,在监听中,我们只改变textview的top和bottom的位置,让它跟着当前动画的值来改变它当前的top和bottom的位置。然后我们利用setDuration(1000)给它设置上做一次动画所需要的时长,然后通过setInterpolator()给它设置插值器,也就是过渡值变化的规则; 
从效果图中也可以看出,插值器的意义其实就相当于物理公式中的加速度参数,所以这也就是它也叫加速器的原因。 
源码在文章底部给出 
在学会了怎么使用加速器以后,我们来看看如何自定义一个加速器吧

2、自定义加速器

1、概述

在这段,我们就开始着手自己写一个加速器了,在写加速器之前,先看看人家的加速器是怎么写的吧。 
先看看LinearInterpolator:
[java] view plain copy
  1. public class LinearInterpolator implements Interpolator {  
  2.   
  3.     public LinearInterpolator() {  
  4.     }  
  5.   
  6.     public LinearInterpolator(Context context, AttributeSet attrs) {  
  7.     }  
  8.   
  9.     public float getInterpolation(float input) {  
  10.         return input;  
  11.     }  
  12. }  
  13. public interface Interpolator extends TimeInterpolator {  
  14. }  
LinearInterpolator实现了Interpolator接口;而Interpolator接口则直接继承自TimeInterpolator,而且并没有添加任何其它的方法。 
那我们来看看TimeInterpolator接口都有哪些函数吧:
[java] view plain copy
  1. /** 
  2.  * A time interpolator defines the rate of change of an animation. This allows animations 
  3.  * to have non-linear motion, such as acceleration and deceleration. 
  4.  */  
  5. public interface TimeInterpolator {  
  6.   
  7.     /** 
  8.      * Maps a value representing the elapsed fraction of an animation to a value that represents 
  9.      * the interpolated fraction. This interpolated value is then multiplied by the change in 
  10.      * value of an animation to derive the animated value at the current elapsed animation time. 
  11.      * 
  12.      * @param input A value between 0 and 1.0 indicating our current point 
  13.      *        in the animation where 0 represents the start and 1.0 represents 
  14.      *        the end 
  15.      * @return The interpolation value. This value can be more than 1.0 for 
  16.      *         interpolators which overshoot their targets, or less than 0 for 
  17.      *         interpolators that undershoot their targets. 
  18.      */  
  19.     float getInterpolation(float input);  
  20. }  
这里是TimeInterpolator的代码,它里面只有一个函数float getInterpolation(float input);我们来讲讲这个函数是干什么的。 
参数input:input参数是一个float类型,它取值范围是0到1,表示当前动画的进度,取0时表示动画刚开始,取1时表示动画结束,取0.5时表示动画中间的位置,其它类推。 
返回值:表示当前实际想要显示的进度。取值可以超过1也可以小于0,超过1表示已经超过目标值,小于0表示小于开始位置。 
对于input参数,它表示的是当前动画的进度,匀速增加的。什么叫动画的进度,动画的进度就是动画在时间上的进度,与我们的任何设置无关,随着时间的增长,动画的进度自然的增加,从0到1;input参数相当于时间的概念,我们通过setDuration()指定了动画的时长,在这个时间范围内,动画进度肯定是一点点增加的;就相当于我们播放一首歌,这首歌的进度是从0到1是一样的。 
而返回值则表示动画的数值进度,它的对应的数值范围是我们通过ofInt(),ofFloat()来指定的,这个返回值就表示当前时间所对应的数值的进度。 
我们先看看下面这段代码:
[java] view plain copy
  1. ValueAnimator anim = ValueAnimator.ofInt(100400);    
  2. anim.setDuration(1000);    
  3. anim.addUpdateListener(new ValueAnimator.AnimatorUpdateListener() {    
  4.     @Override    
  5.     public void onAnimationUpdate(ValueAnimator animation) {    
  6.         float currentValue = (float) animation.getAnimatedValue();    
  7.         Log.d("TAG""cuurent value is " + currentValue);    
  8.     }    
  9. });    
  10. anim.start();    
我们知道,在我们添加了AnimatorUpdateListener的监听以后,通过在监听函数中调用 animation.getAnimatedValue()就可以得到当前的值; 
那当前的值是怎么来的呢?见下面的计算公式:(目前这么理解,后面会细讲真实情况) 
当前的值 = 100 + (400 - 100)* 显示进度 
其中100和400就是我们设置的ofInt(100,400)中的值,这个公式应该是比较容易理解的,就相当于我们做一个应用题: 
小明从100的位置开始出发向400的位置开始跑去,在走到全程距离20%位置时,请问小明在哪个数字点上? 
当前的值 = 100 + (400 -100)* 0.2; 
很简单的应用题,ofInt()中AnimatorUpdateListener中的当前值就是这么来的。从这里大家可以看到,显示进度就表示的是当前的值的位置。但由于我们可以通过指定getInterpolation()的返回值来指定当前的显示值的进度,所以随着时间的增加,我们可以让值随意在我们想让它在的位置。
再重复一遍,input参数与任何我们设定的值没关系,只与时间有关,随着时间的增长,动画的进度也自然的增加,input参数就代表了当前动画的进度。而返回值则表示动画的当前数值进度 
通过上面我们应该知道了input参数getInterpolation()返回值的关系了,下面我们来看看LinearInterpolator是如何重写TimeInterpolator的:
[java] view plain copy
  1. public class LinearInterpolator implements Interpolator {  
  2.   
  3.     …………  
  4.   
  5.     public float getInterpolation(float input) {  
  6.         return input;  
  7.     }  
  8. }  
从上面可以看到,LinearInterpolator在getInterpolation函数中,直接把input值返回,即以当前动画的进度做为动画的数值进度,这也就表示当前动画的数值进度与动画的时间进度一致,比如,如果当前动画进度为0,那动画的数值进度也是0,那如果动画进度为0.5,那动画的数值进度也是在0.5,当动画结束,动画的进度就变成1了,而动画的数值进度也是1了。 
下面我们就用一个例子来讲一下如何自定义插值器。 

2、示例

从上面的讲解中也可以看到,我们自定义插值器,只需要实现TimeInterpolator接口就可以了:
[java] view plain copy
  1. public class MyInterploator implements TimeInterpolator {  
  2.     @Override  
  3.     public float getInterpolation(float input) {  
  4.         return 1-input;  
  5.     }  
  6. }  
在getInterpolation函数中,我们将进度反转过来,当传0的时候,我们让它数值进度在完成的位置,当完成的时候,我们让它在开始的位置 
然后使用我们的插值器:
[java] view plain copy
  1. ValueAnimator animator = ValueAnimator.ofInt(0,600);  
  2.   
  3. animator.addUpdateListener(new ValueAnimator.AnimatorUpdateListener() {  
  4.     @Override  
  5.     public void onAnimationUpdate(ValueAnimator animation) {  
  6.         int curValue = (int)animation.getAnimatedValue();  
  7.         tv.layout(tv.getLeft(),curValue,tv.getRight(),curValue+tv.getHeight());  
  8.     }  
  9. });  
  10. animator.setDuration(1000);  
  11. animator.setInterpolator(new MyInterploator());  
  12. animator.start();  
这里使用自定义插值器的方法与使用普通插值器的方法是完全一样的,下面来看看效果:

从效果图中可见,我们将数值进度倒序返回——即随着动画进度的推进,动画的数值进度从结束位置进行到起始位置; 
到这里,想必大家应该已经理解了getInterpolation(float input)函数中input参数与返回值的关系,在重写插值器时,需要强有力的数学知识做基础,一般而言,都是通过数学公式来计算插值器的变化趋势的,大家可以再分析分析其它几个插值器的写法;可以把它他们总结成公式,放到公式画图软件里,看看对应的数学图在(0,1)之间的走向,这个走向就是插值器在数值变化时的样子。 

源码在文章底部给出

二、Evaluator

1、概述

我们先不讲什么是Evaluator,我们先来看一张图: 


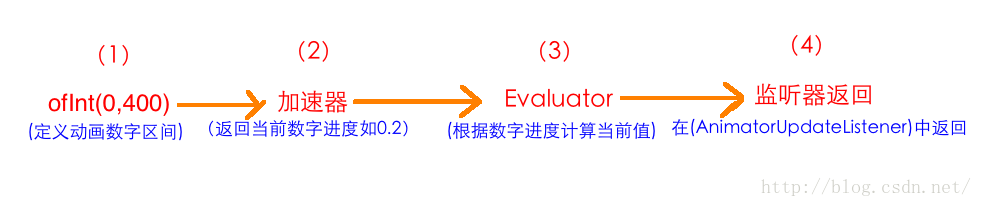
这幅图讲述了从定义动画的数字区间到通过AnimatorUpdateListener中得到当前动画所对应数值的整个过程。下面我们对这四个步骤具体讲解一下: 
(1)、ofInt(0,400)表示指定动画的数字区间,是从0运动到400; 
(2)、加速器:上面我们讲了,在动画开始后,通过加速器会返回当前动画进度所对应的数字进度,但这个数字进度是百分制的,以小数表示,如0.2 
(3)、Evaluator:我们知道我们通过监听器拿到的是当前动画所对应的具体数值,而不是百分制的进度。那么就必须有一个地方会根据当前的数字进度,将其转化为对应的数值,这个地方就是Evaluator;Evaluator就是将从加速器返回的数字进度转成对应的数字值。所以上部分中,我们讲到的公式:

[java] view plain copy
  1. 当前的值 = 100 + (400 - 100)* 显示进度  
这个公式就是在Evaluator计算的;在拿到当前数字进度所对应的值以后,将其返回 
(4)、监听器:我们通过在AnimatorUpdateListener监听器使用animation.getAnimatedValue()函数拿到Evaluator中返回的数字值。 
讲了这么多,Evaluator其实就是一个转换器,他能把小数进度转换成对应的数值位置

2、各种Evaluator

首先,加速器返回的小数值,表示的是当前动画的数值进度。无论是利用ofFloat()还是利用ofInt()定义的动画都是适用的。因为无论是什么动画,它的进度必然都是在0到1之间的。0表示没开始,1表示数值运动的结束,对于任何动画都是适用的。 
但Evaluator则不一样,我们知道Evaluator是根据加速器返回的小数进度转换成当前数值进度所对应的值。这问题就来了,如果我们使用ofInt()来定义动画,动画中的值应该都是Int类型,如果我用ofFloat()来定义动画,那么动画中的值也都是Float类型。所以如果我用ofInt()来定义动画,所对应的Evaluator在返回值时,必然要返回Int类型的值。同样,我们如果用ofFloat来定义动画,那么Evaluator在返回值时也必然返回的是Float类型的值。 
所以每种定义方式所对应的Evaluator必然是它专用的;Evaluator专用的原因在于动画数值类型不一样,在通过Evaluator返回时会报强转错误;所以只有在动画数值类型一样时,所对应的Evaluator才能通用。所以ofInt()对应的Evaluator类名叫IntEvaluator,而ofFloat()对应的Evaluator类名叫FloatEvaluator; 
在设置Evaluator时,是通过animator.setEvaluator()来设置的,比如:

[java] view plain copy
  1. ValueAnimator animator = ValueAnimator.ofInt(0,600);  
  2.   
  3. animator.addUpdateListener(new ValueAnimator.AnimatorUpdateListener() {  
  4.     @Override  
  5.     public void onAnimationUpdate(ValueAnimator animation) {  
  6.         int curValue = (int)animation.getAnimatedValue();  
  7.         tv.layout(tv.getLeft(),curValue,tv.getRight(),curValue+tv.getHeight());  
  8.     }  
  9. });  
  10. animator.setDuration(1000);  
  11. animator.setEvaluator(new IntEvaluator());  
  12. animator.setInterpolator(new BounceInterpolator());  
  13. animator.start();  
但大家会说了,在此之前,我们在使用ofInt()时,从来没有给它定义过使用IntEvaluator来转换值啊,那怎么也能正常运行呢?因为ofInt和ofFloat都是系统直接提供的函数,所以在使用时都会有默认的加速器和Evaluator来使用的,不指定则使用默认的;对于Evaluator而言,ofInt()的默认Evaluator当然是IntEvaluator;而FloatEvalutar默认的则是FloatEvalutor; 
上面,我们已经弄清楚Evaluator定义和使用方法,下面我们就来看看IntEvaluator内部是怎么实现的吧:
[java] view plain copy
  1. /** 
  2.  * This evaluator can be used to perform type interpolation between <code>int</code> values. 
  3.  */  
  4. public class IntEvaluator implements TypeEvaluator<Integer> {  
  5.   
  6.     /** 
  7.      * This function returns the result of linearly interpolating the start and end values, with 
  8.      * <code>fraction</code> representing the proportion between the start and end values. The 
  9.      * calculation is a simple parametric calculation: <code>result = x0 + t * (v1 - v0)</code>, 
  10.      * where <code>x0</code> is <code>startValue</code>, <code>x1</code> is <code>endValue</code>, 
  11.      * and <code>t</code> is <code>fraction</code>. 
  12.      * 
  13.      * @param fraction   The fraction from the starting to the ending values 
  14.      * @param startValue The start value; should be of type <code>int</code> or 
  15.      *                   <code>Integer</code> 
  16.      * @param endValue   The end value; should be of type <code>int</code> or <code>Integer</code> 
  17.      * @return A linear interpolation between the start and end values, given the 
  18.      *         <code>fraction</code> parameter. 
  19.      */  
  20.     public Integer evaluate(float fraction, Integer startValue, Integer endValue) {  
  21.         int startInt = startValue;  
  22.         return (int)(startInt + fraction * (endValue - startInt));  
  23.     }  
  24. }  
可以看到在IntEvaluator中只有一个函数(float fraction, Integer startValue, Integer endValue) ; 
其中fraction就是加速器中的返回值,表示当前动画的数值进度,百分制的小数表示。 
startValue和endValue分别对应ofInt(int start,int end)中的start和end的数值; 
比如我们假设当我们定义的动画ofInt(100,400)进行到数值进度20%的时候,那么此时在evaluate函数中,fraction的值就是0.2,startValue的值是100,endValue的值是400;理解上应该没什么难度。 
下面我们就来看看evaluate(float fraction, Integer startValue, Integer endValue) 是如何根据进度小数值来计算出具体数字的:
[java] view plain copy
  1. return (int)(startInt + fraction * (endValue - startInt));  
大家对这个公式是否似曾相识?我们前面提到的公式:
[java] view plain copy
  1. 当前的值 = 100 + (400 - 100)* 显示进度  
是不是与这个公式完全一样?是的,绝逼完全一样啊,计算原理我们在上面已经讲过了,而且根据进度来计算当前数字值本来就是这么算的…… 
在我们看懂了IntEvalutor以后,下面我们尝试自己写一个Evalutor

3、自定义Evalutor

(1)、简单实现MyEvalutor

前面我们看了IntEvalutor的代码,我们仿照IntEvalutor的实现方法,我们自定义一个MyEvalutor: 
首先是实现TypeEvaluator接口:
[java] view plain copy
  1. public class MyEvaluator implements TypeEvaluator<Integer> {  
  2.     @Override  
  3.     public Integer evaluate(float fraction, Integer startValue, Integer endValue) {  
  4.         return null;  
  5.     }  
  6. }  
这里涉及到泛型的概念,不理解的同学可以去看看《夯实JAVA基本之一 —— 泛型详解(1):基本使用》 
在实现TypeEvaluator,我们给它指定它的返回是Integer类型,这样我们就可以在ofInt()中使用这个Evaluator了。再说一遍原因:只有定义动画时的数值类型与Evalutor的返回值类型一样时,才能使用这个Evalutor;很显然ofInt()定义的数值类型是Integer而我们定义的MyEvaluator,它的返回值类型也是Integer;所以我们定义的MyEvaluator可以给ofInt()来用。同理,如果我们把实现的TypeEvaluator填充为为Float类型,那么这个Evalutor也就只能给FloatEvalutor用了。 
屁话了那么多,现在转入正题,我们来简单实现evaluate函数,代码如下:
[java] view plain copy
  1. public class MyEvaluator implements TypeEvaluator<Integer> {  
  2.     @Override  
  3.     public Integer evaluate(float fraction, Integer startValue, Integer endValue) {  
  4.         int startInt = startValue;  
  5.         return (int)(200+startInt + fraction * (endValue - startInt));  
  6.     }  
  7. }  
我们在IntEvaluator的基础上修改了下,让它返回值时增加了200;所以当我们定义的区间是ofInt(0,400)时,它的实际返回值区间应该是(200,600) 
我们看看MyEvaluator的使用:
[java] view plain copy
  1. ValueAnimator animator = ValueAnimator.ofInt(0,400);  
  2.   
  3. animator.addUpdateListener(new ValueAnimator.AnimatorUpdateListener() {  
  4.     @Override  
  5.     public void onAnimationUpdate(ValueAnimator animation) {  
  6.         int curValue = (int)animation.getAnimatedValue();  
  7.         tv.layout(tv.getLeft(),curValue,tv.getRight(),curValue+tv.getHeight());  
  8.     }  
  9. });  
  10. animator.setDuration(1000);  
  11. animator.setEvaluator(new MyEvaluator());  
  12. animator.start();  
设置MyEvaluator前的动画效果: 

然后再看看我们设置了MyEvaluator以后的效果: 


很明显,textview的动画位置都向下移动了200个点; 
再重新看一下下面的这个流程图:


在加速器中,我们可以通过自定义加速器的返回的数值进度来改变返回数值的位置。比如上面我们实现的倒序动画 
在Evaluator中,我们又可以通过改变进度值所对应的具体数字来改变数值的位置。 
所以,结论来了: 
我们可以通过重写加速器改变数值进度来改变数值位置,也可以通过改变Evaluator中进度所对应的数值来改变数值位置。 

源码在文章底部给出 
下面我们就只通过重写Evaluator来实现数值的倒序输出; 

(2)、实现倒序输出实例

我们自定义一个ReverseEvaluator:

[java] view plain copy
  1. public class ReverseEvaluator implements TypeEvaluator<Integer> {  
  2.     @Override  
  3.     public Integer evaluate(float fraction, Integer startValue, Integer endValue) {  
  4.         int startInt = startValue;  
  5.         return (int) (endValue - fraction * (endValue - startInt));  
  6.     }  
  7. }  
其中 fraction * (endValue - startInt)表示动画实际运动的距离,我们用endValue减去实际运动的距离就表示随着运动距离的增加,离终点越来越远,这也就实现了从终点出发,最终运动到起点的效果了。 
使用方法:
[java] view plain copy
  1. ValueAnimator animator = ValueAnimator.ofInt(0,400);  
  2.   
  3. animator.addUpdateListener(new ValueAnimator.AnimatorUpdateListener() {  
  4.     @Override  
  5.     public void onAnimationUpdate(ValueAnimator animation) {  
  6.         int curValue = (int)animation.getAnimatedValue();  
  7.         tv.layout(tv.getLeft(),curValue,tv.getRight(),curValue+tv.getHeight());  
  8.     }  
  9. });  
  10. animator.setDuration(1000);  
  11. animator.setEvaluator(new ReverseEvaluator());  
  12. animator.start();  
效果图: 

源码在文章底部给出

4、关于ArgbEvalutor

1、使用ArgbEvalutor

我们上面讲了IntEvaluator和FloatEvalutor,还说了Evalutor一般来讲不能通用,会报强转错误,也就是说,只有在数值类型相同的情况下,Evalutor才能共用。 
其实除了IntEvaluator和FloatEvalutor,在android.animation包下,还有另外一个Evalutor叫ArgbEvalutor。 
ArgbEvalutor是用来做颜色值过渡转换的。可能是谷歌的开发人员觉得大家对颜色值变换可能并不知道要怎么做,所以特地给我们提供了这么一个过渡Evalutor; 
我们先来简单看一下ArgbEvalutor的源码:(这里先不做具体讲解原理,最后会讲原理,这里先会用)

[java] view plain copy
  1. public class ArgbEvaluator implements TypeEvaluator {  
  2.     public Object evaluate(float fraction, Object startValue, Object endValue) {  
  3.         int startInt = (Integer) startValue;  
  4.         int startA = (startInt >> 24);  
  5.         int startR = (startInt >> 16) & 0xff;  
  6.         int startG = (startInt >> 8) & 0xff;  
  7.         int startB = startInt & 0xff;  
  8.   
  9.         int endInt = (Integer) endValue;  
  10.         int endA = (endInt >> 24);  
  11.         int endR = (endInt >> 16) & 0xff;  
  12.         int endG = (endInt >> 8) & 0xff;  
  13.         int endB = endInt & 0xff;  
  14.   
  15.         return (int)((startA + (int)(fraction * (endA - startA))) << 24) |  
  16.                 (int)((startR + (int)(fraction * (endR - startR))) << 16) |  
  17.                 (int)((startG + (int)(fraction * (endG - startG))) << 8) |  
  18.                 (int)((startB + (int)(fraction * (endB - startB))));  
  19.     }  
  20. }  
我们在这里关注两个地方,第一返回值是int类型,这说明我们可以使用ofInt()来初始化动画数值范围。第二:颜色值包括A,R,G,B四个值,每个值是8位所以用16进制表示一个颜色值应该是0xffff0000(纯红色) 
下面我们就使用一下ArgbEvaluator,并看看效果:
[java] view plain copy
  1. ValueAnimator animator = ValueAnimator.ofInt(0xffffff00,0xff0000ff);  
  2. animator.setEvaluator(new ArgbEvaluator());  
  3. animator.setDuration(3000);  
  4.   
  5. animator.addUpdateListener(new ValueAnimator.AnimatorUpdateListener() {  
  6.     @Override  
  7.     public void onAnimationUpdate(ValueAnimator animation) {  
  8.         int curValue = (int)animation.getAnimatedValue();  
  9.         tv.setBackgroundColor(curValue);  
  10.   
  11.     }  
  12. });  
  13.   
  14. animator.start();  
在这段代码中,我们将动画的数据范围定义为(0xffffff00,0xff0000ff),即从黄色,变为蓝色。 
在监听中,我们根据当前传回来的颜色值,将其设置为textview的背景色 
我们来看一下效果: 

源码在文章底部给出 
到这里,我们就已经知道ArgbEvalutor的使用方法和效果了,下面我们再来回头看看ArgbEvalutor的实现方法 

2、ArgbEvalutor的实现原理

先重新看源码:

[java] view plain copy
  1. /** 
  2.  * This evaluator can be used to perform type interpolation between integer 
  3.  * values that represent ARGB colors. 
  4.  */  
  5. public class ArgbEvaluator implements TypeEvaluator {  
  6.   
  7.     /** 
  8.      * This function returns the calculated in-between value for a color 
  9.      * given integers that represent the start and end values in the four 
  10.      * bytes of the 32-bit int. Each channel is separately linearly interpolated 
  11.      * and the resulting calculated values are recombined into the return value. 
  12.      * 
  13.      * @param fraction The fraction from the starting to the ending values 
  14.      * @param startValue A 32-bit int value representing colors in the 
  15.      * separate bytes of the parameter 
  16.      * @param endValue A 32-bit int value representing colors in the 
  17.      * separate bytes of the parameter 
  18.      * @return A value that is calculated to be the linearly interpolated 
  19.      * result, derived by separating the start and end values into separate 
  20.      * color channels and interpolating each one separately, recombining the 
  21.      * resulting values in the same way. 
  22.      */  
  23.     public Object evaluate(float fraction, Object startValue, Object endValue) {  
  24.         int startInt = (Integer) startValue;  
  25.         int startA = (startInt >> 24);  
  26.         int startR = (startInt >> 16) & 0xff;  
  27.         int startG = (startInt >> 8) & 0xff;  
  28.         int startB = startInt & 0xff;  
  29.   
  30.         int endInt = (Integer) endValue;  
  31.         int endA = (endInt >> 24);  
  32.         int endR = (endInt >> 16) & 0xff;  
  33.         int endG = (endInt >> 8) & 0xff;  
  34.         int endB = endInt & 0xff;  
  35.   
  36.         return (int)((startA + (int)(fraction * (endA - startA))) << 24) |  
  37.                 (int)((startR + (int)(fraction * (endR - startR))) << 16) |  
  38.                 (int)((startG + (int)(fraction * (endG - startG))) << 8) |  
  39.                 (int)((startB + (int)(fraction * (endB - startB))));  
  40.     }  
  41. }  
英文注释的那一坨大家有兴趣,可以看已看看,我这里就直接讲代码了 
这段代码分为三部分,第一部分根据startValue求出其中A,R,G,B中各个色彩的初始值;第二部分根据endValue求出其中A,R,G,B中各个色彩的结束值,最后是根据当前动画的百分比进度求出对应的数值 
我们先来看第一部分:根据startValue求出其中A,R,G,B中各个色彩的初始值
[java] view plain copy
  1. int startInt = (Integer) startValue;  
  2. int startA = (startInt >> 24);  
  3. int startR = (startInt >> 16) & 0xff;  
  4. int startG = (startInt >> 8) & 0xff;  
  5. int startB = startInt & 0xff;  
这段代码就是根据位移和与运算求出颜色值中A,R,G,B各个部分对应的值;颜色值与ARGB值的对应关系如下: 

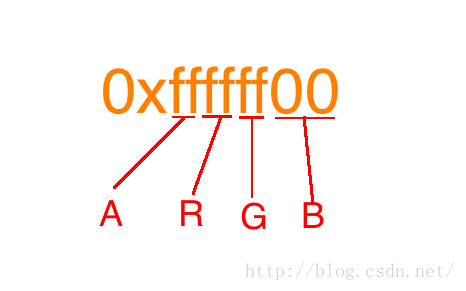
所以我们的初始值是0xffffff00,那么求出来的startA = 0xff,startR = oxff,startG = 0xff,startB = 0x00; 
关于通过位移和与运算如何得到指定位的值的问题,我就不再讲了,大家如果不理解,可以搜一下相关运算符使用方法的文章。 
同样,我们看看第二部分根据endValue求出其中A,R,G,B中各个色彩的结束值:

[java] view plain copy
  1. int endInt = (Integer) endValue;  
  2. int endA = (endInt >> 24);  
  3. int endR = (endInt >> 16) & 0xff;  
  4. int endG = (endInt >> 8) & 0xff;  
  5. int endB = endInt & 0xff;  
原理与startValue求A,R,G,B对应值的一样,所以对于我们上面例子中初始值ofInt(0xffffff00,0xff0000ff)中的endValue:0xff0000ff所对应的endA = 0xff,endR = ox00;endG = 0x00;endB = 0xff; 
最后一部分到了,就是如何根据进度来求得变化的值,我们先看看下面这句是什么意思:
[java] view plain copy
  1. startA + (int)(fraction * (endA - startA)))  
对于这个公式大家应该很容易理解,与IntEvaluator中的计算公式一样,就是根据透明度A的初始值、结束值求得当前进度下透明度A应该的数值。 
同理 
startR + (int)(fraction * (endR - startR)表示当前进度下的红色值 
startG + (int)(fraction * (endG - startG))表示当前进度下的绿色值 
startB + (int)(fraction * (endB - startB))表示当前进度下的蓝色值 
然后通过位移和或运算将当前进度下的A,R,G,B组合起来就是当前的颜色值了。

好了,到这里,有关加速器和Evaluator的知识就讲完了,对于ValueAnimator还有一些知识没来得及讲,这篇文章已经很长了,就另开一篇来讲解吧

如果本文有帮到你,记得加关注哦

源码下载地址:

csdn:http://download.csdn.net/detail/u013210620/9420356
github:https://github.com/harvic/BlogResForGitHub

请大家尊重原创者版权,转载请标明出处: http://blog.csdn.net/harvic880925/article/details/50546884谢谢

posted @ 2016-08-31 11:48  vegatate  阅读(451)  评论(0编辑  收藏  举报