基于mykernel 2.0编写一个操作系统内核
一.实验目的及要求
- 按照https://github.com/mengning/mykernel 的说明配置mykernel 2.0,熟悉Linux内核的编译;
- 2.,参照https://github.com/mengning/mykernel 提供的范例代码
- 简要分析操作系统内核核心功能及运行工作机制
二.实验环境配置
ubuntu系统 版本号 18.04.3 64位
三.实验内容
1.配置mykernel2.0
执行下列指令
wget https://raw.github.com/mengning/mykernel/master/mykernel-2.0_for_linux-5.4.34.patch
(改为:wget https://raw.githubusercontent.com/mengning/mykernel/master/mykernel-2.0_for_linux-5.4.34.patch)
浏览器中输入对应网址,发现无法打开对应网址,如下:
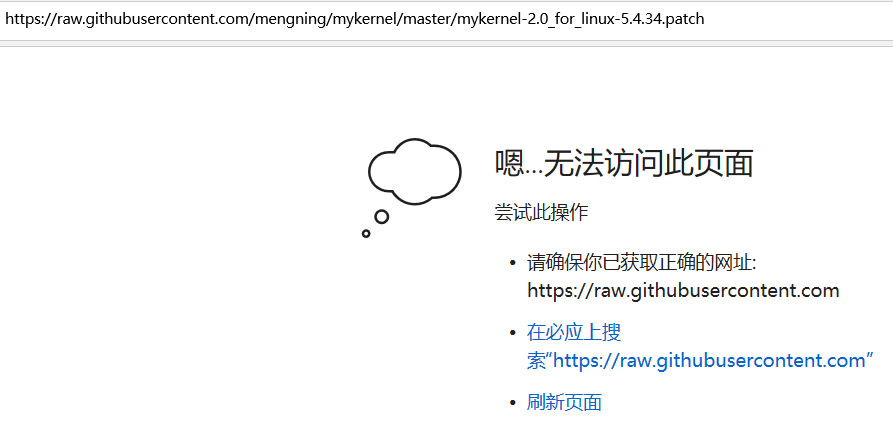
这是由于Github的raw文件读取地址遭受DNS污染,导致文件下载困难,相应解决办法,linux系统中输入以下命令:
sudo vi /etc/hosts
在打开的文件中加入下面一行:
199.232.68.133 raw.githubusercontent.com

i进入编辑模式,ESC退出模式,:wq!强制保存即可,此时可以正常访问对应网址了,结果如下:
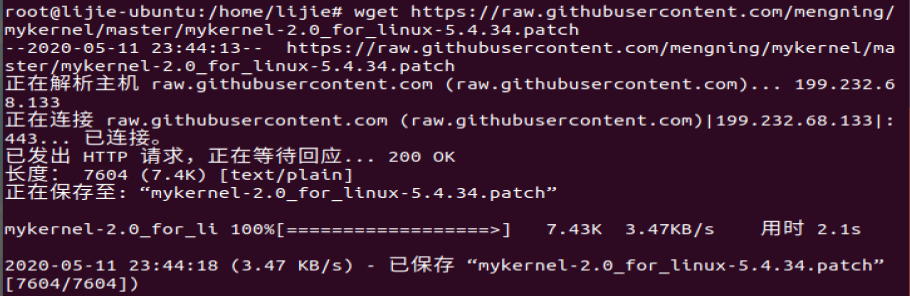
接下来输入以下命令,国内网速不稳定,多次尝试,耐心重连。。。。
sudo apt install axel axel -n 20 https://mirrors.edge.kernel.org/pub/linux/kernel/v5.x/linux-5.4.34.tar.xz xz -d linux-5.4.34.tar.xz tar -xvf linux-5.4.34.tar cd linpatch -p1 < ../mykernel-2.0_for_linux-5.4.34.patch#打补丁
sudo apt install build-essential libncurses-dev bison flex libssl-dev libelf-dev#安装编译器
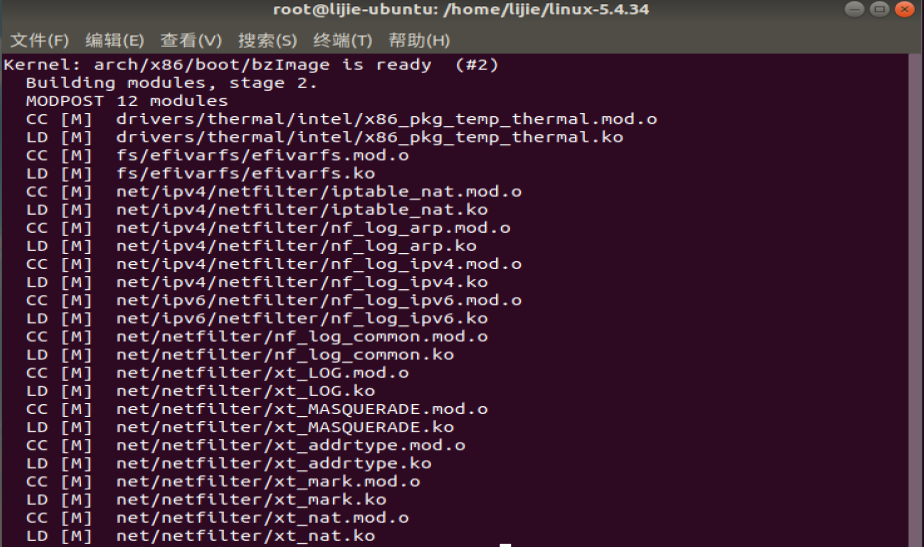
make defconfig # 编译
make -j$(nproc) # 编译的时间比较久
获得下列结果:
输入下列命令:
sudo apt install qemu # install QEMU
qemu-system-x86_64 -kernel arch/x86/boot/bzImage
获得如下结果:
2.基于mykernel 2.0编写操作系统内核
qemu窗口反映的输出的内容的代码mymain.c和myinterrupt.c,打开这两份代码如下:
//mymain.c代码:
void __init my_start_kernel(void)
{
    int i = 0;
    while(1)
    {
        i++;
        if(i%100000 == 0)
            pr_notice("my_start_kernel here  %d \n",i);

    }
}
//myinterrupt.c
void my_timer_handler(void)
{
    pr_notice("\n>>>>>>>>>>>>>>>>>my_timer_handler here<<<<<<<<<<<<<<<<<<\n\n");
}
(1).在mymain.c基础上继续写进程描述PCB和进程链表管理等代码:
首先,如果文件夹没有权限,无法新建或者修改文件,使用如下命令:
chmod -R 777 linux-5.4.34#-R参数,将读写权限传递给子文件夹,777表示读、写、执行权限
在mykernel目录下增加一个mypcb.h 头文件,用来定义进程控制块(Process Control Block),也就是进程结构体。
#define MAX_TASK_NUM        4
#define KERNEL_STACK_SIZE   1024*2

/* CPU-specific state of this task */
struct Thread {
    unsigned long        ip;
    unsigned long        sp;
};

typedef struct PCB{
    int pid;
    volatile long state;    /* -1 unrunnable, 0 runnable, >0 stopped */
    unsigned long stack[KERNEL_STACK_SIZE];

    /* CPU-specific state of this task */

    struct Thread thread;
    unsigned long    task_entry;
    struct PCB *next;
}tPCB;

void my_schedule(void);
PCB结构体中的各个字段含义如下
pid:进程号
state:进程状态,-1表示就绪态,0表示运行态,大于0表示阻塞态
stack:进程使用的堆栈
thread:当前正在执行的线程信息
task_entry:进程入口函数
next:指向下一个PCB,系统中所有的PCB是以链表的形式组织起来的。
对mymain.c中的my_start_kernel函数进行修改,并在mymain.c中实现了my_process函数,用来作为进程的代码模拟一个个进程,时间片轮转调度,修改后代码如下:
#include <linux/types.h>
#include <linux/string.h>
#include <linux/ctype.h>
#include <linux/tty.h>
#include <linux/vmalloc.h>
#include "mypcb.h"

tPCB task[MAX_TASK_NUM];
tPCB * my_current_task = NULL;

volatile int my_need_sched = 0;

void my_process(void);

void __init my_start_kernel(void)

{
    int pid = 0;
    int i;

    /* Initialize process 0*/

    task[pid].pid = pid;
    task[pid].state = 0;/* -1 unrunnable, 0 runnable, >0 stopped */
    task[pid].task_entry = task[pid].thread.ip = (unsigned long)my_process;
    task[pid].thread.sp = (unsigned long)&task[pid].stack[KERNEL_STACK_SIZE-1];
    task[pid].next = &task[pid];

    /*fork more process */

    for(i=1;i<MAX_TASK_NUM;i++)
    {
        memcpy(&task[i],&task[0],sizeof(tPCB));
        task[i].pid = i;
        task[i].thread.sp = (unsigned long)(&task[i].stack[KERNEL_STACK_SIZE-1]);
        task[i].next = task[i-1].next;
        task[i-1].next = &task[i];
    }

    /* start process 0 by task[0] */

    pid = 0;
    my_current_task = &task[pid];
    asm volatile(
        "movq %1,%%rsp\n\t"     /* set task[pid].thread.sp to rsp */
        "pushq %1\n\t"             /* push rbp */
        "pushq %0\n\t"             /* push task[pid].thread.ip */
        "ret\n\t"                 /* pop task[pid].thread.ip to rip */
        :
        : "c" (task[pid].thread.ip),"d" (task[pid].thread.sp)    /* input c or d mean %ecx/%edx*/
    );
}

int i = 0;
void my_process(void)

{
    while(1)
    {
        i++;
        if(i%10000000 == 0)
        {
            printk(KERN_NOTICE "this is process %d -\n",my_current_task->pid);
            if(my_need_sched == 1)
            {
                my_need_sched = 0;
                my_schedule();
            }
            printk(KERN_NOTICE "this is process %d +\n",my_current_task->pid);
        }
    }
}
(2).在myinterrupt.c的基础上完成进程切换代码
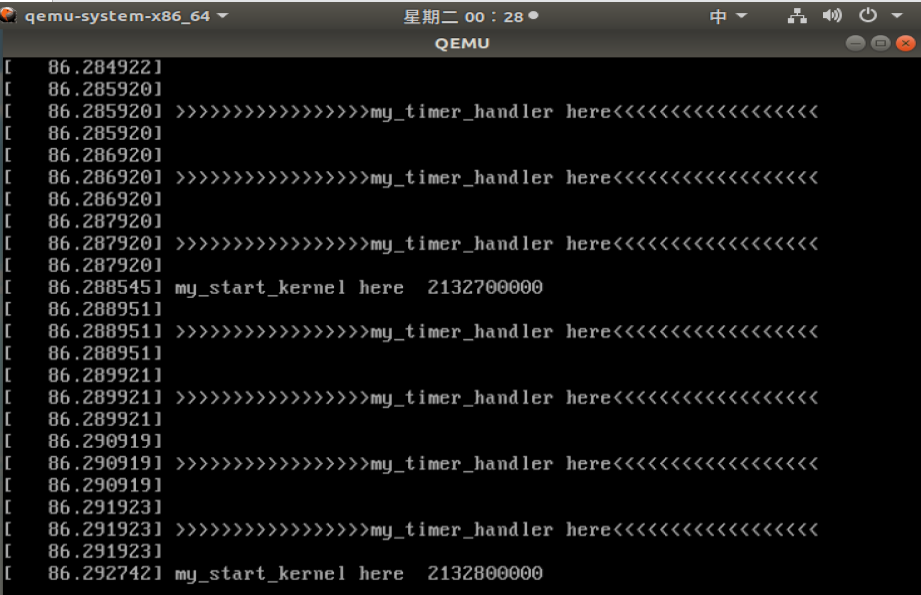
修改完成后重新编译,运行结果如下:
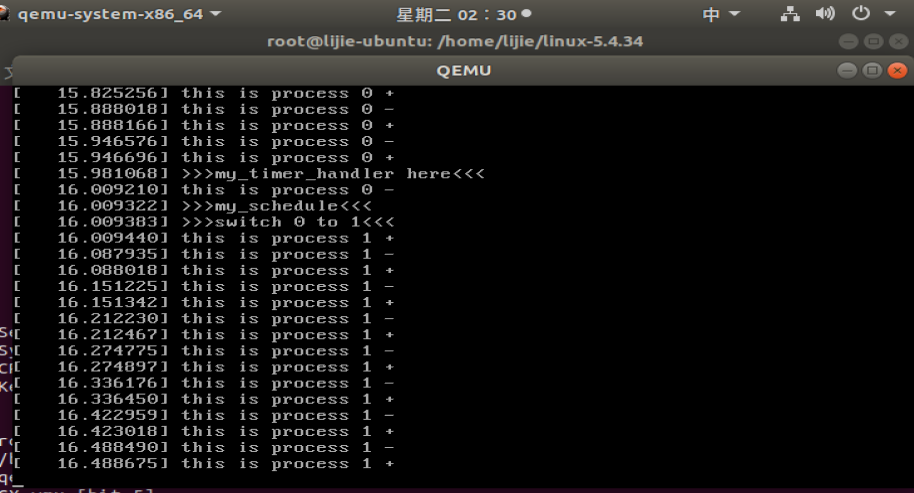
3.简要分析操作系统内核核心功能及运行工作机制
系统工作机制简要分析:
系统启动后,首先运行mymain.c中的my_start_kernel函数,里面是一个while(1) 循环,永远执行下去。然后是myinterrupt.c,里面的my_timer_handler 函数会被内核周期性的调用,每调用1000次,就去将全局变量my_need_sched的值修改为1,my_start_kernel中的while循环发现my_need_sched值变为1后,就进行进程的调度,完成进程的切换,如此往复。
核心代码:
/* switch to next process */
        asm volatile(
            "pushq %%rbp\n\t"         /* save rbp of prev */
            "movq %%rsp,%0\n\t"     /* save rsp of prev */
            "movq %2,%%rsp\n\t"     /* restore  rsp of next */
            "movq $1f,%1\n\t"       /* save rip of prev */
            "pushq %3\n\t"
            "ret\n\t"                 /* restore  rip of next */
            "1:\t"                  /* next process start here */
            "popq %%rbp\n\t"
            : "=m" (prev->thread.sp),"=m" (prev->thread.ip)
            : "m" (next->thread.sp),"m" (next->thread.ip)
        );
分析:
pushq %%rbp 保存prev进程(本例中指进程0)当前RBP寄存器的值到prev进程的堆栈;
movq %%rsp,%0 保存prev进程(本例中指进程0)当前RSP寄存器的值到prev->thread.sp,这时RSP寄存器指向进程的栈顶地址,实际上就是将prev进程的栈顶地址保存;%0、%1...指这段汇编代码下面输入输出部分的编号。
movq %2,%%rsp 将next进程的栈顶地址next->thread.sp放入RSP寄存器,完成了进程0和进程1的堆栈切换。
movq $1f,%1 保存prev进程当前RIP寄存器值到prev->thread.ip,这里$1f是指标号1,恢复进程后从此执行。
pushq %3 把即将执行的next进程的指令地址next->thread.ip入栈。
ret 就是将压入栈中的next->thread.ip放入rip寄存器,rip寄存器现在存储next进程的指令。
1: next进程开始执行的位置。
popq %%rbp 将next进程堆栈基地址从堆栈中恢复到RBP寄存器中。

 浙公网安备 33010602011771号