Vue高级跨域问题插件 ,session混入
- # 1 vue项目目录介绍
myfirstvue                    #项目名字
    node_modules              # 文件夹,内部有很多当前项目依赖的模块,可以删除,npm install
    public                    #文件夹
        -favicon.ico           # 网站小图标
        -index.html            # spa:单页面应用
    src                       #以后咱们写代码,都在这下面
    	-assets                # 静态资源,js,css,图片  类似于static文件夹
    		logo.png          # 静态资源的图片
    	-components           # 组件:小组件,用在别的大(页面组件)组件中
    		-HelloWorld.vue   # 默认了一个hello world组件
    	-router                    # 装了vue-router自动生成的,如果不装就没有
    		index.js              # vue-router的配置
    	-store                # 装了vuex自动生成的,如果不装就没有
    		index.js          # vuex的配置
    	-views                # 放了一堆组件,页面组件
            AboutView.vue     # 关于 页面组件
            HomeView.vue      # 主页  页面组件
    	-App.vue              # 根组件
    	-main.js              # 整个项目启动入口
    .gitignore                #git的忽略文件
    babel.config.js           #babel的配置
    jsconfig.json
    package.json              # 重要:类似于python项目的requirements.txt  当前项目所有依赖
    package-lock.json         #锁定文件:package.json中写了依赖的版本,这个文件锁定所有版本
    README.md                 # 读我,项目的介绍
    vue.config.js             # vue项目的配置文件
2 es6的导入导出语法
# 如果要导入,必须先导出
	-默认导出
    -命名导出
# 默认导出写法
	1 写一个js ,在js中定义变量,函数,最后使用export defalut 导出
    export default {
        name: '彭于晏',
        printName () {
            console.log(this.name)
        }
    }
    2 在想使用的js中,导入
    import 随便起 from './lqz/utils'


#命名导出和导入
    1 写一个js ,在js中定义变量,函数,最后使用export  导出
    export const name = '刘亦菲'
    export const printName = () => {
        console.log('星象衔新宠')
    }
    2 在想使用的js中,导入
    import {printName} from './lqz/utils'


# 在包下可以建立一个名为index.js 的文件,以后导入的时候,会默认找它
	-对比python中得__init__.py
vue项目开发规范
# 以后写的组件,都是单页面组件  使用 xx.vue 以后写一个组件就是一个xx.vue,页面组件
小组件
# 以后一个组件就是一个xx.vue,内部都有三部分
	-<template></template>  # html内容写在里面
    -<script></script>      # 写js内容
    -<style></style>        # 写css样式
# main.js 是整个入口
1 把App.vue根组件导入了,
2 使用new Vue({render: h => h(App)}).$mount('#app') 把App.vue组件中得数据和模
版插入到了index.html的id为app  div中了
3 以后,只要在每个组件的export default {} 写之前学过的所有js的东西
4 以后,只要在每个组件的template,写模板,插值语法,指令。。
5 以后,只要在每个组件的style,写样式
vue项目集成axios,vue项目前后端打通,简单跨域解决
axios发请求到后端如果成功会执行.then(res=>{成功执行的逻辑})失败执行.catch(error=>{失败执行的逻辑})
# 安装axios
	-npm install axios --S

# 导入使用

	import axios from 'axios'

# 发送请求,获取数据
    axios.get('http://127.0.0.1:8000/books/').then(res => {
      console.log(res.data)
      this.bookList=res.data
    }).catch(errors => {
    show.value = true;
    setTimeout(function () {
      show.value = false
    }, 2500)  // 失败的话显示错误信息定时清除
  })

# 先用这种方式解决跨域(django 项目)
	1 pip3 install django-cors-headers
    2 app中注册:
        INSTALLED_APPS = (
            ...
            'corsheaders',
            ...
        )
    3 中间件注册
        MIDDLEWARE = [
        ...
        'corsheaders.middleware.CorsMiddleware',
        ...
        ]
    4 把下面的复制到配置文件中
        CORS_ORIGIN_ALLOW_ALL = True
        CORS_ALLOW_METHODS = (
            'DELETE',
            'GET',
            'OPTIONS',
            'PATCH',
            'POST',
            'PUT',
            'VIEW',
        )
        CORS_ALLOW_HEADERS = (
            'XMLHttpRequest',
            'X_FILENAME',
            'accept-encoding',
            'authorization',
            'content-type',
            'dnt',
            'origin',
            'user-agent',
            'x-csrftoken',
            'x-requested-with',
            'Pragma',
        )
props配置项
# 接受父传子自定义的属性
	-1 数组写法
    -2 对象对象写法
    -3 对象套对象写法

# 写法总结
  // 普通使用
  // props: ['msg'],
  //属性验证
  // props: {msg: String},
  // 指定类型,必填和默认值
  props: {
    msg: {
      type: String, //类型
      required: true, //必要性
      default: '老王' //默认值
    }
  },
混入
# mixin(混入) 可以把多个组件共用的配置提取成一个混入对象
	把多个组件中公用的东西,抽取出来,以后可以全局使用和局部使用
# 使用步骤
	-1 写个mixin/index.js
    export const hunhe = {
        data() {
        return {
          name: '彭于晏'
        }
      },
        methods: {
            handlePrintName() {
                alert(this.name)
            }
        },
    }
    -2 局部导入:在组件中
    import {hunhe} from "@/mixin";
    mixins:[hunhe,]

    -3 全局使用,在main.js 中  以后所有组件都可以用
    import {hunhe} from "@/mixin";
	Vue.mixin(hunhe)
插件
# 功能:用于增强Vue
本质:包含install方法的一个对象,install的第一个参数是Vue,第二个以后的参数是插件使
用者传递的数据

# 使用步骤
	-写一个 plugins/index.js
    import Vue from "vue";
    import axios from "axios";
    import {hunhe} from '@/mixin'
    export default {
        install(miVue) {
            // console.log(miVue)
            // 1 vue 实例上放个变量
            // Vue.prototype.$name = 'lqz'  // 类比python,在类上放了一个属性,
所有对象都能取到
            // Vue.prototype.$ajax = axios

            // 2 使用插件,加入混入
            // 全局使用混入
            // Vue.mixin(hunhe)


            // 3 定义全局组件
	import Login from '@/views/LoginView' //需要倒入组件在注册
	//定义全局组件 在插件中定义 写一个组件注册 使用插件全局即可使用该组件
	Vue.component('login',Login)

            // 4 定义自定义指令  v-lqz
            Vue.directive("fbind", {
                //指令与元素成功绑定时(一上来)
                bind(element, binding) {
                    element.value = binding.value;
                },
                //指令所在元素被插入页面时
                inserted(element, binding) {
                    element.focus();
                },
                //指令所在的模板被重新解析时
                update(element, binding) {
                    element.value = binding.value;
                },
            });

        }
    }

    2 在main.js 中使用插件
    import plugins from '@/plugins'
	Vue.use(plugins)  // 本子,使用use,会自动触发插件对象中得install

    3 以后再组件中可以直接用插件中写的东西
scoped样式
在styple上写 ,以后只针对于当前组件生效
localStorage和sessionStorage
- 存数据localStorage.setItem('userinfo', JSON.stringify(person))
- 取数据let userinfo = localStorage.getItem('userinfo')
- 删除数据 localStorage.removeItem('userinfo')
# window 浏览器对象有的东西
# 如果想在浏览器中存储数据,
	永久存储:localStorage   不登录加购物车,没登录 搜索过的商品
    关闭页面数据就没了(临时存储):sessionStorage
    设定一个时间,到时候就过期:cookie


 # 补充:序列化和反序列化
      // 对象转json字符串
      // JSON.stringify(person)
      // json字符串转对象
      // JSON.parse()
<template>
  <div id="app">
    <h1>localStorage操作</h1>
    <button @click="saveStorage">点我向localStorage放数据</button>
    <button @click="getStorage">点我获取localStorage数据</button>
    <button @click="removeStorage">点我删除localStorage放数据</button>

    <h1>sessionStorage操作</h1>
    <button @click="saveSessionStorage">点我向localStorage放数据</button>
    <button @click="getSessionStorage">点我获取localStorage数据</button>
    <button @click="removeSessionStorage">点我删除localStorage放数据</button>

    <h1>cookie操作</h1>
    <button @click="saveCookie">点我向localStorage放数据</button>
    <button @click="getCookie">点我获取localStorage数据</button>
    <button @click="removeCookie">点我删除localStorage放数据</button>
  </div>
</template>


<script>
import cookies from 'vue-cookies'

export default {
  name: 'App',
  data() {
    return {}
  },
  methods: {
    saveStorage() {
      var person = {
        name: '彭于晏',
        age: 38
      }
      localStorage.setItem('userinfo', JSON.stringify(person))
    },
    getStorage() {
      let userinfo = localStorage.getItem('userinfo')
      console.log(userinfo)
      console.log(typeof userinfo)
    },
    removeStorage() {
      // localStorage.clear()
      localStorage.removeItem('userinfo')
    },

    saveSessionStorage() {
      var person = {
        name: '彭于晏',
        age: 38
      }
      sessionStorage.setItem('userinfo', JSON.stringify(person))
    },
    getSessionStorage() {
      let userinfo = sessionStorage.getItem('userinfo')
      console.log(userinfo)
      console.log(typeof userinfo)
    },
    removeSessionStorage() {
      // localStorage.clear()
      sessionStorage.removeItem('userinfo')
    },

    saveCookie() {
      cookies.set('name','lqz','7d')  // 按秒计
    },
    getCookie() {
      console.log(cookies.get('name'))
    },
    removeCookie() {

      cookies.remove('name')
    }
  }


}
</script>

<style scoped>
h1 {
  background-color: aqua;
}
</style>
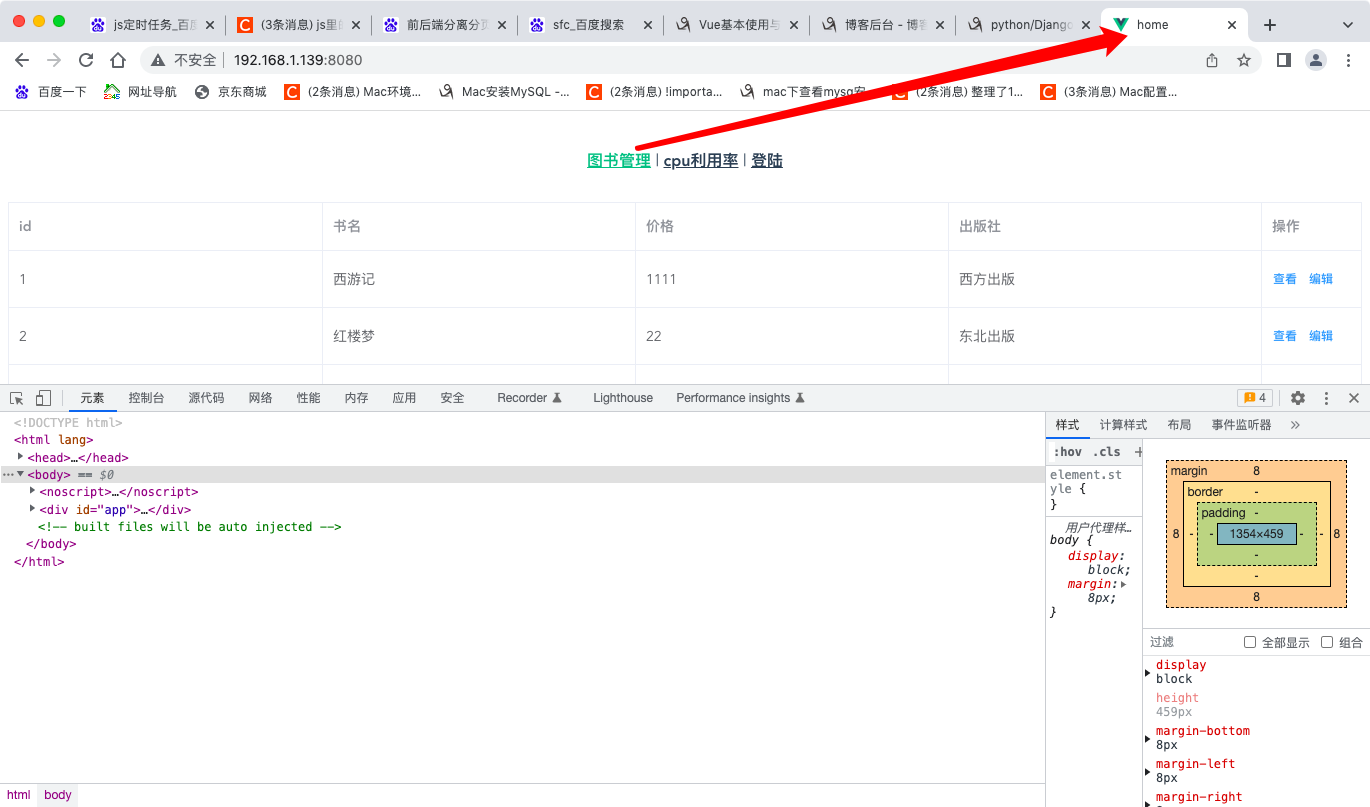
element 组件使用案列
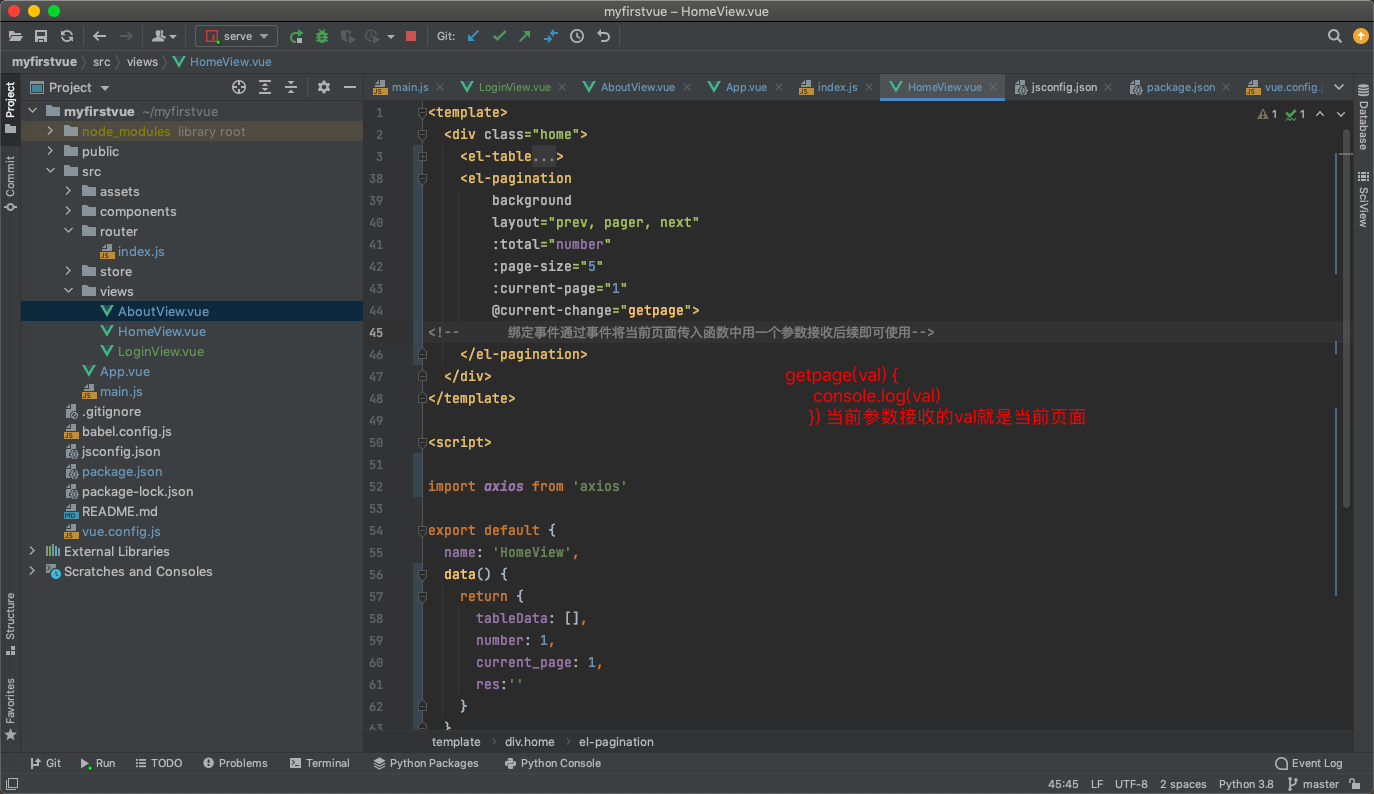
- 分页使用
<template>
  <div class="home">
    <el-table
        :data="tableData"
        border
        style="width: 100%">
      <el-table-column
          fixed
          prop="id"
          label="id"
      >
      </el-table-column>
      <el-table-column
          prop="title"
          label="书名"
      >
      </el-table-column>
      <el-table-column
          prop="price"
          label="价格"
      >
      </el-table-column>
      <el-table-column
          prop="publish"
          label="出版社"
      >
      </el-table-column>
      <el-table-column
          fixed="right"
          label="操作"
          width="100">
        <template slot-scope="scope">
          <el-button @click="handleClick(scope.row)" type="text" size="small">查看</el-button>
          <el-button type="text" size="small">编辑</el-button>
        </template>
      </el-table-column>
    </el-table>
    <el-pagination
        background
        layout="prev, pager, next"
        :total="number"所有数据条数通过后端传入后统计一下
        :page-size="5" 每页显示几条数据
        :current-page="1"当前页面
        @current-change="getpage">
<!--      绑定事件通过事件将当前页面传入函数中用一个参数接收后续即可使用-->
    </el-pagination>
  </div>
</template>

<script>

import axios from 'axios'

export default {
  name: 'HomeView',
  data() {
    return {
      tableData: [],
      number: 1,
      current_page: 1,
      res:''
    }
  },
  //组件加载好朝后端发送ajax请求获取数据
  created() {
    axios.get('http://127.0.0.1:8000/books/').then(res => {
      console.log(res.data)
      this.res = res.data
      this.tableData = res.data.slice(0,5)
      this.number = res.data.length
      console.log(this.number)
    })
  },
  methods: {
    getpage(val) {
      console.log(val)
      this.tableData = this.res.slice((val-1)*5,val*5)
    }
  }
}
</script>
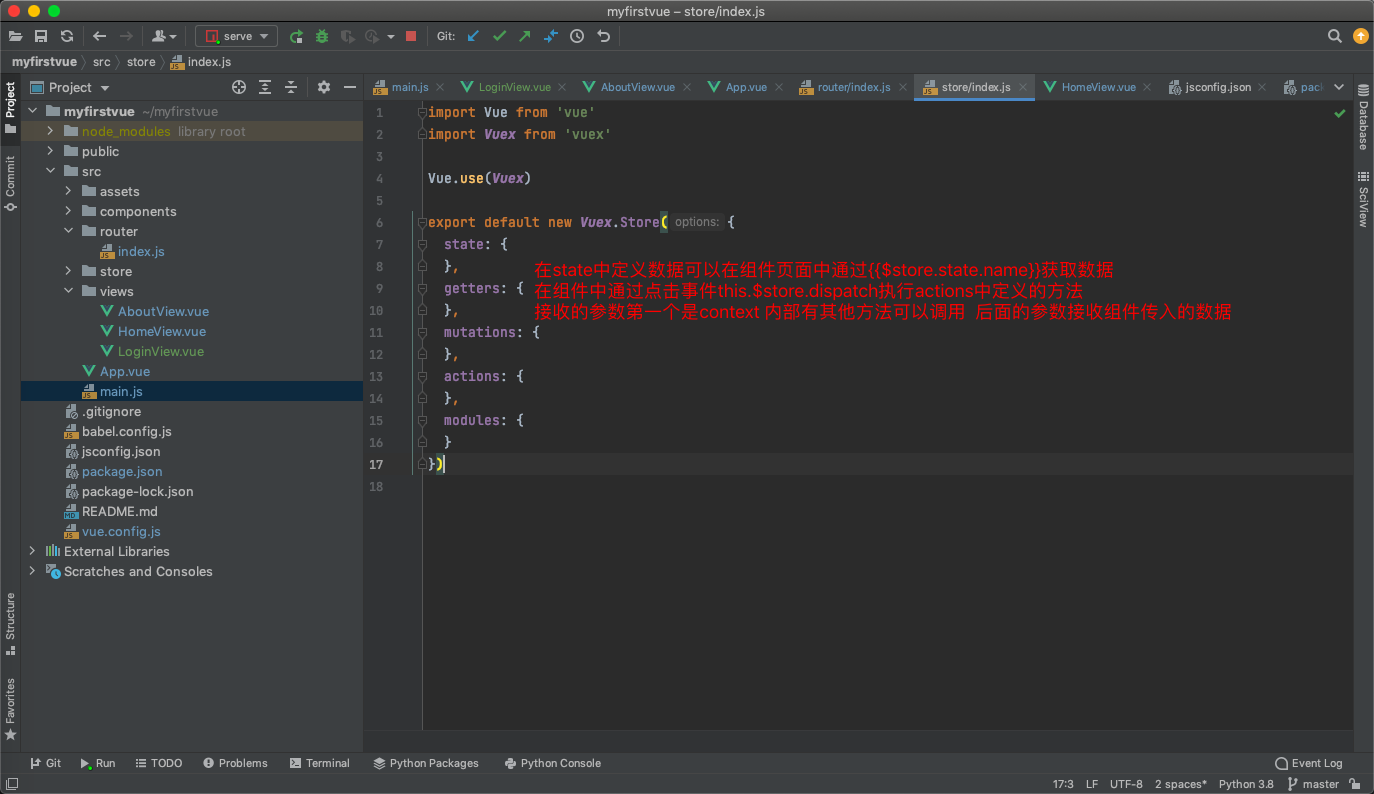
Vuex的简单使用
# vue的插件,增强了vue的功能,
在Vue中实现集中式状态(数据)管理的一个Vue插件,对vue应用中多个组件的共享状态进行
集中式的管理(读/写),也是一种组件间通信的方式,且适用于任意组件间通信

# Vuex的使用流程
	-state:存数据的地址
    -actions:服务员,中转站
    -mutations:厨师,真正改state数据的地方

    -使用步骤:
1 在state中定义变量
2在组件中通过this.$store.dispatch('actions中定义的函数'),触发actions中的函数执行
3 在actions中得函数中,调用 context.commit('mutations中定义的函数')
4 在mutations中定义的函数实现真正的修改state中得数据
5 页面中只要使用$store.state.变量,变量变化,页面就变化  实现了组件间通信
6 注意:
        	-在组件中可以直接调用commit触发【mutations中定义的函数】
            -在组件中可以直接修改state中定义变量
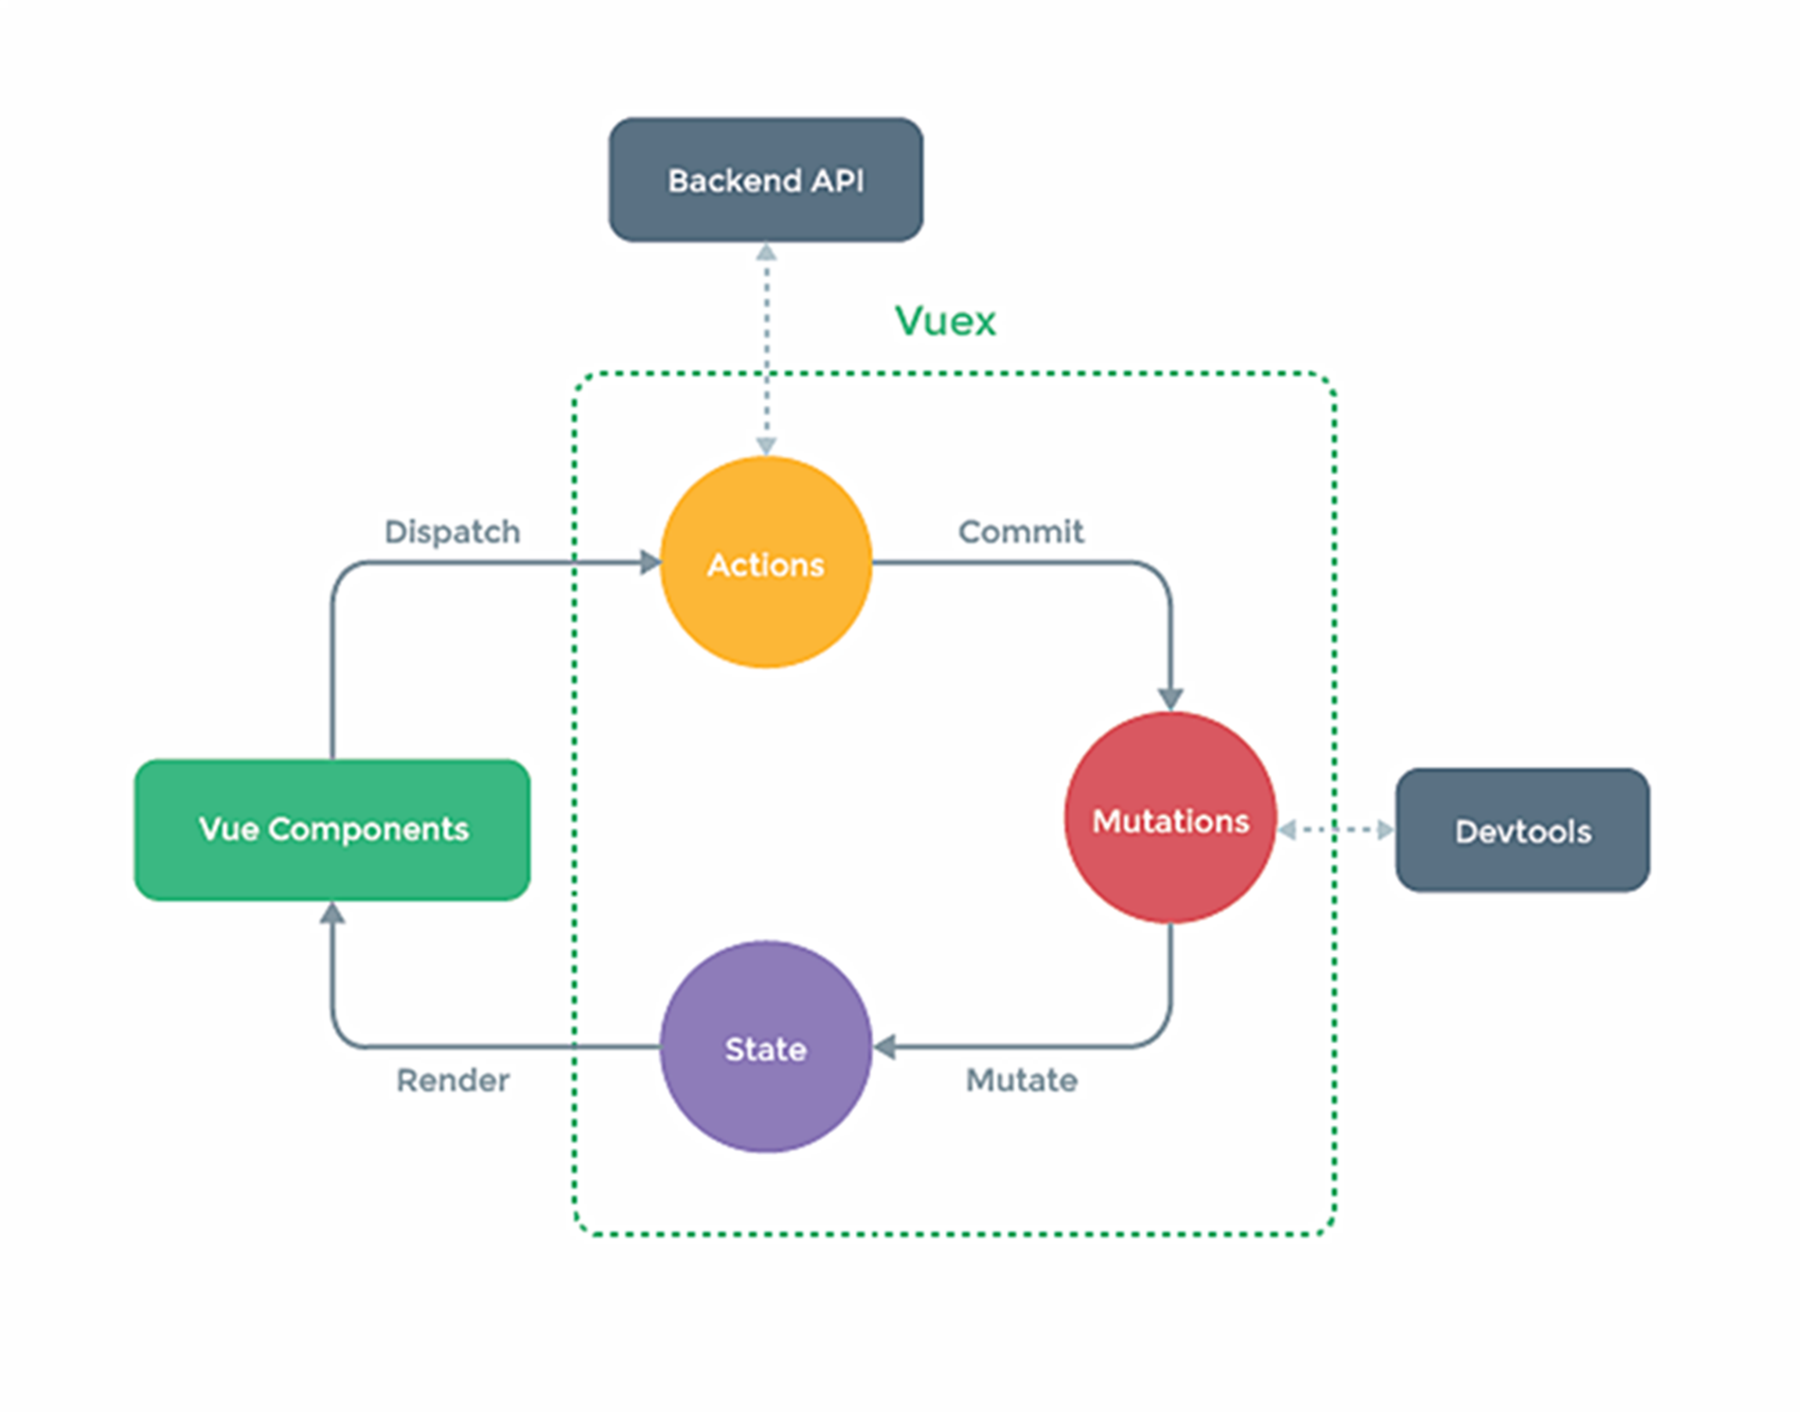
- vuex工作原理与流程
- Vue组件(action里面的dispatch )--> actions(commit方法) -->mutations(Mutate)--> state(getter) -->store更新所有调用vuex的组件(Vue Component组件)
调用方法的顺序参照下图 通过this.$store.xxxx()来执行
![image]()
1、state
存储应用状态数据的对象,与vue组件中data类似
state的值可以是对象,也可以是返回对象的函数
通过store.state访问状态数据

注意:

使用函数的方式返回对象,每次返回的都是新的实例对象,而它们的引用地址不同,就避免了修改data数据时,组件相互影响的问题。
state更新了视图却没有更新,钩子函数未触发导致。使用computed来解决


2、getters
从state中派生的状态数据
接收state作为第一个参数,第二个为可选参数
类似组件中的 computed,派生数据,在数据出门后进行的加工(对原数据再加工,计算后的结果),这些处理都在getters中


3、mutations
提交mutation来修改store中的状态,同步操作
每个mutation都有一个字符串事件类型(type)与一个回调函数(handler),在回调函数中修改状态

注意:

  (1)不能直接去调用mutation的回调函数,需要当mutation类型为increment时,才能调用此函数
  (2)mutation必须是同步的
  (3)在store中初始化时设置好所有的属性


4、actions
与mutations类似,提交修改state的行为,处理异步任务
注意:

  (1)提交的是mutation,不是直接修改状态
  (2)可以包含任意异步操作


5、modules
将store分割成模块
每个模块拥有自己的 state、mutation、action、getters,
模块还可以嵌套子模块——从上至下进行类似的分割
注意:

  (1)将当前业务所需内容 封装到独立的js文件中,以对象的形式导出
  (2)在index.js(主控), 的modules中 注册模块
  (3)组件中使用具体方法时,需要注意语法规范
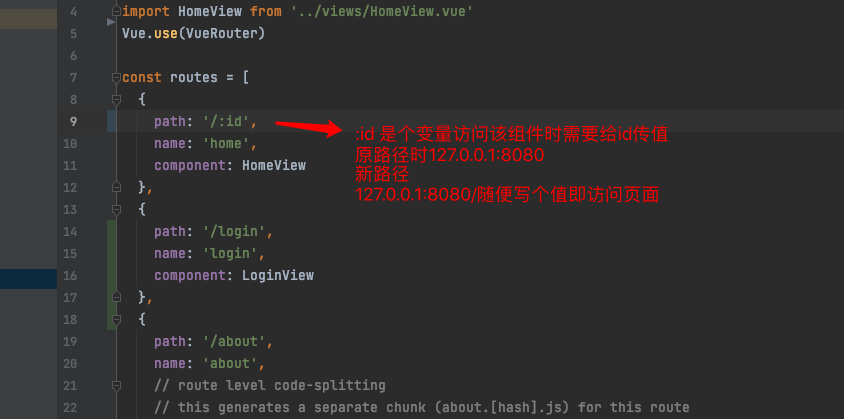
Vue router 使用
基本使用
# 使用步骤
1 新建router/index.js
const routes = [配置路由1,配置路由2]
2 main.js中使用:之前已经写好了
import router from './router'
new Vue({
...
router,
...
}).$mount('#app')
3 只需要写页面组件,配置路由即可
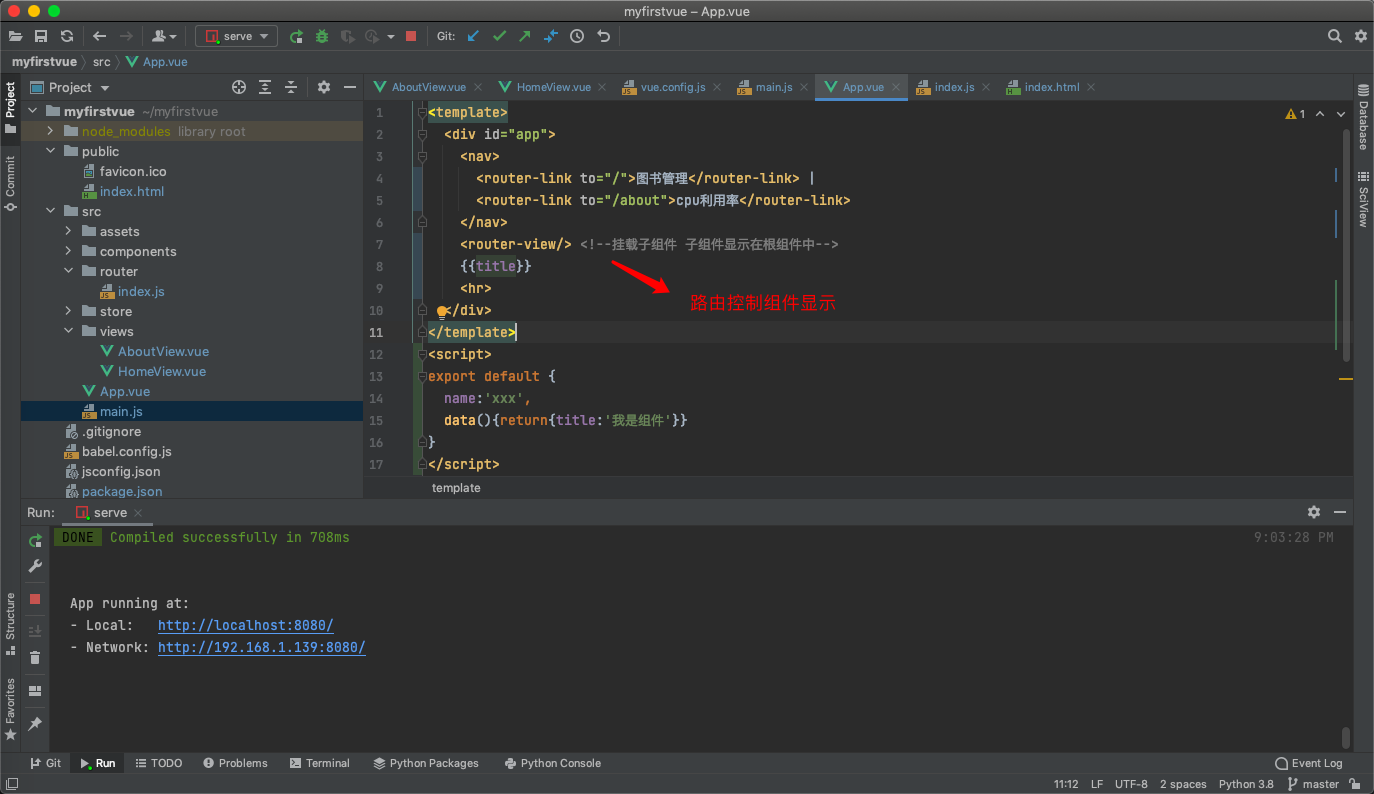
4 在App.vue中加入
<router-link to="/">图书管理</router-link> | to写router路由中path的
路径前面可以不写斜杠直接写后面的路径
<router-link to="about">cpu利用率</router-link>|
<router-view>
</router-view>
简写 <router-view/> 可以直接显示
5 在浏览器访问const routes中配置的路径,就能看到对应的页面组件了
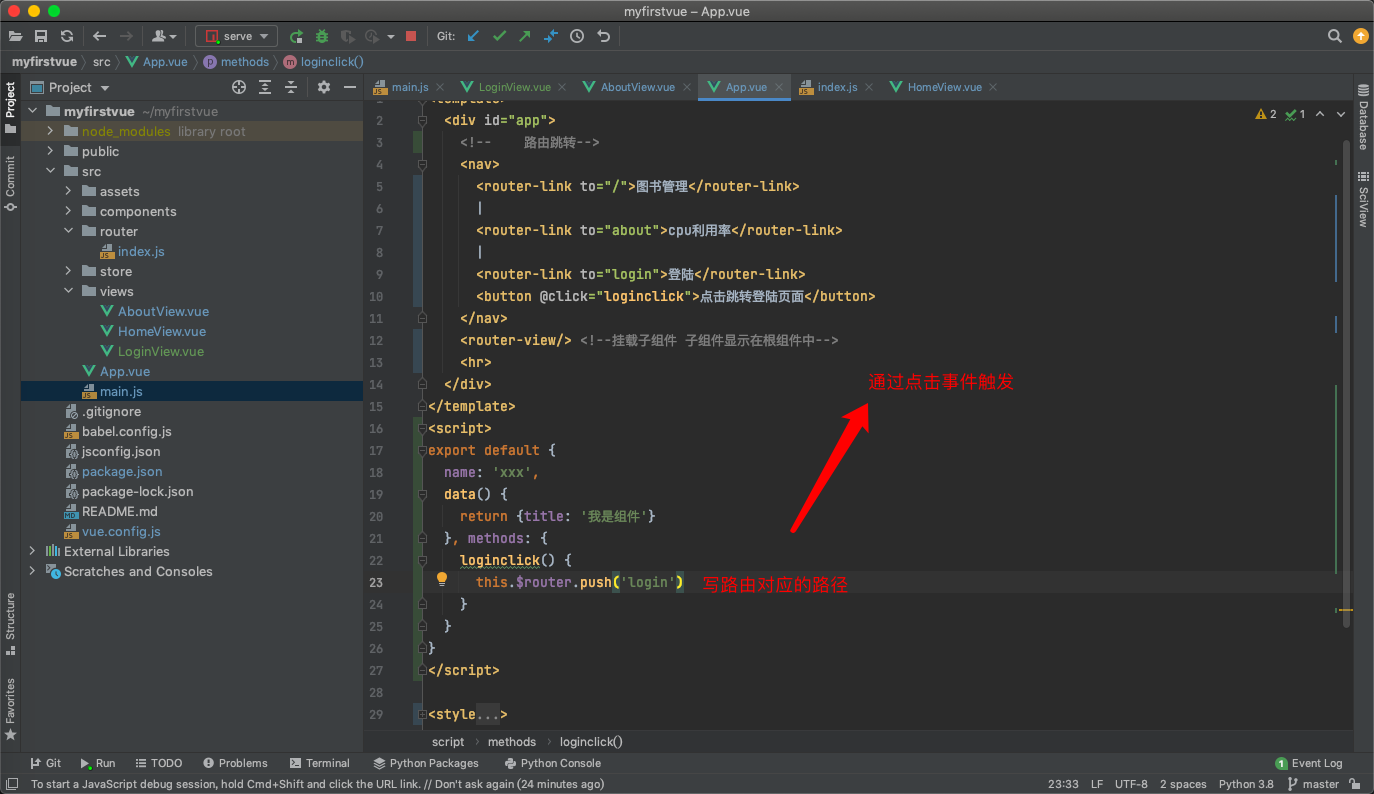
路由跳转
方式一
通过a标签跳转 不建议使用
方式二
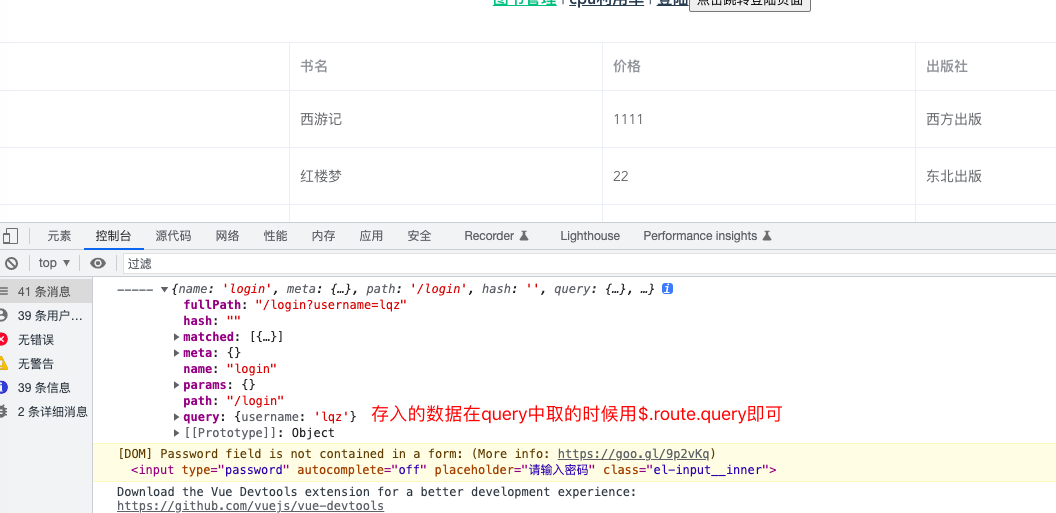
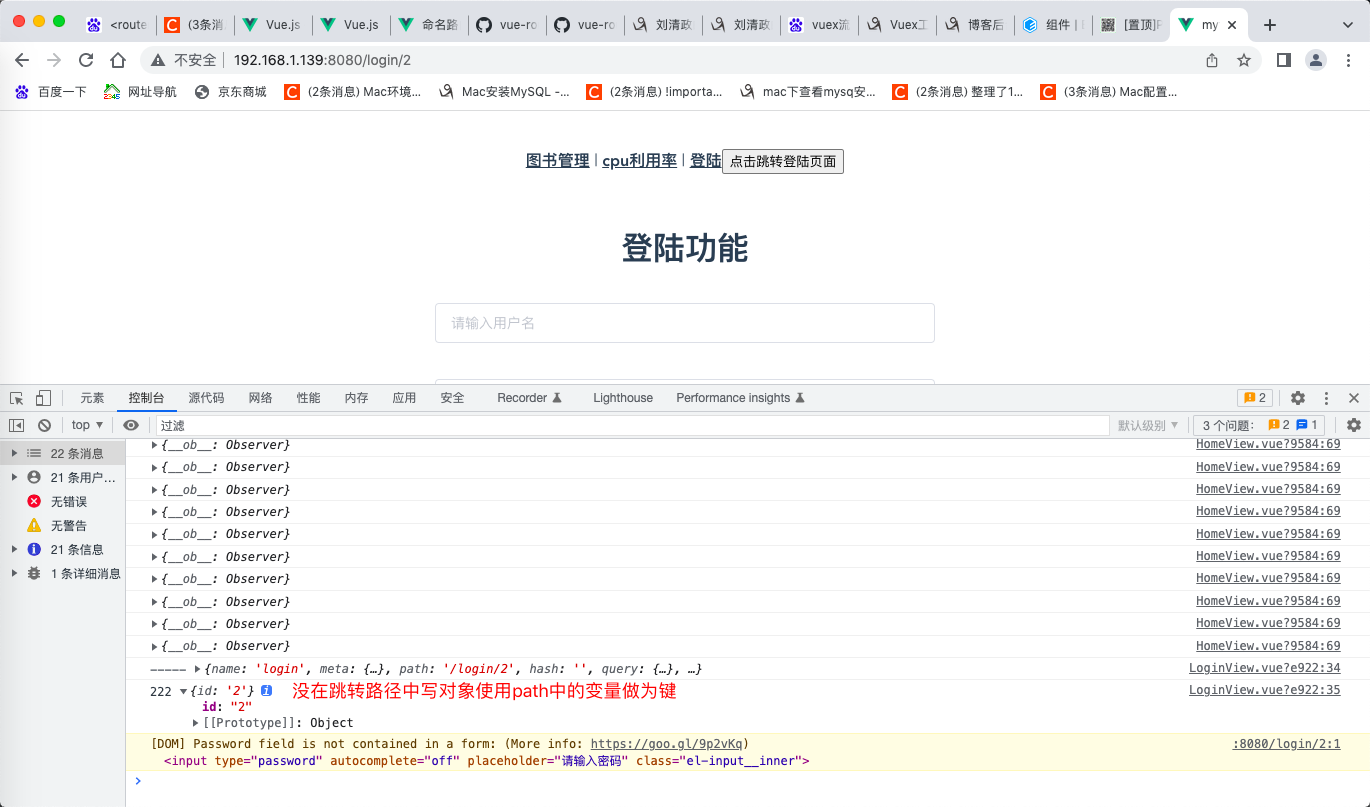
<router-link :to="{name:'home',query:{username:'lqz'}}">图书管理</router-link>
 <router-link to="/home/?name=lqz">图书管理</router-link>
带数据跳转
在跳转之后的页面接收使用this.$route.query取出放入的数据
<router-link :to="{ name: 'user', params: { username: 'erina' }}">
router.push({ name: 'user', params: { username: 'erina' } })
以上两个将导航到
/user/erina/
<template>
<div id="app">
<!-- 路由跳转to=路径 直接跳转当前所写路径-->
<nav>
<router-link to="/">图书管理</router-link> |
<router-link to="about">cpu利用率</router-link>|
<router-link to="login">登陆</router-link>
</nav>
<router-view/> <!--挂载子组件 子组件显示在根组件中-->
<hr>
</div>
</template>
<script>
export default {
name:'xxx',
data(){return{title:'我是组件'}}
}
</script>
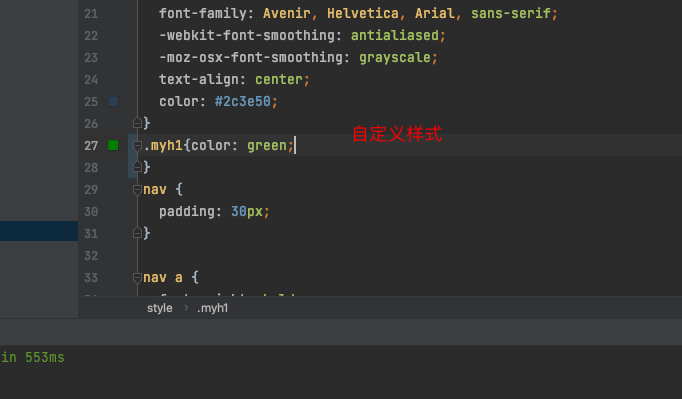
<style>
#app {
font-family: Avenir, Helvetica, Arial, sans-serif;
-webkit-font-smoothing: antialiased;
-moz-osx-font-smoothing: grayscale;
text-align: center;
color: #2c3e50;
}
.myh1{color: green;
}
nav {
padding: 30px;
}
nav a {
font-weight: bold;
color: #2c3e50;
}
nav a.router-link-exact-active {
color: #42b983;
}
</style>
- 路由嵌套
# 使用步骤:
	1 router/index.js 相应的路由中
        {
            path: '/goods',
            name: 'goods',
            component: Goods,
            children: [
                {
                    path: 'list',
                    component: GoodList
                },
                {
                    path: 'detail',
                    component: GoodDetail
                }
            ]

        },
     2 必须要在Goods组件中,写<router-view></router-view>
     3 使用在组件中写router-link标签跳转
     4 只会变更Goods下router-view包裹的位置
路由守卫
//前置守卫
router.beforeEach((to, from, next) => {

    if (to.name == 'about') {
        let name = localStorage.getItem('name')
        if (name) {
            next()
			//进入页面后将当前权限清除 一旦离开需要重新登陆验证权限
        } else {
            alert('不好意思没有权限')
        }
    } else {
        next()
    }})
后置守卫
router.afterEach((to,from)=>{
  document.title = to.name
}) //路由后置守卫 访问什么页面就显示to.name的值
后置守卫的应用
- localStorage.setItem("name",'lqz')//成功将localStorage存入浏览器用于验证登陆之后才能进入的组件页面值可以通过后端传入的数据进行是否有权限的验证 如果没有则不存储localStorage

 浙公网安备 33010602011771号