搭建LNMP环境
### 一、搭建环境
1.1 软件版本
mysql-5.7.26
nginx-1.18.0
php-8.0.5
mysql是二进制安装,其他都为源码安装
1.2 下载地址
https://cdn.mysql.com/archives/mysql-5.7/mysql-5.7.26-linux-glibc2.12-x86_64.tar.gz
http://nginx.org/download/nginx-1.18.0.tar.gz
https://www.php.net/distributions/php-8.0.5.tar.gz
二、安装MySQL
1、移除系统原有的maridb
rpm -qa|grep mariadb
rpm -qa | grep mysql
yum remove -y mariadb-libs-5.5.64-1.el7.x86_64
2、安装依赖包
yum install -y cmake make gcc gcc-c++ wget ncurses-devel cmake make \
perl ncurses-devel openssl-devel bison-devel libaio libaio-devel
3、解压
tar -zvxf mysql-5.7.26-linux-glibc2.12-x86_64.tar.gz -C /usr/local/ && \
mkdir -p /usr/local/mysql5.7/data
mv  /usr/local/mysql-5.7.26-linux-glibc2.12-x86_64/* /usr/local/mysql5.7/
rm -rf /usr/local/mysql-5.7.26-linux-glibc2.12-x86_64/
4、创建MySQL用户跟组,修改目录权限
修改数据库目录权限,注意data目录也要修改,我的data目录就在该目录下
groupadd mysql
useradd -M -s /sbin/nologin -r -g mysql mysql
chown -R mysql:mysql /usr/local/mysql5.7/
5、设置环境变量
echo 'export PATH=/usr/local/mysql5.7/bin:$PATH' >> /etc/profile
source /etc/profile
6、初始化mysql,记住最后输出的初始密码!
/usr/local/mysql5.7/bin/mysqld --initialize --user=mysql \
--basedir=/usr/local/mysql5.7/ \
--datadir=/usr/local/mysql5.7/data/ \
--user=mysql
7、修改配置文件
cat >/etc/my.cnf <<EOF
[mysqld]
user=mysql
basedir=/usr/local/mysql5.7  #根据实际情况修改路径
datadir=/usr/local/mysql5.7/data #根据实际情况修改路径
socket=/tmp/mysql.sock
server_id=6
port=3306
[mysql]
socket=/tmp/mysql.sock
EOF
8、设置sysv方式启动数据库
cp /usr/local/mysql5.7/support-files/mysql.server /etc/init.d/mysqld
chmod +x /etc/init.d/mysqld

vim /etc/init.d/mysqld
basedir=/usr/local/mysql5.7  #在第46~47行
datadir=/usr/local/mysql5.7/data  #注意此行需要根据实际情况修改路径
9、启动数据库
killall mysqld
/etc/init.d/mysqld start
#或者service mysqld restart
10、判断数据库服务是否启动
netstat -lnp|grep 3306
ps -ef |grep 3306
ps -ef |grep mysql
11、修改MySQL密码
mysql -uroot -pjdxtt1Qvzh-R  #这里是初始密码
mysql> alter user 'root'@'localhost' identified by "root";
mysql -uroot -proot
三、安装Nginx
1、安装依赖包
yum install -y gcc-c++ \
pcre pcre-devel \
zlib zlib-devel \
openssl openssl-devel \
gd gd-devel \
perl perl-ExtUtils-Embed \
libxml2 libxslt-devel \
GeoIP-devel

#查看是否安装依赖包
rpm -qa pcre pcre-devel
2、创建nginx用户和组
groupadd nginx
useradd -M -s /sbin/nologin -r -g nginx nginx
3、编译安装
tar -zxvf nginx-1.18.0.tar.gz &&
cd nginx-1.18.0
./configure --prefix=/usr/local/nginx \
--with-file-aio \
--with-http_auth_request_module \
--with-http_ssl_module \
--with-http_v2_module \
--with-http_realip_module \
--with-http_addition_module \
--with-http_xslt_module=dynamic \
--with-http_geoip_module=dynamic \
--with-http_sub_module \
--with-http_dav_module \
--with-http_flv_module \
--with-http_mp4_module \
--with-http_gunzip_module \
--with-http_gzip_static_module \
--with-http_random_index_module \
--with-http_secure_link_module \
--with-http_degradation_module \
--with-http_slice_module \
--with-http_stub_status_module \
--with-http_perl_module=dynamic \
--with-pcre \
--with-pcre-jit \
--with-stream=dynamic \
--with-stream_ssl_module \
--with-mail \
--with-mail_ssl_module \
--user=nginx \
--group=nginx
注意:如果配置检查报错,缺少相关依赖包,可使用yum搜索未安装的包进行安装
#以GeoIP为例
yum search GeoIP
yum install -y GeoIP-devel
5、编译安装,修改目录权限
make && make install
chown -R nginx:nginx /usr/local/nginx
6、加入全局变量
echo 'export PATH=/usr/local/nginx/sbin:$PATH' >> /etc/profile.d/nginx.sh
source /etc/profile
7、启动Nginx
#启动服务
nginx

#指定配置文件启动主程序
nginx -c /usr/local/nginx/conf/nginx.conf

#重启Nginx
nginx -s stop #或者killall nginx
nginx
#不重启服务,重新加载配置文件
nginx -s reload

#关闭Nginx
nginx -s stop #强制
nginx -s quit #缓和

#检查配置文件语法
nginx -t -c /usr/local/nginx/conf/nginx.conf
nginx -t
8、查看服务是否运行
nginx -v #查看版本
nginx -V #查看版本,可显示开启的模块

ps -ef | grep nginx
netstat -lnt|grep 80

yum -y install lsof
lsof -i :80
四、安装PHP
1、安装依赖包
yum -y install php-mcrypt libmcrypt libmcrypt-devel autoconf freetype gd libmcrypt libpng libpng-devel libjpeg libxml2 libxml2-devel zlib curl curl-devel re2c php-pear sqlite-devel oniguruma oniguruma-devel
2、解压
cd ~/soft/ && tar -zxvf php-8.0.5.tar.gz
3、编译安装
cd php-8.0.5
./configure --prefix=/usr/local/php \
--with-config-file-path=/usr/local/php/ --enable-fpm \
--with-mysqli=mysqlnd --with-pdo-mysql=mysqlnd \
--with-iconv-dir --with-freetype-dir \
--with-jpeg-dir --with-png-dir --with-zlib \
--with-libxml-dir=/usr --enable-xml --disable-rpath \
--enable-bcmath --enable-shmop --enable-sysvsem \
--enable-inline-optimization --with-curl \
--enable-mbregex --enable-mbstring --with-mcrypt \
--enable-ftp --with-gd --enable-gd-native-ttf \
--with-openssl --with-mhash --enable-pcntl \
--enable-sockets --with-xmlrpc --enable-zip \
--enable-soap --without-pear --with-gettext \
--disable-fileinfo --enable-maintainer-zts

make && make install

#修改目录权限
chown -R nginx:nginx /usr/local/php
注意:检查配置过程中会有一些未能识别的模块,这个根据版本的不同,模块有可能被废弃不能识别。
具体可参考:PHP编译参数说明
4、复制配置文件
cd /root/soft/php-8.0.5
cp php.ini-production /usr/local/php/php.ini
cp /usr/local/php/etc/php-fpm.d/www.conf.default /usr/local/php/etc/php-fpm.conf
5、修改php-fpm配置文件中的运行用户和运行组为nginx
vim /usr/local/php/etc/php-fpm.conf
user = nginx  #第23~24行,nobody改为nginx
group = nginx
6、生成php-fpm启动脚本,并添加开机自启
cp sapi/fpm/init.d.php-fpm /etc/init.d/php-fpm
chmod +x /etc/init.d/php-fpm
chkconfig --add php-fpm  #添加到chkconfig管理中
7、启动php-fpm
/etc/init.d/php-fpm start #启动php-fpm
/etc/init.d/php-fpm status #查看php-fpm状态
8、修改Nginx配置让其支持php文件
vim /usr/local/nginx/conf/nginx.conf
        location ~ \.php$ {  #第65~71行
            root           html;
            fastcgi_pass   127.0.0.1:9000;
            fastcgi_index  index.php;
            fastcgi_param  SCRIPT_FILENAME  $document_root$fastcgi_script_name;  #只修改这一行
            include        fastcgi_params;
        }
#重启
nginx -s reload
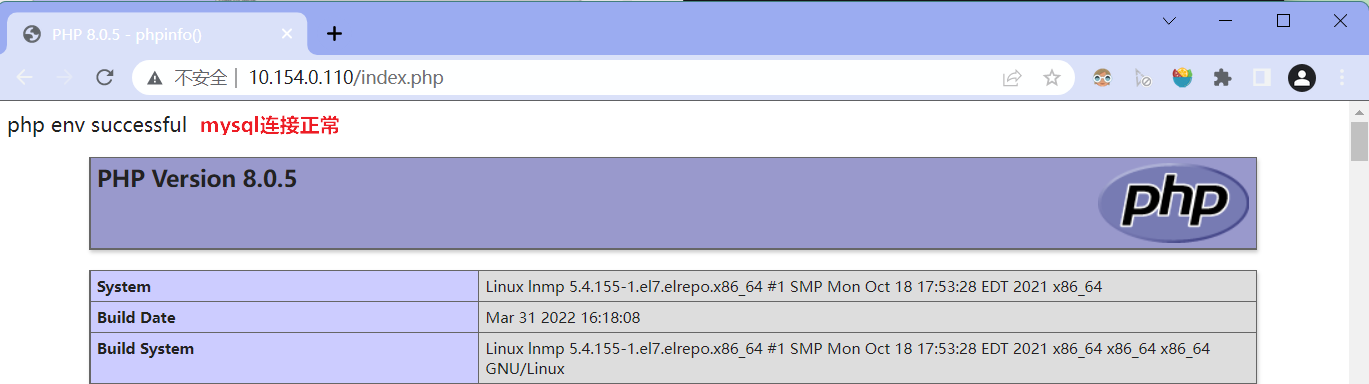
9、测试
vim /usr/local/nginx/html/index.php
<?php
	$mysqli = new mysqli("localhost", "root", "root");
	if(!$mysqli) {
		echo"database error";
	}else{
		echo"php env successful";
	}
	$mysqli->close();
	phpinfo();
?>
五、下载截图
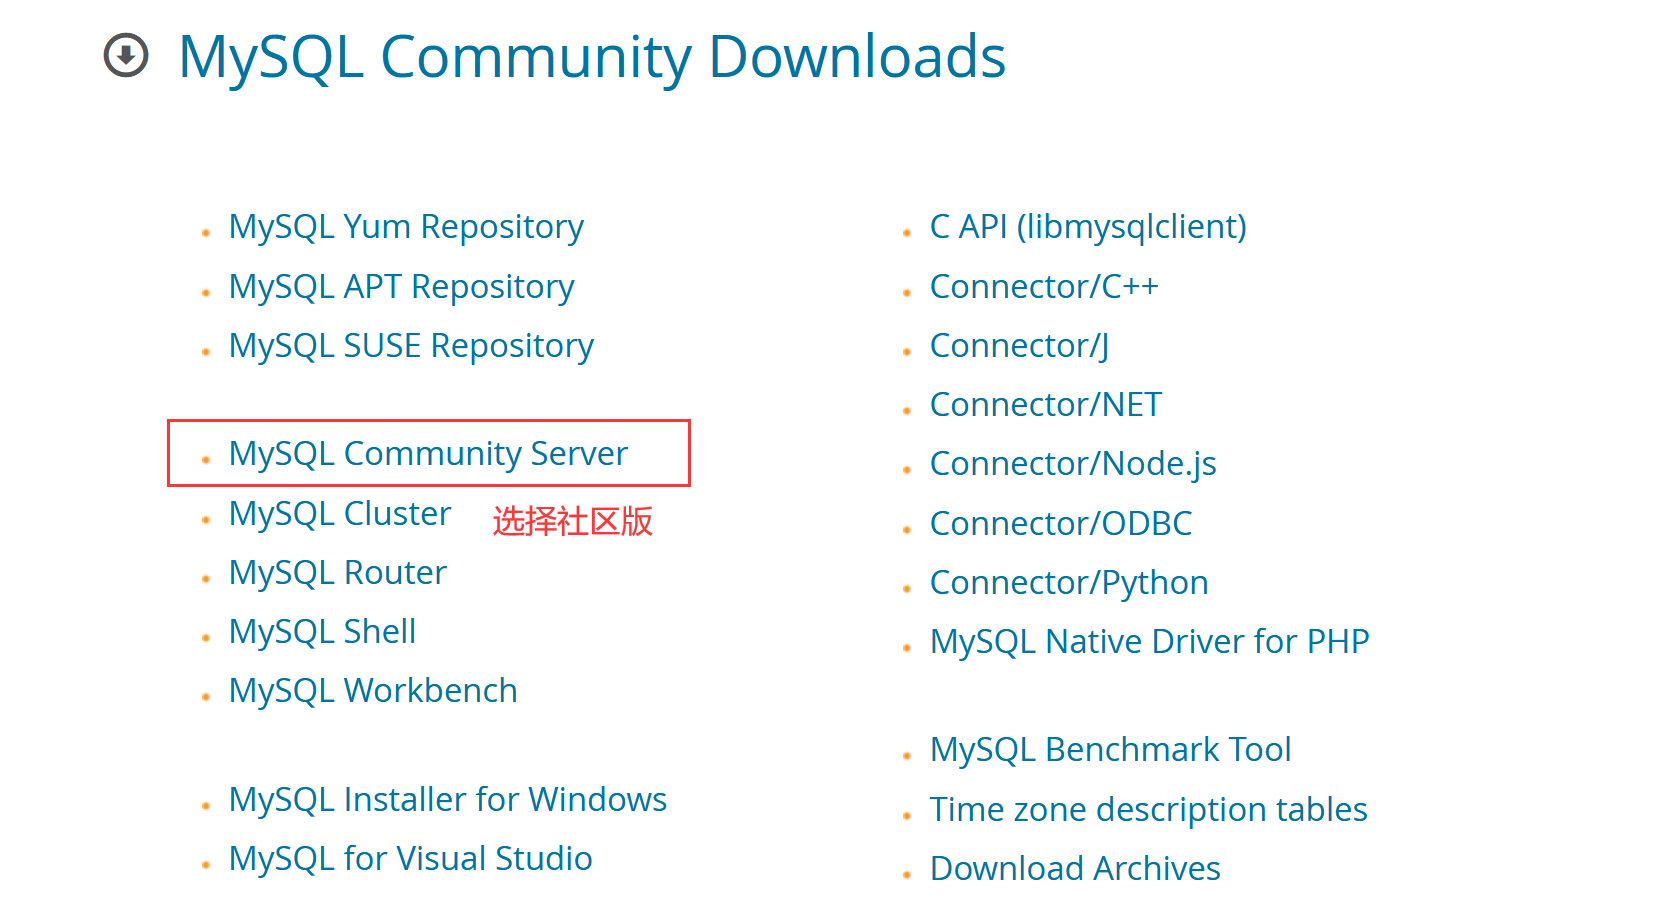
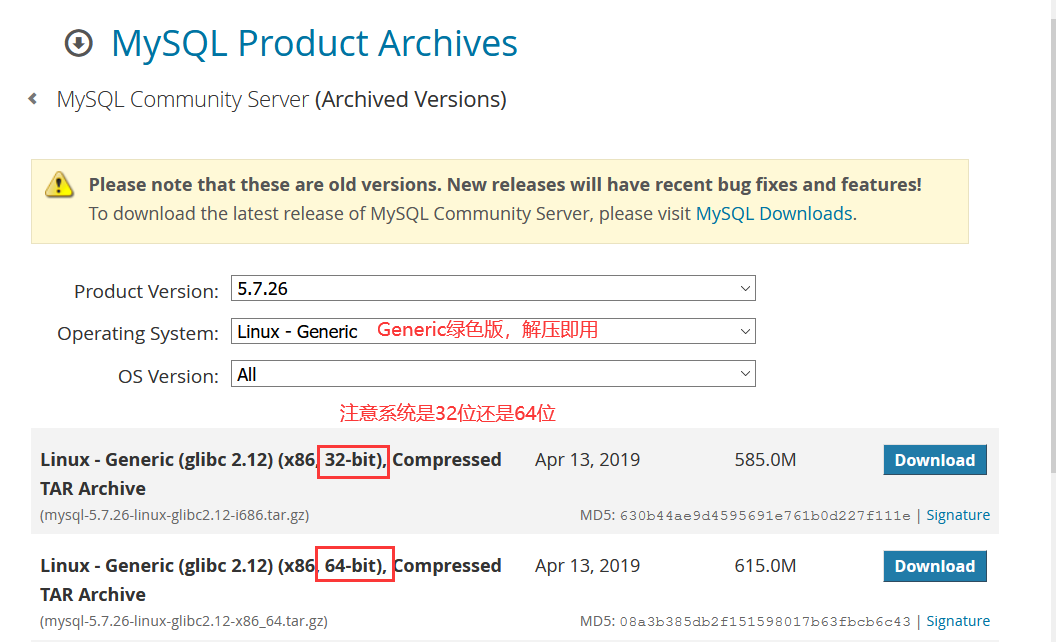
有时候忘记在官网哪个位置下载了,在这里截图记录一下。
5.1 mysql下载
5.2 nginx下载
- Mainline version 开发版
- Stable version 稳定版
- Legacy version 以往版本
根据实际情况下载,我这里选择最新稳定版nginx-1.18.0版本
5.3 php下载
官网下载
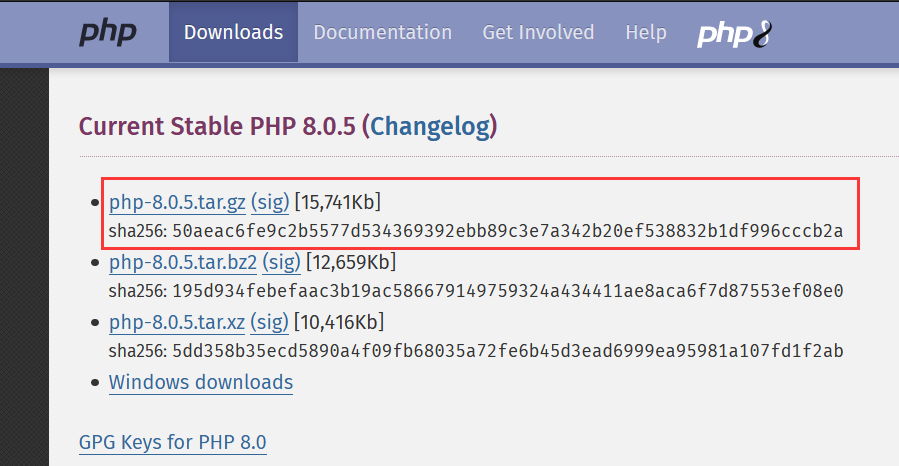
目前最新版本是php-8.0.5
六、参考资料
今天的学习是为了以后的工作更加的轻松!

 浙公网安备 33010602011771号