Zabbix5.0服务端安装配置在一台机子上用centos8.2配合nginx和mysql安装监控软件zabbix5
1安装前的准备:
[root@stu ~]#systemctl stop firewalld #关闭防火墙
[root@stu ~]#systemctl disable firewalld #禁止防火墙开机启动
[root@stu ~]#getenforce #查看selinux是否已关闭
Enable
[root@stu ~]#setenforce 0 #临时关闭selinux
[root@stu ~]#sed -i "/^SELINUX/s/enforcing/disabled/" /etc/selinux/config #永久关闭selinux
[root@stu ~]#getenforce #查看selinux是否已关闭
Disabled
[root@stu ~]#
2CentOS 8解决yum不能更新源问题
wget -O /etc/yum.repos.d/CentOS-Base.repo http://mirrors.aliyun.com/repo/Centos-8.repo
sed -i 's/$releasever/8/g' /etc/yum.repos.d/CentOS-Base.repo
yum clean all #清理缓存
yum makecache #更新源
2安装epel源:
[root@stu ~]#yum install -y https://mirrors.aliyun.com/epel/epel-release-latest-8.noarch.rpm
3安装mysql:
dnf -y install wget
yum -y install https://repo.mysql.com/mysql80-community-release-el8-1.noarch.rpm
yum install mysql-server -y
systemctl start mysqld && systemctl status mysqld
systemctl enable mysqld
mysql -uroot -p(直接回车,登录无密码)
mysql> alter user 'root'@'localhost' identified by '123456';
4安装zabbix:
1)安装Zabbix存储库
[root@stu ~]#rpm -Uvh https://repo.zabbix.com/zabbix/5.0/rhel/8/x86_64/zabbix-release-5.0-1.el8.noarch.rpm
[root@stu ~]#dnf clean all
2)安装Zabbix服务器、前端、代理
[root@stu ~]#dnf install zabbix-server-mysql zabbix-web-mysql zabbix-nginx-conf zabbix-agent
3)创建zabbix初始数据库
[root@stu ~]#mysql -uroot -p123456
mysql> create database zabbix character set utf8 collate utf8_bin;
mysql> create user zabbix@localhost identified by '123456';
mysql> grant all privileges on zabbix.* to zabbix@localhost;
mysql> quit
4)在Zabbix服务器主机上导入初始架构和数据:
[root@stu ~]#zcat /usr/share/doc/zabbix-server-mysql*/create.sql.gz | mysql -uzabbix -p123456 zabbix
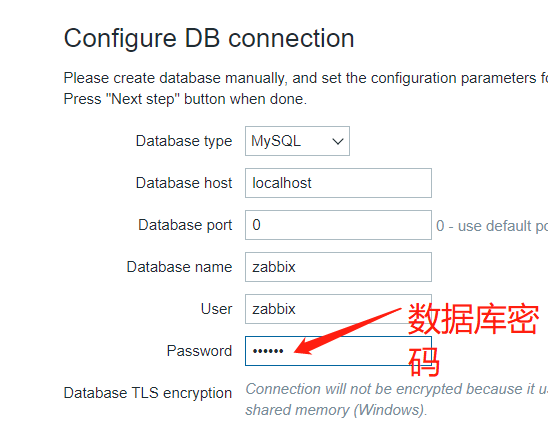
5)为Zabbix监控服务器配置数据库:
vim /etc/zabbix/zabbix_server.conf
DBPassword=123456
DBSocket=/tmp/mysql.sock(根据mysql实际情况)
6)为Zabbix前端配置PHP:
[root@stu ~]#vim  /etc/nginx/conf.d/zabbix.conf
listen          81;
server_name     zabbix.tangyingjie.com;
[root@stu ~]#cp /etc/nginx/conf.d/zabbix.conf /application/nginx/conf/extra
7)设置时区:
vim /etc/php-fpm.d/zabbix.conf
php_value[date.timezone] = Asia/Shanghai
8)给nginx设置一个zabbix默认支持的使用用户并重启nginx:
[root@stu ~]#vim /application/nginx/conf/nginx.conf
user nginx;
[root@stu ~]#/application/nginx/sbin/nginx -s reload
9)启动Zabbix服务器和代理进程
systemctl restart zabbix-server zabbix-agent nginx php-fpm
systemctl enable zabbix-server zabbix-agent nginx php-fpm
10)浏览器访问ip并进行配置
http://zabbix.tangyingjie.com:81/setup.php
户用名:Admin
密码:zabbix
11)设置后台:

 浙公网安备 33010602011771号