1DCL之mysql用户的增删改查及登陆方式
数据控制语言DCL用来授予或回收访问数据库的某种特权,并控制
数据库操纵事务发生的时间及效果,对数据库实行监视等
mysql用户管理
1创建用户
mysql> flush privileges;
Query OK, 0 rows affected (0.01 sec)

mysql> create user tyjs09@'106.13.111.56' identified by '123456';
Query OK, 0 rows affected (0.00 sec)
2查询用户信息
mysql> select user,host,authentication_string from mysql.user;
+---------------+---------------+-------------------------------------------+
| user          | host          | authentication_string                     |
+---------------+---------------+-------------------------------------------+
| root          | localhost     | *84AAC12F54AB666ECFC2A83C676908C8BBC381B1 |
| mysql.session | localhost     | *THISISNOTAVALIDPASSWORDTHATCANBEUSEDHERE |
| mysql.sys     | localhost     | *THISISNOTAVALIDPASSWORDTHATCANBEUSEDHERE |
| tyjs09        | 106.13.186.56 | *6BB4837EB74329105EE4568DDA7DC67ED2CA2AD9 |
+---------------+---------------+-------------------------------------------+
4 rows in set (0.00 sec)

mysql>
3删除用户
mysql> drop user tyjs09@'106.13.111.56';
Query OK, 0 rows affected (0.00 sec)

mysql>
4修改用户密码
mysql> alter user root@'localhost' identified by '123456' ;
Query OK, 0 rows affected (0.00 sec)
5授权远程管理员用户
mysql> grant all on *.* to root@'%' identified by '123456';
Query OK, 0 rows affected, 1 warning (0.01 sec)
root@'%',百分号是客户ip地址或者网段,目前你就写个%就行了. 让所有.
但是注意这很危险就成了.
授权管理
mysql8.0以后必须先建用户再授权,以下命令仅限于8.0以前
grant ALL on wordpress.* to wordpress@’10.0.0.%’ identified by ‘123’;
grant 权限 on 范围(库wordpress里面的所有表)        to 用户                  密码
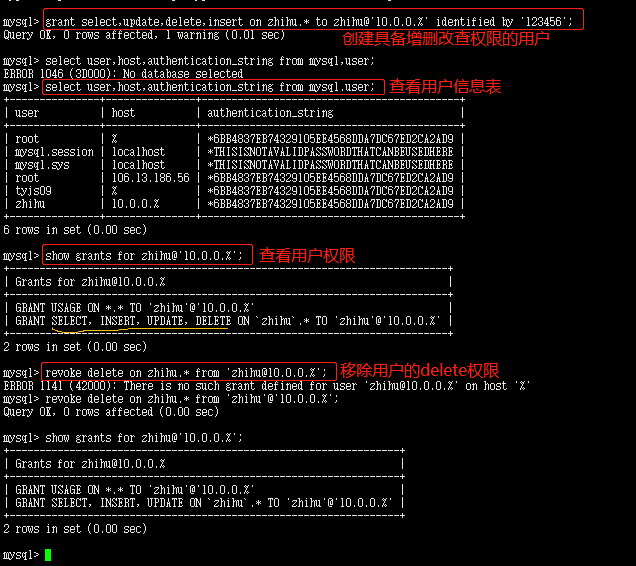
实例1:创建知乎用户,只授权对zhihu这个库进行增删改查
grant insert,delete,update,select on zhuhu.* to zhihu@’10.0.0.%’ identified by ‘123456’;
问题思考:
1,grant select,update on *.* to test1@'10.0.0.%';
2,grant delete on wordpress.* to test1@'10.0.0.%';
3,grant insert on wordpress.t1 to test1@'10.0.0.%';
问test1@'10.0.0.%'能对t1表具备什么权限?
答:具备增删改查的权限,因为mysql的全是是可以继承的,多次授权是叠加的,因此这又涉及到了权限回收的问题,即:要想取消某个权限,必须通过回收的方式实现。
6查看用户权限:
查看tyjs09的权限发现该用户只有USAGE能连接数据库的权限
mysql> show grants for tyjs09@'%';
+------------------------------------+
| Grants for tyjs09@%                |
+------------------------------------+
| GRANT USAGE ON *.* TO 'tyjs09'@'%' |
+------------------------------------+
1 row in set (0.00 sec)

查看root用户发现是超级管理员具备给其他用户授权的权限WITH GRANT OPTION
mysql> show grants for root@'%';
+-------------------------------------------------------------+
| Grants for root@%                                           |
+-------------------------------------------------------------+
| GRANT ALL PRIVILEGES ON *.* TO 'root'@'%' WITH GRANT OPTION |
+-------------------------------------------------------------+
1 row in set (0.00 sec)
我也想把tyjs09设为拥有给其他用户授权的超级管理员:
mysql> grant all on *.* to tyjs09@'%' identified by '123456' with grant option;
Query OK, 0 rows affected, 1 warning (0.00 sec)

查看一下tyjs09是不是超级管理员:
mysql> show grants for tyjs09@'%';
+---------------------------------------------------------------+
| Grants for tyjs09@%                                           |
+---------------------------------------------------------------+
| GRANT ALL PRIVILEGES ON *.* TO 'tyjs09'@'%' WITH GRANT OPTION |
+---------------------------------------------------------------+
1 row in set (0.00 sec)

mysql>
7回收用户权限:
mysql> revoke delete on zhihu.* from 'zhihu@10.0.0.%';
ERROR 1141 (42000): There is no such grant defined for user 'zhihu@10.0.0.%' on host '%'
mysql> revoke delete on zhihu.* from 'zhihu'@'10.0.0.%';
Query OK, 0 rows affected (0.00 sec)
mysql客户端命令
-u:用户名
-p:密码
-S:本地连接时需要指定的sock文件路径
-P:端口
-h:指定要连接的ip地址
-e:在linux中免交互执行mysql命令
<:导入SQL数据库文件
1)用本地的方式连接mysql:
[root@查看配置文件 ~]# cat /etc/my.cnf
[mysqld]
user=mysql
skip-grant-tables
basedir=/application/mysql
datadir=/data/mysql/data
socket=/tmp/mysql.sock
server_id=6
port=3306
log_error=/tmp/mysql.err
log_warnings=9
[mysql]
socket=/tmp/mysql.sock
[root@本地方式连接mysql ~]# mysql -uroot -p -S /tmp/mysql.sock
Enter password:
Welcome to the MySQL monitor.  Commands end with ; or \g.
Your MySQL connection id is 21
Server version: 5.7.26 MySQL Community Server (GPL)

Copyright (c) 2000, 2019, Oracle and/or its affiliates. All rights reserved.

Oracle is a registered trademark of Oracle Corporation and/or its
affiliates. Other names may be trademarks of their respective
owners.

Type 'help;' or '\h' for help. Type '\c' to clear the current input statement.

mysql> show processlist;
+----+------+-----------+------+---------+------+----------+------------------+
| Id | User | Host      | db   | Command | Time | State    | Info             |
+----+------+-----------+------+---------+------+----------+------------------+
| 21 | root | localhost | NULL | Query   |    0 | starting | show processlist |
+----+------+-----------+------+---------+------+----------+------------------+
1 row in set (0.00 sec)

mysql>
2)用远程的方式连接mysql:
[root@instance-r5y0pf5d ~]# mysql -uroot -p -h 123.23.123.23 -P 3306
Enter password:
Welcome to the MySQL monitor.  Commands end with ; or \g.
Your MySQL connection id is 22
Server version: 5.7.26 MySQL Community Server (GPL)

Copyright (c) 2000, 2019, Oracle and/or its affiliates. All rights reserved.

Oracle is a registered trademark of Oracle Corporation and/or its
affiliates. Other names may be trademarks of their respective
owners.

Type 'help;' or '\h' for help. Type '\c' to clear the current input statement.

mysql> show processlist;
+----+------+---------------------+------+---------+------+----------+------------------+
| Id | User | Host                | db   | Command | Time | State    | Info             |
+----+------+---------------------+------+---------+------+----------+------------------+
| 22 | root | 123.23.123.23:48456 | NULL | Query   |    0 | starting | show processlist |
+----+------+---------------------+------+---------+------+----------+------------------+
1 row in set (0.00 sec)

mysql>
3)将库文件导入到mysql
[root@instance-r5y0pf5d ~]# ls
testku.sql
[root@instance-r5y0pf5d ~]#
[root@在数据库文件第一行添加数据库名 ~]# vim /root/testku.sql
[root@instance-r5y0pf5d ~]# head -1 /root/testku.sql
use testku;
[root@导入数据库 ~]# mysql -uroot -p < testku.sql
Enter password:
[root@linux中查看数据库是否导入成功 ~]# mysql -uroot -p123456 -h123.23.123.23 -e "show databases;"
mysql: [Warning] Using a password on the command line interface can be insecure.
+--------------------+
| Database |
+--------------------+
| information_schema |
| mysql |
| performance_schema |
| sys |
| testku |
+--------------------+
备注:如果远程连不上mysql,可用下面方法进行排查:
1查看3306端口是否已经启动netstat -lun|grep 3306
2查看mysql是否启动:ps -ef |grep mysql
3命令行测试连接:mysql -uroot -p -h10.0.0.51
4查看该用户的host设置是否正确
mysql -uroot -p123456 -h123.23.323.23 -e "select user,host from mysql.user;"

 浙公网安备 33010602011771号