

LNMP的配置与优化
一、LNMP的下载
LNMP一键安装包是一个用Linux Shell编写的可以为CentOS/RadHat/Fedora、Debian/Ubuntu/Raspbian/Deepin VPS或独立主机安装LNMP(Nginx/MySQL/PHP)、LNMPA(Nginx/MySQL/PHP/Apache)、LAMP(Apache/MySQL/PHP)生产环境的Shell程序。同时提供一些实用的辅助工具如:虚拟主机管理、FTP用户管理、Nginx、MySQL/MariaDB、PHP的升级、常用缓存组件Redis、Xcache等的安装、重置MySQL root密码、502自动重启、日志切割、SSH防护DenyHosts/Fail2Ban、备份等许多实用脚本。
官方网站为 https://www.lnmp.org/
二、LNMP的安装
安装时,MySQL版本选择5.5.48及以上(5.4以上支持utf8mb4),PHP版本选择5.6或7
也可以根据实际情况选择其他版本。
三、常用配置
1. 安装memcache
命令如下
[root@www.fangbei.org lnmp1.3-full]# ./addons.sh install memcached
+-----------------------------------------------------------------------+
|            Addons script for LNMP V1.2, Written by Licess             |
+-----------------------------------------------------------------------+
|    A tool to Install cache,optimizer,accelerator...addons for LNMP    |
+-----------------------------------------------------------------------+
|          For more information please visit http://www.lnmp.org        |
+-----------------------------------------------------------------------+
Which memcached php extension do you choose:
Install php-memcache,(Discuz x) please enter: 1
Install php-memcached, please enter: 2
Enter 1 or 2 (Default 1):
You choose php-memcache
====== Installing memcached ======

Press any key to install...or Press Ctrl+c to cancel
2. 启用PATH_INFO支持
该功能用于ThinkPHP开发时,URL_MODEL为2时的支持。
网站配置目录 /usr/local/nginx/conf/vhost/www.fangbei.org.conf
打开并添加如下红包部分
server
    {
        listen 80;
        #listen [::]:80;
        server_name www.fangbei.org;
        index index.html index.htm index.php default.html default.htm default.php;
        root  /home/wwwroot/www.fangbei.org;

        include other.conf;
        #error_page   404   /404.html;
        include enable-php.conf;

        location / {
            if (!-e $request_filename){
                rewrite ^/(.*)$ /index.php?s=/$1 last;
            }
        }

        location ~ .*\.(gif|jpg|jpeg|png|bmp|swf)$
        {
            expires      30d;
        }

        location ~ .*\.(js|css)?$
        {
            expires      12h;
        }

        location ~ /\.
        {
            deny all;
        }

        access_log off;
    }
3. 禁用mysql日志
在MySQL数据库中,mysql-bin.000001、mysql- bin.000002等文件是数据库的操作日志,例如UPDATE一个表,或者DELETE一些数据,即使该语句没有匹配的数据,这个命令也会存储到日志文件中,还包括每个语句执行的时间,也会记录进去的。
比如如下
[root@www.fangbei.org /]# cd /usr/local/mysql/var/
[root@www.fangbei.org var]# ll
total 29964
drwx------ 2 mysql mysql     4096 Feb 21 17:42 100893722
-rw-r----- 1 mysql root      8477 Feb 21 18:41 www.fangbei.org.err
-rw-rw---- 1 mysql mysql        5 Feb 21 18:41 www.fangbei.org.pid
-rw-rw---- 1 mysql mysql 18874368 Feb 21 18:41 ibdata1
-rw-rw---- 1 mysql mysql  5242880 Feb 21 18:41 ib_logfile0
-rw-rw---- 1 mysql mysql  5242880 Feb 21 17:08 ib_logfile1
drwx------ 2 mysql mysql     4096 Feb 21 17:08 mysql
-rw-rw---- 1 mysql mysql    27735 Feb 21 17:08 mysql-bin.000001
-rw-rw---- 1 mysql mysql  1113246 Feb 21 17:08 mysql-bin.000002
-rw-rw---- 1 mysql mysql      264 Feb 21 17:08 mysql-bin.000003
-rw-rw---- 1 mysql mysql     1119 Feb 21 17:08 mysql-bin.000004
-rw-rw---- 1 mysql mysql      126 Feb 21 17:08 mysql-bin.000005
-rw-rw---- 1 mysql mysql   127076 Feb 21 18:41 mysql-bin.000006
-rw-rw---- 1 mysql mysql      107 Feb 21 18:41 mysql-bin.000007
-rw-rw---- 1 mysql mysql      133 Feb 21 18:41 mysql-bin.index
drwx------ 2 mysql mysql     4096 Feb 21 17:08 performance_schema
[root@www.fangbei.org var]#
以及
[root@www.fangbei.org var]# cd /root
[root@www.fangbei.org ~]# ll
total 491064
drwxr-xr-x 4 mysql mysql      4096 Feb 21 16:44 databases_backup_20170221164407
drwxr-xr-x 7 root  root       4096 May 27  2016 lnmp1.3-full
-rw-r--r-- 1 root  root  500932095 Dec  4 12:32 lnmp1.3-full.tar.gz
-rw-r--r-- 1 root  root    1898084 Feb 21 17:18 lnmp-install.log
[root@www.fangbei.org ~]# cd databases_backup_20170221164407/
[root@www.fangbei.org databases_backup_20170221164407]# ll
total 21284
drwx------ 2 mysql mysql     4096 Feb 21 16:38 100893722
-rw-r----- 1 mysql root      4654 Feb 21 16:44 www.fangbei.org.err
-rw-rw---- 1 mysql mysql 10485760 Feb 21 16:44 ibdata1
-rw-rw---- 1 mysql mysql  5242880 Feb 21 16:44 ib_logfile0
-rw-rw---- 1 mysql mysql  5242880 Feb 21 16:02 ib_logfile1
drwx------ 2 mysql mysql     4096 Feb 21 16:02 mysql
-rw-rw---- 1 mysql mysql    19758 Feb 21 16:02 mysql-bin.000001
-rw-rw---- 1 mysql mysql   765307 Feb 21 16:02 mysql-bin.000002
-rw-rw---- 1 mysql mysql      263 Feb 21 16:02 mysql-bin.000003
-rw-rw---- 1 mysql mysql      731 Feb 21 16:02 mysql-bin.000004
-rw-rw---- 1 mysql mysql      125 Feb 21 16:02 mysql-bin.000005
-rw-rw---- 1 mysql mysql      497 Feb 21 16:44 mysql-bin.000006
-rw-rw---- 1 mysql mysql      114 Feb 21 16:11 mysql-bin.index
[root@www.fangbei.org databases_backup_20170221164407]#
这些文件的生长速度是很快的,特别占用服务器资源。当服务器资源不够充足的情况下,我们可以选择定期删除这些日志文件,或者修改配置文件,不让日志生成。
编辑my.cnf 文件,命令:vi /etc/my.cnf
注释掉 log-bin=mysql-bin 这个属性
#skip-networking
max_connections = 500
max_connect_errors = 100
open_files_limit = 65535

# log-bin=mysql-bin
binlog_format=mixed
server-id    = 1
expire_logs_days = 10
然后删除上述日志文件
4. phpMyAdmin超时问题
文件 home/wwwroot/default/phpmyadmin/libraries/config.default.php
设置 Cookies 有效期为12小时
$cfg['LoginCookieValidity'] = 43200; //12个小时
设定PHP session有效期的参数值 session.gc_maxlifetime 为大于12小时的秒数。下述配置多了10秒。
文件在./usr/local/php/etc/php.ini
session.gc_maxlifetime = 43210
5. phpMyAdmin输入服务器地址
修改phpMyAdmin目录下的 /libraries/config.default.php中 AllowArbitraryServer 值为 true
$cfg[‘AllowArbitraryServer’] = true;
9. 重启
最后重启 lnmp restart,让上述所有配置生效
10. 删除.user.ini文件
LNMP 1.2开始PHP防跨目录限制使用.user.ini,该文件在网站根目录下,可以修改open_basedir的值来设置限制目录的访问。
.user.ini文件无法直接修改,而且是隐藏文件可能在winscp下可能无法看到。
当网站被删除的时候,.user.ini可以用以下方法删除
[root@www.fangbei.org]# chattr -i ".user.ini"
[root@www.fangbei.org]# chmod 777 ".user.ini"
[root@www.fangbei.org]# rm -rf ".user.ini"
11. 允许mysql远程连接
1. 修改密码
[root@cctv3]# /usr/bin/mysql -u root -p
Enter password:
Welcome to the MySQL monitor. Commands end with ; or \g.
Your MySQL connection id is 39655
Server version: 5.5.60 Source distribution

mysql>
mysql> set password for root@localhost = password('pass1234');
Query OK, 0 rows affected (0.00 sec)
2. 授权
mysql> use idcode;
Database changed
mysql>
mysql> grant all privileges on *.* to root@'%' identified by 'pass1234' with grant option;
Query OK, 0 rows affected (0.00 sec)

mysql>
mysql> flush privileges;
Query OK, 0 rows affected (0.01 sec)

mysql>
mysql> select host,user,password from user;
+-----------+------+-------------------------------------------+
| host      | user | password                                  |
+-----------+------+-------------------------------------------+
| localhost | root | *ASDFF1B8AD1B4CFD578E76ABC1B6ADFF70D0CCTV |
| %         | root | *ASDFF1B8AD1B4CFD578E76ABC1B6ADFF70D0CCTV |
+-----------+------+-------------------------------------------+
3 rows in set (0.00 sec)

mysql>
3、重启
在路由表中移除3306端口的禁止条列
[root@Server-WeiXin ~]# iptables -L -n --line-numbers
Chain INPUT (policy ACCEPT)
num  target     prot opt source               destination
1    ACCEPT     all  --  0.0.0.0/0            0.0.0.0/0
2    ACCEPT     all  --  0.0.0.0/0            0.0.0.0/0            state RELATED,ESTABLISHED
3    ACCEPT     tcp  --  0.0.0.0/0            0.0.0.0/0            tcp dpt:22
4    ACCEPT     tcp  --  0.0.0.0/0            0.0.0.0/0            tcp dpt:80
5    ACCEPT     tcp  --  0.0.0.0/0            0.0.0.0/0            tcp dpt:443
6    DROP       tcp  --  0.0.0.0/0            0.0.0.0/0            tcp dpt:3306
7    ACCEPT     icmp --  0.0.0.0/0            0.0.0.0/0            icmptype 8
8    DROP       tcp  --  0.0.0.0/0            0.0.0.0/0            tcp dpt:11211
9    DROP       udp  --  0.0.0.0/0            0.0.0.0/0            udp dpt:11211

[root@Server-WeiXin ~]# iptables -D INPUT 6
[root@Server-WeiXin ~]# iptables -L -n --line-numbers
Chain INPUT (policy ACCEPT)
num  target     prot opt source               destination
1    ACCEPT     all  --  0.0.0.0/0            0.0.0.0/0
2    ACCEPT     all  --  0.0.0.0/0            0.0.0.0/0            state RELATED,ESTABLISHED
3    ACCEPT     tcp  --  0.0.0.0/0            0.0.0.0/0            tcp dpt:22
4    ACCEPT     tcp  --  0.0.0.0/0            0.0.0.0/0            tcp dpt:80
5    ACCEPT     tcp  --  0.0.0.0/0            0.0.0.0/0            tcp dpt:443
6    ACCEPT     icmp --  0.0.0.0/0            0.0.0.0/0            icmptype 8
7    DROP       tcp  --  0.0.0.0/0            0.0.0.0/0            tcp dpt:11211
8    DROP       udp  --  0.0.0.0/0            0.0.0.0/0            udp dpt:11211

[root@Server-WeiXin ~]#
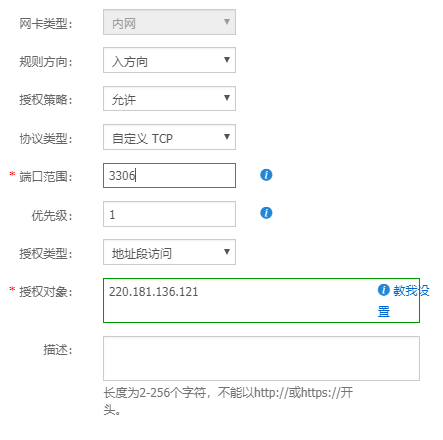
设置阿里云内网入方向规则
11. 配置https及证书,启用启用TLS1.2
server
    {
        listen 80;
        listen 443 ssl;
        #listen [::]:80;
        server_name cet.fangbei.org;
        index index.html index.htm index.php default.html default.htm default.php;
        root  /home/wwwroot/cet.fangbei.org;

        include none.conf;
        #error_page   404   /404.html;
        include enable-php.conf;

        ssl_protocols TLSv1.2;
        ssl_certificate /usr/local/nginx/cert/214130435490250.pem;
        ssl_certificate_key /usr/local/nginx/cert/214130435490250.key;

        location ~ .*\.(gif|jpg|jpeg|png|bmp|swf)$
        {
            expires      30d;
        }

        location ~ .*\.(js|css)?$
        {
            expires      12h;
        }

        location ~ /\.
        {
            deny all;
        }

        access_log off;
    }
12. 配置301跳转
server {
    listen 80;
    server_name lnmp.org;
    return 301 http://www.lnmp.org$request_uri;
}
13. MySQL 5.7及以上版本 ONLY_FULL_GROUP_BY问题
数据库中执行
set GLOBAL sql_mode ='STRICT_TRANS_TABLES,NO_ZERO_IN_DATE,NO_ZERO_DATE,ERROR_FOR_DIVISION_BY_ZERO,NO_ENGINE_SUBSTITUTION '
详情参考 https://blog.csdn.net/qq_34637782/article/details/101029487
本文来自博客园,作者:方倍工作室,转载请注明原文链接:https://www.cnblogs.com/txw1958/p/lnmp-config.html

 浙公网安备 33010602011771号