个人网盘分享·Alist的安装配置和使用
简介
Alist是一款非常强大的开源个人文件管理软件,它的功能非常多。
Alist官方网站(https://cloud.tencent.com/developer/tools/blog-entry?target=https%3A%2F%2Falist.nn.ci%2F&objectId=2142823&objectType=1&isNewArticle=undefined)

对我来说,它可以让我基于自己的服务器自由的分享自己的文件给亲人或者朋友,而不是依赖第三方平台,但是它强大也强大在可以依赖各个云盘实现共享而不占用自己服务器,官方支持的云盘如下:
本地存储 阿里云盘 OneDrive / SharePoint(国际版, 世纪互联,de,us) 天翼云盘 (个人云, 家庭云) GoogleDrive 123云盘 FTP / SFTP PikPak S3 又拍云对象存储 WebDAV(支持无API的OneDrive/SharePoint) Teambition(中国,国际) 分秒帧 和彩云 (个人云, 家庭云) Yandex.Disk 百度网盘 夸克网盘 迅雷网盘 蓝奏云 阿里云盘分享 谷歌相册 Mega.nz 一刻相册
安装
安装也非常简单,根据官方指导文件,可以分为下面两种:
一键脚本
仅适用于 Linux amd64/arm64 平台。
安装
代码语言:shell
curl -fsSL "https://alist.nn.ci/v3.sh" | bash -s install
更新
代码语言:shell
curl -fsSL "https://alist.nn.ci/v3.sh" | bash -s update
卸载
代码语言:shell
curl -fsSL "https://alist.nn.ci/v3.sh" | bash -s uninstall
默认安装在 {/opt/alist} 中,个人建议根据实际路径情况自行添加路径:
比如我安装在 {/var/www/alist} 路径。
代码语言:shell
# Install
curl -fsSL "https://alist.nn.ci/v3.sh" | bash -s install /var/www/alist
# update
#curl -fsSL "https://alist.nn.ci/v3.sh" | bash -s update /var/www/alist
# Uninstall
curl -fsSL "https://alist.nn.ci/v3.sh" | bash -s uninstall /var/www/alist
可以直接执行以下命令:
启动: {systemctl start alist}
关闭: {systemctl stop alist}
配置开机自启: {systemctl enable alist}
取消开机自启: {systemctl disable alist}
状态: {systemctl status alist}
重启: {systemctl restart alist}
手动安装
手动安装我也试了一下,感觉没有区别,步骤为:
1.获取 AList
打开AList Release 下载待部署系统对应的文件。最新版的前端已经和后端打包好了,不用再下载前端文件了。
https://cloud.tencent.com/developer/tools/blog-entry?target=https%3A%2F%2Fgithub.com%2Falist-org%2Falist%2Freleases&objectId=2142823&objectType=1&isNewArticle=undefined
2.运行
Linux&MacOS
代码语言:shell
# 解压下载的文件,得到可执行文件:tar -zxvf alist-xxxx.tar.gz# 授予程序执行权限:chmod +x alist# 获得管理员信息
./alist admin# 运行程序
./alist server
xxxx 指的是不同系统/架构对应的名称,一般 Linux-x86/64 为 alist-linux-amd64。如果你的 glibc 版本太低,建议下载 musl 版本
当你看到 {start server@0.0.0.0:5244} 的输出,之后没有报错,说明操作成功。 第一次运行时会输出初始密码。程序默认监听 5244 端口。 现在打开 {http://ip:5244} 可以看到登录页面。
登录界面
3.守护进程
使用任意方式编辑 {/usr/lib/systemd/system/alist.service} 并添加如下内容,其中 path_alist 为 AList 所在的路径。
代码语言:text
[Unit]
Description=alist
After=network.target
[Service]
Type=simple
WorkingDirectory=path_alist
ExecStart=path_alist/alist-xxxx server
Restart=on-failure
[Install]
WantedBy=multi-user.target
附上我的配置:
代码语言:text
[Unit]
Description=alist
After=network.target
[Service]
Type=simple
WorkingDirectory=/var/www/
ExecStart=/var/www/alist server
Restart=on-failure
[Install]
WantedBy=multi-user.target
然后,执行 {systemctl daemon-reload} 重载配置,现在你可以使用这些命令来管理程序:
启动: {systemctl start alist}
关闭: {systemctl stop alist}
配置开机自启: {systemctl enable alist}
取消开机自启: {systemctl disable alist}
状态: {systemctl status alist}
重启: {systemctl restart alist}
配置
以{Nginx}为例:
修改 {/etc/nginx/sites-enable/alist.conf} 文件:
代码语言:text
server {
listen 80;
listen [::]:80;
server_name file.luxiyue.com; #你的域名
location / {
proxy_redirect off;
proxy_set_header Host $host;
proxy_set_header X-Real-IP $remote_addr;
proxy_set_header X-Forwarded-For $proxy_add_x_forwarded_for;
proxy_set_header X-Forwarded-Proto $scheme;
proxy_pass http://localhost:5244/;
}
}
保存后载入配置:
代码语言:shell
systemctl reload nginx
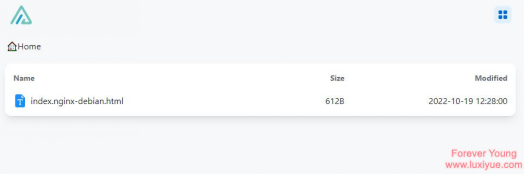
打开你的域名就可以访问了。
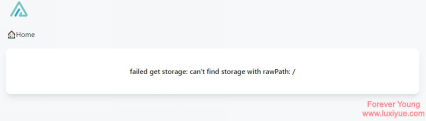
这边简单配置一下存储,以本地Local为例:
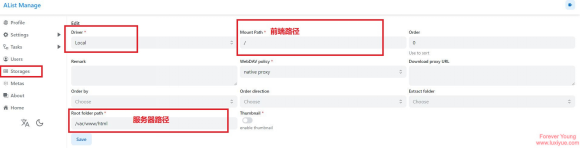
更多存储添加可以查看:官方文档
来源:https://cloud.tencent.com/developer/article/2142823

 浙公网安备 33010602011771号