aidlux 安装 uwsgi
本文链接:aidlux 安装 uwsgi - Tiac - 博客园 (cnblogs.com)
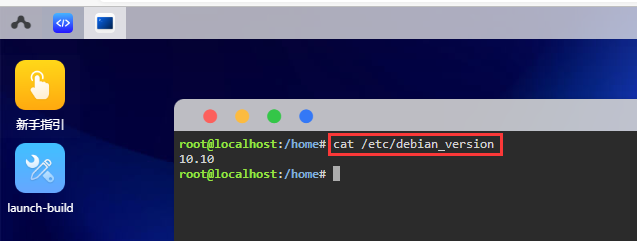
一、确定 debian 版本及代号
aidlux 是基于 debian 开发的,首先,我们看一下 debian 的版本是多少?
注:不同的 debian 有不同的代号,不知道的可以百度一下
我这里的 debian 版本是 10.10,代号为 buster
二、更新 debian 源
这里使用清华大学的源:https://mirror.tuna.tsinghua.edu.cn/help/debian/
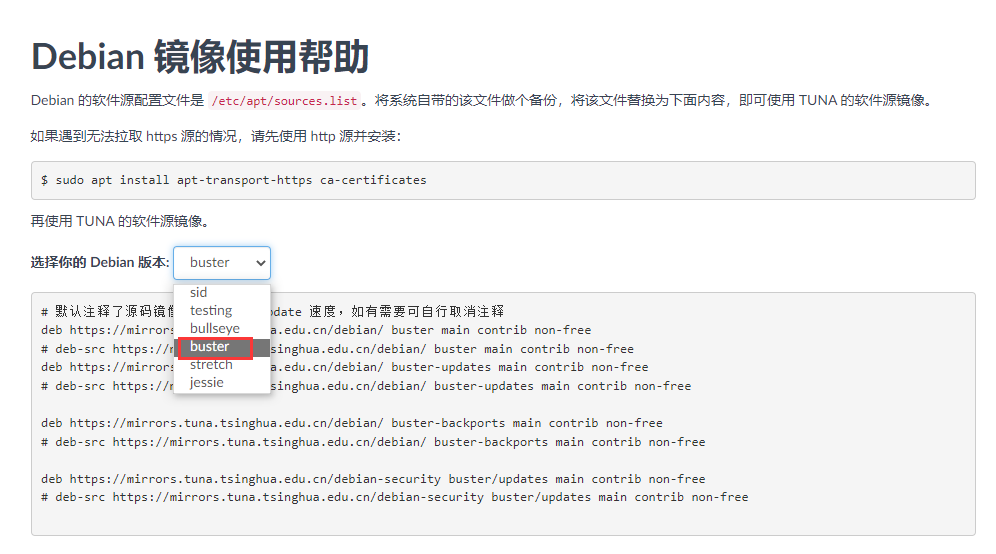
注意:版本不要选错!!
buster 版本的配置如下:
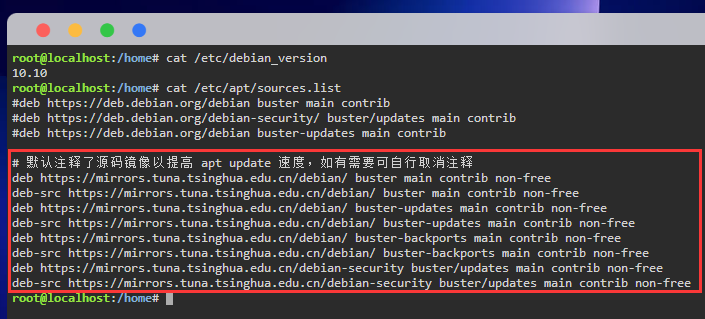
# 默认注释了源码镜像以提高 apt update 速度,如有需要可自行取消注释
deb https://mirrors.tuna.tsinghua.edu.cn/debian/ buster main contrib non-free
# deb-src https://mirrors.tuna.tsinghua.edu.cn/debian/ buster main contrib non-free
deb https://mirrors.tuna.tsinghua.edu.cn/debian/ buster-updates main contrib non-free
# deb-src https://mirrors.tuna.tsinghua.edu.cn/debian/ buster-updates main contrib non-free

deb https://mirrors.tuna.tsinghua.edu.cn/debian/ buster-backports main contrib non-free
# deb-src https://mirrors.tuna.tsinghua.edu.cn/debian/ buster-backports main contrib non-free

deb https://mirrors.tuna.tsinghua.edu.cn/debian-security buster/updates main contrib non-free
# deb-src https://mirrors.tuna.tsinghua.edu.cn/debian-security buster/updates main contrib non-free
1)首先处理一下 https 支持
apt install apt-transport-https ca-certificates
2)然后把配置粘到 /ect/apt/sources.list 去
注:deb-src 取不取消注释都可以,看个人
3)更新源缓存
apt update
三、安装依赖
apt-get install build-essential python3-dev
注:python3-dev 是关键,python2 安装 python-dev,python3 安装 python3-dev
四、安装 uwsgi
pip install uwsgi
五、测试
创建一个 foobar.py 文件,并输入以下内容:
def application(env, start_response):
    start_response('200 OK', [('Content-Type','text/html')])
    return [b"Hello World"]
运行以下命令测试:
uwsgi --http :9090 --wsgi-file foobar.py


注:自己的 ip 可以使用 ifconfig 查看
本文链接:aidlux 安装 uwsgi - Tiac - 博客园 (cnblogs.com)
完。

 浙公网安备 33010602011771号