serverless 如何调试(三)
2019-06-26 22:15 龙恩0707 阅读(1543) 评论(0) 收藏 举报在上篇文章中,我们讲解了如何调用我们的hello-world应用,只需要使用命令:
serverless invoke -f hello -l
,但是我们总不可能修改一次代码,就调用一下这个命令吧,或者说我们需要调试我们的代码的时候,总不能每次都要部署到AWS服务器端吧,那么这样的效率非常低。因此我们需要在本地调式完成后,我们最后部署到我们的AWS服务器上即可。
1. 使用 Terminal调式
我们只需要在 invoke 后加 local 就可以了,如命令:serverless invoke local -f hello -l 如下所示:
但是如上调式,也不是最好的方案,因此我们需要使用工具调试就好了。为了解决这个问题,在serverless中也有类似的工具。
2. 使用工具调试
2.1 安装 serverless-offline 命令如下所示:
npm install serverless-offline -D
2.2 修改 serverless.yml
我们需要打开我们的根目录下的 serverless.yml, 添加如下配置信息:
events:
      - http:
          path: hello/{name}
          method: get
plugins:
  - serverless-offline
因此 serverless.yml 所有配置代码如下:
service: hello-world
provider:
  name: aws
  runtime: nodejs10.x

functions:
  hello:
    handler: handler.hello
    events:
      - http:
          path: hello/{name}
          method: get
plugins:
  - serverless-offline
2.3 修改handler.js
现在我们在handler.js 中添加如下代码:
const {pathParameters = {}} = event;
const {name = 'xxx111'} = pathParameters;
const message = `您好,${ name }.`;
handler.js 的完整的代码如下所示:
'use strict';

module.exports.hello = async (event, context, callback) => {

  console.log(event);
  console.log(context);

  const {pathParameters = {}} = event;
  const {name = 'xxx111'} = pathParameters;
  const message = `您好,${ name }.`;
  const html = `
    <html>
     <style>
      h2 {color:red;}
     </style>
     <body>
       <h1>第一个hello world 应用</h1>
       <h2>${message}</h2>
     </body>
    </html>`;
  return {
    statusCode: 200,
    headers: {
      'Content-Type': 'text/html'
    },
    body: html
  }
};
如上代码打印,我们打印 console.log(event); 后,我们打印的信息如下所示:
{ headers:
   { Host: 'localhost:3000',
     Connection: 'keep-alive',
     Pragma: 'no-cache',
     'Cache-Control': 'no-cache',
     'Upgrade-Insecure-Requests': '1',
     'User-Agent':
      'Mozilla/5.0 (Macintosh; Intel Mac OS X 10_13_6) AppleWebKit/537.36 (KHTML, like Gecko) Chrome/75.0.3770.100 Safari/537.36',
     Accept:
      'text/html,application/xhtml+xml,application/xml;q=0.9,image/webp,image/apng,*/*;q=0.8,application/signed-exchange;v=b3',
     'Accept-Encoding': 'gzip, deflate, br',
     'Accept-Language': 'zh-CN,zh;q=0.9,en;q=0.8' },
  multiValueHeaders:
   { Host: [ 'localhost:3000' ],
     Connection: [ 'keep-alive' ],
     Pragma: [ 'no-cache' ],
     'Cache-Control': [ 'no-cache' ],
     'Upgrade-Insecure-Requests': [ '1' ],
     'User-Agent':
      [ 'Mozilla/5.0 (Macintosh; Intel Mac OS X 10_13_6) AppleWebKit/537.36 (KHTML, like Gecko) Chrome/75.0.3770.100 Safari/537.36' ],
     Accept:
      [ 'text/html,application/xhtml+xml,application/xml;q=0.9,image/webp,image/apng,*/*;q=0.8,application/signed-exchange;v=b3' ],
     'Accept-Encoding': [ 'gzip, deflate, br' ],
     'Accept-Language': [ 'zh-CN,zh;q=0.9,en;q=0.8' ] },
  path: '/hello/2',
  pathParameters: { name: '2' },
  requestContext:
   { accountId: 'offlineContext_accountId',
     resourceId: 'offlineContext_resourceId',
     apiId: 'offlineContext_apiId',
     stage: 'dev',
     requestId: 'offlineContext_requestId_03349087551215857',
     identity:
      { cognitoIdentityPoolId: 'offlineContext_cognitoIdentityPoolId',
        accountId: 'offlineContext_accountId',
        cognitoIdentityId: 'offlineContext_cognitoIdentityId',
        caller: 'offlineContext_caller',
        apiKey: 'offlineContext_apiKey',
        sourceIp: '127.0.0.1',
        cognitoAuthenticationType: 'offlineContext_cognitoAuthenticationType',
        cognitoAuthenticationProvider: 'offlineContext_cognitoAuthenticationProvider',
        userArn: 'offlineContext_userArn',
        userAgent:
         'Mozilla/5.0 (Macintosh; Intel Mac OS X 10_13_6) AppleWebKit/537.36 (KHTML, like Gecko) Chrome/75.0.3770.100 Safari/537.36',
        user: 'offlineContext_user' },
     authorizer:
      { principalId: 'offlineContext_authorizer_principalId',
        claims: undefined },
     protocol: 'HTTP/1.1',
     resourcePath: '/hello/{name}',
     httpMethod: 'GET',
     requestTimeEpoch: 1561535723603 },
  resource: '/hello/{name}',
  httpMethod: 'GET',
  queryStringParameters: null,
  multiValueQueryStringParameters: null,
  stageVariables: null,
  body: null,
  isOffline: true }
然后我们打印我们的 console.log(context); 后,打印的信息如下所示:
{ done: [Function],
  fail: [Function: fail],
  succeed: [Function: succeed],
  getRemainingTimeInMillis: [Function: getRemainingTimeInMillis],
  awsRequestId: 'offline_awsRequestId_7749009079208731',
  clientContext: {},
  functionName: 'hello-world-dev-hello',
  functionVersion: 'offline_functionVersion_for_hello-world-dev-hello',
  identity: {},
  invokedFunctionArn: 'offline_invokedFunctionArn_for_hello-world-dev-hello',
  logGroupName: 'offline_logGroupName_for_hello-world-dev-hello',
  logStreamName: 'offline_logStreamName_for_hello-world-dev-hello',
  memoryLimitInMB: undefined }
2.4 启动服务
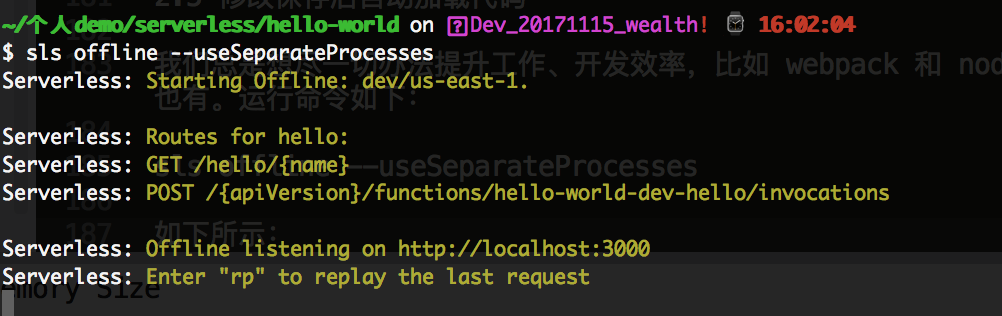
如上配置代码完成后,我们可以通过命令:sls offline 来运行了,如果启动成功,我们就会绑定3000端口了,如下所示:

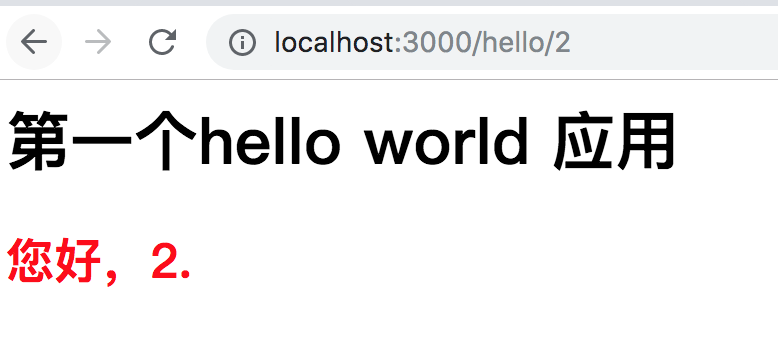
这个时候,我们在浏览器 http://localhost:3000/hello/2 访问的时候,可以看到如下信息了;如下所示:
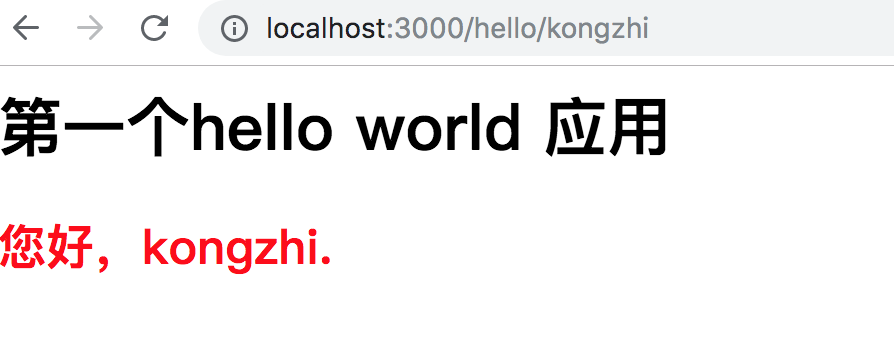
当我们把上面的地址改下的话,比如 http://localhost:3000/hello/kongzhi, 那么页面变成如下了,如下所示:
2.5 修改保存后自动加载代码
我们总是想尽一切办法提升工作、开发效率,比如 webpack 和 nodemon 有 reload 的功能,当然 serverless-offline 也有。运行命令如下:
sls offline --useSeparateProcesses
如下所示:
现在当我修改了下 handler.js 代码,然后会命令行中会自动打包,但是命令行中不会有任何提示,但是当我们刷新页面的时候,发现内容是最新的了如下所示: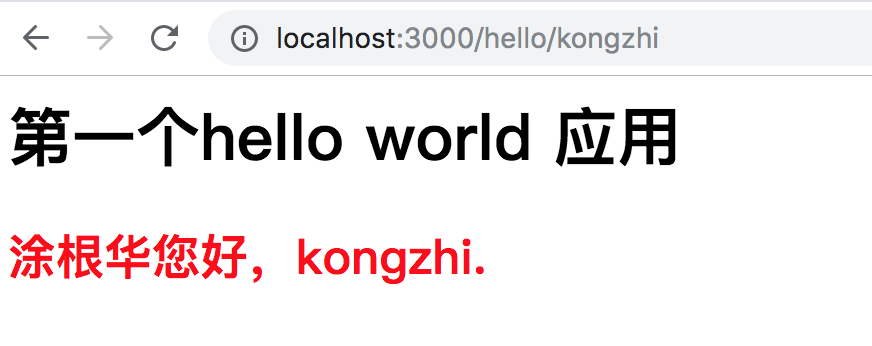

 浙公网安备 33010602011771号