      Vue-router就是WebApp的链接路径管理系统。简单可以理解为路径的跳转。
      那么我们为什么不能用 a 标签,这是因为用 Vue 做的都是单页应用(当你的项目准备 打包时,运行 npm run build 时,就会生成 dist 文件夹,这里面只有静态资源和一个 index.html 页面),所以我们写的<a></a>标签是不起作用的,必须使用 Vue-router 来进行管理。

选择不自动安装 vue-router。
npm install vue-router
npm install --save vue-router //进入项目根目录进行安装路由依赖
通过上述命令安装完路由依赖后,路由使用步骤如下:
(1) 在 src 目录下建立 router/index.js 文件,此文件专门用于管理路由核心文件,使用 Vue.use()加载路由插件,代码如下:
// 引入 vue 框架
import Vue from 'vue'
// 引入 vue-router 路由依赖
 import Router from 'vue-router'
// 引入页面组件,命名为 HelloWorld。@代表绝对路径
import HelloWorld from '@/components/HelloWorld'
// Vue 全局使用 Router Vue.use(Router)
// 定义路由配置,注意 export 导出,只要道出了别的文件才能 import 导入
export default new Router({
   routes: [ //配置路由,这里是个数组
{ //每一个链接都是一个对象
// 引入vue框架
import Vue from 'vue'
// 引入vue-router路由依赖
import Router from 'vue-router'
// 引入页面组件,命名为HelloWorld。@代表绝对路径
import HelloWorld from '@/components/HelloWorld'
import Home from '@/components/Home'
import News from '@/components/News'
import Hi from '../components/Hi'
/*导入页面1 页面2*/
import One from '@/pages/One'
import Two from '@/pages/Two'
import Three from '@/pages/Three'

// Vue全局使用Router
Vue.use(Router)

// 定义路由配置,注意export导出,只要道出了别的文件才能import导入
export default new Router({
  mode:'history',          // 去掉路由地址的#
  routes: [                //配置路由,这里是个数组
    {                        //每一个链接都是一个对象
      path: '/',
      name: 'HelloWorld',        //路由名称,
      component: HelloWorld     //对应的组件模板
    },
    {
      path: '/home',
      name: 'Home',
      component: Home,
      children:[ // 嵌套子路由
        {
          path:'one', // 子页面1
          name:'One',
          component:One
        },
        {
          path:'two/:id/:name', // 子页面2
          component:Two
        },
        {
          path:'three/:id/:name', // 子页面3
          name: 'three',
          component:Three
        }
      ]
    },
    {
      path: '/hi',
      name: 'Hi',
      component: Hi
    },
    {
      path: '/news',
      name: 'News',
      component: News
    }
  ]
})
<template>
  <div id="app">
<!--    <img src="./assets/logo.png">-->
    <Nav></Nav>
    <!--路由占位符:将路由路径所指定的组件渲染到页面中-->
    <router-view/>
  </div>
</template>

<script>
// import HelloWorld from './components/HelloWorld'
import Nav from '@/components/Nav'

export default {
  name: 'App',
  components:{
    Nav
  }
}
</script>

<style>
#app {
  font-family: 'Avenir', Helvetica, Arial, sans-serif;
  -webkit-font-smoothing: antialiased;
  -moz-osx-font-smoothing: grayscale;
  text-align: center;
  color: #2c3e50;
  margin-top: 60px;
}
</style>
<template>
  <div id="hello">
    <h1>HelloWorld.vue组件</h1>
  </div>
</template>

<script>
export default {
  name: 'HelloWorld',
  data () {  //在组件中必须为data函数,这是vue特性
    return {
      msg: 'Welcome to Your Vue.js App',
    }
  },
  created() {
    this.$axios.get('http://rap2api.taobao.org/app/mock/23080/resources/search',{
      params: {
        id: 5
      }
    })
      .then(res => {
        console.log('数据是:', res);
      })
      .catch((e) => {
        console.log('获取数据失败');
      });
  }
}
</script>
<style scoped>
</style>
(5) 运行 npm run dev 启动服务,访问 http://localhost:8080/页面
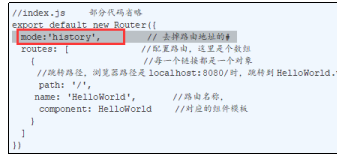
Vue为我们提供了一个属性mode:"history",可以去掉地址栏中的#,如图所示:
每个页面对应一个组件,也就是对应一个.vue文件。在components目录下创建Hi.vue文件,代码如下
<template>
    <div id="hi">
    <h1>Hi.vue 组件</h1>
    </div>
</template>
<script>
         export default {
           name: "Hi"
       }
</script>
再回到 index.js 里,完成路由的配置,代码如下:
//引入 Hi 组件
import Hi from '../components/Hi'
// Vue 全局使用 Router
Vue.use(Router) // 定义路由配置,注意 export 导出,只要道出了别的文件才能 import 导入
 export default new Router({
mode:'history', // 去掉路由地址的#
routes: [ //配置路由,这里是个数组
//...
{
          path: '/hi',
          name: 'Hi',
          component: Hi
      }
   ]
})
      启动服务,在浏览器中访问 http://localhost:8080/和 http://localhost:8080/hi 就可以分别访 问 HelloWorld.vue 和 Hi.vue 组件页面。

     ES6 语法提示:
     ES6 新增了 let 和 const 命令来声明变量,代替了 var。它们的用法类似于 var,但是所 声明的变量只在代码块内有效,如下面代码:

{
let a=123;
var b=234;
}
console.log(a); //报错 a is not defined
console.log(b); //234

let 和 const 的主要区别是,const 声明一个只读的常量。一旦声明,常量的值就不能改 变。
在 components 目录下创建 Home.vue(首页)和 News.vue(新闻页)两个文件,代码如下:
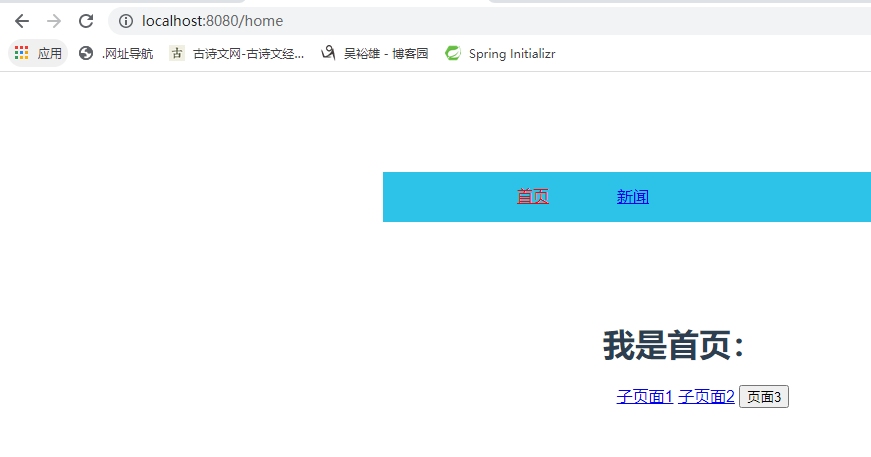
<template>
  <div id="Home">
    <h1>我是首页:</h1>
    <ul>
      <!--路径要写完整路径:父路径+子路径-->
      <span><router-link :to="{name: 'One', params:{username:'beixi'}}">子页面1</router-link></span>
      <span><router-link to="/home/two/666/贝西奇谈" >子页面2</router-link></span>
      <button @click="toThreePage">页面3</button>
    </ul>
    <!-- 子页面展示部分 -->
    <router-view/>
  </div>
</template>

<script>
export default {
  name: "Home",
  methods: {
    toThreePage() {
      this.$router.push({name: 'three', params: {id: 1, name: 'beixi'}})
    }
  }
}
</script>
<style scoped>
.router-link-active{
  color: red;
}
</style>
<template>
  <div id="News">
    <h3>{{title}}</h3>
    <ul class="ulnews">
      <li v-for="(data,index) in newslist">{{data}}</li>
    </ul>
  </div>
</template>

<script>
export default {
  name: "News",
  data(){
    return{
      title:'新闻栏目',
      newslist:[
        '新闻1',
        '新闻2',
        '新闻3'
      ]
    }
  }
}
</script>

<style scoped>
.ulnews li{
  display: block;
}
</style>
这样我们可以在地址栏输入不同的路径访问对应的页面,但一般页面上需要有个导航链接,我们只要点击就可以实现页面内容的变化。在 components 目录下创建 Nav.vue 导航页 面,代码如下:
<template>
  <div id="box">
    <ul>
      <li><router-link to="/home" active-class="router-link-active">首页</router-link></li>
      <!--v-bind动态设置-->
      <!--      <li><router-link v-bind:to="home">首页</router-link></li>-->
      <!--同上-->
      <!--      <li><router-link :to="{ path: 'home' }">首页</router-link></li>-->
      <!--      <button @click="goHome">首页</button>-->
      <li><router-link to="/news" >新闻</router-link></li>
    </ul>
  </div>
</template>

<script>
export default {
  name: "nav",
  data(){
    return {
      home:'/home'
    }
  },
  methods: {
    goHome(){
      this.$router.push('/home');
    }
  }
}
</script>
<!--scoped该样式只能适用于当前组件元素-->
<style scoped>
.router-link-active{
  color: red;
}
*{
  padding: 0;
  margin: 0;
}
ul{
  list-style: none;
  overflow: hidden;
}
#box{
  width: 600px;
  margin: 100px auto;

}
#box ul{
  padding: 0 100px;
  background-color: #2dc3e8;
}
#box ul li {
  display: block;
  width: 100px;
  height: 50px;
  background-color: #2dc3e8;
  color: #fff;
  float: left;
  line-height:50px;
  text-align: center;
}
#box ul li:hover{
  background-color: #00b3ee;
}
</style>
导航页面构建完成后,在跟实例App.vue组件中导入
<template>
  <div id="app">
    <Nav></Nav>
      <router-view/>  <!--路由占位符:将路由路径所指定的组件渲染到页面中-->
  </div>
</template>
<script>
import Nav from '@/components/Nav'
export default {
  name: 'App',
  components:{
    Nav
  }
}
</script>
接着介绍 vue.js 通过路由跳转页面方式:

(1) router-link 标签跳转,它会被渲染成<a>标签,使用方式如下
<template>
  <div id="box">
    <ul>
      <li><router-link to="/home">首页</router-link></li>
      <li><router-link to="/news">新闻</router-link></li>
    </ul>
  </div>
</template>
<router-link> 标签中的属性介绍:
to:  表示目标路由的链接。当然也可以用 v-bind 动态设置链接路 径,代码如下:

<li><router-link to="/home">首页</router-link></li>
      <!--v-bind动态设置-->
 <li><router-link v-bind:to="home">首页</router-link></li>
      <!--同上-->
 <li><router-link :to="{ path: 'home' }">首页</router-link></li>
replace
      使用 replace 属性导航后不会留下 history 记录,所以导航后不能用后退键返回到上一 个页面,如<router-link to="/home" replace>。
tag
      有时想要 <router-link> 渲染成某种标签,例如 <li>。代码如下:
<router-link to="/foo" tag="li">foo</router-link>
(2) JS 代码内部跳转
实际项目中,很多时候都是通过在 JS 代码内部进行导航的跳转,使用方式如下:
this.$router.push('/xxx')
具体的用法步骤如下:
在页面中添加敲击事件,代码如下:
<button @click="goHome">首页</button>
在<script>模块里加入 goHome 方法,
并用 this.$router.push(‘/’)导航到首页,
export default {
       name: 'app',
       methods: {
            goHome(){
                   this.$router.push('/home');
            }
       }
}
路由嵌套
      子路由,也叫路由嵌套,一般应用都会出现二级导航这种情况,这时就得使用路由嵌套 这种写法,采用在 children 后跟路由数组来实现,数组里和其他配置路由基本相同,需要配 置 path 和 component,然后在相应部分添加<router-view/>来展现子页面信息,相当于嵌入 iframe。具体如下面的示例:
(1) Src/components/Home.vue(父页面),代码如下:
<template>
        <div id="Home">
        <h1>我是首页:</h1>
    <ul>
            <!--路径要写完整路径:父路径+子路径-->
            <span><router-link to="/home/one" >子页面 1</router-link></span>
            <span><router-link to="/home/two" >子页面 2</router-link></span>
    </ul>
<!-- 子页面展示部分 -->
          <router-view/>
     </div>
</template>
<script>
     export default {
          name: "Home"
     }
</script>
<style scoped>
     .router-link-active{
         color: red;
   }
</style>
(2) src/pages/One.vue(子页面 1),代码如下:
<template>
  <div id="one">
    <h3>{{msg}}</h3>
    <h2>{{$route.params.username}}</h2>
  </div>
</template>

<script>
export default {
  name: "One",
  data(){
    return {
      msg:'这是第一个子页面'
    }
  }
}
</script>

<style scoped>

</style>
(3) src/pages/Two.vue(子页面 2),代码如下:
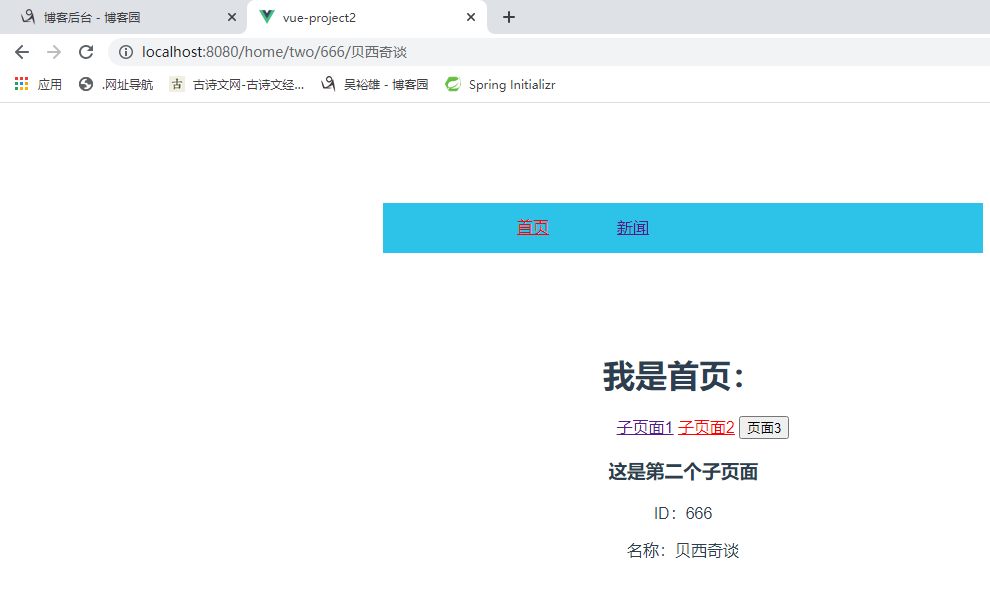
<template>
    <div id="two"><h3>{{msg}}</h3>
      <p>ID:{{ $route.params.id}}</p>
      <p>名称:{{ $route.params.name}}</p>
    </div>
</template>

<script>
    export default {
        name: "Two",
        data(){
          return {
            msg:'这是第二个子页面'
          }
        }
    }
</script>

<style scoped>

</style>
(4) src/router/index.js(路由配置),代码如下:
//部分代码省略
/*导入页面 1 页面 2*/
import One from '@/pages/One'
import Two from '@/pages/Two'
export default new Router({
     routes: [
//...
 {
       path: '/home',
       name: 'Home',
       component: Home,
           children:[ // 嵌套子路由
  {
       path:'one', // 子页面 1
       component:One
},
     {
            path:'two', // 子页面 2
            component:Two
     },
          ]
      }
   ]
})
注意:子页面显示的位置是在其父级页面中,所以一定要在父级页面中加 <router-view/>标签。
路由参数传递

路由传递参数有三种方式:
1. 通过<router-link> 标签中的 to 传参,
<router-link :to="{name:xxx,
params: {key:value}}">valueString</router-link>
上面 to 前面是带冒号,值为对象形式的字符串:
name:对应的是路由配置文件中起的 name 值,叫做路由名称。
params:要传的参数,它是对象形式,在对象里可以传递多个值。
具体实例如下:
(1)在 src/components/Home.vue 里面导航中添加如下代码:
<router-link :to="{name: 'One', params:{username:'beixi'}}">
子页面 1</router-link>
(2)在 src/router/indes.js 中添加如下代码:
{
   path:'one', // 子页面 1
   name:'One', //name 属性不能少
   component:One
}
(3)在 src/pages/One.vue 里面接受参数,代码如下:
<h2>{{$route.params.username}}</h2>
2. url 中传递参数
(1)在路由中以冒号形式传递,在 src/router/index.js中添加如下代码:
{
path:'two/:id/:name', // 子页面 2
component:Two
}
(2)接受参数,在 src/pages/Two.vue 中添加如下代码:
<p>ID:{{ $route.params.id}}</p>
<p>名称:{{ $route.params.name}}</p>
(3)路由跳转,在 src/components/Home.vue 中添加如下代码:
<router-link to="/home/two/666/贝西奇谈" >子页面 2</router-link>
3. 编程式导航 params 传递参数
(1)在 src/router/index.js 页面添加如下代码:
{
    path:'three/:id/:name', // 子页面 3
    name: 'three',
    component:Three
}
(2)在 src/pages/Three.vue 页面添加如下代码:
<p>ID:{{ $route.params.id}}</p>
<p>名称:{{ $route.params.name}}</p>
(3)在 src/components/Home.vue 中添加如下代码:
// template 部分代码省略
<button @click="toThreePage">页面 3</button>
// script
methods: {
      toThreePage() {
           this.$router.push({name: 'three', params: {id: 1, name:'beixi'}})
      }
}
代码说明:
动态路由使用 params 传递参数,在 this.$router.push() 方法中 path 不能和 params 一起使用,否则 params 将无效。需要用 name 来指定页面。
以上方式参数不会显示到浏览器的地址栏中,如果刷新一次页面,就获取不到参数 了,改进方式如下:
{
     path:'/home/three/:id/:name', // 子页面 3
     name: 'three',
     component:Three
}
路由中 router 和 route 的区别:
 (1)router 是 VueRouter 的一个对象,通过 Vue.use(VueRouter)和 VueRouter 构造函数 得到一个 router 的实例对象,这个对象中是一个全局的对象,他包含了所有的路由并且也包 含了许多关键的对象和属性,如下所示:
$router.push({path:'home'});// 切换路由,有 history 记录
$router.replace({path:'home'});//替换路由,没有历史记录
 (2)route 是一个跳转的路由对象,每一个路由都会有一个 route 对象,是一个局部的 对象,可以获取对应的 name,path,params,query 等。
   $route.path,,$route.params,$route.name, $route.query 这几个属性很容易理解,主要 用于接收路由传递的参数。